Route 14
Route 14 runs east to west alongside gentle rivers and thundering waterfalls. The spray kicked up from these waterfalls bathes the area in a thick mist, which can make it tough to see. Above the waterfalls and far to the west lies the Abundant Shrine, the only remaining sign that there was once a village here.
| Trainers
|
| Trainer
|
Pokémon
|
|
|
|
|
|
|
|
|
|
|
|
|
|
|
|
|
|
|
|
|
|
|
|
|
|
|
|
|
|
|
|
|
|
| Requires Waterfall
|
|
|
|
|
|
|
|
|
|
|
| Available Pokémon
|
| Pokémon
|
Games
|
Location
|
Levels
|
Rate
|
|
|
B2
|
W2
|
|
34-35
|
25%
|
|
|
B2
|
W2
|
|
33
|
20%
|
|
|
B2
|
W2
|
|
33-35
|
20%
|
|
|
B2
|
W2
|
|
34-36
|
15%
|
|
|
B2
|
W2
|
|
34-35
|
15%
|
|
|
B2
|
W2
|
|
36
|
5%
|
| Dark grass
|
|
|
B2
|
W2
|
|
37-39
|
30%
|
|
|
B2
|
W2
|
|
37-39
|
25%
|
|
|
B2
|
W2
|
|
37-40
|
15%
|
|
|
B2
|
W2
|
|
38-40
|
15%
|
|
|
B2
|
W2
|
|
38-39
|
15%
|
| Rustling grass
|
|
|
B2
|
W2
|
|
33-36
|
90%
|
|
|
B2
|
W2
|
|
34
|
10%
|
| Surfing
|
|
|
B2
|
W2
|
|
25-40
|
70%
|
|
|
B2
|
W2
|
|
25-40
|
70%
|
|
|
B2
|
W2
|
|
25-40
|
30%
|
| Rippling water
|
|
|
B2
|
W2
|
|
25-40
|
60%
|
|
|
B2
|
W2
|
|
25-40
|
30%
|
|
|
B2
|
W2
|
|
25-40
|
30%
|
|
|
B2
|
W2
|
|
25-40
|
10%
|
| A colored background means that the Pokémon can be found in this location in the specified game. A white background with a colored letter means that the Pokémon cannot be found here.
|
|
Pick up the Big Pearl on the beach and head south. Surf west from the northernmost bridge and climb the waterfall to reach a Heart Scale. Climb the next waterfall and check the north side of the river to find a Nugget. Surf west again to battle Black Belt Jay, and grab the nearby item, another Nugget. Ride down the waterfall and go west to reach the Abundant Shrine.
Abundant Shrine
| Trainers
|
| Trainer
|
Pokémon
|
|
|
|
|
|
|
|
|
|
|
|
|
|
|

|
|
|
Lass Lurleen
Reward: $624
|
|
|
|
|
|
|
|
|
|
|
|
|
|
|
|
|
|
|
|
| Available Pokémon
|
| Pokémon
|
Games
|
Location
|
Levels
|
Rate
|
|
|
B2
|
W2
|
|
33-35
|
30%
|
|
|
B2
|
W2
|
|
33-35
|
30%
|
|
|
B2
|
W2
|
|
33
|
20%
|
|
|
B2
|
W2
|
|
32
|
15%
|
|
|
B2
|
W2
|
|
34
|
10%
|
|
|
B2
|
W2
|
|
34
|
10%
|
|
|
B2
|
W2
|
|
34
|
10%
|
|
|
B2
|
W2
|
|
36
|
5%
|
| Dark grass
|
|
|
B2
|
W2
|
|
37-39
|
35%
|
|
|
B2
|
W2
|
|
37-39
|
35%
|
|
|
B2
|
W2
|
|
37
|
20%
|
|
|
B2
|
W2
|
|
38-40
|
15%
|
|
|
B2
|
W2
|
|
38
|
10%
|
|
|
B2
|
W2
|
|
38
|
10%
|
|
|
B2
|
W2
|
|
36
|
10%
|
| Rustling grass
|
|
|
B2
|
W2
|
|
33-36
|
75%
|
|
|
B2
|
W2
|
|
33-36
|
80%
|
|
|
B2
|
W2
|
|
34
|
10%
|
|
|
B2
|
W2
|
|
36
|
5%
|
|
|
B2
|
W2
|
|
36
|
5%
|
|
|
B2
|
W2
|
|
36
|
5%
|
|
|
B2
|
W2
|
|
36
|
5%
|
| Surfing
|
|
|
B2
|
W2
|
|
25-40
|
70%
|
|
|
B2
|
W2
|
|
25-40
|
70%
|
|
|
B2
|
W2
|
|
25-40
|
30%
|
| Rippling water
|
|
|
B2
|
W2
|
|
25-40
|
60%
|
|
|
B2
|
W2
|
|
25-40
|
35%
|
|
|
B2
|
W2
|
|
25-40
|
35%
|
|
|
B2
|
W2
|
|
30-40
|
5%
|
| Swarm
|
|
|
B2
|
W2
|
|
15-55
|
40%
|
| Hidden Grotto
|
|
|
B2
|
W2
|
|
35-40
|
Common
|
|
|
B2
|
W2
|
|
35-40
|
Uncommon
|
|
|
B2
|
W2
|
|
35-40
|
Rare
|
| Hidden Grotto
|
|
|
B2
|
W2
|
|
35-40
|
Common
|
|
|
B2
|
W2
|
|
35-40
|
Uncommon
|
|
|
B2
|
W2
|
|
35-40
|
Rare
|
| A colored background means that the Pokémon can be found in this location in the specified game. A white background with a colored letter means that the Pokémon cannot be found here.
|
|
Go west to find a Calcium hidden near the pond, then head north to reach Youngster Wes and the Shiny Stone northeast of him. Turn southwest and battle Twins Rae & Ula, then grab the Max Revive near Lass Lurleen. TM92 (Trick Room) lies to the east of Youngster Jaye.
The shrine to Landorus stands on a hill to the north. If you visit with a Landorus that was caught elsewhere, an old man will appear. He gives a brief history lesson about the Kami trio before handing over a Reveal Glass. This mirror is said to show the truth, and can be used to switch any of the three Pokémon between their Incarnate and Therian Formes.
Cross the pond to the east of the shrine to get a Heal Ball, then head to the northeastern plot of soil. A Rare Candy lies on the west end of the fence, while a hidden PP Max lies on the east end.
Back on Route 14, follow the river and jump the ledge to reach a Max Potion. Head southwest to enter Black City or White Forest.
The Southeast
Black City and White Forest
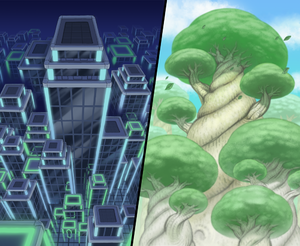
The southeast locale on Unova's main landmass differs between versions, either Black City or White Forest, respectively.
Black City
Black City is a modern metropolis filled with skyscrapers. On the north side of the city stands the Black Tower.
Market
The Market is located on the south side of the city, but is initially empty. The stores will open one by one as you progress through Black Tower. Only one item may be purchased per day from each store.
| Store 1 (unlocked upon clearing Area 2)
|
|
|
|
| Store 2 (unlocked upon clearing Area 5)
|
|
|
|
| Store 3 (unlocked upon clearing Area 8)
|
|
|
|
| Store 4 (unlocked upon clearing Area 10)
|
|
|
|
|
Black Tower
The Black Tower is a battle arena that was just recently constructed. The Trainers found inside change every time you enter it. Battle these Trainers on your way through the various Areas. Defeat the Boss Trainer at the end of each Area to advance. There are ten Areas in all, each more challenging than the last.
Basic Rules
Unlike other battle facilities, you will earn prize money and Experience Points by defeating the Trainers here. However, using the Bag is not allowed, so you will be unable to use items besides held items to restore health or cure status conditions. Each Area's Doctor will, upon defeat, offer a one-time-only courtesy; if you do not need it at that time, you can return to heal up later. The opposing Pokémon you encounter will not be registered in the Pokédex. It is possible to save your progress during the challenge, and you can quit midway by leaving via the elevator.
Clearing an Area
Defeat Trainers in the Area to receive hints about where to find the Gate Trainer, who controls the door to the Boss Trainer's room. Defeat the Gate Trainer to open the door to the Boss Trainer's room. Defeat the Boss Trainer to clear the Area. A full list of Trainers can be found here. Alder's grandson Benga waits in Area 10's final room; defeat him here then meet him back in Floccesy Town to receive a shiny Gible.
After clearing each Area, you will be returned to the entrance to receive your reward. The item obtained is random, and those obtained for clearing Areas 4, 5, 8, and 9 will be doubled.
White Forest
White Forest is an ancient grove filled with giant trees. On the north side of the forest stands the White Treehollow.
Market
The Market is located on the south side of the forest, but is initially empty. The stores will open one by one as you progress through White Treehollow. Only one item may be purchased per day from each store.
| Top-left store (unlocked upon clearing Area 2)
|
|
|
|
| Top-right store (unlocked upon clearing Area 5)
|
|
|
|
| Bottom-left store (unlocked upon clearing Area 8)
|
|
|
|
| Bottom-right store (unlocked upon clearing Area 10)
|
|
|
|
|
White Treehollow
The Black Tower is a battle arena that was just recently established. The Trainers found inside change every time you enter it. Battle these Trainers on your way through the various Areas. Defeat the Boss Trainer at the end of each Area to advance. There are ten Areas in all, each more challenging than the last.
Basic Rules
Unlike other battle facilities, you will earn prize money and Experience Points by defeating the Trainers here. However, using the Bag is not allowed, so you will be unable to use items besides held items to restore health or cure status conditions. Each Area's Nurse will, upon defeat, offer a one-time-only courtesy; if you do not need it at that time, you can return to heal up later. The opposing Pokémon you encounter will not be registered in the Pokédex. It is possible to save your progress during the challenge, and you can quit midway by leaving via the elevator.
Clearing an Area
Defeat Trainers in the Area to receive hints about where to find the Gate Trainer, who controls the door to the Boss Trainer's room. Defeat the Gate Trainer to open the door to the Boss Trainer's room. Defeat the Boss Trainer to clear the Area. A full list of Trainers can be found here. Alder's grandson Benga waits in Area 10's final room; defeat him here then meet him back in Floccesy Town to receive a shiny Dratini.
After clearing each Area, you will be returned to the entrance to receive your reward. The item obtained is random, and those obtained for clearing Areas 4, 5, 8, and 9 will be doubled.
Route 15
Route 15 is characterized by its sheer cliffs, which may scare some people away. In the center of the route is the Poké Transfer Lab, where you can migrate Pokémon to Unova from other regions.
| Available Pokémon
|
| Pokémon
|
Games
|
Location
|
Levels
|
Rate
|
|
|
B2
|
W2
|
|
54-56
|
30%
|
|
|
B2
|
W2
|
|
55-57
|
25%
|
|
|
B2
|
W2
|
|
55-57
|
20%
|
|
|
B2
|
W2
|
|
55-57
|
20%
|
|
|
B2
|
W2
|
|
55-57
|
15%
|
|
|
B2
|
W2
|
|
55
|
10%
|
| Dark grass
|
|
|
B2
|
W2
|
|
62-64
|
30%
|
|
|
B2
|
W2
|
|
63-65
|
25%
|
|
|
B2
|
W2
|
|
63-65
|
20%
|
|
|
B2
|
W2
|
|
63-65
|
20%
|
|
|
B2
|
W2
|
|
63-65
|
15%
|
|
|
B2
|
W2
|
|
63
|
10%
|
| Rustling grass
|
|
|
B2
|
W2
|
|
54-57
|
75%
|
|
|
B2
|
W2
|
|
55
|
10%
|
|
|
B2
|
W2
|
|
57
|
5%
|
|
|
B2
|
W2
|
|
57
|
5%
|
|
|
B2
|
W2
|
|
57
|
5%
|
|
|
B2
|
W2
|
|
57
|
5%
|
| Swarm
|
|
|
B2
|
W2
|
|
15-55
|
40%
|
| Special Pokémon
|
|
|
B2
|
W2
|
|
60
|
One
|
| A colored background means that the Pokémon can be found in this location in the specified game. A white background with a colored letter means that the Pokémon cannot be found here.
|
|
Go south from the gate and move the boulder at the foot of the stairs to get TM26 (Earthquake). Move the other boulder into place and climb the stairs to reach a Max Potion. Work your way to the west side of the cliff to find a trailer parked here; the woman inside is offering to trade her Rotom for a Ditto, which can be caught in the Giant Chasm's Crater Forest. Take Rotom to Shopping Mall Nine's warehouse to change its forms. Check out the Transfer Lab before reaching Marvelous Bridge.
Poké Transfer Lab
The Poké Transfer Lab is the building that houses the Poké Transfer itself, the machinery that can transfer Pokémon from a Generation IV game. When you first enter, a Scientist leads you to Professor Andrew Park, who is very excited to see that you have all eight badges. After his rambling speech, you can participate at any time. The minigame itself involves two DS systems, a Poké Ball-flinging crossbow, and a few clouds of pink sleeping gas. Pokémon that are transferred from Sinnoh or Johto cannot be returned. They also are not allowed to have any items, or know any HM moves.
Marvelous Bridge
Marvelous Bridge is a beautiful futuristic bridge that stretches over the ocean between Route 15 and Route 16. Like Driftveil Drawbridge, flying Pokémon sometimes drop their feathers on the bridge.
Cresselia
When you pass under the eastern archway, the Lunar Wing begins to shine. Hold it up high, and Cresselia swoops down. Start the battle with Bug-, Ghost-, or Dark-type moves to reduce its health quickly, then follow up with Fighting or Psychic moves.
The Magikarp Salesman
On the bridge's west end is a man who will sell you a Magikarp for $500. After enough training, it grows into the formidable Gyarados. The fish is foreign to Unova, so you won't find it normally; however, you will soon be able to hunt them for free. If you decide to take him up on his offer, return here with an empty slot in your party.


