Alola Route 9: Difference between revisions
No edit summary |
Lady Ariel (talk | contribs) No edit summary |
||
| Line 24: | Line 24: | ||
The remaining Ditto are hidden somewhere in Konikoni City. The player will encounter them in sequential order, and will need to collect their reward in order for the next one to spawn. Each Ditto always has a set [[nature]] and [[Individual values|IV]]s that complement them. After apprehending all five, the policeman will give the player a [[Focus Band]]. | The remaining Ditto are hidden somewhere in Konikoni City. The player will encounter them in sequential order, and will need to collect their reward in order for the next one to spawn. Each Ditto always has a set [[nature]] and [[Individual values|IV]]s that complement them. After apprehending all five, the policeman will give the player a [[Focus Band]]. | ||
{| class="roundy" style="background: #{{locationcolor/med| | {| class="roundy" style="background: #{{locationcolor/med|land}}; border: 2px solid #{{locationcolor/dark|land}}" colspan=4 cellspacing="2" cellpadding="4" | ||
|- style="background: #{{locationcolor/light| | |- style="background: #{{locationcolor/light|land}}" | ||
! style="background: #{{locationcolor/light| | ! style="background: #{{locationcolor/light|land}}; {{roundytl|5px}}" | Ditto # | ||
! Appearance | ! Appearance | ||
! Location | ! Location | ||
! {{color2|000|Nature}} | ! {{color2|000|Nature}} | ||
! style="background: #{{locationcolor/light| | ! style="background: #{{locationcolor/light|land}}; {{roundytr|5px}}" | Reward | ||
|- style="background: #fff; | |- | ||
| style="background: #fff; text-align: center" | 1 | |||
| style="text-align: center | | style="background: #fff; text-align: center" | {{tc|Police Officer}} | ||
| In the rear of the Police Station on Route 9. | | style="background: #fff" | In the rear of the Police Station on Route 9. | ||
| style="text-align: center | | style="background: #fff; text-align: center" | Bold | ||
| style="text-align: center | | style="background: #fff; text-align: center" | {{pdollar}}30,000 | ||
|- style="background: #fff; | |- | ||
| style="background: #fff; text-align: center" | 2 | |||
| style="text-align: center | | style="background: #fff; text-align: center" | Herb Seller<br>({{tc|Hiker}}) | ||
| In front of Konikoni City's [[Alola Photo Club|Photo Club]]. | | style="background: #fff" | In front of Konikoni City's [[Alola Photo Club|Photo Club]]. | ||
| style="text-align: center | | style="background: #fff; text-align: center" | Jolly | ||
| style="text-align: center | | style="background: #fff; text-align: center" | {{pdollar}}16,000 | ||
|- style="background: #fff; | |- | ||
| style="background: #fff; text-align: center" | 3 | |||
| style="text-align: center | | style="background: #fff; text-align: center" | {{tc|Chef}} | ||
| In the kitchen of Konikoni City's {{DL|Konikoni City|Restaurant}}. | | style="background: #fff" | In the kitchen of Konikoni City's {{DL|Konikoni City|Restaurant}}. | ||
| style="text-align: center | | style="background: #fff; text-align: center" | Adamant | ||
| style="text-align: center | | style="background: #fff; text-align: center" | {{pdollar}}20,000 | ||
|- style="background: #fff; | |- | ||
| style="background: #fff; text-align: center" | 4 | |||
| style="text-align: center | | style="background: #fff; text-align: center" | Iomi Iomi masseuse<br>({{tc|Dancer}}) | ||
| Next to the Konikoni City Incense shop. | | style="background: #fff" | Next to the Konikoni City Incense shop. | ||
| style="text-align: center | | style="background: #fff; text-align: center" | Modest | ||
| style="text-align: center | | style="background: #fff; text-align: center" | {{pdollar}}24,000 | ||
|- style="background: #fff; | |- | ||
| style="background: #fff; text-align: center; {{roundybl|5px}}" | 5 | |||
| style="text-align: center | | style="background: #fff; text-align: center" | [[Olivia]] | ||
| At the far end of the Konikoni City, looking over the ocean. | | style="background: #fff" | At the far end of the Konikoni City, looking over the ocean. | ||
| style="text-align: center | | style="background: #fff; text-align: center" | Timid | ||
| style="text-align: center; | | style="background: #fff; text-align: center; {{roundybr|5px}}" | {{pdollar}}28,000<br>[[Focus Band]] | ||
|} | |} | ||
==Items== | ==Items== | ||
{{Itlisth|land}} | {{Itlisth|land}} | ||
{{Itemlist|Thunder Stone|From [[Looker]] upon entering the route for the first time|US=yes|UM=yes}} | |||
{{Itemlist|Focus Band|From the {{tc|Police Officer}} by {{p|Snubbull}} inside the Police Station after talking to the Snubbull, after passing [[Olivia]]'s [[island challenge|grand trial]]|Su=yes|M=yes}} | {{Itemlist|Focus Band|From the {{tc|Police Officer}} by {{p|Snubbull}} inside the Police Station after talking to the Snubbull, after passing [[Olivia]]'s [[island challenge|grand trial]]|Su=yes|M=yes}} | ||
{{Itemlist|Net Ball|On the coast, east of {{tc|Fisherman}} Mike|Su=yes|M=yes|display={{ball|Net}}}} | {{Itemlist|Net Ball|On the coast, east of {{tc|Fisherman}} Mike|Su=yes|M=yes|US=yes|UM=yes|display={{ball|Net}}}} | ||
{{Itemlist|X Accuracy|On the coast, in front of a rock northwest of {{tc|Fisherman}} Mike ''(hidden)''|Su=yes|M=yes|display={{DL|Battle item|X Accuracy}}}} | {{Itemlist|X Accuracy|On the coast, in front of a rock northwest of {{tc|Fisherman}} Mike ''(hidden)''|Su=yes|M=yes|US=yes|UM=yes|display={{DL|Battle item|X Accuracy}}}} | ||
{{Itemlist|None|From the Police Officer | {{Itemlist|None|From the Police Officer behind the station desk for apprehending the the Ditto Five|US=yes|UM=yes|display={{pdollar}}118,000 total}} | ||
{{Itemlist|Focus Band|From the Police Officer inside behind the station desk for apprehending all five members of the Ditto Five|US=yes|UM=yes}} | {{Itemlist|Focus Band|From the Police Officer inside behind the station desk for apprehending all five members of the Ditto Five|US=yes|UM=yes}} | ||
{{Itlistfoot|land}} | {{Itlistfoot|land}} | ||
| Line 92: | Line 93: | ||
===Pokémon Ultra Sun and Ultra Moon=== | ===Pokémon Ultra Sun and Ultra Moon=== | ||
{{Catch/header/dn|land}} | {{Catch/header/dn|land}} | ||
{{Catch/div| | {{Catch/div|land|Special Pokémon}} | ||
{{Catch/entryusum|132|Ditto|yes|yes|Special|29|all={{tt|One|Always has Bold nature}}|alliesna=N/A}} | {{Catch/entryusum|132|Ditto|yes|yes|Special|29|all={{tt|One|Always has Bold nature}}|alliesna=N/A}} | ||
{{Catch/footer|land}} | {{Catch/footer|land}} | ||
| Line 118: | Line 119: | ||
[[Category:Routes|Route 009]] | [[Category:Routes|Route 009]] | ||
[[Category:Sun and Moon locations|Route 009]] | [[Category:Sun and Moon locations|Route 009]] | ||
[[Category:Ultra Sun and Ultra Moon locations|Route 009]] | |||
[[de:Route 9 (Alola)]] | [[de:Route 9 (Alola)]] | ||
Revision as of 21:00, 22 November 2017

|
This article is incomplete. Please feel free to edit this article to add missing information and complete it. Reason: Missing complete layout map, Ultra Sun and Ultra Moon info |
| ||||||||||||
| ||||||||||||
Map description
| ||||||||||||
Connecting locations
| ||||||||||||
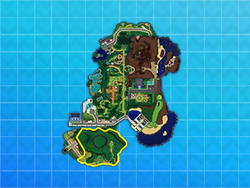
Location  Location of Route 9 in Alola. | ||||||||||||
Pokémon world routes
| ||||||||||||
Route 9 (Japanese: 9番道路 Route 9) is a route on Alola's Akala Island, connecting Diglett's Tunnel, Memorial Hill, and Konikoni City.
Route description
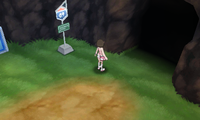
Despite being a short route, Route 9 serves as an intersection between many different locations, most notable of which is Konikoni City to the west. Outside the exit from Diglett's Tunnel lies the Route 9 Police Station, with one of the resident Police Officers standing outside the station and being ready to battle the player. The south end of the route contains a small bit of coastline, allowing the player to fish.
The Ditto Five
In Pokémon Ultra Sun and Ultra Moon, if the player interacts with the Police Officer in the rear of the station, they will discover he is a Ditto and disguise and battle it. After capturing or defeating it, the officer behind the desk will say that the Ditto was a member of the Ditto Five and will ask that the player help him apprehend the rest. As thanks for the first Ditto, he will award the player with $30,000.
The remaining Ditto are hidden somewhere in Konikoni City. The player will encounter them in sequential order, and will need to collect their reward in order for the next one to spawn. Each Ditto always has a set nature and IVs that complement them. After apprehending all five, the policeman will give the player a Focus Band.
| Ditto # | Appearance | Location | Nature | Reward |
|---|---|---|---|---|
| 1 | Police Officer | In the rear of the Police Station on Route 9. | Bold | $30,000 |
| 2 | Herb Seller (Hiker) |
In front of Konikoni City's Photo Club. | Jolly | $16,000 |
| 3 | Chef | In the kitchen of Konikoni City's Restaurant. | Adamant | $20,000 |
| 4 | Iomi Iomi masseuse (Dancer) |
Next to the Konikoni City Incense shop. | Modest | $24,000 |
| 5 | Olivia | At the far end of the Konikoni City, looking over the ocean. | Timid | $28,000 Focus Band |
Items
| Item | Location | Games | |
|---|---|---|---|
| Thunder Stone | From Looker upon entering the route for the first time | US UM | |
| Focus Band | From the Police Officer by Snubbull inside the Police Station after talking to the Snubbull, after passing Olivia's grand trial | S M | |
| Net Ball | On the coast, east of Fisherman Mike | S M US UM | |
| X Accuracy | On the coast, in front of a rock northwest of Fisherman Mike (hidden) | S M US UM | |
| $118,000 total | From the Police Officer behind the station desk for apprehending the the Ditto Five | US UM | |
| Focus Band | From the Police Officer inside behind the station desk for apprehending all five members of the Ditto Five | US UM | |
Fishing
Sometimes, the player will reel in an item instead of a wild Pokémon when fishing.
| Item | Location | Games | |
|---|---|---|---|
| Heart Scale | Sometimes reeled in while fishing | S M | |
| Big Pearl | Sometimes reeled in while fishing | S M | |
| Pearl | Sometimes reeled in while fishing | S M | |
Pokémon
Pokémon Sun and Moon
| Pokémon | Allies | Games | Location | Levels | Rate | ||||||||||
|---|---|---|---|---|---|---|---|---|---|---|---|---|---|---|---|
| Fishing | |||||||||||||||
|
 Magikarp Magikarp Gyarados Gyarados
|
S | M |
|
10-23 | 15% | |||||||||
|
 Corsola Corsola Mareanie Mareanie
|
S | M |
|
10-23 | 5% | |||||||||
|
S | M |
|
10-23 | 70% | ||||||||||
|
S | M |
|
10-23 | 10% | ||||||||||
| A colored background means that the Pokémon can be found in this location in the specified game. A white background with a colored letter means that the Pokémon cannot be found here. | |||||||||||||||
Pokémon Ultra Sun and Ultra Moon
| Pokémon | Allies | Games | Location | Levels | Rate | ||||||||||
|---|---|---|---|---|---|---|---|---|---|---|---|---|---|---|---|
| Special Pokémon | |||||||||||||||
|
N/A | US | UM |
|
29 | One | |||||||||
| A colored background means that the Pokémon can be found in this location in the specified game. A white background with a colored letter means that the Pokémon cannot be found here. | |||||||||||||||
Trainers
Pokémon Sun and Moon
| Trainer | Pokémon | |||||||||||
|---|---|---|---|---|---|---|---|---|---|---|---|---|
|
| |||||||||||
|
| |||||||||||
Pokémon Ultra Sun and Ultra Moon
| Trainer | Pokémon | |||||||||||
|---|---|---|---|---|---|---|---|---|---|---|---|---|
|
| |||||||||||
|
| |||||||||||
| ||||||||||||

|
This article is part of Project Routes, a Bulbapedia project that aims to write comprehensive articles on every route in the Pokémon world. |


