Unova Route 3: Difference between revisions
(→Intro) |
m (r2.7.6) (Robot: Modifying zh:3号道路(合众) to zh:3号道路(合众)) |
||
| (39 intermediate revisions by 25 users not shown) | |||
| Line 1: | Line 1: | ||
{{bad picture|info box|Needs full route maps for all seasons in both BW and B2W2}} | |||
{{Route infobox | {{Route infobox | ||
|number=3 | |number=3 | ||
| Line 7: | Line 8: | ||
|type=forest | |type=forest | ||
|west=Nacrene City | |west=Nacrene City | ||
|west2=Wellspring Cave | |||
|south=Striaton City | |south=Striaton City | ||
|region=Unova | |region=Unova | ||
| Line 16: | Line 18: | ||
}} | }} | ||
'''Route 3''' (Japanese: '''{{tt|3番道路|3ばんどうろ}}''' ''Route 3'') is a route in southeastern [[Unova]] | '''Route 3''' (Japanese: '''{{tt|3番道路|3ばんどうろ}}''' ''Route 3'') is a route in southeastern [[Unova]], connecting [[Striaton City]] to [[Nacrene City]], while also providing access to [[Wellspring Cave]]. | ||
==Route description== | ==Route description== | ||
| Line 30: | Line 32: | ||
{{Itemlist|Repel|In the grass, near Adelaide|Bl=yes|W=yes|display={{DL|Repel|Repel}}}} | {{Itemlist|Repel|In the grass, near Adelaide|Bl=yes|W=yes|display={{DL|Repel|Repel}}}} | ||
{{Itemlist|Heal Ball|Given after defeating the [[Team Plasma]] grunts in [[Wellspring Cave]]|Bl=yes|W=yes|display={{ball|Heal}} ×3}} | {{Itemlist|Heal Ball|Given after defeating the [[Team Plasma]] grunts in [[Wellspring Cave]]|Bl=yes|W=yes|display={{ball|Heal}} ×3}} | ||
{{Itemlist|Antidote|In a grass patch on the way south|Bl=yes|W=yes|display={{DL|Status | {{Itemlist|Antidote|In a grass patch on the way south|Bl=yes|W=yes|display={{DL|Status condition healing item|Antidote}}}} | ||
{{Itemlist|Great Ball|Very south at the end of a short path|Bl=yes|W=yes| | {{Itemlist|Great Ball|Very south at the end of a short path|Bl=yes|W=yes|displaycondition ball|Great}} | ||
{{Itemlist|Awakening|In a grass in the south|Bl=yes|W=yes|display={{DL|Status | {{Itemlist|Awakening|In a grass in the south|Bl=yes|W=yes|display={{DL|Status condition healing item|Awakening}}}} | ||
{{Itemlist|Full Heal|North of the bridge ( | {{Itemlist|Full Heal|North of the bridge (requires {{m|Surf}})|Bl=yes|W=yes|display={{DL|Status condition healing item|Full Heal}}}} | ||
{{Itemlist| | {{Itemlist|Rare Candy|North-west of the bridge (requires {{m|Surf}}) ''(hidden)''|Bl=yes|W=yes|display={{DL|Vitamin|Rare Candy}}}} | ||
{{Itemlist|Max Ether|North-west of the bridge ( | {{Itemlist|Max Ether|North-west of the bridge (requires {{m|Surf}})|Bl=yes|W=yes|display={{DL|Ether|Max Ether}}}} | ||
{{Itemlist| | {{Itemlist|Lum Berry|Gift from Pokémon Breeder Galen (requires {{m|Surf}})|Bl=yes|W=yes}} | ||
{{Itemlist| | {{Itemlist|HP Up|North-west of the bridge (requires {{m|Surf}})|Bl=yes|W=yes|display={{DL|Vitamin|HP Up}}}} | ||
{{Itemlist|Quick Ball|Near School Kid Marsha|B2=yes|W2=yes|display={{ball|Quick}}}} | |||
{{Itemlist|Zinc|South of the pond, near Fisherman Bruce|B2=yes|W2=yes|display={{DL|Vitamin|Zinc}}}} | |||
{{Itemlist|Big Nugget|East of the pond, near School Kid Edgar|B2=yes|W2=yes|display={{DL|Valuable item|Big Nugget}}}} | |||
{{Itemlist|Ultra Ball| | |||
* West of Fisherman Mack (requires {{m|Surf}}) ''(hidden)'' | |||
* North of the T-intersection|B2=yes|W2=yes|display={{ball|Ultra}} ×2}} | |||
{{Itemlist|Calcium|Northwest of Fisherman Mack (requires {{m|Surf}})|B2=yes|W2=yes|display={{DL|Vitamin|Calcium}}}} | |||
{{Itemlist|Full Restore|North of Fisherman Mack (requires {{m|Surf}})|B2=yes|W2=yes|display={{DL|Potion|Full Restore}}}} | |||
{{Itemlist|Nugget|On the ledge near Lass Shannon ''(hidden)''|B2=yes|W2=yes|display={{DL|Valuable item|Nugget}}}} | |||
{{Itemlist|Rare Candy| | {{Itemlist|Rare Candy| | ||
* In the sandbox west of the daycare ''(hidden)'' | * In the sandbox west of the daycare ''(hidden)'' | ||
* Inside the school|B2=yes|W2=yes|display={{DL|Vitamin|Rare Candy}}}} | * Inside the school|B2=yes|W2=yes|display={{DL|Vitamin|Rare Candy}} ×2}} | ||
{{Itemlist|Dive Ball|From the School Kid at the fork in the road after completing the [[Habitat List]]|B2=yes|W2=yes|display={{ball|Dive}} ×5}} | |||
{{Itlistfoot|forest}} | {{Itlistfoot|forest}} | ||
===Hidden Grotto=== | ===Hidden Grotto=== | ||
{{Itlisth|forest}} | {{Itlisth|forest}} | ||
{{Itemlist|Damp Mulch|Sometimes in Hidden Grotto (both) ([[Item#Recurring items|reappears]]) ''(hidden)''|B2=yes|W2=yes}} | {{Itemlist|Damp Mulch|Sometimes in Hidden Grotto (both) ([[Item#Recurring items|reappears]]) ''(hidden)''|B2=yes|W2=yes|display={{DL|Mulch|Damp Mulch}}}} | ||
{{Itemlist|Growth Mulch|Sometimes in Hidden Grotto (both) ([[Item#Recurring items|reappears]]) ''(hidden)''|B2=yes|W2=yes}} | {{Itemlist|Growth Mulch|Sometimes in Hidden Grotto (both) ([[Item#Recurring items|reappears]]) ''(hidden)''|B2=yes|W2=yes|display={{DL|Mulch|Growth Mulch}}}} | ||
{{Itemlist|Stable Mulch|Sometimes in Hidden Grotto (both) ([[Item#Recurring items|reappears]]) ''(hidden)''|B2=yes|W2=yes}} | {{Itemlist|Stable Mulch|Sometimes in Hidden Grotto (both) ([[Item#Recurring items|reappears]]) ''(hidden)''|B2=yes|W2=yes|display={{DL|Mulch|Stable Mulch}}}} | ||
{{Itemlist|Gooey Mulch|Sometimes in Hidden Grotto (both) ([[Item#Recurring items|reappears]]) ''(hidden)''|B2=yes|W2=yes}} | {{Itemlist|Gooey Mulch|Sometimes in Hidden Grotto (both) ([[Item#Recurring items|reappears]]) ''(hidden)''|B2=yes|W2=yes|display={{DL|Mulch|Gooey Mulch}}}} | ||
{{Itemlist|Repel|Sometimes in Hidden Grotto (both) ([[Item#Recurring items|reappears]])|B2=yes|W2=yes}} | {{Itemlist|Repel|Sometimes in Hidden Grotto (both) ([[Item#Recurring items|reappears]])|B2=yes|W2=yes|display={{DL|Repel|Repel}}}} | ||
{{Itemlist|Super Repel|Sometimes in Hidden Grotto (both) ([[Item#Recurring items|reappears]])|B2=yes|W2=yes}} | {{Itemlist|Super Repel|Sometimes in Hidden Grotto (both) ([[Item#Recurring items|reappears]])|B2=yes|W2=yes|display={{DL|Repel|Super Repel}}}} | ||
{{Itemlist|Max Repel|Sometimes in Hidden Grotto (both) ([[Item#Recurring items|reappears]])|B2=yes|W2=yes}} | {{Itemlist|Max Repel|Sometimes in Hidden Grotto (both) ([[Item#Recurring items|reappears]])|B2=yes|W2=yes|display={{DL|Repel|Max Repel}}}} | ||
{{Itemlist|Poké Ball|Sometimes in Hidden Grotto (both) ([[Item#Recurring items|reappears]])|B2=yes|W2=yes}} | {{Itemlist|Poké Ball|Sometimes in Hidden Grotto (both) ([[Item#Recurring items|reappears]])|B2=yes|W2=yes|display={{ball|Poké}}}} | ||
{{Itemlist|Great Ball|Sometimes in Hidden Grotto (both) ([[Item#Recurring items|reappears]])|B2=yes|W2=yes}} | {{Itemlist|Great Ball|Sometimes in Hidden Grotto (both) ([[Item#Recurring items|reappears]])|B2=yes|W2=yes|display={{ball|Great}}}} | ||
{{Itemlist|Ultra Ball|Sometimes in Hidden Grotto (both) ([[Item#Recurring items|reappears]])|B2=yes|W2=yes}} | {{Itemlist|Ultra Ball|Sometimes in Hidden Grotto (both) ([[Item#Recurring items|reappears]])|B2=yes|W2=yes|display={{ball|Ultra}}}} | ||
{{Itemlist|Potion|Sometimes in Hidden Grotto (both) ([[Item#Recurring items|reappears]])|B2=yes|W2=yes}} | {{Itemlist|Potion|Sometimes in Hidden Grotto (both) ([[Item#Recurring items|reappears]])|B2=yes|W2=yes|display={{DL|Potion|Potion}}}} | ||
{{Itemlist|Super Potion|Sometimes in Hidden Grotto (both) ([[Item#Recurring items|reappears]])|B2=yes|W2=yes}} | {{Itemlist|Super Potion|Sometimes in Hidden Grotto (both) ([[Item#Recurring items|reappears]])|B2=yes|W2=yes|display={{DL|Potion|Super Potion}}}} | ||
{{Itemlist|Hyper Potion|Sometimes in Hidden Grotto (both) ([[Item#Recurring items|reappears]])|B2=yes|W2=yes}} | {{Itemlist|Hyper Potion|Sometimes in Hidden Grotto (both) ([[Item#Recurring items|reappears]])|B2=yes|W2=yes|display={{DL|Potion|Hyper Potion}}}} | ||
{{Itemlist|Fire Stone|Sometimes in Hidden Grotto (dark grass) ([[Item#Recurring items|reappears]])|B2=yes|W2=yes}} | {{Itemlist|Fire Stone|Sometimes in Hidden Grotto (dark grass) ([[Item#Recurring items|reappears]])|B2=yes|W2=yes|display={{evostone|Fire Stone}}}} | ||
{{Itemlist|Leaf Stone|Sometimes in Hidden Grotto (dark grass) ([[Item#Recurring items|reappears]])|B2=yes|W2=yes}} | {{Itemlist|Leaf Stone|Sometimes in Hidden Grotto (dark grass) ([[Item#Recurring items|reappears]])|B2=yes|W2=yes|display={{evostone|Leaf Stone}}}} | ||
{{Itemlist|Water Stone|Sometimes in Hidden Grotto (dark grass) ([[Item#Recurring items|reappears]])|B2=yes|W2=yes}} | {{Itemlist|Water Stone|Sometimes in Hidden Grotto (dark grass) ([[Item#Recurring items|reappears]])|B2=yes|W2=yes|display={{evostone|Water Stone}}}} | ||
{{Itemlist| | {{Itemlist|Thunder Stone|Sometimes in Hidden Grotto (dark grass) ([[Item#Recurring items|reappears]])|B2=yes|W2=yes|display={{evostone|Thunder Stone}}}} | ||
{{Itemlist|Dawn Stone|Sometimes in Hidden Grotto (pond) ([[Item#Recurring items|reappears]])|B2=yes|W2=yes}} | {{Itemlist|Dawn Stone|Sometimes in Hidden Grotto (pond) ([[Item#Recurring items|reappears]])|B2=yes|W2=yes|display={{evostone|Dawn Stone}}}} | ||
{{Itemlist|TinyMushroom|Sometimes in Hidden Grotto (both) ([[Item#Recurring items|reappears]]) ''(hidden)''|B2=yes|W2=yes}} | {{Itemlist|TinyMushroom|Sometimes in Hidden Grotto (both) ([[Item#Recurring items|reappears]]) ''(hidden)''|B2=yes|W2=yes|display={{DL|Valuable item|TinyMushroom}}}} | ||
{{Itemlist|Big Mushroom|Sometimes in Hidden Grotto (both) ([[Item#Recurring items|reappears]]) ''(hidden)''|B2=yes|W2=yes}} | {{Itemlist|Big Mushroom|Sometimes in Hidden Grotto (both) ([[Item#Recurring items|reappears]]) ''(hidden)''|B2=yes|W2=yes|display={{DL|Valuable item|Big Mushroom}}}} | ||
{{Itemlist|Rare Candy|Sometimes in Hidden Grotto (both) ([[Item#Recurring items|reappears]]) ''(hidden)''|B2=yes|W2=yes}} | {{Itemlist|Rare Candy|Sometimes in Hidden Grotto (both) ([[Item#Recurring items|reappears]]) ''(hidden)''|B2=yes|W2=yes|display={{DL|Vitamin|Rare Candy}}}} | ||
{{Itemlist|PP Up|Sometimes in Hidden Grotto (both) ([[Item#Recurring items|reappears]]) ''(hidden)''|B2=yes|W2=yes}} | {{Itemlist|PP Up|Sometimes in Hidden Grotto (both) ([[Item#Recurring items|reappears]]) ''(hidden)''|B2=yes|W2=yes|display={{DL|Vitamin|PP Up}}}} | ||
{{Itemlist|PP Max|Sometimes in Hidden Grotto (both) ([[Item#Recurring items|reappears]]) ''(hidden)''|B2=yes|W2=yes}} | {{Itemlist|PP Max|Sometimes in Hidden Grotto (both) ([[Item#Recurring items|reappears]]) ''(hidden)''|B2=yes|W2=yes|display={{DL|Vitamin|PP Max}}}} | ||
{{Itemlist|Red Shard|Sometimes in Hidden Grotto (both) ([[Item#Recurring items|reappears]]) ''(hidden)''|B2=yes|W2=yes}} | {{Itemlist|Red Shard|Sometimes in Hidden Grotto (both) ([[Item#Recurring items|reappears]]) ''(hidden)''|B2=yes|W2=yes|display={{DL|Shard|Red Shard}}}} | ||
{{Itemlist|Green Shard|Sometimes in Hidden Grotto (both) ([[Item#Recurring items|reappears]]) ''(hidden)''|B2=yes|W2=yes}} | {{Itemlist|Green Shard|Sometimes in Hidden Grotto (both) ([[Item#Recurring items|reappears]]) ''(hidden)''|B2=yes|W2=yes|display={{DL|Shard|Green Shard}}}} | ||
{{Itemlist|Yellow Shard|Sometimes in Hidden Grotto (both) ([[Item#Recurring items|reappears]]) ''(hidden)''|B2=yes|W2=yes}} | {{Itemlist|Yellow Shard|Sometimes in Hidden Grotto (both) ([[Item#Recurring items|reappears]]) ''(hidden)''|B2=yes|W2=yes|display={{DL|Shard|Yellow Shard}}}} | ||
{{Itemlist|Blue Shard|Sometimes in Hidden Grotto (both) ([[Item#Recurring items|reappears]]) ''(hidden)''|B2=yes|W2=yes}} | {{Itemlist|Blue Shard|Sometimes in Hidden Grotto (both) ([[Item#Recurring items|reappears]]) ''(hidden)''|B2=yes|W2=yes|display={{DL|Shard|Blue Shard}}}} | ||
{{Itlistfoot|forest}} | {{Itlistfoot|forest}} | ||
| Line 93: | Line 105: | ||
{{catch/entry5|550|Basculin|yes|no|no|Surf|5-15|all=100%|type1=Water}} | {{catch/entry5|550|Basculin|yes|no|no|Surf|5-15|all=100%|type1=Water}} | ||
{{catch/entry5|550B|Basculin|no|yes|no|Surf|5-15|all=100%|type1=Water}} | {{catch/entry5|550B|Basculin|no|yes|no|Surf|5-15|all=100%|type1=Water}} | ||
{{catch/div|water| | {{catch/div|water|Surfing in rippling water}} | ||
{{catch/entry5|550|Basculin|no|yes|no|Rippling|5-15|all=100%|type1=Water}} | {{catch/entry5|550|Basculin|no|yes|no|Rippling|5-15|all=100%|type1=Water}} | ||
{{catch/entry5|550B|Basculin|yes|no|no|Rippling|5-15|all=100%|type1=Water}} | {{catch/entry5|550B|Basculin|yes|no|no|Rippling|5-15|all=100%|type1=Water}} | ||
| Line 100: | Line 112: | ||
{{catch/entry5|550|Basculin|yes|no|no|Fish Super|35-55|all=30%|type1=Water}} | {{catch/entry5|550|Basculin|yes|no|no|Fish Super|35-55|all=30%|type1=Water}} | ||
{{catch/entry5|550B|Basculin|no|yes|no|Fish Super|35-55|all=30%|type1=Water}} | {{catch/entry5|550B|Basculin|no|yes|no|Fish Super|35-55|all=30%|type1=Water}} | ||
{{catch/div|water| | {{catch/div|water|Fishing in rippling water}} | ||
{{catch/entry5|118|Goldeen|yes|yes|no|Rippling|35-60|all=60%|type1=Water}} | {{catch/entry5|118|Goldeen|yes|yes|no|Rippling|35-60|all=60%|type1=Water}} | ||
{{catch/entry5|119|Seaking|yes|yes|no|Rippling|45-70|all=10%|type1=Water}} | {{catch/entry5|119|Seaking|yes|yes|no|Rippling|45-70|all=10%|type1=Water}} | ||
| Line 127: | Line 139: | ||
{{catch/div|forest|Rustling grass}} | {{catch/div|forest|Rustling grass}} | ||
{{catch/entry5-2|508|Stoutland|yes|yes|Rustling|58, 59|all=5%|type1=Normal}} | {{catch/entry5-2|508|Stoutland|yes|yes|Rustling|58, 59|all=5%|type1=Normal}} | ||
{{catch/entry5-2|521|Unfezant|yes|yes|Rustling|58|all=5%|type1=Normal|type2=Flying}} | {{catch/entry5-2|521|Unfezant|yes|yes|Rustling|58|all=2.5%|type1=Normal|type2=Flying}} | ||
{{catch/entry5-2|521F|Unfezant|yes|yes|Rustling|58|all=2.5%|type1=Normal|type2=Flying}} | |||
{{catch/entry5-2|531|Audino|yes|yes|Rustling|55-58|all=85%|type1=Normal}} | {{catch/entry5-2|531|Audino|yes|yes|Rustling|55-58|all=85%|type1=Normal}} | ||
{{catch/entry5-2|469|Yanmega|yes|yes|Rustling|58|all=5%|type1=Bug|type2=Flying}} | {{catch/entry5-2|469|Yanmega|yes|yes|Rustling|58|all=5%|type1=Bug|type2=Flying}} | ||
| Line 134: | Line 147: | ||
{{catch/entry5-2|550|Basculin|yes|no|Surf|45-60|all=70%|type1=Water}} | {{catch/entry5-2|550|Basculin|yes|no|Surf|45-60|all=70%|type1=Water}} | ||
{{catch/entry5-2|550B|Basculin|no|yes|Surf|45-60|all=70%|type1=Water}} | {{catch/entry5-2|550B|Basculin|no|yes|Surf|45-60|all=70%|type1=Water}} | ||
{{catch/div|water| | {{catch/div|water|Surfing in rippling water}} | ||
{{catch/entry5-2|341|Corphish|yes|yes|Rippling|45-60|all=60%|type1=Water}} | {{catch/entry5-2|341|Corphish|yes|yes|Rippling|45-60|all=60%|type1=Water}} | ||
{{catch/entry5-2|342|Crawdaunt|yes|yes|Rippling|50-60|all=10%|type1=Water}} | {{catch/entry5-2|342|Crawdaunt|yes|yes|Rippling|50-60|all=10%|type1=Water|type2=Dark}} | ||
{{catch/entry5-2|550B|Basculin|yes|no|Rippling|45-60|all=30%|type1=Water}} | {{catch/entry5-2|550B|Basculin|yes|no|Rippling|45-60|all=30%|type1=Water}} | ||
{{catch/entry5-2|550|Basculin|no|yes|Rippling|45-60|all=30%|type1=Water}} | {{catch/entry5-2|550|Basculin|no|yes|Rippling|45-60|all=30%|type1=Water}} | ||
| Line 143: | Line 156: | ||
{{catch/entry5-2|550|Basculin|yes|no|Fish Super|40-60|all=30%|type1=Water}} | {{catch/entry5-2|550|Basculin|yes|no|Fish Super|40-60|all=30%|type1=Water}} | ||
{{catch/entry5-2|550B|Basculin|no|yes|Fish Super|40-60|all=30%|type1=Water}} | {{catch/entry5-2|550B|Basculin|no|yes|Fish Super|40-60|all=30%|type1=Water}} | ||
{{catch/div|water| | {{catch/div|water|Fishing in rippling water}} | ||
{{catch/entry5-2|118|Goldeen|yes|yes|Rippling|40-60|all=60%|type1=Water}} | {{catch/entry5-2|118|Goldeen|yes|yes|Rippling|40-60|all=60%|type1=Water}} | ||
{{catch/entry5-2|119|Seaking|yes|yes|Rippling|50-70|all=10%|type1=Water}} | {{catch/entry5-2|119|Seaking|yes|yes|Rippling|50-70|all=10%|type1=Water}} | ||
| Line 164: | Line 177: | ||
==={{game|Black and White|s}}=== | ==={{game|Black and White|s}}=== | ||
{{trainerheader|forest}} | {{trainerheader|forest}} | ||
{{Trainerentry|Spr BW Nursery Aide.png|Nursery Aide|Autumn|400|2|506|Lillipup|♀|10||517|Munna|♀|10|36=アキホ|37=Akiho}} | |||
{{Trainerentry|Spr BW Nursery Aide.png|Nursery Aide|Autumn|400|2|506|Lillipup|♀|10| | |||
{{Trainerdiv|forest}} | {{Trainerdiv|forest}} | ||
{{Trainerentry|Spr BW Preschooler M.png|Preschooler|Doyle|40|1|515|Panpour|♂|10 | {{Trainerentry|Spr BW Preschooler M.png|Preschooler|Doyle|40|1|515|Panpour|♂|10|36=ウシオ|37=Ushio}} | ||
{{Trainerdiv|forest}} | {{Trainerdiv|forest}} | ||
{{Trainerentry|Spr BW Preschooler F.png|Preschooler|Wendy|40|1|513|Pansear|♂|10 | {{Trainerentry|Spr BW Preschooler F.png|Preschooler|Wendy|40|1|513|Pansear|♂|10|36=マツリ|37=Matsuri}} | ||
{{Trainerdiv|forest}} | {{Trainerdiv|forest}} | ||
{{Trainerentry|Spr BW Preschooler M.png|Preschooler|Tully|40|1|511|Pansage|♂|10 | {{Trainerentry|Spr BW Preschooler M.png|Preschooler|Tully|40|1|511|Pansage|♂|10|36=ミノル|37=Minoru}} | ||
{{Trainerdiv|forest}} | {{Trainerdiv|forest}} | ||
{{Trainerentry|Spr BW | {{Trainerentry|Spr BW Twins.png|Twins|Kumi & Amy|160|2|509|Purrloin|♀|10||509|Purrloin|♀|10|36=クミとルミ|37=Kumi and Rumi}} | ||
{{trainerdiv|forest}} | {{trainerdiv|forest}} | ||
{{Trainerentry|Spr BW School Kid | {{Trainerentry|Spr BW Pokémon Breeder F.png|Pokémon Breeder|Adelaide|432|3|504|Patrat|♀|9||519|Pidove|♀|9||506|Lillipup|♀|9|36=トモミ|37=Tomomi}} | ||
{{trainerdiv|forest|After defeating Team Plasma in Wellspring Cave}} | |||
{{Trainerentry|Spr BW School Kid M.png|School Kid|Al|260|1|522|Blitzle|♂|13|36=アル|37=Al}} | |||
{{trainerdiv|forest}} | {{trainerdiv|forest}} | ||
{{Trainerentry|Spr BW School Kid F.png|School Kid| | {{Trainerentry|Spr BW School Kid F.png|School Kid|Marsha|260|1|527|Woobat|♀|13|36=サワコ|37=Sawako}} | ||
{{trainerdiv|forest}} | {{trainerdiv|forest}} | ||
{{Trainerentry|Spr BW School Kid | {{Trainerentry|Spr BW School Kid F.png|School Kid|Gina|240|2|504|Patrat|♀|12||509|Purrloin|♀|12|36=ミズホ|37=Mizuho}} | ||
{{trainerdiv|forest}} | {{trainerdiv|forest}} | ||
{{Trainerentry|Spr BW Pokémon Breeder M.png|Pokémon Breeder|Galen|1536|3|512|Simisage|♂|32| | {{Trainerentry|Spr BW School Kid M.png|School Kid|Edgar|240|2|519|Pidove|♂|12||524|Roggenrola|♂|12|36=シュウヘイ|37=Shūhei}} | ||
{{trainerdiv|forest|Requires Surf}} | |||
{{Trainerentry|Spr BW Pokémon Breeder M.png|Pokémon Breeder|Galen|1536|3|512|Simisage|♂|32||514|Simisear|♂|32||516|Simipour|♂|32|36=ユウリ|37=Yūri}} | |||
{{trainerfooter|forest|5}} | {{trainerfooter|forest|5}} | ||
{{MSP|495|Snivy}} If the {{player}} chose {{p|Snivy}}: | {{MSP|495|Snivy}} If the {{player}} chose {{p|Snivy}}: | ||
{{Party | {{Party/Single | ||
|color={{black color}} | |color={{black color}} | ||
|headcolor={{black color light}} | |headcolor={{black color light}} | ||
| Line 195: | Line 207: | ||
|sprite=Spr BW Cheren.png | |sprite=Spr BW Cheren.png | ||
|prize={{PDollar}}1200 | |prize={{PDollar}}1200 | ||
|class=Pokémon Trainer | |class={{PK}}{{MN}} Trainer | ||
|name=Cheren | |classlink=Pokémon Trainer | ||
|name={{color2|000|Cheren}} | |||
|game=BW | |game=BW | ||
|locationname=Route 3 | |locationname=Route 3 | ||
|location=Unova Route 3 | |location=Unova Route 3 | ||
|pokemon=2 | |pokemon=2}} | ||
| | |{{Pokémon/5 | ||
|game=Black | |game=Black | ||
|ndex=498 | |ndex=498 | ||
| Line 215: | Line 227: | ||
|move3=Ember|move3type=Fire|move3cat=Special | |move3=Ember|move3type=Fire|move3cat=Special | ||
|move4=Defense Curl|move4type=Normal|move4cat=Status}} | |move4=Defense Curl|move4type=Normal|move4cat=Status}} | ||
| | |{{Pokémon/5 | ||
|game=Black | |game=Black | ||
|ndex=509 | |ndex=509 | ||
| Line 228: | Line 239: | ||
|move3=Assist|move3type=Normal|move3cat=Status | |move3=Assist|move3type=Normal|move3cat=Status | ||
|move4=Sand-Attack|move4type=Ground|move4cat=Status}} | |move4=Sand-Attack|move4type=Ground|move4cat=Status}} | ||
}} | {{Party/Footer}} | ||
{{MSP|498|Tepig}} If the {{player}} chose {{p|Tepig}}: | {{MSP|498|Tepig}} If the {{player}} chose {{p|Tepig}}: | ||
{{Party | {{Party/Single | ||
|color={{black color}} | |color={{black color}} | ||
|headcolor={{black color light}} | |headcolor={{black color light}} | ||
| Line 237: | Line 248: | ||
|sprite=Spr BW Cheren.png | |sprite=Spr BW Cheren.png | ||
|prize={{PDollar}}1200 | |prize={{PDollar}}1200 | ||
|class=Pokémon Trainer | |class={{PK}}{{MN}} Trainer | ||
|name=Cheren | |classlink=Pokémon Trainer | ||
|name={{color2|000|Cheren}} | |||
|game=BW | |game=BW | ||
|locationname=Route 3 | |locationname=Route 3 | ||
|location=Unova Route 3 | |location=Unova Route 3 | ||
|pokemon=2 | |pokemon=2}} | ||
| | |{{Pokémon/5 | ||
|game=Black | |game=Black | ||
|ndex=501 | |ndex=501 | ||
| | |pokemon=Oshawott | ||
|level=14 | |level=14 | ||
|gender=male | |gender=male | ||
| Line 253: | Line 264: | ||
|ability=Torrent | |ability=Torrent | ||
|held=Oran Berry | |held=Oran Berry | ||
|move1= | |move1=Focus Energy|move1type=Normal|move1cat=Status | ||
|move2=Tail Whip|move2type=Normal|move2cat=Status | |move2=Tail Whip|move2type=Normal|move2cat=Status | ||
|move3=Water Gun|move3type=Water|move3cat=Special | |move3=Water Gun|move3type=Water|move3cat=Special | ||
|move4=Water Sport|move4type=Water|move4cat=Status}} | |move4=Water Sport|move4type=Water|move4cat=Status}} | ||
| | |{{Pokémon/5 | ||
|game=Black | |game=Black | ||
|ndex=509 | |ndex=509 | ||
| Line 270: | Line 280: | ||
|move3=Assist|move3type=Normal|move3cat=Status | |move3=Assist|move3type=Normal|move3cat=Status | ||
|move4=Sand-Attack|move4type=Ground|move4cat=Status}} | |move4=Sand-Attack|move4type=Ground|move4cat=Status}} | ||
}} | {{Party/Footer}} | ||
{{MSP|501|Oshawott}} If the {{player}} chose {{p|Oshawott}}: | {{MSP|501|Oshawott}} If the {{player}} chose {{p|Oshawott}}: | ||
{{Party | {{Party/Single | ||
|color={{black color}} | |color={{black color}} | ||
|headcolor={{black color light}} | |headcolor={{black color light}} | ||
| Line 279: | Line 289: | ||
|sprite=Spr BW Cheren.png | |sprite=Spr BW Cheren.png | ||
|prize={{PDollar}}1200 | |prize={{PDollar}}1200 | ||
|class=Pokémon Trainer | |class={{PK}}{{MN}} Trainer | ||
|name=Cheren | |classlink=Pokémon Trainer | ||
|name={{color2|000|Cheren}} | |||
|game=BW | |game=BW | ||
|locationname=Route 3 | |locationname=Route 3 | ||
|location=Unova Route 3 | |location=Unova Route 3 | ||
|pokemon=2 | |pokemon=2}} | ||
| | |{{Pokémon/5 | ||
|game=Black | |game=Black | ||
|ndex=495 | |ndex=495 | ||
| Line 299: | Line 309: | ||
|move3=Vine Whip|move3type=Grass|move3cat=Physical | |move3=Vine Whip|move3type=Grass|move3cat=Physical | ||
|move4=Wrap|move4type=Normal|move4cat=Physical}} | |move4=Wrap|move4type=Normal|move4cat=Physical}} | ||
| | |{{Pokémon/5 | ||
|game=Black | |game=Black | ||
|ndex=509 | |ndex=509 | ||
| Line 312: | Line 321: | ||
|move3=Assist|move3type=Normal|move3cat=Status | |move3=Assist|move3type=Normal|move3cat=Status | ||
|move4=Sand-Attack|move4type=Ground|move4cat=Status}} | |move4=Sand-Attack|move4type=Ground|move4cat=Status}} | ||
}} | {{Party/Footer}} | ||
===[[Pokémon Black and White Versions 2|Pokémon Black 2 and White 2]]=== | ===[[Pokémon Black and White Versions 2|Pokémon Black 2 and White 2]]=== | ||
{{trainerheader|forest}} | {{trainerheader|forest}} | ||
{{Trainerentry|Spr B2W2 School Kid F.png|School Kid|Marsha|{{tt|1220|1320 in Challenge Mode}}< | {{Trainerentry|Spr B2W2 School Kid F.png|School Kid|Marsha|{{tt|1220|1120 in Easy Mode, 1320 in Challenge Mode}}<br/><small>[[Rotation Battle]]</small>|3|188|Skiploom|♀|{{tt|61|56 in Easy Mode, 66 in Challenge Mode}}||189|Jumpluff|♀|{{tt|61|56 in Easy Mode, 66 in Challenge Mode}}||182|Bellossom|♀|{{tt|61|56 in Easy Mode, 66 in Challenge Mode}}|36=サワコ|37=Sawako}} | ||
{{Trainerentry|Spr B2W2 Fisherman.png|Fisherman|Mack|{{tt|1856|2016 in Challenge Mode}}|6|129|Magikarp|♂|{{tt|58|63 in Challenge Mode}}| | {{Trainerdiv|forest}} | ||
{{Trainerentry|Spr B2W2 Fisherman.png|Fisherman|Bruce|{{tt|1952|2112 in Challenge Mode}}|3|079|Slowpoke|♂|{{tt|61|66 in Challenge Mode}}| | {{Trainerentry|Spr B2W2 Fisherman.png|Fisherman|Mack|{{tt|1856|1696 in Easy Mode, 2016 in Challenge Mode}}<br><small>Requires {{m|Surf}}</small>|6|129|Magikarp|♂|{{tt|58|53 in Easy Mode, 63 in Challenge Mode}}||129|Magikarp|♂|{{tt|58|53 in Easy Mode, 63 in Challenge Mode}}||129|Magikarp|♂|{{tt|58|53 in Easy Mode, 63 in Challenge Mode}}||129|Magikarp|♂|{{tt|58|53 in Easy Mode, 63 in Challenge Mode}}||129|Magikarp|♂|{{tt|58|53 in Easy Mode, 63 in Challenge Mode}}||129|Magikarp|♂|{{tt|58|53 in Easy Mode, 63 in Challenge Mode}}|36=コウジロウ|37=Kōjirō}} | ||
{{Trainerentry|Spr B2W2 School Kid M.png|School Kid|Edgar|{{tt|1220|1320 in Challenge Mode}}< | {{Trainerdiv|forest}} | ||
{{Trainerentry|Spr B2W2 Backers F.png|Backers|May & Mal|{{tt|2976|3216 in Challenge Mode}}|2|587|Emolga|♀|{{tt|62|67 in Challenge Mode}}| | {{Trainerentry|Spr B2W2 Fisherman.png|Fisherman|Bruce|{{tt|1952|1792 in Easy Mode, 2112 in Challenge Mode}}|3|079|Slowpoke|♂|{{tt|61|56 in Easy Mode, 66 in Challenge Mode}}||118|Goldeen|♂|{{tt|61|56 in Easy Mode, 66 in Challenge Mode}}||119|Seaking|♂|{{tt|61|56 in Easy Mode, 66 in Challenge Mode}}|36=トモヒロ|37=Tomohiro}} | ||
{{Trainerentry|Spr B2W2 Lass.png|Lass|Shannon|{{tt|992|1072 in Challenge Mode}}|2|037|Vulpix|♀|{{tt|62|67 in Challenge Mode}}| | {{Trainerdiv|forest}} | ||
{{Trainerentry|Spr B2W2 Nursery Aide.png|Nursery Aide|Autumn|{{tt|2440|2640 in Challenge Mode}}|3|039|Jigglypuff|♀|{{tt|61|66 in Challenge Mode}}| | {{Trainerentry|Spr B2W2 School Kid M.png|School Kid|Edgar|{{tt|1220|1120 in Easy Mode, 1320 in Challenge Mode}}<br/><small>[[Triple Battle]]</small>|3|177|Natu|♂|{{tt|61|56 in Easy Mode, 66 in Challenge Mode}}||178|Xatu|♂|{{tt|61|56 in Easy Mode, 66 in Challenge Mode}}||022|Fearow|♂|{{tt|61|56 in Easy Mode, 66 in Challenge Mode}}|36=シュウヘイ|37=Shūhei}} | ||
{{Trainerentry|Spr B2W2 Preschooler F.png|Preschooler|Eva|{{tt|244|264 in Challenge Mode}}|2|281|Kirlia|♀|{{tt|61|66 in Challenge Mode}}| | {{Trainerdiv|forest}} | ||
{{Trainerentry|Spr B2W2 Preschooler M.png|Preschooler|Tyrone|{{tt|244|264 in Challenge Mode}}|2|374|Beldum||{{tt|61|66 in Challenge Mode}}| | {{Trainerentry|Spr B2W2 Backers F.png|Backers|May & Mal|{{tt|2976|2736 in Easy Mode, 3216 in Challenge Mode}}|2|587|Emolga|♀|{{tt|62|57 in Easy Mode, 67 in Challenge Mode}}||417|Pachirisu|♀|{{tt|62|57 in Easy Mode, 67 in Challenge Mode}}|36=マミとミホ|37=Mami and Miho}} | ||
{{Trainerentry|Spr B2W2 Preschooler M.png|Preschooler|Buster|{{tt|244|264 in Challenge Mode}}|2|447|Riolu|♂|{{tt|61|66 in Challenge Mode}}| | {{Trainerdiv|forest}} | ||
{{Trainerentry|Spr B2W2 Lass.png|Lass|Shannon|{{tt|992|912 in Easy Mode, 1072 in Challenge Mode}}|2|037|Vulpix|♀|{{tt|62|57 in Easy Mode, 67 in Challenge Mode}}||136|Flareon|♂|{{tt|62|57 in Easy Mode, 67 in Challenge Mode}}|36=チエ|37=Chie}} | |||
{{Trainerdiv|forest}} | |||
{{Trainerentry|Spr B2W2 Nursery Aide.png|Nursery Aide|Autumn|{{tt|2440|2240 in Easy Mode, 2640 in Challenge Mode}}|3|039|Jigglypuff|♀|{{tt|61|56 in Easy Mode, 66 in Challenge Mode}}||432|Purugly|♀|{{tt|61|56 in Easy Mode, 66 in Challenge Mode}}||108|Lickitung|♀|{{tt|61|56 in Easy Mode, 66 in Challenge Mode}}|36=アキホ|37=Akiho}} | |||
{{Trainerdiv|forest}} | |||
{{Trainerentry|Spr B2W2 Preschooler F.png|Preschooler|Eva|{{tt|244|224 in Easy Mode, 264 in Challenge Mode}}|2|281|Kirlia|♀|{{tt|61|56 in Easy Mode, 66 in Challenge Mode}}||025|Pikachu|♀|{{tt|61|56 in Easy Mode, 66 in Challenge Mode}}|36=カナ|37=Kana}} | |||
{{Trainerdiv|forest}} | |||
{{Trainerentry|Spr B2W2 Preschooler M.png|Preschooler|Tyrone|{{tt|244|224 in Easy Mode, 264 in Challenge Mode}}|2|374|Beldum||{{tt|61|56 in Easy Mode, 66 in Challenge Mode}}||633|Deino|♂|{{tt|61|56 in Easy Mode, 66 in Challenge Mode}}|36=リキヤ|37=Rikiya}} | |||
{{Trainerdiv|forest}} | |||
{{Trainerentry|Spr B2W2 Preschooler M.png|Preschooler|Buster|{{tt|244|224 in Easy Mode, 264 in Challenge Mode}}|2|447|Riolu|♂|{{tt|61|56 in Easy Mode, 66 in Challenge Mode}}||166|Ledian|♂|{{tt|61|56 in Easy Mode, 66 in Challenge Mode}}|36=マサヨシ|37=Masayoshi}} | |||
{{trainerfooter|forest|5}} | {{trainerfooter|forest|5}} | ||
| Line 336: | Line 354: | ||
==In the anime== | ==In the anime== | ||
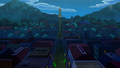
[[File: | [[File:Unova Route 3 anime.png|thumb|200px|Route 3 in the anime]] | ||
Route 3 makes an appearance in ''[[BW007|Snivy Plays Hard to Catch!]]'' to ''[[BW013|Minccino-Neat and Tidy!]]''. There is a small city and a town located in the route. There is also a train station near [[Nacrene City]]. | Route 3 makes an appearance in ''[[BW007|Snivy Plays Hard to Catch!]]'' to ''[[BW013|Minccino-Neat and Tidy!]]''. There is a small city and a town located in the route. There is also a train station near [[Nacrene City]]. | ||
In ''[[BW007|Snivy Plays Hard to Catch!]]'', it is shown to be a forest route with tall grass in some areas and vines hanging from the trees. It has a bog with huge lily pads in the forest and a small stream running through it. It is where {{Ash}} caught a {{AP|Snivy}}. The [[Wellspring Cave]] is located here. | In ''[[BW007|Snivy Plays Hard to Catch!]]'', it is shown to be a forest route with tall grass in some areas and vines hanging from the trees. It has a bog with huge lily pads in the forest and a small stream running through it. It is where {{Ash}} caught a {{AP|Snivy}}. The [[Wellspring Cave]] is located here. | ||
A small city is also located here, as seen in ''[[BW008|Saving Darmanitan From the Bell!]]''. It has colorful buildings with shops and has a small bridge which allows people to enter the city. Trees and shrubbery surround it and a river runs through it. It also has a small [[Pokémon Center]] and a | A small city is also located here, as seen in ''[[BW008|Saving Darmanitan From the Bell!]]''. It has colorful buildings with shops and has a small bridge which allows people to enter the city. Trees and shrubbery surround it and a river runs through it. It also has a small [[Pokémon Center]] and a café is shown to be affiliated with [[Team Rocket]]. | ||
The most famous part of the city is the old clock tower which is now home to a {{p|Darmanitan}} and has a huge bell inside it. There is a long winding stairs, when at the top there is a room with a huge bell. | The most famous part of the city is the old clock tower which is now home to a {{p|Darmanitan}} and has a huge bell inside it. There is a long winding stairs, when at the top there is a room with a huge bell. | ||
After the city is a forest path, as shown in ''[[BW009|The Bloom Is on Axew!]]''. | After the city is a forest path, as shown in ''[[BW009|The Bloom Is on Axew!]]''. | ||
| Line 352: | Line 370: | ||
===Gallery=== | ===Gallery=== | ||
<gallery | <gallery> | ||
File:Unova | File:Day Care Unova.png|The Pokémon Day Care | ||
File:Unova Route 3 Bog.png|The bog on Route 3 | File:Unova Route 3 Bog.png|The bog on Route 3 | ||
File:Unova Route 3 City.png|The small city | File:Unova Route 3 City.png|The small city | ||
| Line 362: | Line 380: | ||
==Trivia== | ==Trivia== | ||
* The in-game maps show Route 3 leaving Striaton City directly from the west. However, the actual entrance to the city is a north-south entrance. | * The in-game maps show Route 3 leaving Striaton City directly from the west. However, the actual entrance to the city is a north-south entrance. | ||
* The two westernmost columns of tall grass in the patch closest to Nacrene City are subject to a graphical glitch: Seven tall grass sprites in each column are squashed to fit into six spaces on the world's grid. The player still moves along this grid, thus disaligning him or her with the grass sprites in these rows. | |||
{{Unova}}<br> | {{Unova}}<br/> | ||
{{Project Routes notice}} | {{Project Routes notice}} | ||
[[Category:Unova locations]] | [[Category:Unova locations|Route 003]] | ||
[[Category:Routes]] | [[Category:Routes|Route 003]] | ||
[[Category:Black and White locations]] | [[Category:Black and White locations|Route 003]] | ||
[[Category:Black 2 and White 2 locations]] | [[Category:Black 2 and White 2 locations|Route 003]] | ||
[[de:Route 3 (Einall)]] | [[de:Route 3 (Einall)]] | ||
[[fr:Route 3 (Unys)]] | [[fr:Route 3 (Unys)]] | ||
[[it:Percorso 3 (Unima)]] | [[it:Percorso 3 (Unima)]] | ||
[[ja:3ばんどうろ (イッシュ地方)]] | |||
[[pl:Unova Droga 3]] | |||
[[zh:3号道路(合众)]] | |||
Revision as of 08:27, 13 November 2016

|
The picture used in this info box is unsatisfactory. Please feel free to replace it so it conforms to Bulbapedia conventions. Reason: Needs full route maps for all seasons in both BW and B2W2 |
| ||||||||||
| ||||||||||
Map description
| ||||||||||
| Required for navigation
| ||||||||||
Connecting locations
| ||||||||||
Location  Location of Route 3 in Unova. | ||||||||||
Pokémon world routes
| ||||||||||

Route 3 (Japanese: 3番道路 Route 3) is a route in southeastern Unova, connecting Striaton City to Nacrene City, while also providing access to Wellspring Cave.
Route description
Route 3 starts off with a short simple path to the north after exiting Striaton City. Straight ahead is the Pokémon Day Care and a school where several Preschoolers can be fought. The player can travel westwards to find two separate paths; a patch of tall grass is located to the north of this path. The player can continue to the west to find Wellspring Cave or to the south, which travels along the shore of a pond. The player can then cross it by a bridge to the west leading to Nacrene City, past a few patches of tall grass.
When the player first locates the Pokémon Day Care, only one Pokémon can be deposited. After meeting the Day-Care Man in Nimbasa City and helping him against some Team Plasma grunts, he'll return to the Day Care and two Pokémon can now be deposited in the Day Care, allowing for Pokémon breeding to occur. Later after obtaining HM03 (Surf), the player can travel across the pond to the other side. On the west side of the pond, the player can find two patches of tall grass and a Pokémon Breeder.
Items
| Item | Location | Games | |
|---|---|---|---|
| Ultra Ball | In the sandbox west of the daycare (hidden) | B W | |
| Super Potion | In a grass patch in the west | B W | |
| Oran Berry | Given by Pokémon Breeder Adelaide after defeating her | B W | |
| Repel | In the grass, near Adelaide | B W | |
| Heal Ball ×3 | Given after defeating the Team Plasma grunts in Wellspring Cave | B W | |
| Antidote | In a grass patch on the way south | B W | |
| Great Ball | Very south at the end of a short path | B W | |
| Awakening | In a grass in the south | B W | |
| Full Heal | North of the bridge (requires Surf) | B W | |
| Rare Candy | North-west of the bridge (requires Surf) (hidden) | B W | |
| Max Ether | North-west of the bridge (requires Surf) | B W | |
| Lum Berry | Gift from Pokémon Breeder Galen (requires Surf) | B W | |
| HP Up | North-west of the bridge (requires Surf) | B W | |
| Quick Ball | Near School Kid Marsha | B2 W2 | |
| Zinc | South of the pond, near Fisherman Bruce | B2 W2 | |
| Big Nugget | East of the pond, near School Kid Edgar | B2 W2 | |
| Ultra Ball ×2 |
|
B2 W2 | |
| Calcium | Northwest of Fisherman Mack (requires Surf) | B2 W2 | |
| Full Restore | North of Fisherman Mack (requires Surf) | B2 W2 | |
| Nugget | On the ledge near Lass Shannon (hidden) | B2 W2 | |
| Rare Candy ×2 |
|
B2 W2 | |
| Dive Ball ×5 | From the School Kid at the fork in the road after completing the Habitat List | B2 W2 | |
Hidden Grotto
| Item | Location | Games | |
|---|---|---|---|
| Damp Mulch | Sometimes in Hidden Grotto (both) (reappears) (hidden) | B2 W2 | |
| Growth Mulch | Sometimes in Hidden Grotto (both) (reappears) (hidden) | B2 W2 | |
| Stable Mulch | Sometimes in Hidden Grotto (both) (reappears) (hidden) | B2 W2 | |
| Gooey Mulch | Sometimes in Hidden Grotto (both) (reappears) (hidden) | B2 W2 | |
| Repel | Sometimes in Hidden Grotto (both) (reappears) | B2 W2 | |
| Super Repel | Sometimes in Hidden Grotto (both) (reappears) | B2 W2 | |
| Max Repel | Sometimes in Hidden Grotto (both) (reappears) | B2 W2 | |
| Poké Ball | Sometimes in Hidden Grotto (both) (reappears) | B2 W2 | |
| Great Ball | Sometimes in Hidden Grotto (both) (reappears) | B2 W2 | |
| Ultra Ball | Sometimes in Hidden Grotto (both) (reappears) | B2 W2 | |
| Potion | Sometimes in Hidden Grotto (both) (reappears) | B2 W2 | |
| Super Potion | Sometimes in Hidden Grotto (both) (reappears) | B2 W2 | |
| Hyper Potion | Sometimes in Hidden Grotto (both) (reappears) | B2 W2 | |
| Fire Stone | Sometimes in Hidden Grotto (dark grass) (reappears) | B2 W2 | |
| Leaf Stone | Sometimes in Hidden Grotto (dark grass) (reappears) | B2 W2 | |
| Water Stone | Sometimes in Hidden Grotto (dark grass) (reappears) | B2 W2 | |
| Thunder Stone | Sometimes in Hidden Grotto (dark grass) (reappears) | B2 W2 | |
| Dawn Stone | Sometimes in Hidden Grotto (pond) (reappears) | B2 W2 | |
| TinyMushroom | Sometimes in Hidden Grotto (both) (reappears) (hidden) | B2 W2 | |
| Big Mushroom | Sometimes in Hidden Grotto (both) (reappears) (hidden) | B2 W2 | |
| Rare Candy | Sometimes in Hidden Grotto (both) (reappears) (hidden) | B2 W2 | |
| PP Up | Sometimes in Hidden Grotto (both) (reappears) (hidden) | B2 W2 | |
| PP Max | Sometimes in Hidden Grotto (both) (reappears) (hidden) | B2 W2 | |
| Red Shard | Sometimes in Hidden Grotto (both) (reappears) (hidden) | B2 W2 | |
| Green Shard | Sometimes in Hidden Grotto (both) (reappears) (hidden) | B2 W2 | |
| Yellow Shard | Sometimes in Hidden Grotto (both) (reappears) (hidden) | B2 W2 | |
| Blue Shard | Sometimes in Hidden Grotto (both) (reappears) (hidden) | B2 W2 | |
Pokémon
Pokémon Black and White
| Pokémon | Games | Location | Levels | Rate | ||||||||||||
|---|---|---|---|---|---|---|---|---|---|---|---|---|---|---|---|---|
|
B | W |
|
8 | 20% | |||||||||||
|
B | W |
|
9 | 10% | |||||||||||
|
B | W |
|
9 | 10% | |||||||||||
|
B | W |
|
8-11 | 40% | |||||||||||
|
B | W |
|
8-11 | 20% | |||||||||||
| Dark grass | ||||||||||||||||
|
B | W |
|
10 | 20% | |||||||||||
|
B | W |
|
11 | 10% | |||||||||||
|
B | W |
|
11 | 10% | |||||||||||
|
B | W |
|
10-13 | 40% | |||||||||||
|
B | W |
|
10-13 | 20% | |||||||||||
| Rustling grass | ||||||||||||||||
|
B | W |
|
8-11 | 100% | |||||||||||
| Surfing | ||||||||||||||||
|
B | W |
|
5-15 | 100% | |||||||||||
|
B | W |
|
5-15 | 100% | |||||||||||
| Surfing in rippling water | ||||||||||||||||
|
B | W |
|
5-15 | 100% | |||||||||||
|
B | W |
|
5-15 | 100% | |||||||||||
| Fishing | ||||||||||||||||
|
B | W |
|
35-55 | 70% | |||||||||||
|
B | W |
|
35-55 | 30% | |||||||||||
|
B | W |
|
35-55 | 30% | |||||||||||
| Fishing in rippling water | ||||||||||||||||
|
B | W |
|
35-60 | 60% | |||||||||||
|
B | W |
|
45-70 | 10% | |||||||||||
|
B | W |
|
35-60 | 30% | |||||||||||
|
B | W |
|
35-60 | 30% | |||||||||||
| Swarm | ||||||||||||||||
|
B | W |
|
15-55 | 40% | |||||||||||
|
B | W |
|
15-55 | 40% | |||||||||||
| A colored background means that the Pokémon can be found in this location in the specified game. A white background with a colored letter means that the Pokémon cannot be found here. | ||||||||||||||||
Pokémon Black 2 and White 2
| Pokémon | Games | Location | Levels | Rate | ||||||||||||
|---|---|---|---|---|---|---|---|---|---|---|---|---|---|---|---|---|
|
B2 | W2 |
|
56 | 10% | |||||||||||
|
B2 | W2 |
|
55 | 20% | |||||||||||
|
B2 | W2 |
|
57 | 10% | |||||||||||
|
B2 | W2 |
|
57 | 10% | |||||||||||
|
B2 | W2 |
|
55, 57 | 30% | |||||||||||
|
B2 | W2 |
|
56, 58 | 20% | |||||||||||
| Dark grass | ||||||||||||||||
|
B2 | W2 |
|
64 | 10% | |||||||||||
|
B2 | W2 |
|
63 | 20% | |||||||||||
|
B2 | W2 |
|
65 | 10% | |||||||||||
|
B2 | W2 |
|
65 | 10% | |||||||||||
|
B2 | W2 |
|
63, 65 | 30% | |||||||||||
|
B2 | W2 |
|
64, 66 | 20% | |||||||||||
| Rustling grass | ||||||||||||||||
|
B2 | W2 |
|
58, 59 | 5% | |||||||||||
|
B2 | W2 |
|
58 | 2.5% | |||||||||||
|
B2 | W2 |
|
58 | 2.5% | |||||||||||
|
B2 | W2 |
|
55-58 | 85% | |||||||||||
|
B2 | W2 |
|
58 | 5% | |||||||||||
| Surfing | ||||||||||||||||
|
B2 | W2 |
|
45-60 | 30% | |||||||||||
|
B2 | W2 |
|
45-60 | 70% | |||||||||||
|
B2 | W2 |
|
45-60 | 70% | |||||||||||
| Surfing in rippling water | ||||||||||||||||
|
B2 | W2 |
|
45-60 | 60% | |||||||||||
|
B2 | W2 |
|
50-60 | 10% | |||||||||||
|
B2 | W2 |
|
45-60 | 30% | |||||||||||
|
B2 | W2 |
|
45-60 | 30% | |||||||||||
| Fishing | ||||||||||||||||
|
B2 | W2 |
|
40-70 | 70% | |||||||||||
|
B2 | W2 |
|
40-60 | 30% | |||||||||||
|
B2 | W2 |
|
40-60 | 30% | |||||||||||
| Fishing in rippling water | ||||||||||||||||
|
B2 | W2 |
|
40-60 | 60% | |||||||||||
|
B2 | W2 |
|
50-70 | 10% | |||||||||||
|
B2 | W2 |
|
40-60 | 30% | |||||||||||
|
B2 | W2 |
|
40-60 | 30% | |||||||||||
| Swarm | ||||||||||||||||
|
B2 | W2 |
|
40-55 | 40% | |||||||||||
|
B2 | W2 |
|
40-55 | 40% | |||||||||||
| Hidden Grotto | ||||||||||||||||
|
B2 | W2 |
|
55-60 | Uncommon | |||||||||||
|
B2 | W2 |
|
55-60 | Common | |||||||||||
|
B2 | W2 |
|
55-60 | Rare | |||||||||||
| Hidden Grotto | ||||||||||||||||
|
B2 | W2 |
|
55-60 | Uncommon | |||||||||||
|
B2 | W2 |
|
55-60 | Rare | |||||||||||
|
B2 | W2 |
|
55-60 | Common | |||||||||||
| A colored background means that the Pokémon can be found in this location in the specified game. A white background with a colored letter means that the Pokémon cannot be found here. | ||||||||||||||||
Trainers
Pokémon Black and White
| Trainer | Pokémon | |||||||||||
|---|---|---|---|---|---|---|---|---|---|---|---|---|
|
| |||||||||||
| ||||||||||||
|
| |||||||||||
|
| |||||||||||
|
| |||||||||||
|
| |||||||||||
| ||||||||||||
|
| |||||||||||
| ||||||||||||
| ||||||||||||
| After defeating Team Plasma in Wellspring Cave | ||||||||||||
|
| |||||||||||
|
| |||||||||||
|
| |||||||||||
| ||||||||||||
|
| |||||||||||
| ||||||||||||
| Requires Surf | ||||||||||||
|
| |||||||||||
| ||||||||||||
| ||||||||||||


|
|||||||||||||||||||||||||||||||||||||||||||||||||||||||||||||||||||
| |||||||||||||||||||||||||||||||||||||||||||||||||||||||||||||||||||


|
|||||||||||||||||||||||||||||||||||||||||||||||||||||||||||||||||||
| |||||||||||||||||||||||||||||||||||||||||||||||||||||||||||||||||||


|
|||||||||||||||||||||||||||||||||||||||||||||||||||||||||||||||||||
| |||||||||||||||||||||||||||||||||||||||||||||||||||||||||||||||||||

Pokémon Black 2 and White 2
| Trainer | Pokémon | |||||||||||
|---|---|---|---|---|---|---|---|---|---|---|---|---|
|
| |||||||||||
| ||||||||||||
| ||||||||||||
|
| |||||||||||
| ||||||||||||
| ||||||||||||
| ||||||||||||
| ||||||||||||
| ||||||||||||
|
| |||||||||||
| ||||||||||||
| ||||||||||||
|
| |||||||||||
| ||||||||||||
| ||||||||||||
|
| |||||||||||
| ||||||||||||
|
| |||||||||||
| ||||||||||||
|
| |||||||||||
| ||||||||||||
| ||||||||||||
|
| |||||||||||
| ||||||||||||
|
| |||||||||||
| ||||||||||||
|
| |||||||||||
| ||||||||||||


Trainer Tips
Pokémon Black and White
|
||||
Pokémon Black 2 and White 2
|
||||
In the anime

Route 3 makes an appearance in Snivy Plays Hard to Catch! to Minccino-Neat and Tidy!. There is a small city and a town located in the route. There is also a train station near Nacrene City.
In Snivy Plays Hard to Catch!, it is shown to be a forest route with tall grass in some areas and vines hanging from the trees. It has a bog with huge lily pads in the forest and a small stream running through it. It is where Ash caught a Snivy. The Wellspring Cave is located here.
A small city is also located here, as seen in Saving Darmanitan From the Bell!. It has colorful buildings with shops and has a small bridge which allows people to enter the city. Trees and shrubbery surround it and a river runs through it. It also has a small Pokémon Center and a café is shown to be affiliated with Team Rocket.
The most famous part of the city is the old clock tower which is now home to a Darmanitan and has a huge bell inside it. There is a long winding stairs, when at the top there is a room with a huge bell.
After the city is a forest path, as shown in The Bloom Is on Axew!.
Luxuria Town is found after the path in A Rival Battle for Club Champ!, where the second Battle Club is located. Then in A Home for Dwebble!, there is a rocky terrain near a river. The Daycare center appears in Here Comes the Trubbish Squad! near a small town which has a garbage dump and a Kindergarten.
Past the Daycare center is another forest path. A Pokémon Center is located there, as shown in Minccino-Neat and Tidy!.
Gallery
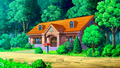
The Pokémon Day Care
The bog on Route 3
The small city
- Unova Route 3 Clock Tower.png
The Clock Tower
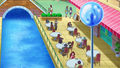
A café near a river


Trivia
- The in-game maps show Route 3 leaving Striaton City directly from the west. However, the actual entrance to the city is a north-south entrance.
- The two westernmost columns of tall grass in the patch closest to Nacrene City are subject to a graphical glitch: Seven tall grass sprites in each column are squashed to fit into six spaces on the world's grid. The player still moves along this grid, thus disaligning him or her with the grass sprites in these rows.
| This article is part of Project Routes, a Bulbapedia project that aims to write comprehensive articles on every route in the Pokémon world. |