Trick House: Difference between revisions
No edit summary |
(I was able to challenge the Trick Master twice in a row. Given the levels of the trainers in the first two challenges, it can be assumed that the Stone Badge is a prerequisite achievement in ORAS. Therefore, I split the table in two.) |
||
| Line 1: | Line 1: | ||
{{incomplete|needs=Trick Master hiding places, manga section (if applicable)}} | {{incomplete|needs=ORAS info, Trick Master hiding places, manga section (if applicable)}} | ||
{{Infobox location | {{Infobox location | ||
|japanese_name=カラクリやしき | |japanese_name=カラクリやしき | ||
| Line 19: | Line 19: | ||
While the rooms in Trick House use mostly the same gimmicks in Emerald as were used in Ruby and Sapphire, the layouts of the rooms are each changed slightly. Trainers, items and the password scrolls are in different locations, and the maze's course changes as well. However, it is only their locations that differ; the items and Trainers in each room are the same in all versions except for the Seventh Puzzle room. Between Ruby and Sapphire, and Emerald, the Trick Master's hiding spots in the first room also change. | While the rooms in Trick House use mostly the same gimmicks in Emerald as were used in Ruby and Sapphire, the layouts of the rooms are each changed slightly. Trainers, items and the password scrolls are in different locations, and the maze's course changes as well. However, it is only their locations that differ; the items and Trainers in each room are the same in all versions except for the Seventh Puzzle room. Between Ruby and Sapphire, and Emerald, the Trick Master's hiding spots in the first room also change. | ||
Players can take the challenges as they earn new [[Gym]] [[Badge]]s, but the final challenge cannot be taken until they defeat the [[Elite Four]]. Each one, however, is only available once and they must be completed in order. | Players can take the challenges as they earn new [[Gym]] [[Badge]]s, but the final challenge cannot be taken until they defeat the [[Elite Four]]. Each one, however, is only available once and they must be completed in order. After all challenges are completed, the Trick Master disappears, leaving behind only a note saying he has gone to distant lands to search for new tricks. | ||
==Items== | |||
These are [[Item#Item ball images|items]] found in the entrance and prize room, not the puzzle rooms or the prizes given in person by the Trick Master in the prize room. | |||
===Entrance=== | |||
{{Itlisth|building}} | |||
{{itemlist|Escape Rope|From the Trick Master upon finding him for the first time|OR=yes|AS=yes}} | |||
{{itemlist|Nugget|Under the Trick Master's chair after completing Puzzle 8|Ru=yes|Sa=yes|E=yes|display={{DL|Valuable item|Nugget}}}} | |||
{{Itlistfoot|building}} | |||
===Prize room=== | |||
{{Itlisth|building}} | |||
{{itemlist|Expert Belt|In prize room after completing Puzzle 1.<!--Remains there if not picked up?-->|OR=yes|AS=yes}} | |||
{{Itlistfoot|building}} | |||
====Mechadoll==== | |||
In {{pkmn|Omega Ruby and Alpha Sapphire}}, the Trick Master's Mechadoll begins selling [[Escape Rope]]s to the player at regular price starting at the second puzzle. | |||
{{shop|Mechadoll}} | |||
{{shoprow|{{shopitem|Escape Rope|550|PD<!--|Service ends after all puzzles are solved.-->}}}} | |||
{{shopfooter}} | |||
==Puzzle overview== | |||
==={{game2|Ruby|Sapphire|Emerald}}=== | |||
{| class="roundy" style="margin:auto; background:#{{Locationcolor/med|building}}; border: 3px solid #{{Locationcolor/dark|building}}" | {| class="roundy" style="margin:auto; background:#{{Locationcolor/med|building}}; border: 3px solid #{{Locationcolor/dark|building}}" | ||
! style="background:#{{Locationcolor/light|building}}; {{roundytl|5px}}" | ! style="background:#{{Locationcolor/light|building}}; {{roundytl|5px}}" | Puzzle | ||
! style="background:#{{Locationcolor/light|building}}" | ! style="background:#{{Locationcolor/light|building}}" | Required accomplishment | ||
! | <!---! style="background:#{{Locationcolor/light|building}};" | Hiding spot--> | ||
! style="background:#{{Locationcolor/light|building}}; | ! style="background:#{{Locationcolor/light|building}};" | Prize | ||
|- | ! style="background:#{{Locationcolor/light|building}};" | HM required | ||
! style="background:#{{Locationcolor/light|building}}" | | |||
! style="background:#{{Locationcolor/light|building}}" | | |||
|- style="background: #fff" | |- style="background: #fff" | ||
| Puzzle 1 | | Puzzle 1 | ||
| None | | None | ||
<!--|--> | |||
| {{Bag|Rare Candy}} {{DL|Vitamin|Rare Candy}} | | {{Bag|Rare Candy}} {{DL|Vitamin|Rare Candy}} | ||
| {{HM|01|Cut}} | | {{HM|01|Cut}} | ||
|- style="background: #fff" | |- style="background: #fff" | ||
| Puzzle 2 | | Puzzle 2 | ||
| [[File:Dynamo Badge.png|40px]]{{Badge|Dynamo}} | | [[File:Dynamo Badge.png|40px]]{{Badge|Dynamo}} | ||
<!--|--> | |||
| {{Bag|Timer Ball}} {{ball|Timer}} | | {{Bag|Timer Ball}} {{ball|Timer}} | ||
| None | | None | ||
|- style="background: #fff" | |- style="background: #fff" | ||
| Line 45: | Line 66: | ||
| [[File:Heat Badge.png|40px]]{{badge|Heat}} | | [[File:Heat Badge.png|40px]]{{badge|Heat}} | ||
| {{Bag|Hard Stone}} {{DL|Type-enhancing item|Hard Stone}} | | {{Bag|Hard Stone}} {{DL|Type-enhancing item|Hard Stone}} | ||
| {{HM|06|Rock Smash}} | | {{HM|06|Rock Smash}} | ||
|- style="background: #fff" | |- style="background: #fff" | ||
| Line 51: | Line 71: | ||
| [[File:Balance Badge.png|40px]]{{badge|Balance}} | | [[File:Balance Badge.png|40px]]{{badge|Balance}} | ||
| {{Bag|Smoke Ball}} {{DL|In-battle effect item|Smoke Ball}} | | {{Bag|Smoke Ball}} {{DL|In-battle effect item|Smoke Ball}} | ||
| {{HM|04|Strength}} | | {{HM|04|Strength}} | ||
|- style="background: #fff" | |- style="background: #fff" | ||
| Line 57: | Line 76: | ||
| [[File:Feather Badge.png|40px]]{{badge|Feather}} | | [[File:Feather Badge.png|40px]]{{badge|Feather}} | ||
| {{TMic|Dark|12|Taunt}} {{tm|12|Taunt}} | | {{TMic|Dark|12|Taunt}} {{tm|12|Taunt}} | ||
| None | | None | ||
|- style="background: #fff" | |- style="background: #fff" | ||
| Line 63: | Line 81: | ||
| [[File:Mind Badge.png|40px]]{{badge|Mind}} | | [[File:Mind Badge.png|40px]]{{badge|Mind}} | ||
| {{Bag|Magnet}} {{DL|Type-enhancing item|Magnet}} | | {{Bag|Magnet}} {{DL|Type-enhancing item|Magnet}} | ||
| None | | None | ||
|- style="background: #fff" | |- style="background: #fff" | ||
| Line 69: | Line 86: | ||
| [[File:Rain Badge.png|40px]] {{badge|Rain}} | | [[File:Rain Badge.png|40px]] {{badge|Rain}} | ||
| {{Bag|PP Max}} {{DL|Vitamin|PP Max}} | | {{Bag|PP Max}} {{DL|Vitamin|PP Max}} | ||
| None | | None | ||
|- | |- | ||
| Line 75: | Line 91: | ||
| rowspan="2" style="background: #fff" | Defeat {{pkmn|Champion}} | | rowspan="2" style="background: #fff" | Defeat {{pkmn|Champion}} | ||
| style="background: #fff" | [[File:BlueTentSprite.png|24px]] {{DL|Ornament|Tents|Blue Tent}}{{sup/3|Sa}}{{sup/3|E}} | | style="background: #fff" | [[File:BlueTentSprite.png|24px]] {{DL|Ornament|Tents|Blue Tent}}{{sup/3|Sa}}{{sup/3|E}} | ||
| rowspan="2" style="background: #fff; {{roundybr|5px}}" | None | | rowspan="2" style="background: #fff; {{roundybr|5px}}" | None | ||
|- style="background: #fff" | |- style="background: #fff" | ||
| Line 82: | Line 97: | ||
After completing the final puzzle in {{game|Emerald}}, players may choose between either tent, but may only take one. | After completing the final puzzle in {{game|Emerald}}, players may choose between either tent, but may only take one. | ||
== | ==={{g|Omega Ruby and Alpha Sapphire}}=== | ||
{| class="roundy" style="margin:auto; background:#{{Locationcolor/med|building}}; border: 3px solid #{{Locationcolor/dark|building}}" | |||
! style="background:#{{Locationcolor/light|building}}; {{roundytl|5px}}" | Puzzle | |||
=== | ! style="background:#{{Locationcolor/light|building}}" | Required accomplishment | ||
{{ | <!---! style="background:#{{Locationcolor/light|building}};" | Hiding spot--> | ||
{{ | ! style="background:#{{Locationcolor/light|building}};" | Prize | ||
{{ | ! style="background:#{{Locationcolor/light|building}};" | TM/HM required | ||
{{ | |- style="background: #fff" | ||
| Puzzle 1 | |||
= | | [[File:Stone Badge.png|40px]]{{Badge|Stone}}{{tt|*|Guaranteed to have due to story progression}} | ||
{{ | <!--| Under the table--> | ||
| {{Bag|TM Dark VI}} {{TM|12|Taunt}} | |||
{{ | | {{HM|01|Cut}} | ||
{{ | |- style="background: #fff" | ||
| Puzzle 2 | |||
{{ | | [[File:Knuckle Badge.png|40px]]{{Badge|Knuckle}}{{tt|*|Guaranteed to have due to story progression}} | ||
<!--| Inside the right tree pot.--> | |||
| {{Bag|Hard Stone}} {{DL|Type-enhancing item|Hard Stone}} | |||
| {{HM|06|Rock Smash}} | |||
|- | |||
{{ | | style="background: #fff; {{roundybl|5px}}" | Puzzle 3 | ||
{{ | | style="background: #fff" | [[File:Dynamo Badge.png|40px]]{{badge|Dynamo}} | ||
<!--| style="background: #fff" | Inside the left dresser--> | |||
| style="background: #fff" | {{Bag|TM Psychic VI}} {{TM|92|Trick Room}} | |||
| style="background: #fff; {{roundybr|5px}}" | {{TM|70|Flash}} | |||
|} | |||
==Puzzles== | ==Puzzles== | ||
| Line 127: | Line 144: | ||
The first puzzle is a straightforward maze. The rooms of the area are separated by trees that must be {{m|Cut}} down to proceed. | The first puzzle is a straightforward maze. The rooms of the area are separated by trees that must be {{m|Cut}} down to proceed. | ||
====Items==== | ====Items==== | ||
| Line 134: | Line 149: | ||
{{itemlist|Orange Mail|In middle area of the maze (requires {{m|Cut}})|Ru=yes|Sa=yes|display={{DL|Mail|Orange Mail}}}} | {{itemlist|Orange Mail|In middle area of the maze (requires {{m|Cut}})|Ru=yes|Sa=yes|display={{DL|Mail|Orange Mail}}}} | ||
{{itemlist|Orange Mail|In the north part of the maze, west of the exit (requires {{m|Cut}})|E=yes|display={{DL|Mail|Orange Mail}}}} | {{itemlist|Orange Mail|In the north part of the maze, west of the exit (requires {{m|Cut}})|E=yes|display={{DL|Mail|Orange Mail}}}} | ||
{{itemlist|Lava Cookie|In middle-left area of the maze (requires {{m|Cut}}) | {{itemlist|Lava Cookie| | ||
* In middle-left area of the maze (requires {{m|Cut}}) | |||
{{Itlistfoot| | * In top-left part of the maze (requires {{m|Cut}})|OR=yes|AS=yes|display={{DL|Status condition healing item|Lava Cookie}} x2}} | ||
{{Itlistfoot|rock}} | |||
====Trainers==== | ====Trainers==== | ||
| Line 149: | Line 165: | ||
=====Pokémon Omega Ruby and Alpha Sapphire===== | =====Pokémon Omega Ruby and Alpha Sapphire===== | ||
{{trainerheader| | {{trainerheader|rock}} | ||
{{Trainerentry|VSLass ORAS.png{{!}}150px|Lass|Sally|256|1|316|Gulpin|♀|16|}} | {{Trainerentry|VSLass ORAS.png{{!}}150px|Lass|Sally|256|1|316|Gulpin|♀|16|<!--36=ミナ|37=Mina-->}} | ||
{{Trainerdiv| | {{Trainerdiv|rock}} | ||
{{Trainerentry|VSBattle Girl ORAS.png{{!}}150px|Battle Girl|Cora|544|1|307|Meditite|♀|17|}} | {{Trainerentry|VSBattle Girl ORAS.png{{!}}150px|Battle Girl|Cora|544|1|307|Meditite|♀|17|<!--36=フウカ|37=Fūka-->}} | ||
{{Trainerdiv| | {{Trainerdiv|rock}} | ||
{{Trainerentry|VSYoungster ORAS.png{{!}}150px|Youngster|Eddie|224|2|290|Nincada|♂|14||074|Geodude|♂|14|}} | {{Trainerentry|VSYoungster ORAS.png{{!}}150px|Youngster|Eddie|224|2|290|Nincada|♂|14||074|Geodude|♂|14|<!--36=ヤスユキ|37=Yasuyuki-->}} | ||
{{Trainerfooter| | {{Trainerfooter|rock|3}} | ||
===Puzzle 2=== | ===Puzzle 2=== | ||
| Line 173: | Line 189: | ||
| colspan="2" style="background:#{{electric color light}}; {{roundybottom|5px}};" | | | colspan="2" style="background:#{{electric color light}}; {{roundybottom|5px}};" | | ||
|} | |} | ||
The second puzzle is another maze, but with a more confusing layout. | |||
The second puzzle is another maze, but with a more confusing layout. In [[Generation III]], holes in the ground cannot be passed until the player hits a switch to extend a platform over them. However, the player cannot tell which switches cover which holes. In [[Generation VI]], the maze is changed to involve {{m|Rock Smash|smashable rocks}}. | |||
====Items==== | ====Items==== | ||
| Line 180: | Line 197: | ||
{{itemlist|Harbor Mail|Far northeast corner of room|Ru=yes|Sa=yes|display={{DL|Mail|Harbor Mail}}}} | {{itemlist|Harbor Mail|Far northeast corner of room|Ru=yes|Sa=yes|display={{DL|Mail|Harbor Mail}}}} | ||
{{itemlist|Harbor Mail|Middle area of room, past the second hole|E=yes|display={{DL|Mail|Harbor Mail}}}} | {{itemlist|Harbor Mail|Middle area of room, past the second hole|E=yes|display={{DL|Mail|Harbor Mail}}}} | ||
{{Itlistfoot| | {{itemlist|Rage Candy Bar| | ||
* Far southeast corner of the room, past Schoolkid Georgie. | |||
* Near Black Belt Yuji after defeating him in battle.|OR=yes|AS=yes|display=[[Rage Candy Bar]] x2}} | |||
{{Itlistfoot|fighting}} | |||
====Trainers==== | ====Trainers==== | ||
=====Pokémon Ruby, Sapphire, and Emerald===== | |||
{{trainerheader|electric}} | {{trainerheader|electric}} | ||
{{Trainerentry|Spr RS School Kid M.png|School Kid|Ted|340|1|280|Ralts|♂|17|36=ノブヒサ|37=Nobuhisa}} | {{Trainerentry|Spr RS School Kid M.png|School Kid|Ted|340|1|280|Ralts|♂|17|36=ノブヒサ|37=Nobuhisa}} | ||
| Line 190: | Line 211: | ||
{{Trainerentry|Spr RS School Kid F.png|School Kid|Georgia|320|2|285|Shroomish|♀|16||267|Beautifly|♀|16|36=ミキエ|37=Mikie}} | {{Trainerentry|Spr RS School Kid F.png|School Kid|Georgia|320|2|285|Shroomish|♀|16||267|Beautifly|♀|16|36=ミキエ|37=Mikie}} | ||
{{Trainerfooter|electric|3}} | {{Trainerfooter|electric|3}} | ||
=====Pokémon Omega Ruby and Alpha Sapphire===== | |||
{{trainerheader|fighting}} | |||
{{Trainerentry|VSBlack Belt.png{{!}}150px|Black Belt|Yuji|576|2|296|Makuhita|♂|16||066|Machop|♂|18|<!--36=カズシ|37=Kazushi-->}} | |||
{{Trainerdiv|fighting}} | |||
{{Trainerentry|VSSchoolkid F.png{{!}}150px|Schoolkid|Georgie<!--Yes, Georgie. Her name is changed.-->|256|2|285|Shroomish|♀|16||267|Beautifly|♀|16|<!--36=ミキエ|37=Mikie-->}} | |||
{{Trainerdiv|fighting}} | |||
{{Trainerentry|VSPokémon Ranger M ORAS.png{{!}}150px|Pokémon Ranger|Sebastian|1080|2|331|Cacnea|♂|16||304|Aron|♂|18<!--36=ケイスケ|37=Keisuke-->}} | |||
{{trainerdiv|fighting}} | |||
{{Trainerentry|VSPokémon Ranger F ORAS.png{{!}}150px|Pokémon Ranger|Sophia|1020|2|333|Swablu|♀|17||315|Roselia|♀|17|<!--36=チアキ|37=Chiaki-->}} | |||
{{Trainerfooter|fighting|3}} | |||
===Puzzle 3=== | ===Puzzle 3=== | ||
| Line 207: | Line 239: | ||
| colspan="2" style="background:#{{fire color light}}; {{roundybottom|5px}};" | | | colspan="2" style="background:#{{fire color light}}; {{roundybottom|5px}};" | | ||
|} | |} | ||
In [[Generation III]], the third puzzle is a room full of alternating red and blue doors. Stepping on a switch opens all red doors and closes all blue doors, and stepping on a switch again will open all blue doors and close all red doors. The entrance to the room, and some switches, are covered by rocks that can be shattered with {{m|Rock Smash}}. | |||
In [[Generation VI]], the room is dark maze that can be illuminated using {{m|Flash}}, but it isn't necessary to use the move to proceed. At the tail end of the maze is a stairway hidden by the maze walls. Using the stairway will allow the player to move south underneath the maze to a small area where the password scroll is hidden. | |||
====Items==== | ====Items==== | ||
{{Itlisth|fire}} | {{Itlisth|fire}} | ||
| Line 215: | Line 248: | ||
{{itemlist|Shadow Mail|Near Hiker Alan|Ru=yes|Sa=yes|display={{DL|Mail|Shadow Mail}}}} | {{itemlist|Shadow Mail|Near Hiker Alan|Ru=yes|Sa=yes|display={{DL|Mail|Shadow Mail}}}} | ||
{{itemlist|Shadow Mail|Behind Picnicker Martha|E=yes|display={{DL|Mail|Shadow Mail}}}} | {{itemlist|Shadow Mail|Behind Picnicker Martha|E=yes|display={{DL|Mail|Shadow Mail}}}} | ||
{{Itlistfoot| | {{itemlist|Lumiose Galette| | ||
* Behind the wall beyond Ace Duo Pike & Shiel | |||
* North of the password scroll|OR=yes|AS=yes|display={{DL|Status condition healing item|Lumiose Galette}} x2}} | |||
{{Itlistfoot|electric}} | |||
====Trainers==== | ====Trainers==== | ||
| Line 225: | Line 261: | ||
{{Trainerentry|Spr RS Hiker.png|Hiker|Alan|880|3|074|Geodude|♂|22||299|Nosepass|♂|22||075|Graveler|♂|22||36=マサノリ|37=Masanori}} | {{Trainerentry|Spr RS Hiker.png|Hiker|Alan|880|3|074|Geodude|♂|22||299|Nosepass|♂|22||075|Graveler|♂|22||36=マサノリ|37=Masanori}} | ||
{{Trainerfooter|fire|3}} | {{Trainerfooter|fire|3}} | ||
====Trainers==== | |||
{{trainerheader|electric}} | |||
{{Trainerentry|VSLass ORAS.png{{!}}150px|Lass|Robin|288|2|043|Oddish|♀|16||118|Goldeen|♀|18|<!--36=シホ|37=Shiho-->}} | |||
{{Trainerdiv|electric}} | |||
{{Trainerentry|VSAce Duo ORAS.png{{!}}150px|Ace Duo|Pike & Shiel|1260|2|318|Carvanha|♂|21||322|Numel|♂|21|<!--36=|37=-->}} | |||
{{Trainerdiv|electric}} | |||
{{Trainerentry|VSSchoolkid M.png{{!}}150px|School Kid|Ted|380|1|280|Ralts|♂|19|<!--36=ノブヒサ|37=Nobuhisa-->}} | |||
{{Trainerfooter|electric|3}} | |||
===Puzzle 4=== | ===Puzzle 4=== | ||
| Line 505: | Line 550: | ||
[[Category:Hoenn locations]] | [[Category:Hoenn locations]] | ||
[[Category:Ruby and Sapphire locations]] | |||
[[Category:Emerald locations]] | |||
[[Category:Omega Ruby and Alpha Sapphire locations]] | |||
[[Category:Buildings]] | [[Category:Buildings]] | ||
Revision as of 22:32, 25 November 2014

|
This article is incomplete. Please feel free to edit this article to add missing information and complete it. Reason: ORAS info, Trick Master hiding places, manga section (if applicable) |
| ||||
| ||||
| Location: | North of Slateport City, on Route 110 | |||
|---|---|---|---|---|
| Region: | Hoenn | |||
| Generations: | III | |||
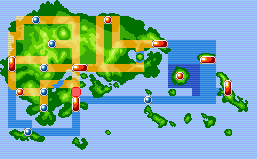 Location of Trick House in Hoenn. | ||||
| Pokémon world locations | ||||
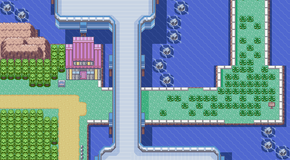
The Trick House (Japanese: カラクリやしき Trick House) is located on Route 110 in Hoenn. It is owned by the Trick Master, who poses puzzling challenges to travelers. Those who wish to play his game must find their way through a maze-like puzzle at the back of his house. If successful, they will be rewarded.
Description
The puzzles for Trick House are divided into three parts. First, the Trick Master is hiding somewhere in the first room of the house. The first few times the player enters the house, a small twinkle indicates the Trick Master's hiding place right away, but in later challenges the player must find him without any help.
Once the Trick Master is found, the player may enter the larger rear room through a passageway hidden behind the scroll on the wall. The rooms consist of some sort of maze with a gimmick to each of them, and each room also has Trainers and items (always Mail in Generation III). The player must navigate through the maze to a second scroll, where they will obtain a secret code. Finally, the player must find the door to the Trick Master's room and write the code on it to gain access. Upon being found, the Trick Master will reward the player, and the player may take a shortcut passage out of the Trick House.
While the rooms in Trick House use mostly the same gimmicks in Emerald as were used in Ruby and Sapphire, the layouts of the rooms are each changed slightly. Trainers, items and the password scrolls are in different locations, and the maze's course changes as well. However, it is only their locations that differ; the items and Trainers in each room are the same in all versions except for the Seventh Puzzle room. Between Ruby and Sapphire, and Emerald, the Trick Master's hiding spots in the first room also change.
Players can take the challenges as they earn new Gym Badges, but the final challenge cannot be taken until they defeat the Elite Four. Each one, however, is only available once and they must be completed in order. After all challenges are completed, the Trick Master disappears, leaving behind only a note saying he has gone to distant lands to search for new tricks.
Items
These are items found in the entrance and prize room, not the puzzle rooms or the prizes given in person by the Trick Master in the prize room.
Entrance
| Item | Location | Games | |
|---|---|---|---|
| Escape Rope | From the Trick Master upon finding him for the first time | OR AS | |
| Nugget | Under the Trick Master's chair after completing Puzzle 8 | R S E | |
Prize room
| Item | Location | Games | |
|---|---|---|---|
| Expert Belt | In prize room after completing Puzzle 1. | OR AS | |
Mechadoll
In Omega Ruby and Alpha Sapphire, the Trick Master's Mechadoll begins selling Escape Ropes to the player at regular price starting at the second puzzle.
| Mechadoll | ||||
|---|---|---|---|---|
|
||||
Puzzle overview
Pokémon Ruby, Sapphire, and Emerald
| Puzzle | Required accomplishment | Prize | HM required |
|---|---|---|---|
| Puzzle 1 | None | HM01 (Cut) | |
| Puzzle 2 | None | ||
| Puzzle 3 | HM06 (Rock Smash) | ||
| Puzzle 4 | HM04 (Strength) | ||
| Puzzle 5 | None | ||
| Puzzle 6 | None | ||
| Puzzle 7 | None | ||
| Puzzle 8 | Defeat Champion | None | |
After completing the final puzzle in Pokémon Emerald, players may choose between either tent, but may only take one.
Pokémon Omega Ruby and Alpha Sapphire
| Puzzle | Required accomplishment | Prize | TM/HM required |
|---|---|---|---|
| Puzzle 1 | HM01 (Cut) | ||
| Puzzle 2 | HM06 (Rock Smash) | ||
| Puzzle 3 | TM70 (Flash) |
Puzzles
Puzzle 1
| Version | 1F |
|---|---|
| Ruby | 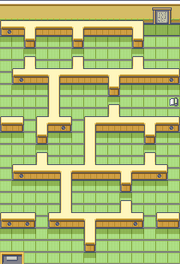
|
| Sapphire | |
| Emerald | 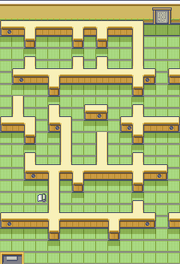
|
The first puzzle is a straightforward maze. The rooms of the area are separated by trees that must be Cut down to proceed.
Items
| Item | Location | Games | |
|---|---|---|---|
| Orange Mail | In middle area of the maze (requires Cut) | R S | |
| Orange Mail | In the north part of the maze, west of the exit (requires Cut) | E | |
| Lava Cookie x2 | OR AS | ||
Trainers
Pokémon Ruby, Sapphire, and Emerald
| Trainer | Pokémon | |||||||||||
|---|---|---|---|---|---|---|---|---|---|---|---|---|
|
| |||||||||||
|
| |||||||||||
| ||||||||||||
| ||||||||||||
|
| |||||||||||
| ||||||||||||
| Trainers with a PokéNav by their names will be registered in the Trainer's Eyes or Match Call function after the first battle, and may have a rematch with the player with higher-level Pokémon. | ||||||||||||
Pokémon Omega Ruby and Alpha Sapphire
| Trainer | Pokémon | |||||||||||
|---|---|---|---|---|---|---|---|---|---|---|---|---|
|
| |||||||||||
|
| |||||||||||
|
| |||||||||||
| ||||||||||||
| Trainers with a PokéNav by their names will be registered in the Trainer's Eyes or Match Call function after the first battle, and may have a rematch with the player with higher-level Pokémon. | ||||||||||||
Puzzle 2
| Version | 1F |
|---|---|
| Ruby | 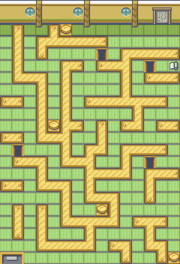
|
| Sapphire | |
| Emerald | 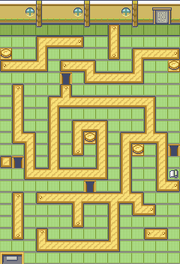
|
The second puzzle is another maze, but with a more confusing layout. In Generation III, holes in the ground cannot be passed until the player hits a switch to extend a platform over them. However, the player cannot tell which switches cover which holes. In Generation VI, the maze is changed to involve smashable rocks.
Items
| Item | Location | Games | |
|---|---|---|---|
| Wave Mail | Near entrance | R S E | |
| Harbor Mail | Far northeast corner of room | R S | |
| Harbor Mail | Middle area of room, past the second hole | E | |
| Rage Candy Bar x2 |
|
OR AS | |
Trainers
Pokémon Ruby, Sapphire, and Emerald
| Trainer | Pokémon | |||||||||||
|---|---|---|---|---|---|---|---|---|---|---|---|---|
|
| |||||||||||
|
| |||||||||||
| ||||||||||||
| ||||||||||||
|
| |||||||||||
| ||||||||||||
| Trainers with a PokéNav by their names will be registered in the Trainer's Eyes or Match Call function after the first battle, and may have a rematch with the player with higher-level Pokémon. | ||||||||||||
Pokémon Omega Ruby and Alpha Sapphire
| Trainer | Pokémon | |||||||||||
|---|---|---|---|---|---|---|---|---|---|---|---|---|
|
| |||||||||||
| ||||||||||||
|
| |||||||||||
| ||||||||||||
|
| |||||||||||
| ||||||||||||
|
| |||||||||||
| ||||||||||||
| Trainers with a PokéNav by their names will be registered in the Trainer's Eyes or Match Call function after the first battle, and may have a rematch with the player with higher-level Pokémon. | ||||||||||||
Puzzle 3
| Version | 1F |
|---|---|
| Ruby | 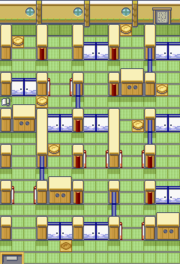
|
| Sapphire | |
| Emerald | 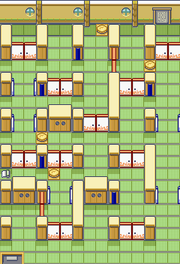
|
In Generation III, the third puzzle is a room full of alternating red and blue doors. Stepping on a switch opens all red doors and closes all blue doors, and stepping on a switch again will open all blue doors and close all red doors. The entrance to the room, and some switches, are covered by rocks that can be shattered with Rock Smash.
In Generation VI, the room is dark maze that can be illuminated using Flash, but it isn't necessary to use the move to proceed. At the tail end of the maze is a stairway hidden by the maze walls. Using the stairway will allow the player to move south underneath the maze to a small area where the password scroll is hidden.
Items
| Item | Location | Games | |
|---|---|---|---|
| Wood Mail | Near Picnicker Martha | R S | |
| Wood Mail | Far northwest corner, past sliding door | E | |
| Shadow Mail | Near Hiker Alan | R S | |
| Shadow Mail | Behind Picnicker Martha | E | |
| Lumiose Galette x2 |
|
OR AS | |
Trainers
| Trainer | Pokémon | |||||||||||
|---|---|---|---|---|---|---|---|---|---|---|---|---|
|
| |||||||||||
| ||||||||||||
|
| |||||||||||
|
| |||||||||||
| ||||||||||||
| ||||||||||||
| Trainers with a PokéNav by their names will be registered in the Trainer's Eyes or Match Call function after the first battle, and may have a rematch with the player with higher-level Pokémon. | ||||||||||||
Trainers
| Trainer | Pokémon | |||||||||||
|---|---|---|---|---|---|---|---|---|---|---|---|---|
|
| |||||||||||
| ||||||||||||
|
| |||||||||||
| ||||||||||||
|
| |||||||||||
| Trainers with a PokéNav by their names will be registered in the Trainer's Eyes or Match Call function after the first battle, and may have a rematch with the player with higher-level Pokémon. | ||||||||||||
Puzzle 4
| Version | 1F |
|---|---|
| Ruby | 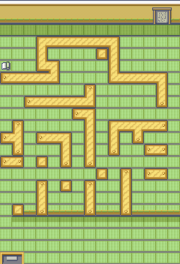
|
| Sapphire | |
| Emerald | 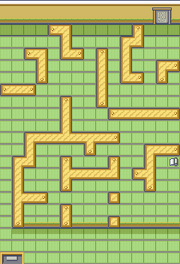
|
The fourth puzzle is a room full of boulders that must be pushed aside using Strength. However, due to the close quarters, pushing boulders the wrong way can block certain paths.
Items
| Item | Location | Games | |
|---|---|---|---|
| Mech Mail | Near Black Belt Yuji | R S | |
| Mech Mail | Near Battle Girl Cora | E | |
Trainers
| Trainer | Pokémon | |||||||||||
|---|---|---|---|---|---|---|---|---|---|---|---|---|
|
| |||||||||||
| ||||||||||||
|
| |||||||||||
|
| |||||||||||
| Trainers with a PokéNav by their names will be registered in the Trainer's Eyes or Match Call function after the first battle, and may have a rematch with the player with higher-level Pokémon. | ||||||||||||
Puzzle 5
| Version | 1F |
|---|---|
| Ruby | 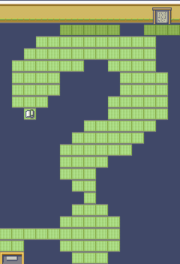
|
| Sapphire | |
| Emerald | 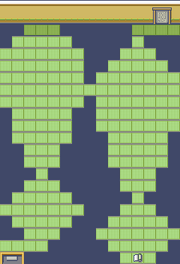
|
The fifth puzzle is a sequence of robots (mechadolls) that will ask the player questions of escalating difficulty. Answering correctly allows advance, a wrong answer sends him or her back to the start of the room. The riddles asked are chosen randomly each time the player enters the room.
In Ruby and Sapphire the questions are:
- One of these Pokémon uses Scratch. Which one is it? (Nincada)
- One of these Pokémon is not found on Route 103. Which one is it? (Nincada)
- One of these Pokémon is not of the Grass type. Which one is it? (Nincada)
- The Devon Researcher was looking for what Pokémon in Petalburg Woods? (Shroomish)
- Which of these Pokémon was chasing Prof. Birch? (Poochyena)
- Which costs more? Three Poké Balls or one Super Potion? (Super Potion)
- Sell one Great Ball and buy one Potion. How much money remains? (Nothing)
- Sell one Escape Rope and buy one Antidote. How much remains? ($175)
- Do one Full Heal and Great Ball cost more than one Revive? (They will cost less.)
- Rustboro Gym Leader Roxanne used a Geodude. Was it male or female? (♀)
- In Dewford Hall, were there more men or women? (Males)
- The first trainer in Dewford Gym was male or female? (Female)
- How many signs are there in Lilycove City? (8)
- How many people give you berries at the Pretty Petal Flower Shop? (1)
- How many bikes does Rydel have on display outside his cycle shop? (8)
- Which Pokémon was offered for a trade at the Pokémon Trainer's School? (Seedot)
In Emerald the questions are:
- One of these Pokémon is not of the Water type. Which one is it? (Azurill)
- One of these Pokémon does not use Leech Life. Which one is it? (Dustox)
- One of these Pokémon is not found on Route 110. Which one is it? (Taillow)
- Which of these Pokémon did Team Aqua use in Petalburg Forest? (Poochyena)
- Which of these Pokémon did Wally borrow from your father? (Zigzagoon)
- Which of these Pokémon was chasing Prof. Birch? (Zigzagoon)
- In Prof. Birch's bag, there were three Pokémon. Which one was at the right? (Mudkip)
- Do one Repel and Soda Pop cost more than one Super Potion? (They will cost less.)
- Which costs more? Three Harbor Mails or one Burn Heal? (Burn Heal)
- In the Trainer's School, how many girl students were there? (1)
- In Lavaridge Town, were there more elderly men or elderly women? (Elderly men)
- In Seashore House, were there more men or women? (Male)
- On the Cycling Road, how many Triathletes were there? (8)
- In Slateport's Pokémon Fan Club, how many Pokémon were there? (3)
- In Fortree City, how many tree houses were there? (6)
- Sell one Great Ball, and buy one Potion. How much remains? (Nothing)
There are no items or Trainers in this room.
Puzzle 6
| Version | 1F |
|---|---|
| Ruby | 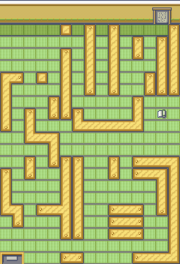
|
| Sapphire | |
| Emerald | 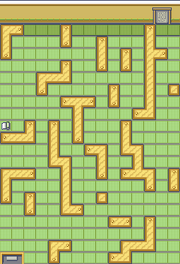
|
The sixth room is full of flipping gates like those found in Fortree Gym, but arranged in a more confusing pattern. As with Fortree, the player must walk through the gates in certain combinations to advance through the room.
Items
| Item | Location | Games | |
|---|---|---|---|
| Glitter Mail | Near exit of room | R S | |
| Glitter Mail | In the southeast part of the maze | E | |
Trainers
| Trainer | Pokémon | |||||||||||
|---|---|---|---|---|---|---|---|---|---|---|---|---|
|
| |||||||||||
| ||||||||||||
| ||||||||||||
|
| |||||||||||
| ||||||||||||
|
| |||||||||||
| Trainers with a PokéNav by their names will be registered in the Trainer's Eyes or Match Call function after the first battle, and may have a rematch with the player with higher-level Pokémon. | ||||||||||||
Puzzle 7
| Version | 1F |
|---|---|
| Ruby | 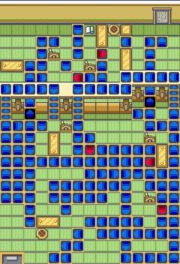
|
| Sapphire | |
| Emerald | 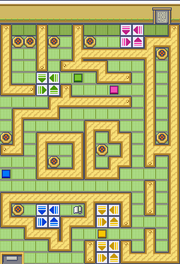
|
The seventh room is filled with spinners similar to Mossdeep Gym. The player must navigate the maze of spinners and pull switches to change their directions to advance through the room. In Pokémon Emerald, the room is instead full of Trainers standing on spinners that rotate when switches are triggered, due to Mossdeep Gym being redesigned for Emerald.
Items
| Item | Location | Games | |
|---|---|---|---|
| Tropic Mail | To the right of Hex Maniac Patricia | R S | |
| Tropic Mail | In center of room, via transport tile | E | |
Trainers
| Trainer | Pokémon | |||||||||||
|---|---|---|---|---|---|---|---|---|---|---|---|---|
|
| |||||||||||
| ||||||||||||
|
| |||||||||||
| ||||||||||||
|
| |||||||||||
| ||||||||||||
| ||||||||||||
|
| |||||||||||
| ||||||||||||
|
| |||||||||||
|
| |||||||||||
| Trainers with a PokéNav by their names will be registered in the Trainer's Eyes or Match Call function after the first battle, and may have a rematch with the player with higher-level Pokémon. | ||||||||||||
Puzzle 8
| Version | 1F |
|---|---|
| Ruby | 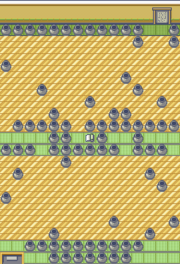
|
| Sapphire | |
| Emerald | 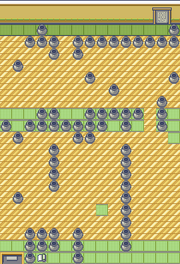
|
The eight room is divided into two areas, an upper and lower area. Both are made up primarily of polished floors lined with pots. Stepping on the polished floor will send the player sliding across it until they hit an obstacle. The player must navigate their way across both floors to conquer Trick Master's final challenge.
After the player talks to the Trick Master, he will leave. A Nugget can be found under his cushion.
Items
| Item | Location | Games | |
|---|---|---|---|
| Bead Mail | Between the upper and lower area | R S | |
| Bead Mail | Northwest area of room | E | |
Trainers
| Trainer | Pokémon | |||||||||||
|---|---|---|---|---|---|---|---|---|---|---|---|---|
|
| |||||||||||
| ||||||||||||
| ||||||||||||
|
| |||||||||||
| ||||||||||||
|
| |||||||||||
| ||||||||||||
| Trainers with a PokéNav by their names will be registered in the Trainer's Eyes or Match Call function after the first battle, and may have a rematch with the player with higher-level Pokémon. | ||||||||||||
Layout
| Version | Entrance | Trick Room* | End | Hallway | ||||||||||||||||
|---|---|---|---|---|---|---|---|---|---|---|---|---|---|---|---|---|---|---|---|---|
| Ruby | 
|
|

|
| ||||||||||||||||
| Sapphire | ||||||||||||||||||||
| Emerald | 
|
|

|
| ||||||||||||||||
In the anime

Ash and his friends visited the Trick House in A Poké-BLOCK Party!, which is located within Mauville City. The Trick House was holding a contest, with a free year's supply of Pokéblock as the prize. It is the last place the wild Jigglypuff from Neon Town has been seen.
Trivia
- Each scroll has a compliment about the Trick Master on it (Trick Master is fabulous, Trick Master is smart, Trick Master is coveted, Trick Master is cool, Trick Master is a genius, Trick Master is my life, Trick Master is huggable, Trick Master I love.).
- In puzzle five some of the tiles are arranged in the shape of a question mark in Ruby and Sapphire. In Emerald, the tiles are arranged in the shape of two exclamation marks instead. These punctuation mark arrangements tie in with the trivia-based nature of the fifth puzzle.

|
This article is part of Project Locations, a Bulbapedia project that aims to write comprehensive articles on every location in the Pokémon world. |
