Saffron Gym: Difference between revisions
mNo edit summary |
|||
| (35 intermediate revisions by 11 users not shown) | |||
| Line 17: | Line 17: | ||
==In the games== | ==In the games== | ||
{{sign|RBY|header}} | |||
{{sign|RBY|title|Saffron City}} | |||
{{sign|RBY|title|Pokémon Gym}} | |||
{{sign|RBY|title|Leader: Sabrina}} | |||
{{sign|RBY|The Master of}} | |||
{{sign|RBY|Psychic <sc>Pokémon</sc>!}} | |||
{{sign|RBY|footer}} | |||
{{sign|RBY|header}} | |||
{{sign|RBY|title|Saffron City}} | |||
{{sign|RBY|title|Pokémon Gym}} | |||
{{sign|RBY|title|Leader: Sabrina}} | |||
{{sign|RBY|The Master of}} | |||
{{sign|RBY|Psychic <sc>Pokémon</sc>!}} | |||
{{sign|RBY|footer}} | |||
{{sign|FRLG|header}} | {{sign|FRLG|header}} | ||
{{sign|FRLG|title|Saffron City Pokémon Gym}} | {{sign|FRLG|title|Saffron City Pokémon Gym}} | ||
{{sign|FRLG|title|Leader: Sabrina}} | {{sign|FRLG|title|Leader: Sabrina}} | ||
{{sign|FRLG| | {{sign|FRLG|The Master Of Psychic Pokémon}} | ||
{{sign|FRLG|footer}} | {{sign|FRLG|footer}} | ||
| Line 26: | Line 42: | ||
{{sign|DPcity|title|Saffron City Pokémon Gym}} | {{sign|DPcity|title|Saffron City Pokémon Gym}} | ||
{{sign|DPcity|title|Leader: Sabrina}} | {{sign|DPcity|title|Leader: Sabrina}} | ||
{{sign|DPcity| | {{sign|DPcity|The Mistress of Psychic-type Pokémon}} | ||
{{sign|DPcity|footer}} | {{sign|DPcity|footer}} | ||
The Saffron Gym is a maze of warp | In Generations {{gen|I}} and {{gen|III}}, a {{tc|Team Rocket Grunt}} is initially blocking the Saffron Gym door. He will only leave once the player has driven [[Team Rocket]] out of the [[Silph Co.]] office building. | ||
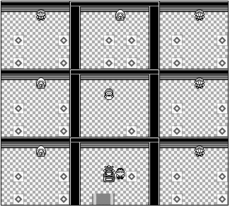
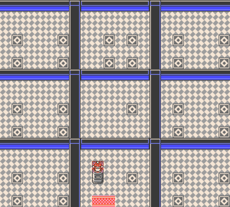
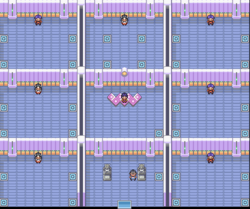
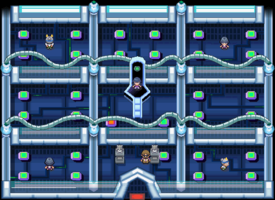
The Saffron Gym is a maze of [[warp tile]]s and nine rooms. Seven of these rooms contain Trainers (only four in Generations {{gen|II}} and {{gen|IV}}), while the other two (five in Generations II and IV) hold Sabrina and the entrance. | |||
A field based on the Gym also appears in {{eng|Pokémon Stadium}}'s [[Gym Leader Castle]] and {{pkmn|Stadium 2}}'s Kanto Gym Leader Castle. | |||
At some point prior to the | At some point prior to the Generation I games, both Sabrina's Gym and the [[Kiyo|Karate Master]]'s [[Fighting Dojo]] laid claim to the status of being an official Indigo League Pokémon Gym. Due to the type advantage that the Gym's {{t|Psychic}} types had over the Dojo's {{t|Fighting}} types, Sabrina easily won the challenge and became the official Gym Leader of Saffron City. | ||
===Appearance=== | ===Appearance=== | ||
| Line 41: | Line 61: | ||
|genII=Saffron Gym GSC.png | |genII=Saffron Gym GSC.png | ||
|genIII=Saffron Gym FRLG.png | |genIII=Saffron Gym FRLG.png | ||
|genIV=Saffron Gym HGSS. | |genIV=Saffron Gym HGSS.png | ||
|sizeI=230px | |sizeI=230px | ||
|sizeII=230px | |sizeII=230px | ||
|sizeIII=250px | |sizeIII=250px | ||
|sizeIV= | |sizeIV=275px}} | ||
===Teleporters=== | |||
Below is a map of the teleporters' connections. The teleporters work the same in all Generations, excepting the addition of a one-way teleporter in Sabrina's room (Mid) that warps the player back to the entrance room (S) in Generation IV. The colors are purely visual aids and have no other significance. | |||
{| style="margin:auto" | |||
|+'''Teleporter Map''' | |||
|- | |||
| | |||
{| border=1 style="text-align:center" | |||
|+NW | |||
|- | |||
| style="background-color:#{{yellow color}}" width=20 | h | |||
| style="background-color:#{{green color}}; color:#FFF" width=20 | j | |||
|- | |||
| m | |||
| style="background-color:#{{platinum color}}; color:#FFF" | n | |||
|} | |||
| | |||
{| border=1 style="text-align:center" | |||
|+N | |||
|- | |||
| style="background-color:#{{blue color}}; color:#FFF" width=20 | f | |||
| style="background-color:#{{green color}}; color:#FFF" width=20 | j | |||
|- | |||
| style="background-color:#{{green color}}; color:#FFF" | k | |||
| style="background-color:#{{green color}}; color:#FFF" | l | |||
|} | |||
| | |||
{| border=1 style="text-align:center" | |||
|+NE | |||
|- | |||
| style="background-color:#{{blue color}}; color:#FFF" width=20 | e | |||
| style="background-color:#{{red color}}" width=20 | b | |||
|- | |||
| style="background-color:#{{yellow color}}" | h | |||
| style="background-color:#{{yellow color}}" | i | |||
|} | |||
|- | |||
| | |||
{| border=1 style="text-align:center" | |||
|+W | |||
|- | |||
| style="background-color:#{{blue color}}; color:#FFF" width=20 | g | |||
| style="background-color:#{{green color}}; color:#FFF" width=20 | k | |||
|- | |||
| style="background-color:#{{platinum color}}; color:#FFF" | n | |||
| style="background-color:#{{platinum color}}; color:#FFF" | o | |||
|} | |||
| | |||
{| border=1 style="text-align:center" | |||
|+Mid | |||
|- | |||
| width=20 | | |||
| width=20 | | |||
|- | |||
| | |||
| m | |||
|} | |||
| | |||
{| border=1 style="text-align:center" | |||
|+E | |||
|- | |||
| style="background-color:#{{blue color}}; color:#FFF" width=20 | e | |||
| style="background-color:#{{red color}}" width=20 | c | |||
|- | |||
| style="background-color:#{{blue color}}; color:#FFF" | f | |||
| style="background-color:#{{blue color}}; color:#FFF" | g | |||
|} | |||
|- | |||
| | |||
{| border=1 style="text-align:center" | |||
|+SW | |||
|- | |||
| style="background-color:#{{yellow color}}" width=20 | i | |||
| style="background-color:#{{red color}}" width=20 | d | |||
|- | |||
| style="background-color:#{{green color}}; color:#FFF" | l | |||
| style="background-color:#{{platinum color}}; color:#FFF" | o | |||
|} | |||
| | |||
{| border=1 style="text-align:center" | |||
|+S | |||
|- | |||
| width=20 | | |||
| width=20 | a | |||
|- | |||
| | |||
| | |||
|} | |||
| | |||
{| border=1 style="text-align:center" | |||
|+SE | |||
|- | |||
| style="background-color:#{{red color}}" width=20 | b | |||
| style="background-color:#{{red color}}" width=20 | c | |||
|- | |||
| style="background-color:#{{red color}}" | d | |||
| a | |||
|} | |||
|} | |||
===Trainers=== | ===Trainers=== | ||
===={{ | ====Core series==== | ||
====={{game2|Red|Blue|Yellow}}===== | |||
{{Trainerheader|Psychic}} | {{Trainerheader|Psychic}} | ||
{{Trainerentry|Spr RG Psychic.png|Psychic||330|3|079|Slowpoke||33|None|079|Slowpoke||33|None|080|Slowbro||33|None|}} | {{Trainerentry|Spr RG Psychic.png|Psychic||330|3|079|Slowpoke||33|None|079|Slowpoke||33|None|080|Slowbro||33|None|}} | ||
| Line 65: | Line 185: | ||
{{Trainerfooter|Psychic|1|inside}} | {{Trainerfooter|Psychic|1|inside}} | ||
{{Party | ======{{game|Red and Blue|s}}====== | ||
{{Party/Single | |||
|color={{psychic color}} | |color={{psychic color}} | ||
|bordercolor={{psychic color dark}} | |bordercolor={{psychic color dark}} | ||
| Line 74: | Line 195: | ||
|game=RGB| | |game=RGB| | ||
|location=Saffron Gym | |location=Saffron Gym | ||
|pokemon=4 | |pokemon=4}} | ||
| | |{{Pokémon/1 | ||
|game=Red and Blue | |game=Red and Blue | ||
|ndex=064 | |ndex=064 | ||
| Line 81: | Line 202: | ||
|level=38 | |level=38 | ||
|type1=Psychic | |type1=Psychic | ||
|move1=Disable | |move1=Disable|move1type=Normal | ||
|move1type=Normal | |move2=Psybeam|move2type=Psychic | ||
|move2=Psybeam | |move3=Recover|move3type=Normal | ||
|move2type=Psychic | |move4=Psychic|move4type=Psychic}} | ||
|move3=Recover | |{{Pokémon/1 | ||
|move3type=Normal | |||
|move4=Psychic | |||
|move4type=Psychic}} | |||
| | |||
|game=Red and Blue | |game=Red and Blue | ||
|ndex=122 | |ndex=122 | ||
| Line 95: | Line 212: | ||
|level=37 | |level=37 | ||
|type1=Psychic | |type1=Psychic | ||
|move1=Confusion | |move1=Confusion|move1type=Psychic | ||
|move1type=Psychic | |move2=Barrier|move2type=Psychic | ||
|move2=Barrier | |move3=Light Screen|move3type=Psychic | ||
|move2type=Psychic | |move4=DoubleSlap|move4type=Normal}} | ||
|move3=Light Screen | {{Party/Div|color={{psychic color}}}} | ||
|move3type=Psychic | |{{Pokémon/1 | ||
|move4=DoubleSlap | |||
|move4type=Normal}} | |||
| | |||
|game=Red and Blue | |game=Red and Blue | ||
|ndex=049 | |ndex=049 | ||
|pokemon=Venomoth | |pokemon=Venomoth | ||
|level=38 | |level=38 | ||
|type1=Bug | |type1=Bug|type2=Poison | ||
|type2=Poison | |move1=PoisonPowder|move1type=Poison | ||
|move1=PoisonPowder | |move2=Leech Life|move2type=Bug | ||
|move1type=Poison | |move3=Stun Spore|move3type=Grass | ||
|move2=Leech Life | |move4=Psybeam|move4type=Psychic}} | ||
|move2type=Bug | |{{Pokémon/1 | ||
|move3=Stun Spore | |||
|move3type=Grass | |||
|move4=Psybeam | |||
|move4type=Psychic}} | |||
| | |||
|game=Red and Blue | |game=Red and Blue | ||
|ndex=065 | |ndex=065 | ||
| Line 124: | Line 233: | ||
|level=43 | |level=43 | ||
|type1=Psychic | |type1=Psychic | ||
|move1=Psybeam | |move1=Psybeam|move1type=Psychic | ||
|move1type=Psychic | |move2=Recover|move2type=Normal | ||
|move2=Recover | |move3=Psywave|move3type=Psychic | ||
|move2type=Normal | |move4=Reflect|move4type=Psychic}} | ||
|move3=Psywave | {{Party/Footer}} | ||
|move3type=Psychic | |||
|move4=Reflect | |||
|move4type=Psychic}} | |||
}} | |||
{{Party | ======{{game|Yellow}}====== | ||
{{Party/Single | |||
|color={{psychic color}} | |color={{psychic color}} | ||
|bordercolor={{psychic color dark}} | |bordercolor={{psychic color dark}} | ||
| Line 143: | Line 249: | ||
|game=Y| | |game=Y| | ||
|location=Saffron Gym | |location=Saffron Gym | ||
|pokemon=3 | |pokemon=3}} | ||
| | |{{Pokémon/1 | ||
|game=Yellow | |game=Yellow | ||
|ndex=063 | |ndex=063 | ||
| Line 152: | Line 258: | ||
|move1=Teleport|move1type=Psychic | |move1=Teleport|move1type=Psychic | ||
|move2=Flash|move2type=Normal}} | |move2=Flash|move2type=Normal}} | ||
| | |{{Pokémon/1 | ||
|game=Yellow | |game=Yellow | ||
|ndex=064 | |ndex=064 | ||
| Line 158: | Line 264: | ||
|level=50 | |level=50 | ||
|type1=Psychic | |type1=Psychic | ||
|move1=Psybeam | |move1=Psybeam|move1type=Psychic | ||
|move1type=Psychic | |move2=Recover|move2type=Normal | ||
|move2=Recover | |move3=Kinesis|move3type=Psychic | ||
|move2type=Normal | |move4=Psywave|move4type=Psychic}} | ||
|move3=Kinesis | |{{Pokémon/1 | ||
|move3type=Psychic | |||
|move4=Psywave | |||
|move4type=Psychic}} | |||
| | |||
|game=Yellow | |game=Yellow | ||
|ndex=065 | |ndex=065 | ||
| Line 172: | Line 274: | ||
|level=50 | |level=50 | ||
|type1=Psychic | |type1=Psychic | ||
|move1=Psybeam | |move1=Psybeam|move1type=Psychic | ||
|move1type=Psychic | |move2=Psywave|move2type=Psychic | ||
|move2=Psywave | |move3=Reflect|move3type=Psychic | ||
|move2type=Psychic | |move4=Recover|move4type=Normal}} | ||
|move3=Reflect | {{Party/Footer}} | ||
|move3type=Psychic | |||
|move4=Recover | |||
|move4type=Normal}} | |||
}} | |||
===={{ | ====={{game2|Gold|Silver|Crystal}}===== | ||
{{Trainerheader|Psychic}} | {{Trainerheader|Psychic}} | ||
{{Trainerentry|Spr GS Medium.png|Medium|Rebecca|1400|2|096|Drowzee|♀|35|None|097|Hypno|♀|35|None|36=トミコ|37=Tomiko}} | {{Trainerentry|Spr GS Medium.png|Medium|Rebecca|1400|2|096|Drowzee|♀|35|None|097|Hypno|♀|35|None|36=トミコ|37=Tomiko}} | ||
| Line 193: | Line 291: | ||
{{Trainerfooter|Psychic|2|inside}} | {{Trainerfooter|Psychic|2|inside}} | ||
{{Party | {{Party/Single | ||
|color={{psychic color}} | |color={{psychic color}} | ||
|bordercolor={{psychic color dark}} | |bordercolor={{psychic color dark}} | ||
|headcolor={{psychic color light}} | |headcolor={{psychic color light}} | ||
|sprite=Spr GS Sabrina.png | |sprite=Spr GS Sabrina.png | ||
|prize={{ | |prize={{PDollar}}4800 | ||
|class=Leader | |class=Leader | ||
|classlink=Gym Leader | |||
|name={{color2|000000|Sabrina}} | |name={{color2|000000|Sabrina}} | ||
|game=GSC | |game=GSC | ||
|location=Saffron Gym | |location=Saffron Gym | ||
|pokemon=3 | |pokemon=3}} | ||
| | |{{Pokémon/2 | ||
|game=Crystal | |game=Crystal | ||
|ndex=196 | |ndex=196 | ||
| Line 211: | Line 310: | ||
|level=46 | |level=46 | ||
|type1=Psychic | |type1=Psychic | ||
|move1=Sand-Attack | |move1=Sand-Attack|move1type=Ground | ||
|move1type=Ground | |move2=Quick Attack|move2type=Normal | ||
|move2=Quick Attack | |move3=Swift|move3type=Normal | ||
|move2type=Normal | |move4=Psychic|move4type=Psychic}} | ||
|move3=Swift | |{{Pokémon/2 | ||
|move3type=Normal | |||
|move4=Psychic | |||
|move4type=Psychic}} | |||
| | |||
|game=Crystal | |game=Crystal | ||
|ndex=122 | |ndex=122 | ||
| Line 226: | Line 321: | ||
|level=46 | |level=46 | ||
|type1=Psychic | |type1=Psychic | ||
|move1=Barrier | |move1=Barrier|move1type=Psychic | ||
|move1type=Psychic | |move2=Reflect|move2type=Psychic | ||
|move2=Reflect | |move3=Baton Pass|move3type=Normal | ||
|move2type=Psychic | |move4=Psychic|move4type=Psychic}} | ||
|move3=Baton Pass | |{{Pokémon/2 | ||
|move3type=Normal | |||
|move4=Psychic | |||
|move4type=Psychic}} | |||
| | |||
|game=Crystal | |game=Crystal | ||
|ndex=065 | |ndex=065 | ||
| Line 241: | Line 332: | ||
|level=48 | |level=48 | ||
|type1=Psychic | |type1=Psychic | ||
|move1=Recover | |move1=Recover|move1type=Normal | ||
|move1type=Normal | |move2=Future Sight|move2type=Psychic | ||
|move2=Future Sight | |move3=Psychic|move3type=Psychic | ||
|move2type=Psychic | |move4=Reflect|move4type=Psychic}} | ||
|move3=Psychic | {{Party/Footer}} | ||
|move3type=Psychic | |||
|move4=Reflect | |||
|move4type=Psychic}} | |||
}} | |||
===={{game|FireRed and LeafGreen|s}}==== | ====={{game|FireRed and LeafGreen|s}}===== | ||
{{trainerheader|Psychic}} | {{trainerheader|Psychic}} | ||
{{trainerentry|Spr FRLG Psychic M.png|Psychic|Cameron|660|3|079|Slowpoke|♂|33|None|079|Slowpoke|♂|33|None|080|Slowbro|♂|33|None|36=カオル|37=Kaoru}} | {{trainerentry|Spr FRLG Psychic M.png|Psychic|Cameron|660|3|079|Slowpoke|♂|33|None|079|Slowpoke|♂|33|None|080|Slowbro|♂|33|None|36=カオル|37=Kaoru}} | ||
| Line 268: | Line 355: | ||
{{trainerfooter|Psychic|4|inside}} | {{trainerfooter|Psychic|4|inside}} | ||
{{Party | {{Party/Single | ||
|color={{psychic color}} | |color={{psychic color}} | ||
|bordercolor={{psychic color dark}} | |bordercolor={{psychic color dark}} | ||
|headcolor={{psychic color light}} | |headcolor={{psychic color light}} | ||
|sprite=Spr FRLG Sabrina.png | |sprite=Spr FRLG Sabrina.png | ||
|prize={{ | |prize={{PDollar}}4300 | ||
|class=Leader | |class=Leader | ||
|classlink=Gym Leader | |||
|name={{color2|000000|Sabrina}} | |name={{color2|000000|Sabrina}} | ||
|game=FRLG| | |game=FRLG| | ||
|location=Saffron Gym | |location=Saffron Gym | ||
|pokemon=4 | |pokemon=4}} | ||
| | |{{Pokémon/3 | ||
|game=FireRed | |game=FireRed | ||
|ndex=064 | |ndex=064 | ||
|pokemon=Kadabra | |pokemon=Kadabra | ||
| Line 287: | Line 375: | ||
|level=38 | |level=38 | ||
|type1=Psychic | |type1=Psychic | ||
|move1=Psybeam | |move1=Psybeam|move1type=Psychic | ||
|move1type=Psychic | |move2=Reflect|move2type=Psychic | ||
|move2=Reflect | |move3=Future Sight|move3type=Psychic | ||
|move2type=Psychic | |move4=Calm Mind|move4type=Psychic}} | ||
|move3=Future Sight | |{{Pokémon/3 | ||
|move3type=Psychic | |game=FireRed | ||
|move4=Calm Mind | |||
|move4type=Psychic}} | |||
| | |||
|game=FireRed | |||
|ndex=122 | |ndex=122 | ||
|pokemon=Mr. Mime | |pokemon=Mr. Mime | ||
| Line 303: | Line 387: | ||
|level=37 | |level=37 | ||
|type1=Psychic | |type1=Psychic | ||
|move1=Barrier | |move1=Barrier|move1type=Psychic | ||
|move1type=Psychic | |move2=Psybeam|move2type=Psychic | ||
|move2=Psybeam | |move3=Baton Pass|move3type=Normal | ||
|move2type=Psychic | |move4=Calm Mind|move4type=Psychic}} | ||
|move3=Baton Pass | {{Party/Div|color={{psychic color}}}} | ||
|move3type=Normal | |{{Pokémon/3 | ||
|move4=Calm Mind | |||
|move4type=Psychic}} | |||
| | |||
|game=FireRed and LeafGreen | |game=FireRed and LeafGreen | ||
|ndex=049 | |ndex=049 | ||
| Line 318: | Line 399: | ||
|ability=Shield Dust | |ability=Shield Dust | ||
|level=38 | |level=38 | ||
|type1=Bug | |type1=Bug|type2=Poison | ||
|type2=Poison | |move1=Psybeam|move1type=Psychic | ||
|move1=Psybeam | |move2=Gust|move2type=Flying | ||
|move1type=Psychic | |move3=Leech Life|move3type=Bug | ||
|move2=Gust | |move4=Supersonic|move4type=Normal}} | ||
|move2type=Flying | |{{Pokémon/3 | ||
|move3=Leech Life | |game=FireRed | ||
|move3type=Bug | |||
|move4=Supersonic | |||
|move4type=Normal}} | |||
| | |||
|game=FireRed | |||
|ndex=065 | |ndex=065 | ||
|pokemon=Alakazam | |pokemon=Alakazam | ||
| Line 336: | Line 412: | ||
|level=43 | |level=43 | ||
|type1=Psychic | |type1=Psychic | ||
|move1=Psychic | |move1=Psychic|move1type=Psychic | ||
|move1type=Psychic | |move2=Recover|move2type=Normal | ||
|move2=Recover | |move3=Future Sight|move3type=Psychic | ||
|move2type=Normal | |move4=Calm Mind|move4type=Psychic}} | ||
|move3=Future Sight | {{Party/Footer}} | ||
|move3type=Psychic | |||
|move4=Calm Mind | |||
|move4type=Psychic}} | |||
}} | |||
===={{game|HeartGold and SoulSilver|s}}==== | ====={{game|HeartGold and SoulSilver|s}}===== | ||
{{Trainerheader|Psychic}} | {{Trainerheader|Psychic}} | ||
{{Trainerentry|Spr | {{Trainerentry|Spr HGSS Medium.png|Medium|Rebecca|2160|2|436|Bronzor||45|None|097|Hypno|♀|45|None|36=トミコ|37=Tomiko}} | ||
{{Trainerdiv|Psychic}} | {{Trainerdiv|Psychic}} | ||
{{Trainerentry|Spr | {{Trainerentry|Spr DP Psychic M.png|Psychic|Jared|1440|3|122|Mr. Mime|♂|42|None|102|Exeggcute|♂|42|None|102|Exeggcute|♂|45|None|36=タクミ|37=Takumi}} | ||
{{Trainerdiv|Psychic}} | {{Trainerdiv|Psychic}} | ||
{{Trainerentry|Spr | {{Trainerentry|Spr HGSS Medium.png|Medium|Darcy|2208|2|079|Slowpoke|♀|44|None|080|Slowbro|♀|46|None|36=ケサコ|37=Kesako}} | ||
{{Trainerdiv|Psychic}} | {{Trainerdiv|Psychic}} | ||
{{Trainerentry|Spr | {{Trainerentry|Spr DP Psychic M.png|Psychic|Franklin|1504|2|064|Kadabra|♂|44|None|203|Girafarig|♂|47|None|36=ヒロ|37=Hiro}} | ||
{{Trainerfooter|Psychic|2|inside}} | {{Trainerfooter|Psychic|2|inside}} | ||
{{Party | {{Party/Single | ||
|color={{psychic color}} | |color={{psychic color}} | ||
|bordercolor={{psychic color dark}} | |bordercolor={{psychic color dark}} | ||
|headcolor={{psychic color light}} | |headcolor={{psychic color light}} | ||
|sprite=Spr HGSS Sabrina.png | |sprite=Spr HGSS Sabrina.png | ||
|prize={{ | |prize={{PDollar}}6600 | ||
|class=Leader | |class=Leader | ||
|classlink=Gym Leader | |||
|name={{color2|000000|Sabrina}} | |name={{color2|000000|Sabrina}} | ||
|game=HGSS | |game=HGSS | ||
|location=Saffron Gym | |location=Saffron Gym | ||
|pokemon=3 | |pokemon=3}} | ||
| | |{{Pokémon/4 | ||
|game=HeartGold | |game=HeartGold | ||
|ndex=196 | |ndex=196 | ||
| Line 376: | Line 449: | ||
|type1=Psychic | |type1=Psychic | ||
|ability=Synchronize | |ability=Synchronize | ||
|move1=Calm Mind | |move1=Calm Mind|move1type=Psychic|move1cat=Status | ||
|move1type=Psychic | |move2=Shadow Ball|move2type=Ghost|move2cat=Special | ||
|move1cat=Status | |move3=Psychic|move3type=Psychic|move3cat=Special | ||
|move2=Shadow Ball | |move4=Skill Swap|move4type=Psychic|move4cat=Status}} | ||
|move2type=Ghost | |{{Pokémon/4 | ||
|move2cat=Special | |||
|move3=Psychic | |||
|move3type=Psychic | |||
|move3cat=Special | |||
|move4=Skill Swap | |||
|move4type=Psychic | |||
|move4cat=Status | |||
| | |||
|game=SoulSilver | |game=SoulSilver | ||
|ndex=122 | |ndex=122 | ||
| Line 398: | Line 461: | ||
|type1=Psychic | |type1=Psychic | ||
|ability=Filter | |ability=Filter | ||
|move1=Mimic | |move1=Mimic|move1type=Normal|move1cat=Status | ||
|move1type=Normal | |move2=Light Screen|move2type=Psychic|move2cat=Status | ||
|move1cat=Status | |move3=Psychic|move3type=Psychic|move3cat=Special | ||
|move2=Light Screen | |move4=Skill Swap|move4type=Psychic|move4cat=Status}} | ||
|move2type=Psychic | |{{Pokémon/4 | ||
|move2cat=Status | |||
|move3=Psychic | |||
|move3type=Psychic | |||
|move3cat=Special | |||
|move4=Skill Swap | |||
|move4type=Psychic | |||
|move4cat=Status}} | |||
| | |||
|game=HeartGold | |game=HeartGold | ||
|ndex=065 m | |ndex=065 m | ||
| Line 420: | Line 474: | ||
|type1=Psychic | |type1=Psychic | ||
|ability=Inner Focus | |ability=Inner Focus | ||
|move1=Psychic | |move1=Psychic|move1type=Psychic|move1cat=Special | ||
|move1type=Psychic | |move2=Skill Swap|move2type=Psychic|move2cat=Status | ||
|move1cat=Special | |move3=Reflect|move3type=Psychic|move3cat=Status | ||
|move2=Skill Swap | |move4=Energy Ball|move4type=Grass|move4cat=Special}} | ||
|move2type=Psychic | {{Party/Footer}} | ||
|move2cat=Status | |||
|move3=Reflect | ====Side series==== | ||
|move3type=Psychic | ====={{eng|Pokémon Stadium}}===== | ||
|move3cat=Status | ======Round 1====== | ||
|move4=Energy Ball | {{Trainerheader|Psychic}} | ||
|move4type=Grass | {{Trainerentry|SJP Cueball.png|Cueball||N/A|6|148|Dragonair||50-100|None|057|Primeape||50-100|None|087|Dewgong||50-100|None|056|Mankey||50-100|None|066|Machop||50-100|None|111|Rhyhorn||50-100|None}} | ||
| | {{Trainerdiv|Psychic}} | ||
}} | {{Trainerentry|S2 Burglar.png|Burglar||N/A|6|038|Ninetales||50-100|None|037|Vulpix||50-100|None|077|Ponyta||50-100|None|058|Growlithe||50-100|None|005|Charmeleon||50-100|None|078|Rapidash||50-100|None}} | ||
{{Trainerdiv|Psychic}} | |||
{{Trainerentry|SJP Channeler.png|Medium||N/A|6|092|Gastly||50-100|None|093|Haunter||50-100|None|094|Gengar||50-100|None|042|Golbat||50-100|None|108|Lickitung||50-100|None|073|Tentacruel||50-100|None}} | |||
{{Trainerfooter|Psychic|1|Inside}} | |||
{{Party/Single | |||
|color={{psychic color}} | |||
|bordercolor={{psychic color dark}} | |||
|headcolor={{psychic color light}} | |||
|sprite=Sabrina Stadium.png | |||
|prize=N/A | |||
<!--GEN I HAD NO CLASSES--> | |||
|name={{color2|000000|Sabrina}} | |||
|game=Pokémon Stadium | |||
|location=Gym Leader Castle | |||
|pokemon=6}} | |||
|{{Pokémon/1 | |||
|ndex=065 | |||
|pokemon=Alakazam | |||
|level=50-100 | |||
|type1=Psychic | |||
|move1=Psybeam|move1type=Psychic | |||
|move2=Disable|move2type=Normal | |||
|move3=Toxic|move3type=Poison | |||
|move4=Dig|move4type=Ground}} | |||
|{{Pokémon/1 | |||
|ndex=064 | |||
|pokemon=Kadabra | |||
|level=50-100 | |||
|type1=Psychic | |||
|move1=Disable|move1type=Normal | |||
|move2=Psybeam|move2type=Psychic | |||
|move3=Reflect|move3type=Psychic | |||
|move4=Seismic Toss|move4type=Fighting}} | |||
|{{Pokémon/1 | |||
|ndex=122 | |||
|pokemon=Mr. Mime | |||
|level=50-100 | |||
|type1=Psychic | |||
|move1=DoubleSlap|move1type=Normal | |||
|move2=Psychic|move2type=Psychic | |||
|move3=Thunder Wave|move3type=Electric | |||
|move4=SolarBeam|move4type=Grass}} | |||
{{Party/Div|color={{psychic color}}}} | |||
|{{Pokémon/1 | |||
|ndex=097 | |||
|pokemon=Hypno | |||
|level=50-100 | |||
|type1=Psychic | |||
|move1=Hypnosis|move1type=Psychic | |||
|move2=Dream Eater|move2type=Psychic | |||
|move3=Confusion|move3type=Psychic | |||
|move4=Mega Punch|move4type=Normal}} | |||
|{{Pokémon/1 | |||
|ndex=103 | |||
|pokemon=Exeggutor | |||
|level=50-100 | |||
|type1=Grass|type2=Psychic | |||
|move1=Leech Seed|move1type=Grass | |||
|move2=Toxic|move2type=Poison | |||
|move3=Mega Drain|move3type=Grass | |||
|move4=Psywave|move4type=Psychic}} | |||
|{{Pokémon/1 | |||
|ndex=124 | |||
|pokemon=Jynx | |||
|level=50-100 | |||
|type1=Ice|type2=Psychic | |||
|move1=Lovely Kiss|move1type=Normal | |||
|move2=Ice Punch|move2type=Ice | |||
|move3=Psywave|move3type=Psychic | |||
|move4=BubbleBeam|move4type=Water}} | |||
{{Party/Footer}} | |||
======Round 2====== | |||
{{Trainerheader|Psychic}} | |||
{{Trainerentry|SJP Cueball.png|Cueball||N/A|6|062|Poliwrath||50-100|None|057|Primeape||50-100|None|087|Dewgong||50-100|None|028|Sandslash||50-100|None|142|Aerodactyl||50-100|None|112|Rhydon||50-100|None}} | |||
{{Trainerdiv|Psychic}} | |||
{{Trainerentry|S2 Burglar.png|Burglar||N/A|6|038|Ninetales||50-100|None|110|Weezing||50-100|None|059|Arcanine||50-100|None|036|Clefable||50-100|None|068|Machamp||50-100|None|078|Rapidash||50-100|None}} | |||
{{Trainerdiv|Psychic}} | |||
{{Trainerentry|SJP Channeler.png|Medium||N/A|6|131|Lapras||50-100|None|126|Magmar||50-100|None|094|Gengar||50-100|None|042|Golbat||50-100|None|108|Lickitung||50-100|None|073|Tentacruel||50-100|None}} | |||
{{Trainerfooter|Psychic|1|Inside}} | |||
{{Party/Single | |||
|color={{psychic color}} | |||
|bordercolor={{psychic color dark}} | |||
|headcolor={{psychic color light}} | |||
|sprite=Sabrina Stadium.png | |||
|prize=N/A | |||
<!--GEN I HAD NO CLASSES--> | |||
|name={{color2|000000|Sabrina}} | |||
|game=Pokémon Stadium | |||
|location=Gym Leader Castle | |||
|pokemon=6}} | |||
|{{Pokémon/1 | |||
|ndex=065 | |||
|pokemon=Alakazam | |||
|level=50-100 | |||
|type1=Psychic | |||
|move1=Psychic|move1type=Psychic | |||
|move2=Recover|move2type=Normal | |||
|move3=Reflect|move3type=Psychic | |||
|move4=Dig|move4type=Ground}} | |||
|{{Pokémon/1 | |||
|ndex=122 | |||
|pokemon=Mr. Mime | |||
|level=50-100 | |||
|type1=Psychic | |||
|move1=Light Screen|move1type=Psychic | |||
|move2=Thunder Wave|move2type=Electric | |||
|move3=Psychic|move3type=Psychic | |||
|move4=SolarBeam|move4type=Grass}} | |||
|{{Pokémon/1 | |||
|ndex=143 | |||
|pokemon=Snorlax | |||
|level=50-100 | |||
|type1=Normal | |||
|move1=Amnesia|move1type=Psychic | |||
|move2=Ice Beam|move2type=Ice | |||
|move3=Rest|move3type=Psychic | |||
|move4=Thunderbolt|move4type=Electric}} | |||
{{Party/Div|color={{psychic color}}}} | |||
|{{Pokémon/1 | |||
|ndex=097 | |||
|pokemon=Hypno | |||
|level=50-100 | |||
|type1=Psychic | |||
|move1=Meditate|move1type=Psychic | |||
|move2=Hypnosis|move2type=Psychic | |||
|move3=Dream Eater|move3type=Psychic | |||
|move4=Mega Punch|move4type=Normal}} | |||
|{{Pokémon/1 | |||
|ndex=103 | |||
|pokemon=Exeggutor | |||
|level=50-100 | |||
|type1=Grass|type2=Psychic | |||
|move1=Leech Seed|move1type=Grass | |||
|move2=Mega Drain|move2type=Grass | |||
|move3=Explosion|move3type=Normal | |||
|move4=Toxic|move4type=Poison}} | |||
|{{Pokémon/1 | |||
|ndex=040 | |||
|pokemon=Wigglytuff | |||
|level=50-100 | |||
|type1=Normal | |||
|move1=Seismic Toss|move1type=Fighting | |||
|move2=Body Slam|move2type=Normal | |||
|move3=Thunderbolt|move3type=Electric | |||
|move4=Ice Beam|move4type=Ice}} | |||
{{Party/Footer}} | |||
=====[[Pokémon Stadium 2]]===== | |||
======Round 1====== | |||
{{Party/Single | |||
|color={{psychic color}} | |||
|bordercolor={{psychic color dark}} | |||
|headcolor={{psychic color light}} | |||
|sprite=S2 Leader Sabrina.png | |||
|prize=N/A | |||
|class=Gym Leader | |||
|classlink=Gym Leader | |||
|name={{color2|000000|Sabrina}} | |||
|game=Pokémon Stadium 2 | |||
|location=Gym Leader Castle | |||
|locationname=Kanto Gym Leader Castle | |||
|pokemon=6}} | |||
|{{Pokémon/2 | |||
|ndex=065 | |||
|pokemon=Alakazam | |||
|gender=male | |||
|held=King's Rock | |||
|level=50-100 | |||
|type1=Psychic | |||
|move1=Psychic|move1type=Psychic | |||
|move2=Ice Punch|move2type=Ice | |||
|move3=Future Sight|move3type=Psychic | |||
|move4=Shadow Ball|move4type=Ghost}} | |||
|{{Pokémon/2 | |||
|ndex=040 | |||
|pokemon=Wigglytuff | |||
|gender=female | |||
|held=Quick Claw | |||
|level=50-100 | |||
|type1=Normal | |||
|move1=Psychic|move1type=Psychic | |||
|move2=Double-Edge|move2type=Normal | |||
|move3=Shadow Ball|move3type=Ghost | |||
|move4=SolarBeam|move4type=Grass}} | |||
|{{Pokémon/2 | |||
|ndex=080 | |||
|pokemon=Slowbro | |||
|gender=female | |||
|held=PRZCureBerry | |||
|level=50-100 | |||
|type1=Water|type2=Psychic | |||
|move1=Psychic|move1type=Psychic | |||
|move2=Surf|move2type=Water | |||
|move3=Fire Blast|move3type=Fire | |||
|move4=Earthquake|move4type=Ground}} | |||
{{Party/Div|color={{psychic color}}}} | |||
|{{Pokémon/2 | |||
|ndex=097 | |||
|pokemon=Hypno | |||
|gender=male | |||
|held=Scope Lens | |||
|level=50-100 | |||
|type1=Psychic | |||
|move1=Psychic|move1type=Psychic | |||
|move2=Headbutt|move2type=Normal | |||
|move3=Nightmare|move3type=Ghost | |||
|move4=Shadow Ball|move4type=Ghost}} | |||
|{{Pokémon/2 | |||
|ndex=122 | |||
|pokemon=Mr. Mime | |||
|gender=female | |||
|held=Focus Band | |||
|level=50-100 | |||
|type1=Psychic | |||
|move1=Psychic|move1type=Psychic | |||
|move2=Ice Punch|move2type=Ice | |||
|move3=Fire Punch|move3type=Fire | |||
|move4=ThunderPunch|move4type=Electric}} | |||
|{{Pokémon/2 | |||
|ndex=162 | |||
|pokemon=Furret | |||
|gender=female | |||
|held=MiracleBerry | |||
|level=50-100 | |||
|type1=Normal | |||
|move1=Dig|move1type=Ground | |||
|move2=Quick Attack|move2type=Normal | |||
|move3=Iron Tail|move3type=Steel | |||
|move4=DynamicPunch|move4type=Fighting}} | |||
{{Party/Footer}} | |||
======Round 2====== | |||
{{Party/Single | |||
|color={{psychic color}} | |||
|bordercolor={{psychic color dark}} | |||
|headcolor={{psychic color light}} | |||
|sprite=S2 Leader Sabrina.png | |||
|prize=N/A | |||
|class=Gym Leader | |||
|classlink=Gym Leader | |||
|name={{color2|000000|Sabrina}} | |||
|game=Pokémon Stadium 2 | |||
|location=Gym Leader Castle | |||
|locationname=Kanto Gym Leader Castle | |||
|pokemon=6}} | |||
|{{Pokémon/2 | |||
|ndex=065 | |||
|pokemon=Alakazam | |||
|held=King's Rock | |||
|level=50-100 | |||
|gender=male | |||
|type1=Psychic | |||
|move1=Psychic|move1type=Psychic | |||
|move2=Fire Punch|move2type=Fire | |||
|move3=ThunderPunch|move3type=Electric | |||
|move4=Future Sight|move4type=Psychic}} | |||
|{{Pokémon/2 | |||
|ndex=028 | |||
|pokemon=Sandslash | |||
|held=BrightPowder | |||
|level=50-100 | |||
|gender=female | |||
|type1=Ground | |||
|move1=Slash|move1type=Normal | |||
|move2=Earthquake|move2type=Ground | |||
|move3=Rock Slide|move3type=Rock | |||
|move4=Submission|move4type=Fighting}} | |||
|{{Pokémon/2 | |||
|ndex=106 | |||
|pokemon=Hitmonlee | |||
|gender=male | |||
|held=Scope Lens | |||
|level=50-100 | |||
|gender=male | |||
|type1=Fighting | |||
|move1=DynamicPunch|move1type=Fighting | |||
|move2=Mega Kick|move2type=Normal | |||
|move3=Foresight|move3type=Normal | |||
|move4=Mind Reader|move4type=Normal}} | |||
{{Party/Div|color={{psychic color}}}} | |||
|{{Pokémon/2 | |||
|ndex=157 | |||
|pokemon=Typhlosion | |||
|held=Focus Band | |||
|level=50-100 | |||
|gender=male | |||
|type1=Fire | |||
|move1=Flamethrower|move1type=Fire | |||
|move2=Earthquake|move2type=Ground | |||
|move3=ThunderPunch|move3type=Electric | |||
|move4=Reversal|move4type=Fighting}} | |||
|{{Pokémon/2 | |||
|ndex=199 | |||
|pokemon=Slowking | |||
|held=Quick Claw | |||
|level=50-100 | |||
|gender=male | |||
|type1=Water|type2=Psychic | |||
|move1=Surf|move1type=Water | |||
|move2=Psychic|move2type=Psychic | |||
|move3=Earthquake|move3type=Ground | |||
|move4=Future Sight|move4type=Psychic}} | |||
|{{Pokémon/2 | |||
|ndex=212 | |||
|pokemon=Scizor | |||
|held=MiracleBerry | |||
|level=50-100 | |||
|gender=male | |||
|type1=Bug|type2=Steel | |||
|move1=Slash|move1type=Normal | |||
|move2=Reversal|move2type=Fighting | |||
|move3=Metal Claw|move3type=Steel | |||
|move4=Light Screen|move4type=Psychic}} | |||
{{Party/Footer}} | |||
===Items=== | ===Items=== | ||
| Line 442: | Line 812: | ||
==In the anime== | ==In the anime== | ||
Saffron Gym appeared in two episodes of the {{pkmn|anime}}. It is an unusual dome-shaped building that also an institute for the study of PSI phenomenon. | ===In the main series=== | ||
Saffron Gym appeared in two episodes of the {{pkmn|anime}}. It is an unusual dome-shaped building that also an institute for the study of {{wp|PSI}} phenomenon. | |||
It first appeared in ''[[EP022|Abra and the Psychic Showdown]]''. {{Ash}} and {{ashfr}} found their way to the Gym after getting trapped by {{TRT}}. Ash challenged Sabrina to a battle, to which she offered an unusual request | It first appeared in ''[[EP022|Abra and the Psychic Showdown]]''. {{Ash}} and {{ashfr}} found their way to the Gym after getting trapped by {{TRT}}. Ash challenged Sabrina to a battle, to which she offered an unusual request: if he lost, he and his friends would have to play with her. | ||
Sure enough, Ash lost and was forced to play with Sabrina. She shrunk him and the others down to the size of dolls and nearly knocked them over with a ball. They were saved by [[Sabrina's father]], who told Ash that if he really wanted to defeat Sabrina, he would have to get a {{type|Ghost}} Pokémon from [[Lavender Town]]. | Sure enough, Ash lost and was forced to play with Sabrina. She shrunk him and the others down to the size of dolls and nearly knocked them over with a ball. They were saved by [[Sabrina's father]], who told Ash that if he really wanted to defeat Sabrina, he would have to get a {{type|Ghost}} Pokémon from [[Lavender Town]]. | ||
Ash took his advice and returned two episodes later in ''[[EP024|Haunter versus Kadabra]]'' with a {{TP|Sabrina|Haunter}} he picked up. However, when he went to challenge Sabrina, it was nowhere to be found. Ash was about to be turned into a doll, like {{an|Brock}} and {{an|Misty}}, when Sabrina's father appeared once again to save him. | Ash took his advice and returned two episodes later in ''[[EP024|Haunter versus Kadabra]]'' with a {{TP|Sabrina|Haunter}} he picked up. However, when he went to challenge Sabrina, it was nowhere to be found. Ash was about to be turned into a doll, like {{an|Brock}} and {{an|Misty}}, when Sabrina's father appeared once again to save him. | ||
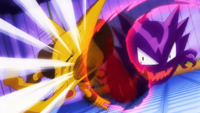
Once more, Ash went to challenge Sabrina with his Haunter. It disappeared again, but reappeared halfway through the battle with {{p|Kadabra}} and {{AP|Pikachu}}. After making Sabrina laugh, all of her spells were broken, and Ash received his fourth Badge. | |||
====Pokémon used in Gym==== | |||
{{TrainerPoké | |||
|main=yes | |||
|trainer=Sabrina | |||
|pkmn=Kadabra | |||
|stage1=Abra | |||
|type1=Psychic | |||
|img=Sabrina Kadabra.png | |||
|img_size=200px | |||
|epnum=EP022 | |||
|epname=Abra and the Psychic Showdown | |||
|vajp=Unshō Ishizuka | |||
|vaen=Maddie Blaustein | |||
|desc=Kadabra first appeared as an Abra in ''[[EP022|Abra and the Psychic Showdown]]''. Sabrina used it in a one-on-one Gym battle against {{Ash}}. During the battle with [[Ash's Pikachu]], Abra evolved into a Kadabra and with its {{type|Psychic}} attacks, it eventually caused Ash to forfeit the match to save Pikachu from being further injured. It was shown that Sabrina and Kadabra share a strong psychic bond. | |||
Ash later returned for a rematch in ''[[EP024|Haunter Versus Kadabra]]''. During the battle, [[Sabrina's Haunter|Ash's Haunter]] appeared during the battle and made Sabrina laugh for the first time in years, which caused Kadabra to laugh as well due to the psychic bond it has with Sabrina. Due to this, Sabrina decided to give the {{Badge|Marsh}} to Ash.}} | |||
[[File:Red Haunter PO.png|200px|thumb|Saffron Gym in Pokémon Origins]] | |||
===In Pokémon Origins=== | |||
{{OBP|Red|Origins}} was seen visiting the Saffron Gym after the [[Silph Co.]] incident in the [[Pokémon Origins]] episode ''[[PO03|File 3 - Giovanni]]''. Countering Sabrina's Psychic-types with a Ghost-type Pokémon, {{p|Haunter}}, Red was able to win his match against her and earn himself the {{badge|Marsh}}. | |||
{{right clear}} | |||
==In the TCG== | ==In the TCG== | ||
| Line 459: | Line 850: | ||
==Trivia== | ==Trivia== | ||
* In {{game|Red and Green|s}}, there is an oversight here. By returning to the Gym after losing the battle against [[Sabrina]], the game will consider that the player won. The player is thus registered as a winner and receives both the {{badge|Marsh}} and [[TM46]]. This error was fixed in {{game|Blue| (Japanese)}} and the international {{game|Red and Blue|s}}. | |||
* For unknown reasons, the Saffron Gym is the fourth Gym in the {{pkmn|anime}}, but the sixth Gym in the {{pkmn|games}}. | * For unknown reasons, the Saffron Gym is the fourth Gym in the {{pkmn|anime}}, but the sixth Gym in the {{pkmn|games}}. | ||
** However, in the [[Generation I]] and [[Generation III]] games, it is possible to defeat [[Sabrina]] before obtaining any more than three Badges, as it is accessible through [[Vermilion City]]. | ** However, in the [[Generation I]] and [[Generation III]] games, it is possible to defeat [[Sabrina]] before obtaining any more than three Badges, as it is accessible through [[Vermilion City]]. | ||
* | ** It is also possible to defeat Sabrina as the seventh Gym Leader, as {{m|Surf}} can be used outside of battle to reach the [[Cinnabar Island]] and [[Blaine]]'s Gym right after obtaining the {{badge|Soul}}. | ||
{{-}} | {{-}} | ||
| Line 474: | Line 866: | ||
[[it:Palestra di Zafferanopoli]] | [[it:Palestra di Zafferanopoli]] | ||
[[ja:ヤマブキジム]] | [[ja:ヤマブキジム]] | ||
[[zh:金黃道館]] | |||
Revision as of 13:14, 16 April 2015
| Saffron Gym ヤマブキジム Yamabuki Gym | |
| |
| Location | Saffron City |
| Gym Leader | Sabrina |
| Badge | Marsh Badge |
| Dominant Type | Psychic |
| Region | Kanto |
| |
| Battlefield | |
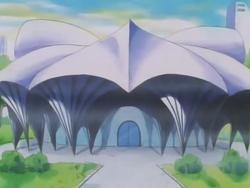
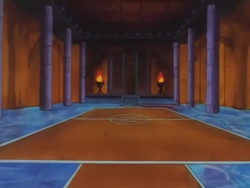
The Saffron Gym (Japanese: ヤマブキジム Yamabuki Gym) is the official Gym of Saffron City. It is based on Psychic-type Pokémon. The Gym Leader is Sabrina. Trainers who defeat her receive the Marsh Badge.
In the games
Saffron City
Pokémon Gym
Leader: Sabrina
The Master of
Psychic Pokémon!
Saffron City
Pokémon Gym
Leader: Sabrina
The Master of
Psychic Pokémon!
In Generations I and III, a Team Rocket Grunt is initially blocking the Saffron Gym door. He will only leave once the player has driven Team Rocket out of the Silph Co. office building.
The Saffron Gym is a maze of warp tiles and nine rooms. Seven of these rooms contain Trainers (only four in Generations II and IV), while the other two (five in Generations II and IV) hold Sabrina and the entrance.
A field based on the Gym also appears in Pokémon Stadium's Gym Leader Castle and Stadium 2's Kanto Gym Leader Castle.
At some point prior to the Generation I games, both Sabrina's Gym and the Karate Master's Fighting Dojo laid claim to the status of being an official Indigo League Pokémon Gym. Due to the type advantage that the Gym's Psychic types had over the Dojo's Fighting types, Sabrina easily won the challenge and became the official Gym Leader of Saffron City.
Appearance
|
Teleporters
Below is a map of the teleporters' connections. The teleporters work the same in all Generations, excepting the addition of a one-way teleporter in Sabrina's room (Mid) that warps the player back to the entrance room (S) in Generation IV. The colors are purely visual aids and have no other significance.
|
|
| ||||||||||||
|
|
| ||||||||||||
|
|
|
Trainers
Core series
Pokémon Red, Blue, and Yellow
| Trainer | Pokémon | |||||||||||
|---|---|---|---|---|---|---|---|---|---|---|---|---|
|
| |||||||||||
| ||||||||||||
| ||||||||||||
|
| |||||||||||
| ||||||||||||
|
| |||||||||||
|
| |||||||||||
|
| |||||||||||
| ||||||||||||
|
| |||||||||||
| ||||||||||||
| ||||||||||||
|
| |||||||||||
| ||||||||||||
| ||||||||||||
| ||||||||||||
Pokémon Red and Blue
|
|||||||||||||||||||||||||||||||||||||||||||||||||||||||||||||||||||||||||||||||||||||||
| |||||||||||||||||||||||||||||||||||||||||||||||||||||||||||||||||||||||||||||||||||||||
Pokémon Yellow
|
||||||||||||||||||||||||||||||||||||||||||||||||||||||||||||||||||||||
| ||||||||||||||||||||||||||||||||||||||||||||||||||||||||||||||||||||||
Pokémon Gold, Silver, and Crystal
| Trainer | Pokémon | |||||||||||
|---|---|---|---|---|---|---|---|---|---|---|---|---|
|
| |||||||||||
| ||||||||||||
|
| |||||||||||
| ||||||||||||
| ||||||||||||
|
| |||||||||||
| ||||||||||||
|
| |||||||||||
| Trainers with a telephone symbol by their names will give their Pokégear number to the player, and may call or be called for a rematch with higher-level Pokémon. | ||||||||||||
|
||||||||||||||||||||||||||||||||||||||||||||||||||||||||||||||||||||||
| ||||||||||||||||||||||||||||||||||||||||||||||||||||||||||||||||||||||
Pokémon FireRed and LeafGreen
| Trainer | Pokémon | |||||||||||
|---|---|---|---|---|---|---|---|---|---|---|---|---|
|
| |||||||||||
| ||||||||||||
| ||||||||||||
|
| |||||||||||
| ||||||||||||
|
| |||||||||||
|
| |||||||||||
|
| |||||||||||
| ||||||||||||
|
| |||||||||||
| ||||||||||||
| ||||||||||||
|
| |||||||||||
| ||||||||||||
| ||||||||||||
| ||||||||||||
| Trainers with a Vs. Seeker by their names, when alerted for a rematch using the item, may use higher-level Pokémon. | ||||||||||||
|
|||||||||||||||||||||||||||||||||||||||||||||||||||||||||||||||||||||||||||||||||||||||||||||||||||||||
| |||||||||||||||||||||||||||||||||||||||||||||||||||||||||||||||||||||||||||||||||||||||||||||||||||||||
Pokémon HeartGold and SoulSilver
| Trainer | Pokémon | |||||||||||
|---|---|---|---|---|---|---|---|---|---|---|---|---|
|
| |||||||||||
| ||||||||||||
|
| |||||||||||
| ||||||||||||
| ||||||||||||
|
| |||||||||||
| ||||||||||||
|
| |||||||||||
| ||||||||||||
| Trainers with a telephone symbol by their names will give their Pokégear number to the player, and may call or be called for a rematch with higher-level Pokémon. | ||||||||||||
|
||||||||||||||||||||||||||||||||||||||||||||||||||||||||||||||||||||||||||||||||||||||||||||||||||||
| ||||||||||||||||||||||||||||||||||||||||||||||||||||||||||||||||||||||||||||||||||||||||||||||||||||
Side series
Pokémon Stadium
Round 1
| Trainer | Pokémon | |||||||||||
|---|---|---|---|---|---|---|---|---|---|---|---|---|
|
| |||||||||||
| ||||||||||||
| ||||||||||||
| ||||||||||||
| ||||||||||||
| ||||||||||||
|
| |||||||||||
| ||||||||||||
| ||||||||||||
| ||||||||||||
| ||||||||||||
| ||||||||||||
|
| |||||||||||
| ||||||||||||
| ||||||||||||
| ||||||||||||
| ||||||||||||
| ||||||||||||
|
|||||||||||||||||||||||||||||||||||||||||||||||||||||||||||||||||||||||||||||||||||||||||||||||||||||||||||||||||||||||||||||||||||
| |||||||||||||||||||||||||||||||||||||||||||||||||||||||||||||||||||||||||||||||||||||||||||||||||||||||||||||||||||||||||||||||||||
Round 2
| Trainer | Pokémon | |||||||||||
|---|---|---|---|---|---|---|---|---|---|---|---|---|
|
| |||||||||||
| ||||||||||||
| ||||||||||||
| ||||||||||||
| ||||||||||||
| ||||||||||||
|
| |||||||||||
| ||||||||||||
| ||||||||||||
| ||||||||||||
| ||||||||||||
| ||||||||||||
|
| |||||||||||
| ||||||||||||
| ||||||||||||
| ||||||||||||
| ||||||||||||
| ||||||||||||
|
|||||||||||||||||||||||||||||||||||||||||||||||||||||||||||||||||||||||||||||||||||||||||||||||||||||||||||||||||||||||||||||||||
| |||||||||||||||||||||||||||||||||||||||||||||||||||||||||||||||||||||||||||||||||||||||||||||||||||||||||||||||||||||||||||||||||
Pokémon Stadium 2
Round 1
|
|||||||||||||||||||||||||||||||||||||||||||||||||||||||||||||||||||||||||||||||||||||||||||||||||||||||||||||||||||||||||||||||||||||||||||||
| |||||||||||||||||||||||||||||||||||||||||||||||||||||||||||||||||||||||||||||||||||||||||||||||||||||||||||||||||||||||||||||||||||||||||||||
Round 2
|
|||||||||||||||||||||||||||||||||||||||||||||||||||||||||||||||||||||||||||||||||||||||||||||||||||||||||||||||||||||||||||||||||||||||||||||||
| |||||||||||||||||||||||||||||||||||||||||||||||||||||||||||||||||||||||||||||||||||||||||||||||||||||||||||||||||||||||||||||||||||||||||||||||
Items
| Item | Location | Games | |
|---|---|---|---|
| TM46 (Psywave) | Reward for defeating Sabrina | R B Y | |
| TM04 (Calm Mind) | Reward for defeating Sabrina | FR LG | |
| TM48 (Skill Swap) | Reward for defeating Sabrina | HG SS | |
In the anime
In the main series
Saffron Gym appeared in two episodes of the anime. It is an unusual dome-shaped building that also an institute for the study of PSI phenomenon.
It first appeared in Abra and the Psychic Showdown. Ash and his friends found their way to the Gym after getting trapped by Team Rocket. Ash challenged Sabrina to a battle, to which she offered an unusual request: if he lost, he and his friends would have to play with her.
Sure enough, Ash lost and was forced to play with Sabrina. She shrunk him and the others down to the size of dolls and nearly knocked them over with a ball. They were saved by Sabrina's father, who told Ash that if he really wanted to defeat Sabrina, he would have to get a Ghost-type Pokémon from Lavender Town.
Ash took his advice and returned two episodes later in Haunter versus Kadabra with a Haunter he picked up. However, when he went to challenge Sabrina, it was nowhere to be found. Ash was about to be turned into a doll, like Brock and Misty, when Sabrina's father appeared once again to save him. Once more, Ash went to challenge Sabrina with his Haunter. It disappeared again, but reappeared halfway through the battle with Kadabra and Pikachu. After making Sabrina laugh, all of her spells were broken, and Ash received his fourth Badge.
Pokémon used in Gym
|
||
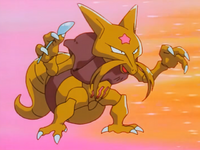
Kadabra first appeared as an Abra in Abra and the Psychic Showdown. Sabrina used it in a one-on-one Gym battle against Ash. During the battle with Ash's Pikachu, Abra evolved into a Kadabra and with its Psychic-type attacks, it eventually caused Ash to forfeit the match to save Pikachu from being further injured. It was shown that Sabrina and Kadabra share a strong psychic bond. Ash later returned for a rematch in Haunter Versus Kadabra. During the battle, Ash's Haunter appeared during the battle and made Sabrina laugh for the first time in years, which caused Kadabra to laugh as well due to the psychic bond it has with Sabrina. Due to this, Sabrina decided to give the Marsh Badge to Ash. | ||
| Debut | Abra and the Psychic Showdown | |
|---|---|---|
| Voice actors | ||
| Japanese | Unshō Ishizuka | |
| English | Maddie Blaustein | |
In Pokémon Origins
Red was seen visiting the Saffron Gym after the Silph Co. incident in the Pokémon Origins episode File 3 - Giovanni. Countering Sabrina's Psychic-types with a Ghost-type Pokémon, Haunter, Red was able to win his match against her and earn himself the Marsh Badge.
In the TCG
The Saffron Gym was featured in the TCG as both a Japan-exclusive Theme Deck and as a card. The following is a list of cards named Saffron City Gym.
| Related cards Cards listed with a blue background are only legal to use in the current Expanded format. Cards listed with a green background are legal to use in both the current Standard and Expanded formats. | |||||||
|---|---|---|---|---|---|---|---|
| Card | Type | English Expansion |
Rarity | # | Japanese Expansion |
Rarity | # |
| Saffron City Gym | T [St] | Gym Challenge | 122/132 | Challenge from the Darkness | |||
Trivia
- In Pokémon Red and Green, there is an oversight here. By returning to the Gym after losing the battle against Sabrina, the game will consider that the player won. The player is thus registered as a winner and receives both the Marsh Badge and TM46. This error was fixed in Pokémon Blue and the international Pokémon Red and Blue.
- For unknown reasons, the Saffron Gym is the fourth Gym in the anime, but the sixth Gym in the games.
- However, in the Generation I and Generation III games, it is possible to defeat Sabrina before obtaining any more than three Badges, as it is accessible through Vermilion City.
- It is also possible to defeat Sabrina as the seventh Gym Leader, as Surf can be used outside of battle to reach the Cinnabar Island and Blaine's Gym right after obtaining the Soul Badge.

|
This article is part of Project Locations, a Bulbapedia project that aims to write comprehensive articles on every location in the Pokémon world. |
