|
|
| (One intermediate revision by one other user not shown) |
| Line 99: |
Line 99: |
| |prize={{PDollar}}2871 | | |prize={{PDollar}}2871 |
| <!--GEN I HAD NO CLASSES--> | | <!--GEN I HAD NO CLASSES--> |
| |name={{color2|000000|Giovanni}} | | |name={{color2|000|Giovanni}} |
| |game=RGB | | |game=RGB |
| |location=Rocket Hideout | | |location=Rocket Hideout |
| Line 138: |
Line 138: |
| |sprite=Spr Y Jessie James.png | | |sprite=Spr Y Jessie James.png |
| |prize={{PDollar}}750 | | |prize={{PDollar}}750 |
| |name={{color2|000000|Team Rocket trio|Rocket}} | | |name={{color2|000|Team Rocket trio|Rocket}} |
| |game=Y | | |game=Y |
| |location=Rocket Hideout | | |location=Rocket Hideout |
| Line 179: |
Line 179: |
| |prize={{PDollar}}2871 | | |prize={{PDollar}}2871 |
| <!--GEN I HAD NO CLASSES--> | | <!--GEN I HAD NO CLASSES--> |
| |name={{color2|000000|Giovanni}} | | |name={{color2|000|Giovanni}} |
| |game=Y | | |game=Y |
| |location=Rocket Hideout | | |location=Rocket Hideout |
| Line 207: |
Line 207: |
| |type1=Normal | | |type1=Normal |
| |move1=Pay Day|move1type=Normal | | |move1=Pay Day|move1type=Normal |
| |move2=Scratch|move2type=Normal | | |move2=Screech|move2type=Normal |
| |move3=Bite|move3type=Normal | | |move3=Bite|move3type=Normal |
| |move4=Growl|move4type=Normal}} | | |move4=Growl|move4type=Normal}} |
| Line 255: |
Line 255: |
| |class=Boss | | |class=Boss |
| |classlink=Giovanni | | |classlink=Giovanni |
| |name={{color2|000000|Giovanni}} | | |name={{color2|000|Giovanni}} |
| |game=FRLG | | |game=FRLG |
| |location=Rocket Hideout | | |location=Rocket Hideout |
| Line 300: |
Line 300: |
| {| class="roundy" style="margin:auto; background: #000; border: 3px solid #C00" | | {| class="roundy" style="margin:auto; background: #000; border: 3px solid #C00" |
| |- | | |- |
| ! style="background:#CCC; {{roundytl|5px}}" | Version | | ! style="background:#CCC; {{roundytl|5px}}" | Version |
| ! style="background:#CCC" | B1F | | ! style="background:#CCC" | B1F |
| ! style="background:#CCC" | B2F | | ! style="background:#CCC" | B2F |
| Line 324: |
Line 324: |
| ! style="background:#{{leafgreen color}}" | {{color2|000|Pokémon FireRed and LeafGreen Versions|LeafGreen}} | | ! style="background:#{{leafgreen color}}" | {{color2|000|Pokémon FireRed and LeafGreen Versions|LeafGreen}} |
| |- | | |- |
| | colspan="5" style="background:#CCC; {{roundybottom|5px}}" | | | | colspan="5" style="background:#CCC; {{roundybottom|5px}}" | |
| |} | | |} |
|
| |
|
- This article is about the Celadon City hideout. For the Mahogany Town hideout, see Team Rocket HQ.
The Rocket Hideout (Japanese: ロケットだんアジト Team Rocket Hideout) is a four-floored underground complex beneath the Rocket Game Corner in Celadon City. It is a secret base built and used by Team Rocket to facilitate and administer their operations.
Access
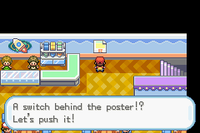
The secret switch concealed behind a poster in the Game Corner
The Rocket Hideout is accessed by pressing a switch behind a poster in the Rocket Game Corner in Celadon City. A Team Rocket Grunt is guarding the poster in question when the player first approaches it. After being defeated, the Grunt retreats into the base, leaving the poster unguarded, and enabling the player to approach. Once the player activates a switch behind the poster, the stairs to the hideout will appear.
In Generation II, the Rocket Hideout is referred to when the player walks and selects the poster at the back of the Rocket Game Corner in Celadon City. The words, "Hey! Under this poster... There's nothing!" will appear, a reference to the original access point.
Features
This is the first time that the player encounters spin tiles, a special type of tile that, when stepped on, will uncontrollably spin the player in the direction of the arrows until they hit a stop tile. These are used on the second and third basement floors to create a complex maze.
Items
Trainers
Generation I
B1F
| Trainer
|
Pokémon
|
|
|
|
|
|
|
|
|
|
|
|
|
|
|
|
|
|
|
|
|
|
|
|
|
|
|
|
|
|
|
| Requires Lift Key
|
|
|
|
|
|
|
|
|
|
B2F
B3F
B4F
| Trainer
|
Pokémon
|
|
|
|
|
|
| Requires Lift Key
|
|
|
|
|
|
|
|
|
|
|
|
|
|
|
|
|
|
|

|
|
Reward: $2871
|
|
|
|
|
|

|
|
Reward: $750
|
|
|
|
|
|

|
|
Reward: $2871
|
|
|
|
|
|
Generation III
B1F
| Trainer
|
Pokémon
|
|
|
|
|
|
|
|
|
|
|
|
|
|
|
|
|
|
|
|
|
|
|
|
|
|
|
|
|
|
|
|
|
| Requires Lift Key
|
|
|
|
|
|
| Trainers with a Vs. Seeker by their names, when alerted for a rematch using the item, may use higher-level Pokémon.
|
B2F
| Trainer
|
Pokémon
|
|
|
|
|
|
|
|
|
|
|
|
| Trainers with a Vs. Seeker by their names, when alerted for a rematch using the item, may use higher-level Pokémon.
|
B3F
| Trainer
|
Pokémon
|
|
|
|
|
|
|
|
|
|
|
|
|
|
|
| Trainers with a Vs. Seeker by their names, when alerted for a rematch using the item, may use higher-level Pokémon.
|
B4F
| Trainer
|
Pokémon
|
|
|
|
|
|
| Requires Lift Key
|
|
|
|
|
|
|
|
|
|
|
|
|
|
|
|
|
| Trainers with a Vs. Seeker by their names, when alerted for a rematch using the item, may use higher-level Pokémon.
|

|
|
Reward: $2900
|
|
|
|
|
|
Layout
In the anime

Giovanni's Rocket Hideout office in Pokémon Origins
In Pokémon Origins
The Rocket Hideout made a brief appearance during the beginning of the Pokémon Origins episode File 3: Giovanni, where Red was seen freeing some imprisoned Pokémon in there, as well as encountering Giovanni for the first time.
In the manga

Rocket Hideout in Pokémon Adventures
In the Pokémon Adventures manga
The Rocket Hideout has appeared in Tauros the Tyrant and The Jynx Jinx in the Red, Green & Blue arc, where Red inflitrated it, disguised as a Team Rocket Grunt. The entrance to the Hideout was opened by pressing a switch behind a poster in the Rocket Game Corner. In the Hideout, there was a laboratory, in which Team Rocket was creating a monster using cells from Mew, intending it to be their ultimate fighting machine. Blaine was one of the scientists working on the project. The Hideout was presumably destroyed when the monster escaped soon after is completion.
In the TCG
The following is a list of cards named Rocket's Hideout.
In other languages


