|
|
| (28 intermediate revisions by 16 users not shown) |
| Line 1: |
Line 1: |
| {{search|location in Kanto|location with the Japanese name of Rock Tunnel|Rock Path}}
| | ''If you were looking for the Mystery Dungeons whose Japanese names are Rock Tunnel, see [[Rock Path (Red and Blue Rescue Team)]] and [[Rock Path (Explorers of Time, Darkness, and Sky)]]'' |
| ---- | | ---- |
| {{Infobox location | | {{Infobox location |
| Line 5: |
Line 5: |
| |image_size=256 | | |image_size=256 |
| |type=cave | | |type=cave |
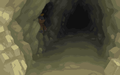
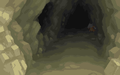
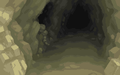
| |mapdesc=A naturally formed underground tunnel. Because it has not been developed, it is inky dark inside. A light is needed to get through.{{sup/3|FRLG}}<br>A dark tunnel that begins in Lavender Town and comes out in Cerulean City.{{sup/4|HGSS}} | | |mapdesc=A naturally formed underground tunnel. Because it has not been developed, it is inky dark inside. A light is needed to get through.{{sup/3|FRLG}}<br/>A dark tunnel that begins in Lavender Town and comes out in Cerulean City.{{sup/4|HGSS}} |
| |location_name=Rock Tunnel | | |location_name=Rock Tunnel |
| |japanese_name=イワヤマトンネル | | |japanese_name=イワヤマトンネル |
| Line 18: |
Line 18: |
| Rock Tunnel is the only alternative route to [[Lavender Town]], as any other route has either been rendered inaccessible by a slumbering {{p|Snorlax}} or the [[Saffron City]] gatekeepers. The cave has two separate floors, both of which are roughly the same size. There are many Trainers within the cave, there for the fun of exploring, training, or are simply lost in the darkness. | | Rock Tunnel is the only alternative route to [[Lavender Town]], as any other route has either been rendered inaccessible by a slumbering {{p|Snorlax}} or the [[Saffron City]] gatekeepers. The cave has two separate floors, both of which are roughly the same size. There are many Trainers within the cave, there for the fun of exploring, training, or are simply lost in the darkness. |
|
| |
|
| {{rt|10|Kanto}} leads from [[Cerulean City]] to Rock Tunnel. At the northern entrance of the cave is a convenient [[Pokémon Center]]. The roof of the [[Power Plant]] can also be seen from here (excluding Generation III). The southern entrance exits onto the remainder of Route 10, leading to [[Lavender Town]]. | | {{rt|10|Kanto}} leads from [[Cerulean City]] to Rock Tunnel. At the northern entrance of the cave is a convenient [[Pokémon Center]]. The roof of the [[Kanto Power Plant]] can also be seen from here (excluding Generation III). The southern entrance exits onto the remainder of Route 10, leading to [[Lavender Town]]. |
|
| |
|
| In FireRed and LeafGreen, there is [[Move Tutor]] who will teach the move {{m|Rock Slide}} to a Pokémon. | | In FireRed and LeafGreen, there is a [[Move Tutor]] who will teach the move {{m|Rock Slide}} to a Pokémon. |
|
| |
|
| ==Items== | | ==Items== |
| {{itlisth|cave}} | | {{itlisth|cave}} |
| {{Itemlist|TM Steel|1F; center platform|display={{TM|47|Steel Wing}}|G=yes|S=yes|C=yes}} | | {{Itemlist|TM Steel|1F; center platform|display={{TM|47|Steel Wing}}|G=yes|S=yes|C=yes}} |
| {{Itemlist|Elixir|1F; southwest|G=yes|S=yes|C=yes|display={{DL|Ether|Elixir}}}} | | {{Itemlist|Elixir|1F; southwest|G=yes|S=yes|C=yes|display=[[Elixir|Elixer]]}} |
| {{Itemlist|X Defend|1F; east of TM47 ''(hidden)''|G=yes|S=yes|C=yes|display={{DL|Battle item|X Defend}}}} | | {{Itemlist|X Defend|1F; east of TM47 ''(hidden)''|G=yes|S=yes|C=yes|display={{DL|Battle item|X Defend}}}} |
| {{Itemlist|Max Potion|B1F; northwest of PP Up ''(hidden)''|G=yes|S=yes|C=yes|display={{DL|Potion|Max Potion}}}} | | {{Itemlist|Max Potion|B1F; northwest of PP Up ''(hidden)''|G=yes|S=yes|C=yes|display={{DL|Potion|Max Potion}}}} |
| Line 33: |
Line 33: |
| {{Itemlist|X Accuracy|1F; northeast ''(hidden)''|G=yes|S=yes|C=yes|display={{DL|Battle item|X Accuracy}}}} | | {{Itemlist|X Accuracy|1F; northeast ''(hidden)''|G=yes|S=yes|C=yes|display={{DL|Battle item|X Accuracy}}}} |
| {{Itemlist|Repel|1F; northeast corner|FR=yes|LG=yes|display={{DL|Repel|Repel}}}} | | {{Itemlist|Repel|1F; northeast corner|FR=yes|LG=yes|display={{DL|Repel|Repel}}}} |
| {{Itemlist|Escape Rope|Southeast of Hiker Lucas|FR=yes|LG=yes}}
| |
| {{Itemlist|Revive|B1F; southwest corner|FR=yes|LG=yes|display={{DL|Revive|Revive}}}} | | {{Itemlist|Revive|B1F; southwest corner|FR=yes|LG=yes|display={{DL|Revive|Revive}}}} |
| {{Itemlist|Max Ether|North of Picnicker Sofia and Hiker Dudley|FR=yes|LG=yes|display={{DL|Ether|Max Ether}}}} | | {{Itemlist|Escape Rope|1F; Southeast of Hiker Lucas|FR=yes|LG=yes}} |
| {{Itemlist|Pearl|North of Picnicker Dana|FR=yes|LG=yes|display={{DL|Valuable item|Pearl}}}} | | {{Itemlist|Max Ether|B1F; North of Picnicker Sofia and Hiker Dudley|FR=yes|LG=yes}} |
| | {{Itemlist|Pearl|1F; North of Picnicker Dana|FR=yes|LG=yes|display={{DL|Valuable item|Pearl}}}} |
| {{Itemlist|Max Potion|B1F; near south-east corner (requires {{m|Rock Smash}}) ''(hidden)''|HG=yes|SS=yes|display={{DL|Potion|Max Potion}}}} | | {{Itemlist|Max Potion|B1F; near south-east corner (requires {{m|Rock Smash}}) ''(hidden)''|HG=yes|SS=yes|display={{DL|Potion|Max Potion}}}} |
| {{Itemlist|PP Up|B1F; southwest of ladder from northern entrance|HG=yes|SS=yes|display={{DL|Vitamin|PP Up}}}} | | {{Itemlist|PP Up|B1F; southwest of ladder from northern entrance|HG=yes|SS=yes|display={{DL|Vitamin|PP Up}}}} |
| Line 43: |
Line 43: |
| {{Itemlist|Iron|B1F; far-right Rock Climb chamber (requires {{m|Rock Climb}})|HG=yes|SS=yes|display={{DL|Vitamin|Iron}}}} | | {{Itemlist|Iron|B1F; far-right Rock Climb chamber (requires {{m|Rock Climb}})|HG=yes|SS=yes|display={{DL|Vitamin|Iron}}}} |
| {{Itemlist|HP Up|B1F; second-to-the-left Rock Climb chamber (requires {{m|Rock Climb}}) ''(hidden)''|HG=yes|SS=yes|display={{DL|Vitamin|HP Up}}}} | | {{Itemlist|HP Up|B1F; second-to-the-left Rock Climb chamber (requires {{m|Rock Climb}}) ''(hidden)''|HG=yes|SS=yes|display={{DL|Vitamin|HP Up}}}} |
| {{Itemlist|Oval Stone|B1F; far-left Rock Climb chamber (requires {{m|Rock Climb}})|HG=yes|SS=yes|display={{DL|Evolution-inducing held item|Oval Stone}}}} | | {{Itemlist|Oval Stone|B1F; far-left Rock Climb chamber (requires {{m|Rock Climb}})|HG=yes|SS=yes}} |
| {{Itemlist|Elixir|1F; north of south-west ladder|HG=yes|SS=yes|display={{DL|Ether|Elixir}}}} | | {{Itemlist|Elixir|1F; north of south-west ladder|HG=yes|SS=yes}} |
| {{Itemlist|X Defend|1F; on a stalagmite north-east of the southern entrance ''(hidden)''|HG=yes|SS=yes|display={{DL|Battle item|X Defend}}}} | | {{Itemlist|X Defend|1F; on a stalagmite north-east of the southern entrance ''(hidden)''|HG=yes|SS=yes|display={{DL|Battle item|X Defend}}}} |
| {{Itemlist|TM Dark|1F; on second raised area north of southern entrance|display={{TM|56|Fling}}|HG=yes|SS=yes}} | | {{Itemlist|TM Dark|1F; on second raised area north of southern entrance|display={{TM|56|Fling}}|HG=yes|SS=yes}} |
| Line 57: |
Line 57: |
| {{Itemlist|Heart Scale|Randomly found by {{m|Rock Smash|smashing rocks}}|HG=yes|SS=yes|display={{DL|Exchangeable item|Heart Scale}}}} | | {{Itemlist|Heart Scale|Randomly found by {{m|Rock Smash|smashing rocks}}|HG=yes|SS=yes|display={{DL|Exchangeable item|Heart Scale}}}} |
| {{Itemlist|Revive|Randomly found by {{m|Rock Smash|smashing rocks}}|HG=yes|SS=yes|display={{DL|Revive|Revive}}}} | | {{Itemlist|Revive|Randomly found by {{m|Rock Smash|smashing rocks}}|HG=yes|SS=yes|display={{DL|Revive|Revive}}}} |
| {{Itemlist|Max Ether|Randomly found by {{m|Rock Smash|smashing rocks}}|HG=yes|SS=yes|display={{DL|Ether|Max Ether}}}} | | {{Itemlist|Max Ether|Randomly found by {{m|Rock Smash|smashing rocks}}|HG=yes|SS=yes}} |
| {{Itemlist|Star Piece|Randomly found by {{m|Rock Smash|smashing rocks}}|HG=yes|SS=yes|display={{DL|Valuable item|Star Piece}}}} | | {{Itemlist|Star Piece|Randomly found by {{m|Rock Smash|smashing rocks}}|HG=yes|SS=yes|display={{DL|Valuable item|Star Piece}}}} |
| {{itlistfoot|cave}} | | {{itlistfoot|cave}} |
| Line 66: |
Line 66: |
| {{catch/header|cave|no}} | | {{catch/header|cave|no}} |
| {{catch/entry1|041|Zubat|yes|yes|no|Cave|15-18|55%|type1=Poison|type2=Flying}} | | {{catch/entry1|041|Zubat|yes|yes|no|Cave|15-18|55%|type1=Poison|type2=Flying}} |
| {{catch/entry1|041|Zubat|no|no|yes|Cave|15-21|50%|type1=Poison|type2=Flying}} | | {{catch/entry1|041|Zubat|no|no|yes|Cave|15, 17, 19, 21|55%|type1=Poison|type2=Flying}} |
| {{catch/entry1|074|Geodude|yes|yes|no|Cave|16-17|25%|type1=Rock|type2=Ground}} | | {{catch/entry1|074|Geodude|yes|yes|no|Cave|16-17|25%|type1=Rock|type2=Ground}} |
| {{catch/entry1|074|Geodude|no|no|yes|Cave|16-20|40%|type1=Rock|type2=Ground}} | | {{catch/entry1|074|Geodude|no|no|yes|Cave|16, 18, 20|35%|type1=Rock|type2=Ground}} |
| {{catch/entry1|066|Machop|yes|yes|no|Cave|15-17|15%|type1=Fighting}} | | {{catch/entry1|066|Machop|yes|yes|no|Cave|15, 17|15%|type1=Fighting}} |
| {{catch/entry1|066|Machop|no|no|yes|Cave|17-21|10%|type1=Fighting}} | | {{catch/entry1|066|Machop|no|no|yes|Cave|17, 19, 21|10%|type1=Fighting}} |
| {{catch/entry1|095|Onix|yes|yes|no|Cave|13-15|5%|type1=Rock|type2=Ground}} | | {{catch/entry1|095|Onix|yes|yes|no|Cave|13, 15|5%|type1=Rock|type2=Ground}} |
| {{catch/footer|cave}} | | {{catch/footer|cave}} |
|
| |
|
| Line 77: |
Line 77: |
| {{catch/header|cave|no}} | | {{catch/header|cave|no}} |
| {{catch/entry1|041|Zubat|yes|yes|no|Cave|16-18|50%|type1=Poison|type2=Flying}} | | {{catch/entry1|041|Zubat|yes|yes|no|Cave|16-18|50%|type1=Poison|type2=Flying}} |
| {{catch/entry1|041|Zubat|no|no|yes|Cave|20-22|40%|type1=Poison|type2=Flying}} | | {{catch/entry1|041|Zubat|no|no|yes|Cave|20-22|45%|type1=Poison|type2=Flying}} |
| | {{catch/entry1|066|Machop|yes|yes|no|Cave|15, 17|15%|type1=Fighting}} |
| | {{catch/entry1|066|Machop|no|no|yes|Cave|18, 20|20%|type1=Fighting}} |
| {{catch/entry1|074|Geodude|yes|yes|no|Cave|16-18|26%|type1=Rock|type2=Ground}} | | {{catch/entry1|074|Geodude|yes|yes|no|Cave|16-18|26%|type1=Rock|type2=Ground}} |
| {{catch/entry1|074|Geodude|no|no|yes|Cave|17-21|30%|type1=Rock|type2=Ground}} | | {{catch/entry1|074|Geodude|no|no|yes|Cave|17, 21|25%|type1=Rock|type2=Ground}} |
| {{catch/entry1|066|Machop|yes|yes|no|Cave|15-17|15%|type1=Fighting}}
| | {{catch/entry1|095|Onix|yes|yes|no|Cave|13, 17|9%|type1=Rock|type2=Ground}} |
| {{catch/entry1|066|Machop|no|no|yes|Cave|18-20|20%|type1=Fighting}}
| | {{catch/entry1|095|Onix|no|no|yes|Cave|14, 18, 22|10%|type1=Rock|type2=Ground}} |
| {{catch/entry1|095|Onix|yes|yes|no|Cave|13-17|9%|type1=Rock|type2=Ground}} | |
| {{catch/entry1|095|Onix|no|no|yes|Cave|14-22|10%|type1=Rock|type2=Ground}} | |
| {{catch/footer|cave}} | | {{catch/footer|cave}} |
|
| |
|
| Line 130: |
Line 130: |
| {{catch/entryfl|056|Mankey|yes|yes|Cave|16-17|15%|type1=Fighting}} | | {{catch/entryfl|056|Mankey|yes|yes|Cave|16-17|15%|type1=Fighting}} |
| {{catch/entryfl|066|Machop|yes|yes|Cave|16-17|15%|type1=Fighting}} | | {{catch/entryfl|066|Machop|yes|yes|Cave|16-17|15%|type1=Fighting}} |
| {{catch/entryfl|095|Onix|yes|yes|Cave|13-15|5%|type1=Rock|type2=Ground}} | | {{catch/entryfl|095|Onix|yes|yes|Cave|13, 15|5%|type1=Rock|type2=Ground}} |
| {{catch/footer|cave}} | | {{catch/footer|cave}} |
|
| |
|
| Line 139: |
Line 139: |
| {{catch/entryfl|056|Mankey|yes|yes|Cave|16-17|15%|type1=Fighting}} | | {{catch/entryfl|056|Mankey|yes|yes|Cave|16-17|15%|type1=Fighting}} |
| {{catch/entryfl|066|Machop|yes|yes|Cave|17|10%|type1=Fighting}} | | {{catch/entryfl|066|Machop|yes|yes|Cave|17|10%|type1=Fighting}} |
| {{catch/entryfl|095|Onix|yes|yes|Cave|13-17|10%|type1=Rock|type2=Ground}} | | {{catch/entryfl|095|Onix|yes|yes|Cave|13, 15, 17|10%|type1=Rock|type2=Ground}} |
| {{Catch/div|cave|Rock Smash}} | | {{Catch/div|cave|Rock Smash}} |
| {{catch/entryfl|074|Geodude|yes|yes|Rock Smash|5-30|90%|type1=Rock|type2=Ground}} | | {{catch/entryfl|074|Geodude|yes|yes|Rock Smash|5-30|90%|type1=Rock|type2=Ground}} |
| Line 242: |
Line 242: |
| {{Trainerdiv|cave}} | | {{Trainerdiv|cave}} |
| {{Trainerentry|Spr FRLG_Picnicker.png|Picnicker|Dana|400|3|052|Meowth|♀|20|None|043|Oddish|♀|20|None|016|Pidgey|♀|20|None|36=ミユキ|37=Miyuki}} | | {{Trainerentry|Spr FRLG_Picnicker.png|Picnicker|Dana|400|3|052|Meowth|♀|20|None|043|Oddish|♀|20|None|016|Pidgey|♀|20|None|36=ミユキ|37=Miyuki}} |
| {{Trainerfooter|cave|1}} | | {{Trainerfooter|cave|FRLG}} |
|
| |
|
| ==Layout== | | ==Layout== |
| {| style="margin:auto; background: #000; {{roundy|10px}}; border: 5px solid #{{Locationcolor/med|cave}}" | | {| class="roundy" style="margin:auto; background: #000; border: 5px solid #{{Locationcolor/med|cave}}" |
| |- | | |- |
| ! style="background:#{{Locationcolor/light|cave}}; {{roundytl|5px}};" | Version | | ! style="background:#{{Locationcolor/light|cave}}; {{roundytl|5px}};" | Version |
| ! style="background:#{{Locationcolor/light|cave}}" | 1st floor | | ! style="background:#{{Locationcolor/light|cave}}" | 1F |
| ! style="background:#{{Locationcolor/light|cave}}; {{roundytr|5px}};" | 2nd floor | | ! style="background:#{{Locationcolor/light|cave}}; {{roundytr|5px}};" | B1F |
| |- style="background:#000" | | |- style="background:#000" |
| ! style="background:#{{red color}}" | {{color2|000|Pokémon Red and Blue Versions|Red}} | | ! style="background:#{{red color}}" | {{color2|000|Pokémon Red and Blue Versions|Red}} |
| Line 279: |
Line 279: |
| ! style="background:#{{soulsilver color}}" | {{color2|000|Pokémon HeartGold and SoulSilver Versions|SoulSilver}} | | ! style="background:#{{soulsilver color}}" | {{color2|000|Pokémon HeartGold and SoulSilver Versions|SoulSilver}} |
| |- | | |- |
| | colspan="3" style="background:#{{Locationcolor/light|cave}}; {{roundybl|5px}}; {{roundybr|5px}};" | | | | colspan="3" style="background:#{{Locationcolor/light|cave}}; {{roundybottom|5px}}" | |
| |} | | |} |
|
| |
|
| Line 286: |
Line 286: |
| In {{g|Pinball}}, Rock Tunnel appears on the Red and Blue tables; catchable {{OBP|Pokémon|species}} include {{p|Ekans}}, {{p|Diglett}}, {{p|Machop}}, {{p|Geodude}}, {{p|Slowpoke}}, {{p|Onix}}, {{p|Voltorb}} and {{p|Mr. Mime}}. | | In {{g|Pinball}}, Rock Tunnel appears on the Red and Blue tables; catchable {{OBP|Pokémon|species}} include {{p|Ekans}}, {{p|Diglett}}, {{p|Machop}}, {{p|Geodude}}, {{p|Slowpoke}}, {{p|Onix}}, {{p|Voltorb}} and {{p|Mr. Mime}}. |
|
| |
|
| ==Eyecatch== | | ==[[Location preview|Preview]]== |
| <gallery> | | <gallery> |
| File:HGSS Rock Tunnel-Morning.png|Morning (Kangaskhan) | | File:HGSS Rock Tunnel-Morning.png|Morning (Kangaskhan) |
| Line 293: |
Line 293: |
| File:FL Rock Tunnel.png|FRLG | | File:FL Rock Tunnel.png|FRLG |
| </gallery> | | </gallery> |
| | |
| | ==In the anime== |
| | [[File:Rock Tunnel PO.png|200px|thumb|Rock Tunnel in Pokémon Origins]] |
| | ===In Pokémon Origins=== |
| | Rock Tunnel was briefly shown in the beginning of the [[Pokémon Origins]] episode ''[[PO02|File 2: Cubone]]'' when {{OBP|Red|Origins}} exited it on his way to [[Lavender Town]]. |
| | {{right clear}} |
|
| |
|
| ==Trivia== | | ==Trivia== |
| * One of the {{tc|Hiker}}s in the tunnel makes a reference to the song ''{{wp|Hit Me with Your Best Shot}}'' by {{wp|Pat Benatar}}, saying "Hit me with your best shot!" prior to battle, and "Fired away!" after being defeated. | | * One of the {{tc|Hiker}}s in the tunnel makes a reference to the song ''{{wp|Hit Me with Your Best Shot}}'' by {{wp|Pat Benatar}}, saying "Hit me with your best shot!" prior to battle, and "Fired away!" after being defeated. |
| * One of the {{tc|Poké Maniac}}s in the tunnel makes a reference to ''{{wp|Mobile Fighter G Gundam}}'', saying "Pokémon Fight! Ready, Go!" prior to battle. Official Gundam Fights in the series began with both participants declaring "Gundam Fight! Ready, Go!" | | * One of the {{tc|Poké Maniac}}s in the tunnel makes a reference to ''{{wp|Mobile Fighter G Gundam}}'', saying "Pokémon Fight! Ready, Go!" prior to battle. Official Gundam Fights in the series began with both participants declaring "Gundam Fight! Ready, Go!" |
| | * Rock Tunnel is the only one of Kanto's caves to appear in each of the first four [[Generation|generations]] with the same background music. |
|
| |
|
| ==In other languages== | | ==In other languages== |
| {{Langtable|color={{kanto color}}|bordercolor={{kanto color dark}} | | {{Langtable|color={{locationcolor/light|cave}}|bordercolor={{locationcolor/dark|cave}} |
| |fr_eu=Grotte Sombre | | |fr=Grotte |
| |de=Felstunnel | | |de=Felstunnel |
| |it=Tunnel Roccioso | | |it=Tunnel Roccioso |
| |es_eu=Túnel Roca}} | | |ko={{tt|돌산 터널 ''Dolsan Teoneol''|Rock Mountain Tunnel}} |
| | |es=Túnel Roca}} |
| {{-}} | | {{-}} |
|
| |
|
| {{-}} | | {{-}} |
| {{Kanto}}<br> | | {{Kanto}}<br/> |
| {{Project Locations notice}} | | {{Project Locations notice}} |
|
| |
|
| Line 317: |
Line 325: |
| [[Category:Pokémon Pinball locations]] | | [[Category:Pokémon Pinball locations]] |
| [[Category:Caves]] | | [[Category:Caves]] |
|
| |
| [[pt:Rock Tunnel]]
| |
|
| |
|
| [[de:Felstunnel]] | | [[de:Felstunnel]] |
| [[fr:Grotte (Kanto)]] | | [[fr:Grotte (Kanto)]] |
| | [[it:Tunnel Roccioso]] |
| [[ja:イワヤマトンネル]] | | [[ja:イワヤマトンネル]] |
| [[pl:Skalny Tunel]] | | [[pl:Skalny Tunel]] |
| [[zh:岩山隧道]] | | [[zh:岩山隧道]] |