Reflection Cave: Difference between revisions
m (→Pokémon: Ceiling drop encounter percentages added) |
|||
| (36 intermediate revisions by 18 users not shown) | |||
| Line 1: | Line 1: | ||
{{Infobox location | {{Infobox location | ||
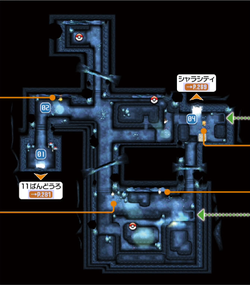
|image=Reflection Cave 1F XY.png | |image=Reflection Cave 1F XY.png | ||
| Line 11: | Line 10: | ||
|mapdesc=The sheer faces of these rock walls reflect the images of people and Pokémon like nature's mirror. | |mapdesc=The sheer faces of these rock walls reflect the images of people and Pokémon like nature's mirror. | ||
|generation={{Gen|VI}} | |generation={{Gen|VI}} | ||
}} | }} | ||
'''Reflection Cave''' (Japanese: '''{{tt|映し身の洞窟|うつしみのどうくつ}}''' ''Reflection Cave'') is a [[cave]] in western [[Kalos]], connecting {{rt|11|Kalos}} and [[Shalour City]]. | '''Reflection Cave''' (Japanese: '''{{tt|映し身の洞窟|うつしみのどうくつ}}''' ''Reflection Cave'') is a [[cave]] in western [[Kalos]], connecting {{rt|11|Kalos}} and [[Shalour City]]. | ||
Many walls in the Reflection Cave are reflective like mirrors, thus explaining the origin of the cave's name. Due to these reflective surfaces, several {{pkmn|Trainer}}s facing the walls will be able to notice the {{player}} walking behind them and challenge them to a {{pkmn|battle}}. The player can also use these surfaces to locate a hidden passageway on B2F. | |||
==Items== | ==Items== | ||
{{itlisth|cave}} | {{itlisth|cave}} | ||
{{Itemlist|Nest Ball|1F | {{Itemlist|Nest Ball|1F, north of the junction just beyond {{tc|Backpacker}} Lane|X=yes|y=yes|display={{ball|Nest}}}} | ||
{{Itemlist|Revive|1F | {{Itemlist|Revive|1F, east of {{tc|Backpacker}} Lane, at the end of the thin path|X=yes|y=yes|display={{DL|Revive|Revive}}}} | ||
{{Itemlist|Moon Stone|1F | {{Itemlist|Moon Stone|1F, south of {{tc|Battle Girl}} Hedvig, on top of the small mesa|X=yes|y=yes|display={{DL|Evolutionary stone|Moon Stone}}}} | ||
{{Itemlist|Black Belt|B1F | {{Itemlist|Black Belt|B1F, north of {{tc|Tourist}} Monami, on top of the hill|X=yes|y=yes|display={{DL|Type-enhancing item|Black Belt}}}} | ||
{{Itemlist|TM Normal|B1F | {{Itemlist|TM Normal VI|B1F, gift from [[Tierno]]|X=yes|y=yes|display={{TM|70|Flash}}}} | ||
{{Itemlist|Escape Rope|B1F | {{Itemlist|Escape Rope|B1F, east of [[Tierno]], north of {{tc|Black Belt}} Igor|X=yes|y=yes}} | ||
{{Itemlist|Hyper Potion|B1F | {{Itemlist|Hyper Potion|B1F, east of {{tc|Honeymooners}} Yuu & Ami|X=yes|y=yes|display={{DL|Potion|Hyper Potion}}}} | ||
{{Itemlist|Iron|B1F | {{Itemlist|Iron|B1F, west of {{tc|Honeymooners}} Yuu & Ami, near the stairs to return to 1F|X=yes|y=yes|display={{DL|Vitamin|Iron}}}} | ||
{{Itemlist|Earth Plate|B2F | {{Itemlist|Earth Plate|B2F, north of the staircase from B1F|X=yes|y=yes|display={{DL|Plate|Earth Plate}}}} | ||
{{Itemlist|TM Steel|B2F | {{Itemlist|TM Steel VI|B2F, via the hidden passageway from B1F|X=yes|y=yes|display={{TM|74|Gyro Ball}}}} | ||
{{Itemlist| | {{Itemlist|Alakazite|B2F, via the hidden passageway from B1F (post-game)|X=yes|y=yes|display={{DL|Mega Stone|Alakazite}}}} | ||
{{Itemlist|Reveal Glass|1F | {{Itemlist|Reveal Glass|1F, from the scientist if the player has {{p|Thundurus}}, {{p|Tornadus}}, or {{p|Landorus}} in their party|X=yes|y=yes}} | ||
{{itlistfoot|cave}} | {{itlistfoot|cave}} | ||
==Pokémon== | ==Pokémon== | ||
{{ | {{Catch/header|cave|4}} | ||
{{ | {{Catch/entry6|122|Mr. Mime|yes|yes|Cave|22-23|all=20%|type1=psychic|type2=fairy}} | ||
{{ | {{Catch/entry6|202|Wobbuffet|yes|yes|Cave|22|all=10%|type1=psychic}} | ||
{{ | {{Catch/entry6|302|Sableye|yes|yes|Cave|22-23|all=5%|type1=Dark|type2=Ghost}} | ||
{{ | {{Catch/entry6|433|Chingling|yes|yes|Cave|21-22|all=15%|type1=psychic}} | ||
{{ | {{Catch/entry6|524|Roggenrola|yes|yes|Cave|21-22|all=20%|type1=rock}} | ||
{{ | {{Catch/entry6|577|Solosis|yes|yes|Cave|22-23|all=20%|type1=psychic}} | ||
{{ | {{Catch/entry6|703|Carbink|yes|yes|Cave|23|all=10%|type1=rock|type2=fairy}} | ||
{{ | {{Catch/div|cave|{{color2|000|Horde Encounter}}}} | ||
{{ | {{Catch/entry6|439|Mime Jr.|yes|yes|Horde Encounter|11|all=60%|type1=psychic|type2=fairy}} | ||
{{ | {{Catch/entry6|524|Roggenrola|yes|yes|Horde Encounter|11|all=35%|type1=rock}} | ||
{{ | {{Catch/entry6|524|Roggenrola|yes|yes|Horde Encounter|11|all={{tt|5%|4 will appear}}<br/><small>with Carbink</small>|type1=rock}} | ||
{{ | {{Catch/entry6|703|Carbink|yes|yes|Horde Encounter|11|all={{tt|5%|Only 1 will appear}}<br/><small>with Roggenrola</small>|type1=rock|type2=fairy}} | ||
{{Catch/div|cave|Drops from the ceiling}} | {{Catch/div|cave|Drops from the ceiling}} | ||
{{ | {{Catch/entry6|527|Woobat|yes|yes|Ceiling|21-23|all=~80%|type1=psychic|type2=flying}} | ||
{{ | {{Catch/entry6|597|Ferroseed|yes|yes|Ceiling|21-23|all=~20%|type1=grass|type2=steel}} | ||
{{ | {{Catch/footer|cave}} | ||
==Trainers== | ==Trainers== | ||
{{trainerheader|cave}} | {{trainerheader|cave}} | ||
{{Trainerentry|VSBackpacker.png{{!}}150px|Backpacker|Lane| | {{trainerdiv|cave|1F}} | ||
{{Trainerentry|VSBattle Girl.png{{!}}150px|Battle Girl|Hedvig| | {{Trainerentry|VSBackpacker.png{{!}}150px|Backpacker|Lane|1,040|1|264|Linoone|♂|26|None|36=ヒサナオ|37=Hisanao}} | ||
{{Trainerentry|VSAce Trainer F.png{{!}}150px|Ace Trainer|Monique| | {{trainerdiv|cave}} | ||
{{Trainerentry|VSHiker.png{{!}}150px|Hiker|Dunstan| | {{Trainerentry|VSBattle Girl.png{{!}}150px|Battle Girl|Hedvig|1,248|2|538|Throh|♂|25|None|701|Hawlucha|♀|26|None|36=マコト|37=Makoto}} | ||
{{ | {{trainerdiv|cave}} | ||
{{Trainerentry|VSAce Trainer F.png{{!}}150px|Ace Trainer|Monique|2,500|3|084|Doduo|♀|24|None|210|Granbull|♀|24|None|694|Helioptile|♀|25|None|36=アスカ|37=Asuka}} | |||
{{trainerdiv|cave}} | |||
{{Trainerentry|VSHiker.png{{!}}150px|Hiker|Dunstan|1,344|3|551|Sandile|♂|22|None|557|Dwebble|♂|23|None|660|Diggersby|♂|24|None|36=イワオ|37=Iwao}} | |||
{{Trainerentry|VSTourist F B.png{{!}}150px|Tourist|Monami| | {{trainerdiv|cave|B1F}} | ||
{{Trainerentry|VSBlack Belt.png{{!}}150px|Black Belt|Igor| | {{Trainerentry|VSTourist F B.png{{!}}150px|Tourist|Monami|1,872|1|030|Nidorina|♀|26|None|36=マナミ|37=Manami}} | ||
{{Trainerentry|VSPsychic.png{{!}}150px|Psychic|Franz| | {{trainerdiv|cave}} | ||
{{Trainerentry|VSTourist M.png{{!}}150px|Tourist|Haruto| | {{Trainerentry|VSBlack Belt.png{{!}}150px|Black Belt|Igor|1,344|1|539|Sawk|♂|28|None|36=マサタカ|37=Masataka}} | ||
{{Trainerentry|VSHoneymooners.png{{!}}150px|Honeymooners|Yuu & Ami| | {{trainerdiv|cave}} | ||
{{Trainerentry|VSAce Trainer M.png{{!}}150px|Ace Trainer|Emil| | {{Trainerentry|VSPsychic.png{{!}}150px|Psychic|Franz|1,344|2|358|Chimecho|♂|24|None|622|Golett||24|None|36=レイジ|37=Reiji}} | ||
{{trainerdiv|cave}} | |||
{{Trainerentry|VSTourist M.png{{!}}150px|Tourist|Haruto|1,872|1|033|Nidorino|♂|26|None|36=ステファン|37=Stefan}} | |||
{{trainerdiv|cave}} | |||
{{Trainerentry|VSHoneymooners.png{{!}}150px|Honeymooners|Yuu & Ami|3,744|2|415|Combee|♂|26|None|416|Vespiquen|♀|26|None|36=シンジ と アミ|37=Shinji and Ami}} | |||
{{trainerdiv|cave}} | |||
{{Trainerentry|VSAce Trainer M.png{{!}}150px|Ace Trainer|Emil|2,500|2|359|Absol|♂|26|None|127|Pinsir|♂|25|None|36=ナオト|37=Naoto}} | |||
{{trainerfooter|cave|6}} | {{trainerfooter|cave|6}} | ||
==Layout== | ==Layout== | ||
{| style="margin:auto; background: #000 | {| class="roundy" style="margin:auto; background: #000; border: 3px solid #{{Locationcolor/dark|cave}}" | ||
|- style="background:#{{Locationcolor/light|cave}}" | |- | ||
! style="{{ | ! style="background:#{{Locationcolor/light|cave}}; {{roundytl|5px}}" | Game | ||
! style="background:#{{Locationcolor/light|cave}}" | 1F | |||
! B1F | ! style="background:#{{Locationcolor/light|cave}}" | B1F | ||
! style="{{roundytr|5px}}" | B2F | ! style="background:#{{Locationcolor/light|cave}}; {{roundytr|5px}}" | B2F | ||
|- | |- | ||
! style="background:#{{x color}}" | {{color2|000|Pokémon X and Y|X}} | ! style="background:#{{x color}}" | {{color2|000|Pokémon X and Y|X}} | ||
| rowspan="2" | [[File:Reflection Cave 1F XY.png|200px]] | | rowspan="2" | [[File:Reflection Cave 1F XY.png|200px]] | ||
| Line 87: | Line 92: | ||
| colspan="4" style="background:#{{Locationcolor/light|cave}}; {{roundybottom|5px}}" | | | colspan="4" style="background:#{{Locationcolor/light|cave}}; {{roundybottom|5px}}" | | ||
|} | |} | ||
==In the anime== | |||
[[File:Reflection Cave anime.png|thumb|250px|Reflection Cave in the anime]] | |||
[[File:Mirror World Reflection Cave.png|thumb|250px|The Mirror World's Reflection Cave]] | |||
The Reflection Cave made an appearance in ''[[XY037|The Cave of Mirrors!]]''. Like in the games, it is filled with many reflective crystals. While traveling through the cave, {{Ash}}'s mirror image suddenly seemed to come alive and grabbed {{AP|Pikachu}}, prompting him to follow. He soon found out that on the other side of the Reflection Cave's mirrors, there was a [[Mirror World]], where he met mirror versions of himself and {{ashfr}}, all of whom possessed characteristics completely opposite to their real world counterparts: [[Mirror Ash]] was timid and easily shaken; Pikachu was mischievous and a roughneck; [[Mirror Serena]] was arrogant and a serious battler; [[Mirror Clemont]] was a fit and fast runner, who relied on magic instead of science; [[Mirror Bonnie]] was lady-like and proud of her big brother's achievements; and [[Mirror Team Rocket]] were celebrated heroes of justice. | |||
The real Ash soon learned that after losing a {{pkmn|battle}} against Mirror Serena, Mirror Ash tearfully ran into the Mirror World's Reflection Cave, where he became separated with his Pikachu. After seeing the real Ash's Pikachu in a mirror, he reached out and grabbed it, believing it to be his own. After being reunited, Ash and Pikachu agreed to help find Pikachu's counterpart, which turned out to have been caught by Team Rocket, also having found their way into the Mirror World. As they began to attack the real Pikachu, both Ashes sent their {{AP|Hawlucha}} to battle the them, but the real Hawlucha soon became {{status|Confusion|confused}} by [[James's Inkay]]'s {{m|Psybeam}}, and was quickly [[recall]]ed before it started hurting its counterpart. Mirror Ash's Hawlucha was quickly called back as well, being too cowardly and scared to fight [[Jessie's Pumpkaboo]] effectively. However, during the commotion, Mirror Clemont sneaked behind the trio and freed the two Pikachu, who proceeded to send Team Rocket blasting off with a double {{m|Thunderbolt}}. | |||
Afterwards, the real Ash managed to re-open the portal between the real world and Mirror World, and barely managed to return back to his friends before the portal was closed again, his friends and their Mirror World counterparts wishing each other good luck on their journeys. Ash and his friends then exited the cave, deciding to find a [[Pokémon Center]] to spend their night in. The episode ended with the Team Rocket trio wandering in the Mirror World forest before being found by their heroic counterparts. | |||
==In other languages== | ==In other languages== | ||
{{langtable|color={{locationcolor/light|cave}}|bordercolor={{locationcolor/dark|cave}} | {{langtable|color={{locationcolor/light|cave}}|bordercolor={{locationcolor/dark|cave}} | ||
|zh_cmn=鏡穴 ''{{tt|Jìngxué|Mirror Cave}}'' | |||
|fi=Heijastusluola | |||
|fr=Grotte Miroitante | |fr=Grotte Miroitante | ||
|de=Spiegelhöhle | |de=Spiegelhöhle | ||
|it=Grotta dei Riflessi | |it=Grotta dei Riflessi | ||
|ko={{tt|비춤의동굴|Bichum-yi Donggul}} ''Reflection Cave'' | |ko={{tt|비춤의동굴|Bichum-yi Donggul}} ''Reflection Cave'' | ||
|es=Cueva Reflejos}} | |es=Cueva Reflejos | ||
|pl=Lustrzana Jaskinia}} | |||
{{Kalos}}<br> | {{Kalos}}<br/> | ||
{{Project Routes notice}} | {{Project Routes notice}} | ||
| Line 107: | Line 124: | ||
[[it:Grotta dei Riflessi]] | [[it:Grotta dei Riflessi]] | ||
[[ja:うつしみのどうくつ]] | [[ja:うつしみのどうくつ]] | ||
[[zh: | [[zh:鏡穴]] | ||
Revision as of 06:20, 18 February 2015
| ||||
| ||||
| Map description: | The sheer faces of these rock walls reflect the images of people and Pokémon like nature's mirror. | |||
|---|---|---|---|---|
| Location: | Route 11 and Shalour City | |||
| Region: | Kalos | |||
| Generations: | VI | |||
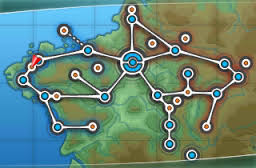 Location of Reflection Cave in Kalos. | ||||
| Pokémon world locations | ||||
Reflection Cave (Japanese: 映し身の洞窟 Reflection Cave) is a cave in western Kalos, connecting Route 11 and Shalour City.
Many walls in the Reflection Cave are reflective like mirrors, thus explaining the origin of the cave's name. Due to these reflective surfaces, several Trainers facing the walls will be able to notice the player walking behind them and challenge them to a battle. The player can also use these surfaces to locate a hidden passageway on B2F.
Items
| Item | Location | Games | |
|---|---|---|---|
| Nest Ball | 1F, north of the junction just beyond Backpacker Lane | X Y | |
| Revive | 1F, east of Backpacker Lane, at the end of the thin path | X Y | |
| Moon Stone | 1F, south of Battle Girl Hedvig, on top of the small mesa | X Y | |
| Black Belt | B1F, north of Tourist Monami, on top of the hill | X Y | |
| TM70 (Flash) | B1F, gift from Tierno | X Y | |
| Escape Rope | B1F, east of Tierno, north of Black Belt Igor | X Y | |
| Hyper Potion | B1F, east of Honeymooners Yuu & Ami | X Y | |
| Iron | B1F, west of Honeymooners Yuu & Ami, near the stairs to return to 1F | X Y | |
| Earth Plate | B2F, north of the staircase from B1F | X Y | |
| TM74 (Gyro Ball) | B2F, via the hidden passageway from B1F | X Y | |
| Alakazite | B2F, via the hidden passageway from B1F (post-game) | X Y | |
| Reveal Glass | 1F, from the scientist if the player has Thundurus, Tornadus, or Landorus in their party | X Y | |
Pokémon
| Pokémon | Games | Location | Levels | Rate | |||||||||||
|---|---|---|---|---|---|---|---|---|---|---|---|---|---|---|---|
|
X | Y |
|
22-23 | 20% | ||||||||||
|
X | Y |
|
22 | 10% | ||||||||||
|
X | Y |
|
22-23 | 5% | ||||||||||
|
X | Y |
|
21-22 | 15% | ||||||||||
|
X | Y |
|
21-22 | 20% | ||||||||||
|
X | Y |
|
22-23 | 20% | ||||||||||
|
X | Y |
|
23 | 10% | ||||||||||
| Horde Encounter | |||||||||||||||
|
X | Y |
|
11 | 60% | ||||||||||
|
X | Y |
|
11 | 35% | ||||||||||
|
X | Y |
|
11 | 5% with Carbink | ||||||||||
|
X | Y |
|
11 | 5% with Roggenrola | ||||||||||
| Drops from the ceiling | |||||||||||||||
|
X | Y |
|
21-23 | ~80% | ||||||||||
|
X | Y |
|
21-23 | ~20% | ||||||||||
| A colored background means that the Pokémon can be found in this location in the specified game. A white background with a colored letter means that the Pokémon cannot be found here. | |||||||||||||||
Trainers
| Trainer | Pokémon | |||||||||||
|---|---|---|---|---|---|---|---|---|---|---|---|---|
| 1F | ||||||||||||
|
| |||||||||||
|
| |||||||||||
| ||||||||||||
|
| |||||||||||
| ||||||||||||
| ||||||||||||
|
| |||||||||||
| ||||||||||||
| ||||||||||||
| B1F | ||||||||||||
|
| |||||||||||
|
| |||||||||||
|
| |||||||||||
| ||||||||||||
|
| |||||||||||
|
| |||||||||||
| ||||||||||||
|
| |||||||||||
| ||||||||||||
Layout
| Game | 1F | B1F | B2F |
|---|---|---|---|
| X | 
|
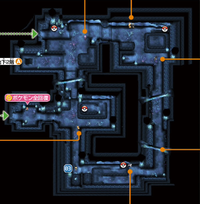
|
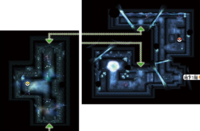
|
| Y | |||
In the anime
The Reflection Cave made an appearance in The Cave of Mirrors!. Like in the games, it is filled with many reflective crystals. While traveling through the cave, Ash's mirror image suddenly seemed to come alive and grabbed Pikachu, prompting him to follow. He soon found out that on the other side of the Reflection Cave's mirrors, there was a Mirror World, where he met mirror versions of himself and his friends, all of whom possessed characteristics completely opposite to their real world counterparts: Mirror Ash was timid and easily shaken; Pikachu was mischievous and a roughneck; Mirror Serena was arrogant and a serious battler; Mirror Clemont was a fit and fast runner, who relied on magic instead of science; Mirror Bonnie was lady-like and proud of her big brother's achievements; and Mirror Team Rocket were celebrated heroes of justice.
The real Ash soon learned that after losing a battle against Mirror Serena, Mirror Ash tearfully ran into the Mirror World's Reflection Cave, where he became separated with his Pikachu. After seeing the real Ash's Pikachu in a mirror, he reached out and grabbed it, believing it to be his own. After being reunited, Ash and Pikachu agreed to help find Pikachu's counterpart, which turned out to have been caught by Team Rocket, also having found their way into the Mirror World. As they began to attack the real Pikachu, both Ashes sent their Hawlucha to battle the them, but the real Hawlucha soon became confused by James's Inkay's Psybeam, and was quickly recalled before it started hurting its counterpart. Mirror Ash's Hawlucha was quickly called back as well, being too cowardly and scared to fight Jessie's Pumpkaboo effectively. However, during the commotion, Mirror Clemont sneaked behind the trio and freed the two Pikachu, who proceeded to send Team Rocket blasting off with a double Thunderbolt.
Afterwards, the real Ash managed to re-open the portal between the real world and Mirror World, and barely managed to return back to his friends before the portal was closed again, his friends and their Mirror World counterparts wishing each other good luck on their journeys. Ash and his friends then exited the cave, deciding to find a Pokémon Center to spend their night in. The episode ended with the Team Rocket trio wandering in the Mirror World forest before being found by their heroic counterparts.
In other languages
| ||||||||||||||||||||||||||||||
| Kalos | ||||||||
|---|---|---|---|---|---|---|---|---|
| ||||||||
|

|
This article is part of Project Routes, a Bulbapedia project that aims to write comprehensive articles on every route in the Pokémon world. |
