Ragged Mountain: Difference between revisions
From Bulbapedia, the community-driven Pokémon encyclopedia.
Jump to navigationJump to search
m (→Gallery) |
(Made an update to reflect the changes to the Dungeon info template) |
||
| (15 intermediate revisions by 6 users not shown) | |||
| Line 2: | Line 2: | ||
{{Dungeon infobox | {{Dungeon infobox | ||
|colorscheme=Rock | |colorscheme=Rock | ||
|bordercolorscheme= | |bordercolorscheme=Grass | ||
|name=Ragged Mountain | |name=Ragged Mountain | ||
|jname=でこぼこ山 | |jname=でこぼこ山 | ||
| Line 11: | Line 11: | ||
|rest=No | |rest=No | ||
|traps=No | |traps=No | ||
|monsterhouses=No | |||
|items=48 | |items=48 | ||
|money=Allowed | |money=Allowed | ||
| Line 19: | Line 20: | ||
}} | }} | ||
'''Ragged Mountain''' (Japanese: '''{{tt|でこぼこ山|でこぼこやま}}''' ''Bumpy Mountain'') is the first dungeon the player goes through in [[Pokémon Mystery Dungeon: Gates to Infinity]]. The dungeon has both an | '''Ragged Mountain''' (Japanese: '''{{tt|でこぼこ山|でこぼこやま}}''' ''Bumpy Mountain'') is the first dungeon the player goes through in [[Pokémon Mystery Dungeon: Gates to Infinity]]. The dungeon has both an inside area (1F, 2F, 4F) and an outside area (3F,5F). It has five floors and no boss. This is the first dungeon that has sparkling obstacles that need to be attacked to progress through the dungeon, which is the dead tree at 3F. After the main story-line, this dungeon does not have a Golden Chamber or a Mapless Street. | ||
==Pokémon encountered== | ==Pokémon encountered== | ||
{{mdloc/h| | {{mdloc/h|rock}} | ||
{{mdloc|527|Woobat|1-5|2|?}} | {{mdloc|527|Woobat|1-5|2|?}} | ||
{{mdloc|529|Drilbur|1-5|2|?}} | {{mdloc|529|Drilbur|1-5|2|?}} | ||
{{mdloc|572|Minccino|1-5|3|?}} | {{mdloc|572|Minccino|1-5|3|?}} | ||
{{mdloc|574|Gothita|2, 4|2|?}} | {{mdloc|574|Gothita|2, 4 (first time only)|2|?}} | ||
{{mdloc|599|Klink|1-5|4|?}} | {{mdloc|599|Klink|1-5|4|?}} | ||
{{mdloc/f| | {{mdloc/f|rock}} | ||
==Items== | ==Items== | ||
{{DungeonItem/h|rock}} | {{DungeonItem/h|rock}} | ||
{{DungeonItem|Poké|4=34-49|sprite=Poké currency|3=1-5}} | {{DungeonItem|Poké|4=34-49|sprite=Poké currency|3=1-5}} | ||
{{DungeonItem|Oran Berry|3= | {{DungeonItem|Oran Berry|3=1-5}} | ||
{{DungeonItem|Chesto Berry|3=1-5}} | |||
{{DungeonItem|Chesto Berry|3= | {{DungeonItem|Pecha Berry|sprite=MDBag Pecha Berry Sprite|3=1-5}} | ||
{{DungeonItem|Pecha Berry|sprite=MDBag Pecha Berry | {{DungeonItem|Rawst Berry|sprite=MDBag Rawst Berry Sprite|3=1-5}} | ||
{{DungeonItem|Rawst Berry|sprite=MDBag Rawst Berry | {{DungeonItem|Escape Orb|Wonder Orb|3=1-5}} | ||
{{DungeonItem|Escape Orb|Wonder Orb|3= | {{DungeonItem|Blast Seed|Seed|3=1-5}} | ||
{{DungeonItem|Blast Seed|Seed|3= | {{DungeonItem|Max Elixir|Health drink|sprite=MDBag Health drink Sprite|3=1-5}} | ||
{{DungeonItem|Max Elixir|Health drink|sprite=MDBag | |||
|} | |} | ||
| Line 57: | Line 50: | ||
File:Ragged Mountain sparkling object PMDGTI.png|Sparkling object that needs to be attacked | File:Ragged Mountain sparkling object PMDGTI.png|Sparkling object that needs to be attacked | ||
</gallery> | </gallery> | ||
==In other languages== | |||
{{langtable|color={{ground color}}|bordercolor={{grass color}} | |||
|fr=Mont Bosselé | |||
|de=Stufenberg | |||
|it=Monte Saliscendi | |||
|es=Monte Quebrado | |||
}} | |||
{{-}} | {{-}} | ||
{{PMD GTI locations}} | |||
{{DoubleProjectTag|Locations|Sidegames}} | {{DoubleProjectTag|Locations|Sidegames}} | ||
[[Category:Pokémon Mystery Dungeon: Gates to Infinity locations]] | [[Category:Pokémon Mystery Dungeon: Gates to Infinity locations]] | ||
[[Category:Mountains]] | [[Category:Mountains]] | ||
[[de:Stufenberg]] | |||
[[fr:Mont Bosselé]] | |||
[[ja:でこぼこ山]] | |||
Revision as of 01:47, 20 March 2016
|
|
|
|
| ||||||||||||||||||||||||||||||||||||||||||
| ||||||||||||||||||||||||||||||||||||||||||
| ||||||||||||||||||||||||||||||||||||||||||

Ragged Mountain (Japanese: でこぼこ山 Bumpy Mountain) is the first dungeon the player goes through in Pokémon Mystery Dungeon: Gates to Infinity. The dungeon has both an inside area (1F, 2F, 4F) and an outside area (3F,5F). It has five floors and no boss. This is the first dungeon that has sparkling obstacles that need to be attacked to progress through the dungeon, which is the dead tree at 3F. After the main story-line, this dungeon does not have a Golden Chamber or a Mapless Street.
Pokémon encountered
| Pokémon | Floors | Levels | Recruit Rate | |
|---|---|---|---|---|
| Woobat | 1-5 | 2 | ?% | |
| Drilbur | 1-5 | 2 | ?% | |
| Minccino | 1-5 | 3 | ?% | |
| Gothita | 2, 4 (first time only) | 2 | ?% | |
| Klink | 1-5 | 4 | ?% | |
Items
| Item | Floors | |
|---|---|---|
| 34-49 Poké | 1-5F | |
| Oran Berry | 1-5F | |
| Chesto Berry | 1-5F | |
| Pecha Berry | 1-5F | |
| Rawst Berry | 1-5F | |
| Escape Orb | 1-5F | |
| Blast Seed | 1-5F | |
| Max Elixir | 1-5F | |
Gallery
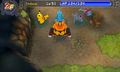
Ragged Mountain 2F

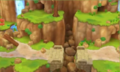
Ragged Mountain entrance
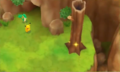
Ragged Mountain bridge
Sparkling object that needs to be attacked


In other languages
| ||||||||||||||||||
| This article is part of both Project Locations and Project Sidegames, Bulbapedia projects that, together, aim to write comprehensive articles on the Pokémon Locations and Sidegames, respectively. |