Petalburg Gym: Difference between revisions
AlexTheRose (talk | contribs) mNo edit summary |
NeoCrimson (talk | contribs) |
||
| (36 intermediate revisions by 23 users not shown) | |||
| Line 5: | Line 5: | ||
|image=Petalburg Gym anime.png | |image=Petalburg Gym anime.png | ||
|location=Petalburg City | |location=Petalburg City | ||
|leader=[[Norman]] | |leader=[[Norman]] | ||
|badge=Balance Badge | |badge=Balance Badge | ||
|type=Normal | |type=Normal | ||
| Line 14: | Line 14: | ||
}} | }} | ||
The '''Petalburg Gym''' (Japanese: '''トウカジム''' ''Touka Gym'') is the official [[ | The '''Petalburg Gym''' (Japanese: '''トウカジム''' ''Touka Gym'') is the official [[Gym]] of [[Petalburg City]]. It is based on {{type|Normal}} {{OBP|Pokémon|species}}. The [[Gym Leader]] is [[Norman]]. {{pkmn|Trainer}}s who defeat him receive the {{Badge|Balance}}. | ||
==In the games== | ==In the games== | ||
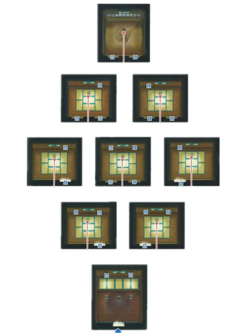
Between the entrance and Gym Leader [[Norman]] are a series of rooms, each containing a Trainer. In order to access these rooms, all of the first four Badges must be obtained first; otherwise, the doors will be locked. The Trainers have special methods of battling, as displayed on the doors leading to their rooms. They include the One-Hit KO Room, Accuracy Room, Attack Room, Defense Room, Speed Room, and | Between the entrance and Gym Leader [[Norman]] are a series of rooms, each containing a Trainer. In order to access these rooms, all of the first four Badges must be obtained first; otherwise, the doors will be locked. The Trainers have special methods of battling, as displayed on the doors leading to their rooms. They include the One-Hit KO Room, Accuracy Room, Attack Room, Defense Room, Speed Room, Recovery Room and either Zero Reduction Room{{sup/3|RS}}{{sup/6|ORAS}} or Confusion Room{{sup/3|E}}. Once three rooms in a row are completed, they can access the Gym Leader Room with Norman. In {{game|Ruby and Sapphire|s}} and [[Pokémon Omega Ruby and Alpha Sapphire]], all seven Trainers in their respective rooms use items in the battle, whereas in {{game|Emerald}}, the strategy of these Trainers is dependent on the moves of their Pokémon. | ||
When defeated, Norman will give the player the {{ | When defeated, Norman will give the player the {{Badge|Balance}} as well as {{TM|42|Facade}}{{sup/3|RSE}}/{{TM|67|Retaliate}}{{sup/6|ORAS}} as a reward. | ||
===Appearance=== | ===Appearance=== | ||
{| | {| class="roundy" style="margin:auto; background: #000; border: 3px solid #{{normal color dark}};" | ||
|- | |- | ||
! style="background:#{{ | ! style="background:#{{ruby color}}; {{roundytl|5px}}" | {{color2|fff|Pokémon Ruby and Sapphire Versions|Ruby}} | ||
! style="background:#{{ | ! style="background:#{{sapphire color}}" | {{color2|fff|Pokémon Ruby and Sapphire Versions|Sapphire}} | ||
! style="background:#{{emerald color}}" | {{color2|fff|Pokémon Emerald Version|Emerald}} | |||
! | ! style="background:#{{omega ruby color}}" | {{color2|fff|Pokémon Omega Ruby and Alpha Sapphire|Omega Ruby}} | ||
! style="background:#{{alpha sapphire color}}; {{roundytr|5px}}" | {{color2|fff|Pokémon Omega Ruby and Alpha Sapphire|Alpha Sapphire}} | |||
|- | |- | ||
| colspan="2" | [[File:Petalburg Gym RS.png|180px]] | |||
| [[File:Petalburg Gym E.png|180px]] | |||
| colspan="2" | [[File:Petalburg Gym ORAS.png|250px]] | |||
|- | |- | ||
| colspan="5" style="background:#{{normal color light}}; {{roundybottom|5px}}" | | |||
| colspan="5" style="background:#{{normal color light}}; | |||
|} | |} | ||
| Line 41: | Line 40: | ||
===={{game|Ruby and Sapphire|s}}==== | ===={{game|Ruby and Sapphire|s}}==== | ||
{{trainerheader|Normal}} | {{trainerheader|Normal}} | ||
{{trainerentry| | {{trainerdiv|Normal|Speed Room}} | ||
{{trainerdiv|Normal}} | {{trainerentry|Spr RS Cooltrainer M.png|Cooltrainer|Randall|1296|1|301|Delcatty|♀|27|36=トシキ|37=Toshiki}} | ||
{{trainerentry| | {{trainerdiv|Normal|Accuracy Room}} | ||
{{trainerdiv|Normal}} | {{trainerentry|Spr RS Cooltrainer F.png|Cooltrainer|Mary|1296|1|301|Delcatty|♀|27|36=アヤカ|37=Ayaka}} | ||
{{trainerentry| | {{trainerdiv|Normal|Zero Reduction Room}} | ||
{{trainerdiv|Normal}} | {{trainerentry|Spr RS Cooltrainer M.png|Cooltrainer|Parker|1296|1|264|Linoone|♂|27|36=ヒデキ|37=Hideki}} | ||
{{trainerentry| | {{trainerdiv|Normal|Defense Room}} | ||
{{trainerdiv|Normal}} | {{trainerentry|Spr RS Cooltrainer F.png|Cooltrainer|Lori|1296|1|264|Linoone|♀|27|36=ヒトミ|37=Hitomi}} | ||
{{trainerentry| | {{trainerdiv|Normal|Recovery Room}} | ||
{{trainerdiv|Normal}} | {{trainerentry|Spr RS Cooltrainer M.png|Cooltrainer|George|1296|1|264|Linoone|♂|27|36=カズマ|37=Kazuma}} | ||
{{trainerentry| | {{trainerdiv|Normal|Strength Room}} | ||
{{trainerdiv|Normal}} | {{trainerentry|Spr RS Cooltrainer F.png|Cooltrainer|Jody|1296|1|335|Zangoose|♀|27|36=サオリ|37=Saori}} | ||
{{trainerentry| | {{trainerdiv|Normal|One-Hit KO Room}} | ||
{{trainerfooter|Normal|3 | {{trainerentry|Spr RS Cooltrainer M.png|Cooltrainer|Berke|1296|1|335|Zangoose|♂|27|36=ナオキ|37=Naoki}} | ||
{{trainerfooter|Normal|3}} | |||
{{Party | {{Party/Single | ||
|color={{normal color}} | |color={{normal color}} | ||
|bordercolor={{normal color dark}} | |bordercolor={{normal color dark}} | ||
|headcolor={{normal color light}} | |headcolor={{normal color light}} | ||
|sprite= | |sprite=Spr RS Norman.png | ||
|prize={{ | |prize={{PDollar}}3100 | ||
|class=Leader | |class=Leader | ||
|name=Norman | |classlink=Gym Leader | ||
|name={{color2|000|Norman}} | |||
|game=RS | |game=RS | ||
|location=Petalburg Gym | |location=Petalburg Gym | ||
|pokemon=3 | |pokemon=3}} | ||
| | |{{Pokémon/3 | ||
|game=Ruby | |game=Ruby | ||
|ndex=289 | |ndex=289 | ||
| Line 76: | Line 76: | ||
|level=28 | |level=28 | ||
|type1=Normal | |type1=Normal | ||
|move1= | |move1=Encore|move1type=Normal | ||
|move2= | |move2=Facade|move2type=Normal | ||
|move3= | |move3=Yawn|move3type=Normal | ||
|move4= | |move4=Faint Attack|move4type=Dark}} | ||
| | |{{Pokémon/3 | ||
|game=Ruby | |game=Ruby | ||
|ndex=288 | |ndex=288 | ||
| Line 91: | Line 90: | ||
|move1=Slash|move1type=Normal | |move1=Slash|move1type=Normal | ||
|move2=Faint Attack|move2type=Dark | |move2=Faint Attack|move2type=Dark | ||
|move3= | |move3=Facade|move3type=Normal | ||
|move4= | |move4=Encore|move4type=Normal}} | ||
| | |{{Pokémon/3 | ||
|game=Ruby | |game=Ruby | ||
|ndex=289 | |ndex=289 | ||
| Line 104: | Line 102: | ||
|move1=Focus Punch|move1type=Fighting | |move1=Focus Punch|move1type=Fighting | ||
|move2=Slack Off|move2type=Normal | |move2=Slack Off|move2type=Normal | ||
|move3= | |move3=Facade|move3type=Normal | ||
|move4= | |move4=Faint Attack|move4type=Dark}} | ||
}} | {{Party/Footer}} | ||
===={{game|Emerald}}==== | ===={{game|Emerald}}==== | ||
{{trainerheader|Normal}} | {{trainerheader|Normal}} | ||
{{trainerentry| | {{trainerdiv|Normal|Speed Room}} | ||
{{trainerdiv|Normal}} | {{trainerentry|Spr RS Cooltrainer M.png|Cooltrainer|Randall|1248|1|277|Swellow|♂|26|36=トシキ|37=Toshiki}} | ||
{{trainerentry| | {{trainerdiv|Normal|Accuracy Room}} | ||
{{trainerdiv|Normal}} | {{trainerentry|Spr RS Cooltrainer F.png|Cooltrainer|Mary|1248|1|301|Delcatty|♀|26|36=アヤカ|37=Ayaka}} | ||
{{trainerentry| | {{trainerdiv|Normal|Confusion Room}} | ||
{{trainerdiv|Normal}} | {{trainerentry|Spr RS Cooltrainer M.png|Cooltrainer|Parker|1248|1|327|Spinda|♂|26|36=ヒデキ|37=Hideki}} | ||
{{trainerentry| | {{trainerdiv|Normal|Defense Room}} | ||
{{trainerdiv|Normal}} | {{trainerentry|Spr RS Cooltrainer F.png|Cooltrainer|Alexia|1248|1|040|Wigglytuff|♀|26|36=ミハル|37=Miharu}} | ||
{{trainerentry| | {{trainerdiv|Normal|Recovery Room}} | ||
{{trainerdiv|Normal}} | {{trainerentry|Spr RS Cooltrainer M.png|Cooltrainer|George|1248|1|287|Slakoth|♂|26|Sitrus Berry|36=カズマ|37=Kazuma}} | ||
{{trainerentry| | {{trainerdiv|Normal|Strength Room}} | ||
{{trainerdiv|Normal}} | {{trainerentry|Spr RS Cooltrainer F.png|Cooltrainer|Jody|1248|1|335|Zangoose|♀|26|36=サオリ|37=Saori}} | ||
{{trainerentry| | {{trainerdiv|Normal|One-Hit KO Room}} | ||
{{trainerfooter|Normal|3 | {{trainerentry|Spr RS Cooltrainer M.png|Cooltrainer|Berke|1248|1|288|Vigoroth|♂|26|36=ナオキ|37=Naoki}} | ||
{{trainerfooter|Normal|3}} | |||
{{Party|color={{normal color}} | {{Party/Single | ||
|color={{normal color}} | |||
|headcolor={{normal color light}} | |headcolor={{normal color light}} | ||
|bordercolor={{normal color dark}} | |bordercolor={{normal color dark}} | ||
|sprite= | |sprite=Spr RS Norman.png | ||
|prize={{PDollar}}3100 | |prize={{PDollar}}3100 | ||
|class=Leader | |class=Leader | ||
|name=Norman | |classlink=Gym Leader | ||
|name={{color2|000|Norman}} | |||
|game=E | |game=E | ||
|location=Petalburg Gym | |location=Petalburg Gym | ||
|pokemon=4 | |pokemon=4}} | ||
| | |{{Pokémon/3 | ||
|game=Emerald | |game=Emerald | ||
|ndex=327 | |ndex=327 | ||
| Line 144: | Line 144: | ||
|level=27 | |level=27 | ||
|type1=Normal | |type1=Normal | ||
|move1= | |move1=Teeter Dance|move1type=Normal | ||
|move2= | |move2=Psybeam|move2type=Psychic | ||
|move3= | |move3=Facade|move3type=Normal | ||
|move4= | |move4=Encore|move4type=Normal}} | ||
| | |{{Pokémon/3 | ||
|game=Emerald | |game=Emerald | ||
|ndex=288 | |ndex=288 | ||
| Line 158: | Line 157: | ||
|type1=Normal | |type1=Normal | ||
|move1=Slash|move1type=Normal | |move1=Slash|move1type=Normal | ||
|move2= | |move2=Facade|move2type=Normal | ||
|move3=Encore|move3type=Normal | |move3=Encore|move3type=Normal | ||
|move4= | |move4=Faint Attack|move4type=Dark}} | ||
| | {{Party/Div|color={{normal color}}}} | ||
| | |{{Pokémon/3 | ||
|game=Emerald | |game=Emerald | ||
|ndex=264 | |ndex=264 | ||
| Line 172: | Line 171: | ||
|move1=Slash|move1type=Normal | |move1=Slash|move1type=Normal | ||
|move2=Belly Drum|move2type=Normal | |move2=Belly Drum|move2type=Normal | ||
|move3= | |move3=Facade|move3type=Normal | ||
|move4= | |move4=Headbutt|move4type=Normal}} | ||
| | |{{Pokémon/3 | ||
|game=Emerald | |game=Emerald | ||
|ndex=289 | |ndex=289 | ||
| Line 184: | Line 182: | ||
|level=31 | |level=31 | ||
|type1=Normal | |type1=Normal | ||
|move1= | |move1=Counter|move1type=Fighting | ||
|move2= | |move2=Yawn|move2type=Normal | ||
|move3= | |move3=Facade|move3type=Normal | ||
|move4= | |move4=Faint Attack|move4type=Dark}} | ||
}} | {{Party/Footer}} | ||
=====First [[ | =====First [[rematch]]===== | ||
{{Party|color={{normal color}} | {{Party/Single | ||
|color={{normal color}} | |||
|headcolor={{normal color light}} | |headcolor={{normal color light}} | ||
|bordercolor={{normal color dark}} | |bordercolor={{normal color dark}} | ||
|sprite= | |sprite=Spr RS Norman.png | ||
|prize={{PDollar}}9000 | |prize={{PDollar}}9000 | ||
|class=Leader | |class=Leader | ||
|name=Norman | |classlink=Gym Leader | ||
|name={{color2|000|Norman}} | |||
|game=E | |game=E | ||
|location=Petalburg Gym | |location=Petalburg Gym | ||
|pokemon=4 | |pokemon=4}} | ||
| | |{{Pokémon/3 | ||
|game=Emerald | |game=Emerald | ||
|ndex=113 | |ndex=113 | ||
| Line 210: | Line 209: | ||
|level=42 | |level=42 | ||
|type1=Normal | |type1=Normal | ||
|move1= | |move1=Light Screen|move1type=Psychic | ||
|move2= | |move2=Sing|move2type=Normal | ||
|move3= | |move3=Skill Swap|move3type=Psychic | ||
|move4=Focus Punch|move4type=Fighting}} | |move4=Focus Punch|move4type=Fighting}} | ||
| | |{{Pokémon/3 | ||
|game=Emerald | |game=Emerald | ||
|ndex=289 | |ndex=289 | ||
| Line 224: | Line 222: | ||
|level=42 | |level=42 | ||
|type1=Normal | |type1=Normal | ||
|move1= | |move1=Blizzard|move1type=Ice | ||
|move2= | |move2=Shadow Ball|move2type=Ghost | ||
|move3= | |move3=Double-Edge|move3type=Normal | ||
|move4= | |move4=Fire Blast|move4type=Fire}} | ||
| | {{Party/Div|color={{normal color}}}} | ||
| | |{{Pokémon/3 | ||
|game=Emerald | |game=Emerald | ||
|ndex=327 | |ndex=327 | ||
| Line 237: | Line 235: | ||
|level=43 | |level=43 | ||
|type1=Normal | |type1=Normal | ||
|move1= | |move1=Teeter Dance|move1type=Normal | ||
|move2= | |move2=Skill Swap|move2type=Psychic | ||
|move3= | |move3=Facade|move3type=Normal | ||
|move4= | |move4=Hypnosis|move4type=Psychic}} | ||
| | |{{Pokémon/3 | ||
|game=Emerald | |game=Emerald | ||
|ndex=289 | |ndex=289 | ||
| Line 251: | Line 248: | ||
|level=45 | |level=45 | ||
|type1=Normal | |type1=Normal | ||
|move1= | |move1=Hyper Beam|move1type=Normal | ||
|move2=Flamethrower|move2type=Fire | |move2=Flamethrower|move2type=Fire | ||
|move3=Thunderbolt|move3type=Electric | |move3=Thunderbolt|move3type=Electric | ||
|move4= | |move4=Shadow Ball|move4type=Ghost}} | ||
}} | {{Party/Footer}} | ||
=====Second | =====Second rematch===== | ||
{{Party|color={{normal color}} | {{Party/Single | ||
|color={{normal color}} | |||
|headcolor={{normal color light}} | |headcolor={{normal color light}} | ||
|bordercolor={{normal color dark}} | |bordercolor={{normal color dark}} | ||
|sprite= | |sprite=Spr RS Norman.png | ||
|prize={{PDollar}}10000 | |prize={{PDollar}}10000 | ||
|class=Leader | |class=Leader | ||
|name=Norman | |classlink=Gym Leader | ||
|name={{color2|000|Norman}} | |||
|game=E | |game=E | ||
|location=Petalburg Gym | |location=Petalburg Gym | ||
|pokemon=5 | |pokemon=5}} | ||
| | |{{Pokémon/3 | ||
| | |game=Emerald | ||
|ndex=289 | |||
|pokemon=Slaking | |||
|gender=male | |||
|ability=Truant | |||
|held=Sitrus Berry | |||
|level=47 | |||
|type1=Normal | |||
|move1=Blizzard|move1type=Ice | |||
|move2=Shadow Ball|move2type=Ghost | |||
|move3=Double-Edge|move3type=Normal | |||
|move4=Fire Blast|move4type=Fire}} | |||
|{{Pokémon/3 | |||
|game=Emerald | |game=Emerald | ||
|ndex=113 | |ndex=113 | ||
| Line 277: | Line 288: | ||
|level=47 | |level=47 | ||
|type1=Normal | |type1=Normal | ||
|move1= | |move1=Light Screen|move1type=Psychic | ||
|move2= | |move2=Sing|move2type=Normal | ||
|move3= | |move3=Skill Swap|move3type=Psychic | ||
|move4=Focus Punch|move4type=Fighting}} | |move4=Focus Punch|move4type=Fighting}} | ||
| | |{{Pokémon/3 | ||
|game=Emerald | |game=Emerald | ||
|ndex=115 | |ndex=115 | ||
| Line 304: | Line 301: | ||
|type1=Normal | |type1=Normal | ||
|move1=Fake Out|move1type=Normal | |move1=Fake Out|move1type=Normal | ||
|move2= | |move2=Dizzy Punch|move2type=Normal | ||
|move3=Endure|move3type=Normal | |move3=Endure|move3type=Normal | ||
|move4= | |move4=Reversal|move4type=Fighting}} | ||
| | {{Party/Div|color={{normal color}}}} | ||
| | | style="margin:auto" |{{Pokémon/3 | ||
|game=Emerald | |game=Emerald | ||
|ndex=327 | |ndex=327 | ||
| Line 316: | Line 313: | ||
|level=48 | |level=48 | ||
|type1=Normal | |type1=Normal | ||
|move1= | |move1=Teeter Dance|move1type=Normal | ||
|move2= | |move2=Skill Swap|move2type=Psychic | ||
|move3= | |move3=Facade|move3type=Normal | ||
|move4= | |move4=Hypnosis|move4type=Psychic}} | ||
| | | style="margin:auto" |{{Pokémon/3 | ||
|game=Emerald | |game=Emerald | ||
|ndex=289 | |ndex=289 | ||
| Line 330: | Line 326: | ||
|level=50 | |level=50 | ||
|type1=Normal | |type1=Normal | ||
|move1= | |move1=Hyper Beam|move1type=Normal | ||
|move2=Flamethrower|move2type=Fire | |move2=Flamethrower|move2type=Fire | ||
|move3=Thunderbolt|move3type=Electric | |move3=Thunderbolt|move3type=Electric | ||
|move4= | |move4=Shadow Ball|move4type=Ghost}} | ||
}} | {{Party/Footer}} | ||
=====Third | =====Third rematch===== | ||
{{Party|color={{normal color}} | {{Party/Single | ||
|color={{normal color}} | |||
|headcolor={{normal color light}} | |headcolor={{normal color light}} | ||
|bordercolor={{normal color dark}} | |bordercolor={{normal color dark}} | ||
|sprite= | |sprite=Spr RS Norman.png | ||
|prize={{PDollar}}11000 | |prize={{PDollar}}11000 | ||
|class=Leader | |class=Leader | ||
|name=Norman | |classlink=Gym Leader | ||
|name={{color2|000|Norman}} | |||
|game=E | |game=E | ||
|location=Petalburg Gym | |location=Petalburg Gym | ||
|pokemon=5 | |pokemon=5}} | ||
| | |{{Pokémon/3 | ||
| | |game=Emerald | ||
|ndex=289 | |||
|pokemon=Slaking | |||
|gender=male | |||
|ability=Truant | |||
|held=Sitrus Berry | |||
|level=52 | |||
|type1=Normal | |||
|move1=Blizzard|move1type=Ice | |||
|move2=Shadow Ball|move2type=Ghost | |||
|move3=Double-Edge|move3type=Normal | |||
|move4=Fire Blast|move4type=Fire}} | |||
|{{Pokémon/3 | |||
|game=Emerald | |game=Emerald | ||
|ndex=242 | |ndex=242 | ||
| Line 356: | Line 366: | ||
|level=52 | |level=52 | ||
|type1=Normal | |type1=Normal | ||
|move1= | |move1=Light Screen|move1type=Psychic | ||
|move2= | |move2=Sing|move2type=Normal | ||
|move3= | |move3=Skill Swap|move3type=Psychic | ||
|move4=Focus Punch|move4type=Fighting}} | |move4=Focus Punch|move4type=Fighting}} | ||
| | |{{Pokémon/3 | ||
|game=Emerald | |game=Emerald | ||
|ndex=115 | |ndex=115 | ||
| Line 383: | Line 379: | ||
|type1=Normal | |type1=Normal | ||
|move1=Fake Out|move1type=Normal | |move1=Fake Out|move1type=Normal | ||
|move2= | |move2=Dizzy Punch|move2type=Normal | ||
|move3=Endure|move3type=Normal | |move3=Endure|move3type=Normal | ||
|move4= | |move4=Reversal|move4type=Fighting}} | ||
| | {{Party/Div|color={{normal color}}}} | ||
| | | style="margin:auto" |{{Pokémon/3 | ||
|game=Emerald | |game=Emerald | ||
|ndex=327 | |ndex=327 | ||
| Line 395: | Line 391: | ||
|level=53 | |level=53 | ||
|type1=Normal | |type1=Normal | ||
|move1= | |move1=Teeter Dance|move1type=Normal | ||
|move2= | |move2=Skill Swap|move2type=Psychic | ||
|move3= | |move3=Facade|move3type=Normal | ||
|move4= | |move4=Hypnosis|move4type=Psychic}} | ||
| | | style="margin:auto" |{{Pokémon/3 | ||
|game=Emerald | |game=Emerald | ||
|ndex=289 | |ndex=289 | ||
| Line 409: | Line 404: | ||
|level=55 | |level=55 | ||
|type1=Normal | |type1=Normal | ||
|move1= | |move1=Hyper Beam|move1type=Normal | ||
|move2=Flamethrower|move2type=Fire | |move2=Flamethrower|move2type=Fire | ||
|move3=Thunderbolt|move3type=Electric | |move3=Thunderbolt|move3type=Electric | ||
|move4= | |move4=Shadow Ball|move4type=Ghost}} | ||
}} | {{Party/Footer}} | ||
=====Fourth | =====Fourth rematch===== | ||
{{Party|color={{normal color}} | {{Party/Single | ||
|color={{normal color}} | |||
|headcolor={{normal color light}} | |headcolor={{normal color light}} | ||
|bordercolor={{normal color dark}} | |bordercolor={{normal color dark}} | ||
|sprite= | |sprite=Spr RS Norman.png | ||
|prize={{PDollar}}12000 | |prize={{PDollar}}12000 | ||
|class=Leader | |class=Leader | ||
|name=Norman | |classlink=Gym Leader | ||
|name={{color2|000|Norman}} | |||
|game=E | |game=E | ||
|location=Petalburg Gym | |location=Petalburg Gym | ||
|pokemon=6 | |pokemon=6}} | ||
| | |{{Pokémon/3 | ||
| | |game=Emerald | ||
|ndex=289 | |||
|pokemon=Slaking | |||
|gender=male | |||
|ability=Truant | |||
|held=Sitrus Berry | |||
|level=57 | |||
|type1=Normal | |||
|move1=Blizzard|move1type=Ice | |||
|move2=Shadow Ball|move2type=Ghost | |||
|move3=Double-Edge|move3type=Normal | |||
|move4=Fire Blast|move4type=Fire}} | |||
|{{Pokémon/3 | |||
|game=Emerald | |game=Emerald | ||
|ndex=242 | |ndex=242 | ||
| Line 435: | Line 444: | ||
|level=57 | |level=57 | ||
|type1=Normal | |type1=Normal | ||
|move1= | |move1=Protect|move1type=Normal | ||
|move2= | |move2=Sing|move2type=Normal | ||
|move3= | |move3=Skill Swap|move3type=Psychic | ||
|move4=Focus Punch|move4type=Fighting}} | |move4=Focus Punch|move4type=Fighting}} | ||
| | |{{Pokémon/3 | ||
|game=Emerald | |game=Emerald | ||
|ndex=115 | |ndex=115 | ||
| Line 462: | Line 457: | ||
|type1=Normal | |type1=Normal | ||
|move1=Fake Out|move1type=Normal | |move1=Fake Out|move1type=Normal | ||
|move2= | |move2=Dizzy Punch|move2type=Normal | ||
|move3=Endure|move3type=Normal | |move3=Endure|move3type=Normal | ||
|move4= | |move4=Reversal|move4type=Fighting}} | ||
| | {{Party/Div|color={{normal color}}}} | ||
| | |{{Pokémon/3 | ||
|game=Emerald | |game=Emerald | ||
|ndex=128 | |ndex=128 | ||
| Line 475: | Line 470: | ||
|type1=Normal | |type1=Normal | ||
|move1=Take Down|move1type=Normal | |move1=Take Down|move1type=Normal | ||
|move2= | |move2=Protect|move2type=Normal | ||
|move3= | |move3=Fire Blast|move3type=Fire | ||
|move4= | |move4=Earthquake|move4type=Ground}} | ||
| | |{{Pokémon/3 | ||
|game=Emerald | |game=Emerald | ||
|ndex=327 | |ndex=327 | ||
| Line 487: | Line 481: | ||
|level=58 | |level=58 | ||
|type1=Normal | |type1=Normal | ||
|move1= | |move1=Teeter Dance|move1type=Normal | ||
|move2= | |move2=Skill Swap|move2type=Psychic | ||
|move3= | |move3=Facade|move3type=Normal | ||
|move4= | |move4=Hypnosis|move4type=Psychic}} | ||
| | |{{Pokémon/3 | ||
|game=Emerald | |game=Emerald | ||
|ndex=289 | |ndex=289 | ||
| Line 501: | Line 494: | ||
|level=60 | |level=60 | ||
|type1=Normal | |type1=Normal | ||
|move1= | |move1=Hyper Beam|move1type=Normal | ||
|move2=Flamethrower|move2type=Fire | |move2=Flamethrower|move2type=Fire | ||
|move3=Thunderbolt|move3type=Electric | |move3=Thunderbolt|move3type=Electric | ||
|move4= | |move4=Shadow Ball|move4type=Ghost}} | ||
}} | {{Party/Footer}} | ||
===={{g|Omega Ruby and Alpha Sapphire}}==== | |||
{{trainerheader|Normal}} | |||
{{trainerdiv|Normal|Speed Room}} | |||
{{trainerentry|VSAce Trainer M ORAS.png{{!}}150px|Ace Trainer|Randall|1,680|1|301|Delcatty|♀|28|36=トシキ|37=Toshiki}} | |||
{{trainerdiv|Normal|Accuracy Room}} | |||
{{trainerentry|VSAce Trainer F ORAS.png{{!}}150px|Ace Trainer|Mary|1,680|1|301|Delcatty|♀|28|36=アヤカ|37=Ayaka}} | |||
{{trainerdiv|Normal|Zero Reduction Room}} | |||
{{trainerentry|VSAce Trainer M ORAS.png{{!}}150px|Ace Trainer|Parker|1,680|1|264|Linoone|♂|28|36=ヒデキ|37=Hideki}} | |||
{{trainerdiv|Normal|Defense Room}} | |||
{{trainerentry|VSAce Trainer F ORAS.png{{!}}150px|Ace Trainer|Lori|1,680|1|264|Linoone|♀|28|36=ヒトミ|37=Hitomi}} | |||
{{trainerdiv|Normal|Recovery Room}} | |||
{{trainerentry|VSAce Trainer M ORAS.png{{!}}150px|Ace Trainer|George|1,680|1|264|Linoone|♂|28|36=カズマ|37=Kazuma}} | |||
{{trainerdiv|Normal|Strength Room}} | |||
{{trainerentry|VSAce Trainer F ORAS.png{{!}}150px|Ace Trainer|Jody|1,680|1|335|Zangoose|♀|28|36=サオリ|37=Saori}} | |||
{{trainerdiv|Normal|One-Hit KO Room}} | |||
{{trainerentry|VSAce Trainer M ORAS.png{{!}}150px|Ace Trainer|Berke|1,680|1|335|Zangoose|♂|28|36=ナオキ|37=Naoki}} | |||
{{trainerfooter|Normal|3}} | |||
{{Party/Single | |||
|color={{normal color}} | |||
|bordercolor={{normal color dark}} | |||
|headcolor={{normal color light}} | |||
|sprite=VSNorman.png | |||
|size=150px | |||
|prize={{PDollar}}3,600 | |||
|class=Leader | |||
|classlink=Gym Leader | |||
|name={{color2|000|Norman}} | |||
|game=ORAS | |||
|location=Petalburg Gym | |||
|pokemon=3}} | |||
|{{Pokémon/6 | |||
|game=Ruby | |||
|ndex=289 | |||
|pokemon=Slaking | |||
|gender=male | |||
|ability=Truant | |||
|level=28 | |||
|type1=Normal | |||
|move1=Retaliate|move1type=Normal|move1cat=Physical | |||
|move2=Yawn|move2type=Normal|move2cat=Status | |||
|move3=Feint Attack|move3type=Dark|move3cat=Physical | |||
|move4=Encore|move4type=Normal|move4cat=Status}} | |||
|{{Pokémon/6 | |||
|game=Ruby | |||
|ndex=288 | |||
|pokemon=Vigoroth | |||
|gender=male | |||
|ability=Vital Spirit | |||
|level=28 | |||
|type1=Normal | |||
|move1=Encore|move1type=Normal|move1cat=Status | |||
|move2=Feint Attack|move2type=Dark|move2cat=Physical | |||
|move3=Retaliate|move3type=Normal|move3cat=Physical | |||
|move4=Fury Swipes|move4type=Normal|move4cat=Physical}} | |||
|{{Pokémon/6 | |||
|game=Ruby | |||
|ndex=289 | |||
|pokemon=Slaking | |||
|gender=male | |||
|ability=Truant | |||
|level=30 | |||
|type1=Normal | |||
|move1=Retaliate|move1type=Normal|move1cat=Physical | |||
|move2=Feint Attack|move2type=Dark|move2cat=Physical | |||
|move3=Swagger|move3type=Normal|move3cat=Status | |||
|move4=Chip Away|move4type=Normal|move4cat=Physical}} | |||
{{Party/Footer}} | |||
===Items=== | ===Items=== | ||
{{itlisth|Normal}} | {{itlisth|Normal}} | ||
{{ | {{Itemlist|TM Normal|Reward for defeating Norman|Ru=yes|Sa=yes|E=yes|display={{TM|42|Facade}}}} | ||
{{Itemlist|TM Normal VI|Reward for defeating Norman|OR=yes|AS=yes|display={{TM|67|Retaliate}}}} | |||
{{itlistfoot|Normal}} | {{itlistfoot|Normal}} | ||
| Line 515: | Line 578: | ||
The Petalburg Gym has appeared in multiple episodes of the {{pkmn|anime}}. | The Petalburg Gym has appeared in multiple episodes of the {{pkmn|anime}}. | ||
It first appeared in ''[[AG003|There's No Place Like Hoenn]]''. {{Ash}} and {{an|May}} reached the Gym, where Ash intended to battle Norman and win his first | It first appeared in ''[[AG003|There's No Place Like Hoenn]]''. {{Ash}} and {{an|May}} reached the Gym, where Ash intended to battle Norman and win his first Badge. However, when Norman learned that Ash only had {{AP|Pikachu}} with him, he declined the battle. He did agree to an unofficial battle, which the young {{pkmn|Trainer}} lost. | ||
Its next major appearance came in ''[[AG069|Love, Petalburg Style]]'', | Its next major appearance came in ''[[AG069|Love, Petalburg Style]]''. In ''[[AG070|Balance of Power!]]'', Ash had his official Gym battle against Norman. This time, with the help of his {{AP|Grovyle|Sceptile}} and {{AP|Torkoal}}, Ash defeated the Gym Leader and earned the {{Badge|Balance}}. | ||
In addition to housing the battlefield, the Gym is also home to Norman, his family and the Gym assistant {{ho|Kenny}}. A greenhouse is also on the Gym's property. The various {{t|Normal}} Pokémon at the Gym make their home in the greenhouse when they're not battling. May has also left her Pokémon at the greenhouse for her parents to watch. | In addition to housing the battlefield, the Gym is also home to Norman, his family and the Gym assistant {{ho|Kenny}}. A greenhouse is also on the Gym's property. The various {{t|Normal}} Pokémon at the Gym make their home in the greenhouse when they're not battling. May has also left her Pokémon at the greenhouse for her parents to watch. | ||
It is [[Max]]'s dream to one day succeed his father as Gym Leader, and | It is [[Max]]'s dream to one day succeed his father as Gym Leader, and he approaches this goal through the knowledge of Pokémon battle strategy tactics. | ||
====Pokémon used in Gym==== | |||
{{TrainerPoké | |||
|trainer=Norman | |||
|pkmn=Vigoroth | |||
|type1=Normal | |||
|img=Norman Vigoroth.png | |||
|epnum=AG003 | |||
|epname=There's no Place Like Hoenn | |||
|vajp=Yūji Ueda | |||
<!--|vaen=--> | |||
|desc={{p|Vigoroth}} was first seen in ''[[AG003|There's no Place Like Hoenn]]'' after Norman agreed to have an unofficial battle with {{Ash}} due to his lack of having less than three Pokémon. After a tough battle with [[Ash's Pikachu]], Vigoroth managed to defeat him. Later, it helped in destroying one of [[Team Rocket's mechas]] that was attacking the Gym. | |||
It reappeared in ''[[AG069|Love, Petalburg Style!]]'', when May, Max, Brock and Kenny saw it hanging from a brunch at a place where Norman keeps his Pokémon. It then hugged Max. Team Rocket also planned to steal it for Giovanni, along with Slakoth and Slaking. When Ash arrived at the forest, Vigoroth fell onto Ash. Ash was happy to see Vigoroth again. | |||
Vigoroth was seen again in ''[[AG070|Balance of Power]]'', in Ash and Norman's official Gym battle, where it was the second Pokémon used by the Gym Leader. It at first managed to easily dodge Torkoal's {{m|Overheat}}, and knocked out {{AP|Torkoal}} with {{m|Scratch}}. After this, it had an intense battle with Ash's {{AP|Pikachu}}. Norman ordered Vigoroth to use Scratch, but was surprised when Ash told Pikachu to take the hit. Vigoroth's Scratch attack hit home, but the powerful Pokémon was suddenly paralyzed by Pikachu's innate Static Ability. Seizing the opportunity, Pikachu attacked with Iron Tail, knocking Vigoroth out. However, Pikachu wasted all of his energy, and was also knocked out in the process. | |||
It reappeared in flashbacks in ''[[AG057|Going for a Spinda]]'', ''[[AG068|A Double Dilemma]]'', ''[[AG089|A Scare to Remember!]]'', and [[AG120]]. | |||
{{-}} | Vigoroth's known moves are {{m|Scratch}} and {{m|Flamethrower}}.}} | ||
{{ | |||
{{TrainerPoké | |||
|trainer=Norman | |||
|pkmn=Slakoth | |||
|type1=Normal | |||
|img=Norman Slakoth.png | |||
|epnum=AG069 | |||
|epname=Love, Petalburg Style! | |||
|vajp=Shin'ichirō Miki | |||
<!--|vaen=--> | |||
|desc=Norman's {{p|Slakoth}} first appeared in ''[[AG069|Love, Petalburg Style!]]'', in a greenhouse where Norman keeps his Pokémon. It appeared again in ''[[AG070|Balance of Power!]]'', during Norman's battle with Ash. The match started with Norman's Slakoth against Ash's Pikachu. Utilizing Pikachu's speed, Ash ordered Pikachu to use {{m|Quick Attack}}. Slakoth dodged this and counterattacked with Shadow Ball. Jumping out of the way, Pikachu attacked with {{m|Iron Tail}} but missed once again as Slakoth leaned out of the way. Dazed, Pikachu was unable to dodge Slakoth's Hidden Power, and was blasted across the arena. | |||
As Pikachu recovered from Hidden Power, Ash realized that he needed to change his strategy. He decided to try {{t|Electric}} attacks and ordered Pikachu to attack with {{m|Thunderbolt}}. However Slakoth dodged this attack as well, and responded with Blizzard. The incredible cold kept Pikachu from attacking back, so Ash recalled him and sent out {{AP|Torkoal}} instead. Torkoal used {{m|Flamethrower}}, which easily blasted through Slakoth's Blizzard and scored a direct hit, knocking Slakoth out. | |||
It reappeared in a flashback in [[AG120]]. | |||
Slakoth's known moves are {{m|Shadow Ball}}, {{m|Hidden Power}}, and {{m|Blizzard}}.}} | |||
{{TrainerPoké | |||
|main=yes | |||
|trainer=Norman | |||
|pkmn=Slaking | |||
|type1=Normal | |||
|img=Norman Slaking.png | |||
|epnum=AG069 | |||
|epname=Love, Petalburg Style! | |||
|vajp=Unshō Ishizuka | |||
|vaen=Dan Green | |||
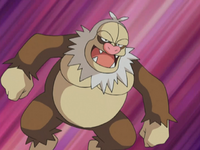
|desc={{p|Slaking}} made its debut in ''[[AG069|Love, Petalburg Style!]]'', in which it was staying in Norman's greenhouse with the rest of his Pokémon. It later battled against [[Ash's Grovyle]] in Ash's Gym Battle against Norman, but was ultimately defeated.}} | |||
{{Gym Leaders of Hoenn}}<br/> | |||
{{Project Locations notice}} | {{Project Locations notice}} | ||
[[Category:Hoenn Gyms]] | |||
[[Category:Gyms]] | |||
[[de:Pokémon-Arena von Blütenburg City]] | [[de:Pokémon-Arena von Blütenburg City]] | ||
| Line 531: | Line 643: | ||
[[ja:トウカジム]] | [[ja:トウカジム]] | ||
[[it:Palestra di Petalipoli]] | [[it:Palestra di Petalipoli]] | ||
[[zh:橙華道館]] | |||
Revision as of 18:42, 18 June 2015
| Petalburg Gym トウカジム Touka Gym | |
| |
| Location | Petalburg City |
| Gym Leader | Norman |
| Badge | Balance Badge |
| Dominant Type | Normal |
| Region | Hoenn |
| |
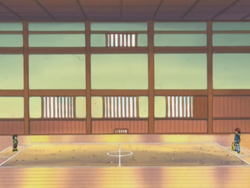
| Battlefield | |
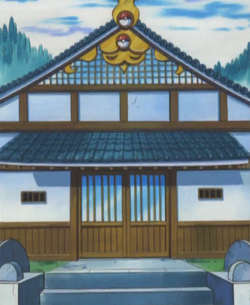
The Petalburg Gym (Japanese: トウカジム Touka Gym) is the official Gym of Petalburg City. It is based on Normal-type Pokémon. The Gym Leader is Norman. Trainers who defeat him receive the Balance Badge.
In the games
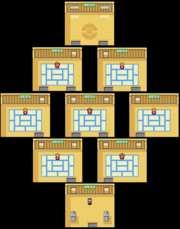
Between the entrance and Gym Leader Norman are a series of rooms, each containing a Trainer. In order to access these rooms, all of the first four Badges must be obtained first; otherwise, the doors will be locked. The Trainers have special methods of battling, as displayed on the doors leading to their rooms. They include the One-Hit KO Room, Accuracy Room, Attack Room, Defense Room, Speed Room, Recovery Room and either Zero Reduction RoomRSORAS or Confusion RoomE. Once three rooms in a row are completed, they can access the Gym Leader Room with Norman. In Pokémon Ruby and Sapphire and Pokémon Omega Ruby and Alpha Sapphire, all seven Trainers in their respective rooms use items in the battle, whereas in Pokémon Emerald, the strategy of these Trainers is dependent on the moves of their Pokémon.
When defeated, Norman will give the player the Balance Badge as well as TM42 (Facade)RSE/TM67 (Retaliate)ORAS as a reward.
Appearance
| Ruby | Sapphire | Emerald | Omega Ruby | Alpha Sapphire |
|---|---|---|---|---|
|

|
| ||
Trainers
Pokémon Ruby and Sapphire
| Trainer | Pokémon | |||||||||||
|---|---|---|---|---|---|---|---|---|---|---|---|---|
| Speed Room | ||||||||||||
|
| |||||||||||
| Accuracy Room | ||||||||||||
|
| |||||||||||
| Zero Reduction Room | ||||||||||||
|
| |||||||||||
| Defense Room | ||||||||||||
|
| |||||||||||
| Recovery Room | ||||||||||||
|
| |||||||||||
| Strength Room | ||||||||||||
|
| |||||||||||
| One-Hit KO Room | ||||||||||||
|
| |||||||||||
| Trainers with a PokéNav by their names will be registered in the Trainer's Eyes or Match Call function after the first battle, and may have a rematch with the player with higher-level Pokémon. | ||||||||||||
|
||||||||||||||||||||||||||||||||||||||||||||||||||||||||||||||||||||||||||||
| ||||||||||||||||||||||||||||||||||||||||||||||||||||||||||||||||||||||||||||
Pokémon Emerald
| Trainer | Pokémon | |||||||||||
|---|---|---|---|---|---|---|---|---|---|---|---|---|
| Speed Room | ||||||||||||
|
| |||||||||||
| Accuracy Room | ||||||||||||
|
| |||||||||||
| Confusion Room | ||||||||||||
|
| |||||||||||
| Defense Room | ||||||||||||
|
| |||||||||||
| Recovery Room | ||||||||||||
|
| |||||||||||
| Strength Room | ||||||||||||
|
| |||||||||||
| One-Hit KO Room | ||||||||||||
|
| |||||||||||
| Trainers with a PokéNav by their names will be registered in the Trainer's Eyes or Match Call function after the first battle, and may have a rematch with the player with higher-level Pokémon. | ||||||||||||
|
|||||||||||||||||||||||||||||||||||||||||||||||||||||||||||||||||||||||||||||||||||||||||||||||||||||
| |||||||||||||||||||||||||||||||||||||||||||||||||||||||||||||||||||||||||||||||||||||||||||||||||||||
First rematch
|
|||||||||||||||||||||||||||||||||||||||||||||||||||||||||||||||||||||||||||||||||||||||||||||||||||||
| |||||||||||||||||||||||||||||||||||||||||||||||||||||||||||||||||||||||||||||||||||||||||||||||||||||
Second rematch
|
||||||||||||||||||||||||||||||||||||||||||||||||||||||||||||||||||||||||||||||||||||||||||||||||||||||||||||||||||||||||||||||
| ||||||||||||||||||||||||||||||||||||||||||||||||||||||||||||||||||||||||||||||||||||||||||||||||||||||||||||||||||||||||||||||
Third rematch
|
||||||||||||||||||||||||||||||||||||||||||||||||||||||||||||||||||||||||||||||||||||||||||||||||||||||||||||||||||||||||||||||
| ||||||||||||||||||||||||||||||||||||||||||||||||||||||||||||||||||||||||||||||||||||||||||||||||||||||||||||||||||||||||||||||
Fourth rematch
|
|||||||||||||||||||||||||||||||||||||||||||||||||||||||||||||||||||||||||||||||||||||||||||||||||||||||||||||||||||||||||||||||||||||||||||||||||||||||
| |||||||||||||||||||||||||||||||||||||||||||||||||||||||||||||||||||||||||||||||||||||||||||||||||||||||||||||||||||||||||||||||||||||||||||||||||||||||
Pokémon Omega Ruby and Alpha Sapphire
| Trainer | Pokémon | |||||||||||
|---|---|---|---|---|---|---|---|---|---|---|---|---|
| Speed Room | ||||||||||||
|
| |||||||||||
| Accuracy Room | ||||||||||||
|
| |||||||||||
| Zero Reduction Room | ||||||||||||
|
| |||||||||||
| Defense Room | ||||||||||||
|
| |||||||||||
| Recovery Room | ||||||||||||
|
| |||||||||||
| Strength Room | ||||||||||||
|
| |||||||||||
| One-Hit KO Room | ||||||||||||
|
| |||||||||||
| Trainers with a PokéNav by their names will be registered in the Trainer's Eyes or Match Call function after the first battle, and may have a rematch with the player with higher-level Pokémon. | ||||||||||||
|
||||||||||||||||||||||||||||||||||||||||||||||||||||||||||||||||||||||||||||||||||||||||||||||||||||
| ||||||||||||||||||||||||||||||||||||||||||||||||||||||||||||||||||||||||||||||||||||||||||||||||||||
Items
| Item | Location | Games | |
|---|---|---|---|
| TM42 (Facade) | Reward for defeating Norman | R S E | |
| TM67 (Retaliate) | Reward for defeating Norman | OR AS | |
In the anime
The Petalburg Gym has appeared in multiple episodes of the anime.
It first appeared in There's No Place Like Hoenn. Ash and May reached the Gym, where Ash intended to battle Norman and win his first Badge. However, when Norman learned that Ash only had Pikachu with him, he declined the battle. He did agree to an unofficial battle, which the young Trainer lost.
Its next major appearance came in Love, Petalburg Style. In Balance of Power!, Ash had his official Gym battle against Norman. This time, with the help of his Grovyle and Torkoal, Ash defeated the Gym Leader and earned the Balance Badge.
In addition to housing the battlefield, the Gym is also home to Norman, his family and the Gym assistant Kenny. A greenhouse is also on the Gym's property. The various Normal Pokémon at the Gym make their home in the greenhouse when they're not battling. May has also left her Pokémon at the greenhouse for her parents to watch.
It is Max's dream to one day succeed his father as Gym Leader, and he approaches this goal through the knowledge of Pokémon battle strategy tactics.
Pokémon used in Gym

|
||
| Vigoroth was first seen in There's no Place Like Hoenn after Norman agreed to have an unofficial battle with Ash due to his lack of having less than three Pokémon. After a tough battle with Ash's Pikachu, Vigoroth managed to defeat him. Later, it helped in destroying one of Team Rocket's mechas that was attacking the Gym.
It reappeared in Love, Petalburg Style!, when May, Max, Brock and Kenny saw it hanging from a brunch at a place where Norman keeps his Pokémon. It then hugged Max. Team Rocket also planned to steal it for Giovanni, along with Slakoth and Slaking. When Ash arrived at the forest, Vigoroth fell onto Ash. Ash was happy to see Vigoroth again. Vigoroth was seen again in Balance of Power, in Ash and Norman's official Gym battle, where it was the second Pokémon used by the Gym Leader. It at first managed to easily dodge Torkoal's Overheat, and knocked out Torkoal with Scratch. After this, it had an intense battle with Ash's Pikachu. Norman ordered Vigoroth to use Scratch, but was surprised when Ash told Pikachu to take the hit. Vigoroth's Scratch attack hit home, but the powerful Pokémon was suddenly paralyzed by Pikachu's innate Static Ability. Seizing the opportunity, Pikachu attacked with Iron Tail, knocking Vigoroth out. However, Pikachu wasted all of his energy, and was also knocked out in the process. It reappeared in flashbacks in Going for a Spinda, A Double Dilemma, A Scare to Remember!, and AG120. Vigoroth's known moves are Scratch and Flamethrower. | ||
| Debut | There's no Place Like Hoenn | |
|---|---|---|
| Voice actors | ||
| Japanese | Yūji Ueda | |

|
||
| Norman's Slakoth first appeared in Love, Petalburg Style!, in a greenhouse where Norman keeps his Pokémon. It appeared again in Balance of Power!, during Norman's battle with Ash. The match started with Norman's Slakoth against Ash's Pikachu. Utilizing Pikachu's speed, Ash ordered Pikachu to use Quick Attack. Slakoth dodged this and counterattacked with Shadow Ball. Jumping out of the way, Pikachu attacked with Iron Tail but missed once again as Slakoth leaned out of the way. Dazed, Pikachu was unable to dodge Slakoth's Hidden Power, and was blasted across the arena.
As Pikachu recovered from Hidden Power, Ash realized that he needed to change his strategy. He decided to try Electric attacks and ordered Pikachu to attack with Thunderbolt. However Slakoth dodged this attack as well, and responded with Blizzard. The incredible cold kept Pikachu from attacking back, so Ash recalled him and sent out Torkoal instead. Torkoal used Flamethrower, which easily blasted through Slakoth's Blizzard and scored a direct hit, knocking Slakoth out. It reappeared in a flashback in AG120. Slakoth's known moves are Shadow Ball, Hidden Power, and Blizzard. | ||
| Debut | Love, Petalburg Style! | |
|---|---|---|
| Voice actors | ||
| Japanese | Shin'ichirō Miki | |
|
||
Slaking made its debut in Love, Petalburg Style!, in which it was staying in Norman's greenhouse with the rest of his Pokémon. It later battled against Ash's Grovyle in Ash's Gym Battle against Norman, but was ultimately defeated. | ||
| Debut | Love, Petalburg Style! | |
|---|---|---|
| Voice actors | ||
| Japanese | Unshō Ishizuka | |
| English | Dan Green | |

|
This article is part of Project Locations, a Bulbapedia project that aims to write comprehensive articles on every location in the Pokémon world. |


