Mauville Game Corner: Difference between revisions
mNo edit summary |
mNo edit summary |
||
| (37 intermediate revisions by 20 users not shown) | |||
| Line 1: | Line 1: | ||
{{incomplete|2=Missing other languages section}} | |||
{{Infobox location | {{Infobox location | ||
|image=Mauville Game Corner.png | |image=Mauville Game Corner E.png | ||
|image_size=153 | |||
|type=building | |type=building | ||
|location_name=Mauville Game Corner | |location_name=Mauville Game Corner | ||
| Line 8: | Line 10: | ||
|region=Hoenn | |region=Hoenn | ||
|generation={{gen|III}} | |generation={{gen|III}} | ||
|map=Mauville City | |map=Hoenn Mauville City Map.png | ||
}} | }} | ||
[[File:Mauville City Game Corner RS.png|thumb|right|Mauville Game Corner as depicted in {{2v2|Ruby|Sapphire}}]] | |||
The '''Mauville Game Corner''' (Japanese: '''キンセツゲームコーナー''' ''Kinsetsu Game Corner'') is a Game Corner located in [[Mauville City]] in the [[Hoenn]] region in {{game2|Ruby|Sapphire|Emerald}}. | |||
In {{g|Omega Ruby and Alpha Sapphire}}, it is closed down, and the owner gives the player three dolls. The closure is likely due to {{wp|Pan European Game Information|PEGI}}'s current classification standards (simulated depictions of gambling must have at least a "12" rating). | |||
{{sign|E|header}} | {{sign|E|header}} | ||
{{sign|E|"The play spot for all!"}} | {{sign|E|"The play spot for all!"}} | ||
| Line 20: | Line 23: | ||
{{sign|E|footer}} | {{sign|E|footer}} | ||
== | ==Games== | ||
The | [[File:Mauville Game Corner interior RSE.png|thumb|right|200px|The interior of the Game Corner]] | ||
Occasionally, the Game Corner will have a Service Day to "improve your luck". When it does, there will be an announcement on [[Hoenn TV]]. | |||
===Slot machines=== | |||
===Slot | |||
There are sixteen [[slot machine]]s in the Game Corner, with four of them having people already seated at them. | There are sixteen [[slot machine]]s in the Game Corner, with four of them having people already seated at them. | ||
| Line 48: | Line 34: | ||
====Payouts==== | ====Payouts==== | ||
Note that order matters. | Note that order matters. | ||
{| class="roundy" style="background:#{{gold color}}; border: 2px solid #{{gold color}}" | |||
{| | |- | ||
|- style="background: # | ! style="background:#{{gold color light}}; {{roundytl|5px}}" | Series of icons | ||
! style="{{roundytr|5px}}; background:#{{gold color light}}" | Payout | |||
|- style="background:#FFF" | |||
| [[File:Mauville Corner Red 7.png]][[File:Mauville Corner Red 7.png]][[File:Mauville Corner Red 7.png]] || 300 | |||
|- style="background:#FFF" | |||
| [[File:Mauville Corner Blue 7.png]][[File:Mauville Corner Blue 7.png]][[File:Mauville Corner Blue 7.png]] || 300 | |||
|- style="background:#FFF" | |||
| [[File:Mauville Corner Red 7.png]][[File:Mauville Corner Red 7.png]][[File:Mauville Corner Blue 7.png]] || 90 | |||
|- style="background:#FFF" | |||
| [[File:Mauville Corner Blue 7.png]][[File:Mauville Corner Blue 7.png]][[File:Mauville Corner Red 7.png]] || 90 | |||
|- style="background:#FFF" | |||
| [[File:Mauville Corner Azurill.png|link=Azurill (Pokémon)]][[File:Mauville Corner Azurill.png|link=Azurill (Pokémon)]][[File:Mauville Corner Azurill.png|link=Azurill (Pokémon)]] || 12 | |||
|- style="background:#FFF" | |||
| [[File:Mauville Corner Lotad.png|link=Lotad (Pokémon)]][[File:Mauville Corner Lotad.png|link=Lotad (Pokémon)]][[File:Mauville Corner Lotad.png|link=Lotad (Pokémon)]] || 6 | |||
|- style="background:#FFF" | |||
| [[File:Mauville Corner Cherry.png]][[File:Mauville Corner Cherry.png]] || 4 | |||
|- style="background:#FFF" | |||
| [[File:Mauville Corner Cherry.png]] || 2 | |||
|- style="background:#FFF" | |||
| [[File:Mauville Corner Replay.png]][[File:Mauville Corner Replay.png]][[File:Mauville Corner Replay.png]] || Replay | |||
|- | |- | ||
| | | style="background:#FFF; {{roundybl|5px}}" | [[File:Mauville Corner Lightning Bolt.png]][[File:Mauville Corner Lightning Bolt.png]][[File:Mauville Corner Lightning Bolt.png]] || style="background:#FFF; {{roundybr|5px}}" | 3 coins, power | ||
|}{{-}} | |||
| [[File:Mauville Corner | |||
| | |||
| 3 coins, power | |||
|} | |||
====Reel Time==== | ====Reel Time==== | ||
| Line 111: | Line 69: | ||
As a patron at the Game Corner notes, the maximum the player can manage to earn (through five Reel Time spins) is four regular bonuses then a big bonus, totaling 660 coins. However, since the reels speed up after a win, it may be more useful to attempt two regular bonuses and a big bonus (i.e. regular bonus, loss, regular bonus, loss, big bonus), for 480 coins. | As a patron at the Game Corner notes, the maximum the player can manage to earn (through five Reel Time spins) is four regular bonuses then a big bonus, totaling 660 coins. However, since the reels speed up after a win, it may be more useful to attempt two regular bonuses and a big bonus (i.e. regular bonus, loss, regular bonus, loss, big bonus), for 480 coins. | ||
=====Video===== | |||
{{youtubevid|gjLgBALMoNg|Blueapple128|hoenn}} | |||
====Reels==== | ====Reels==== | ||
In all versions, the reels have the following symbols. (The reels slide downward, so symbols at the bottom show up first.) | In all versions, the reels have the following symbols. (The reels slide downward, so symbols at the bottom show up first.) | ||
{| | {| class="roundy" style="background:#{{gold color}}; border: 2px solid #{{gold color}}" | ||
|- style="background: # | |- | ||
! style="background:#{{gold color light}}; {{roundytl|5px}}" | Left | |||
! Mid. | ! style="background:#{{gold color light}}" | Mid. | ||
! Right | ! style="background:#{{gold color light}}; {{roundytr|5px}} " | Right | ||
|- | |- style="background:#FFF" | ||
| [[File:Mauville Corner Lightning Bolt.png]] | | [[File:Mauville Corner Lightning Bolt.png]] | ||
| [[File:Mauville Corner Lightning Bolt.png]] | | [[File:Mauville Corner Lightning Bolt.png]] | ||
| [[File:Mauville Corner Lightning Bolt.png]] | | [[File:Mauville Corner Lightning Bolt.png]] | ||
|- | |- style="background:#FFF" | ||
| [[File:Mauville Corner Lotad.png]] | | [[File:Mauville Corner Lotad.png]] | ||
| [[File:Mauville Corner Lightning Bolt.png]] | | [[File:Mauville Corner Lightning Bolt.png]] | ||
| [[File:Mauville Corner Replay.png]] | | [[File:Mauville Corner Replay.png]] | ||
|- | |- style="background:#FFF" | ||
| [[File:Mauville Corner Replay.png]] | | [[File:Mauville Corner Replay.png]] | ||
| [[File:Mauville Corner Lotad.png]] | | [[File:Mauville Corner Lotad.png]] | ||
| [[File:Mauville Corner Lotad.png]] | | [[File:Mauville Corner Lotad.png]] | ||
|- | |- style="background:#FFF" | ||
| [[File:Mauville Corner Red 7.png]] | | [[File:Mauville Corner Red 7.png]] | ||
| [[File:Mauville Corner Blue 7.png]] | | [[File:Mauville Corner Blue 7.png]] | ||
| [[File:Mauville Corner Cherry.png]] | | [[File:Mauville Corner Cherry.png]] | ||
|- | |- style="background:#FFF" | ||
| [[File:Mauville Corner Cherry.png]] | | [[File:Mauville Corner Cherry.png]] | ||
| [[File:Mauville Corner Lotad.png]] | | [[File:Mauville Corner Lotad.png]] | ||
| [[File:Mauville Corner Red 7.png]] | | [[File:Mauville Corner Red 7.png]] | ||
|- | |- style="background:#FFF" | ||
| [[File:Mauville Corner Azurill.png]] | | [[File:Mauville Corner Azurill.png]] | ||
| [[File:Mauville Corner Replay.png]] | | [[File:Mauville Corner Replay.png]] | ||
| [[File:Mauville Corner Lightning Bolt.png]] | | [[File:Mauville Corner Lightning Bolt.png]] | ||
|- | |- style="background:#FFF" | ||
| [[File:Mauville Corner Replay.png]] | | [[File:Mauville Corner Replay.png]] | ||
| [[File:Mauville Corner Cherry.png]] | | [[File:Mauville Corner Cherry.png]] | ||
| [[File:Mauville Corner Blue 7.png]] | | [[File:Mauville Corner Blue 7.png]] | ||
|- | |- style="background:#FFF" | ||
| [[File:Mauville Corner Lightning Bolt.png]] | | [[File:Mauville Corner Lightning Bolt.png]] | ||
| [[File:Mauville Corner Azurill.png]] | | [[File:Mauville Corner Azurill.png]] | ||
| [[File:Mauville Corner Replay.png]] | | [[File:Mauville Corner Replay.png]] | ||
|- | |- style="background:#FFF" | ||
| [[File:Mauville Corner Lotad.png]] | | [[File:Mauville Corner Lotad.png]] | ||
| [[File:Mauville Corner Lotad.png]] | | [[File:Mauville Corner Lotad.png]] | ||
| [[File:Mauville Corner Lotad.png]] | | [[File:Mauville Corner Lotad.png]] | ||
|- | |- style="background:#FFF" | ||
| [[File:Mauville Corner Blue 7.png]] | | [[File:Mauville Corner Blue 7.png]] | ||
| [[File:Mauville Corner Replay.png]] | | [[File:Mauville Corner Replay.png]] | ||
| [[File:Mauville Corner Azurill.png]] | | [[File:Mauville Corner Azurill.png]] | ||
|- | |- style="background:#FFF" | ||
| [[File:Mauville Corner Lotad.png]] | | [[File:Mauville Corner Lotad.png]] | ||
| [[File:Mauville Corner Cherry.png]] | | [[File:Mauville Corner Cherry.png]] | ||
| [[File:Mauville Corner Replay.png]] | | [[File:Mauville Corner Replay.png]] | ||
|- | |- style="background:#FFF" | ||
| [[File:Mauville Corner Cherry.png]] | | [[File:Mauville Corner Cherry.png]] | ||
| [[File:Mauville Corner Lotad.png]] | | [[File:Mauville Corner Lotad.png]] | ||
| [[File:Mauville Corner Lotad.png]] | | [[File:Mauville Corner Lotad.png]] | ||
|- | |- style="background:#FFF" | ||
| [[File:Mauville Corner Lightning Bolt.png]] | | [[File:Mauville Corner Lightning Bolt.png]] | ||
| [[File:Mauville Corner Replay.png]] | | [[File:Mauville Corner Replay.png]] | ||
| [[File:Mauville Corner Lightning Bolt.png]] | | [[File:Mauville Corner Lightning Bolt.png]] | ||
|- | |- style="background:#FFF" | ||
| [[File:Mauville Corner Replay.png]] | | [[File:Mauville Corner Replay.png]] | ||
| [[File:Mauville Corner Cherry.png]] | | [[File:Mauville Corner Cherry.png]] | ||
| [[File:Mauville Corner Azurill.png]] | | [[File:Mauville Corner Azurill.png]] | ||
|- | |- style="background:#FFF" | ||
| [[File:Mauville Corner Azurill.png]] | | [[File:Mauville Corner Azurill.png]] | ||
| [[File:Mauville Corner Red 7.png]] | | [[File:Mauville Corner Red 7.png]] | ||
| [[File:Mauville Corner Replay.png]] | | [[File:Mauville Corner Replay.png]] | ||
|- | |- style="background:#FFF" | ||
| [[File:Mauville Corner Red 7.png]] | | [[File:Mauville Corner Red 7.png]] | ||
| [[File:Mauville Corner Cherry.png]] | | [[File:Mauville Corner Cherry.png]] | ||
| [[File:Mauville Corner Lotad.png]] | | [[File:Mauville Corner Lotad.png]] | ||
|- | |- style="background:#FFF" | ||
| [[File:Mauville Corner Lightning Bolt.png]] | | [[File:Mauville Corner Lightning Bolt.png]] | ||
| [[File:Mauville Corner Replay.png]] | | [[File:Mauville Corner Replay.png]] | ||
| [[File:Mauville Corner Azurill.png]] | | [[File:Mauville Corner Azurill.png]] | ||
|- | |- style="background:#FFF" | ||
| [[File:Mauville Corner Lotad.png]] | | [[File:Mauville Corner Lotad.png]] | ||
| [[File:Mauville Corner Lotad.png]] | | [[File:Mauville Corner Lotad.png]] | ||
| [[File:Mauville Corner Lightning Bolt.png]] | | [[File:Mauville Corner Lightning Bolt.png]] | ||
|- | |- style="background:#FFF" | ||
| [[File:Mauville Corner Replay.png]] | | [[File:Mauville Corner Replay.png]] | ||
| [[File:Mauville Corner Azurill.png]] | | [[File:Mauville Corner Azurill.png]] | ||
| [[File:Mauville Corner Replay.png]] | | [[File:Mauville Corner Replay.png]] | ||
|- | |- style="background:#FFF" | ||
| [[File:Mauville Corner Azurill.png]] | | [[File:Mauville Corner Azurill.png]] | ||
| [[File:Mauville Corner Cherry.png]] | | [[File:Mauville Corner Cherry.png]] | ||
| [[File:Mauville Corner Lotad.png]] | | [[File:Mauville Corner Lotad.png]] | ||
|- | |- | ||
| [[File:Mauville Corner Blue 7.png]] | | style="background:#FFF; {{roundybl|5px}}" | [[File:Mauville Corner Blue 7.png]] | ||
| [[File:Mauville Corner Replay.png]] | | style="background:#FFF" | [[File:Mauville Corner Replay.png]] | ||
| [[File:Mauville Corner Azurill.png]] | | style="background:#FFF; {{roundybr|5px}}" | [[File:Mauville Corner Azurill.png]] | ||
|}{{-}} | |}{{-}} | ||
| Line 209: | Line 170: | ||
{{main|Roulette}} | {{main|Roulette}} | ||
[[File:Game Corner Roulette wheel.png|right|thumb|The roulette wheel]] | [[File:Game Corner Roulette wheel.png|right|thumb|The roulette wheel]] | ||
The roulette | The roulette wheels have twelve spaces. Each space has one of three colors and one of four Pokémon: yellow, green, and purple; {{p|Makuhita}}, {{p|Azurill}}, {{p|Skitty}}, and {{p|Wynaut}}. By betting where a ball will land, players can win [[Coin]]s. | ||
Bets can be placed in three different ways: by single space, by color, or by Pokémon. Winning a bet | Bets can be placed in three different ways: by single space, by color, or by Pokémon. Once a bet is placed, a ball will be spun around the wheel until it lands in one of the twelve spaces. Winning a bet on a single space returns twelve times as much as was originally bet, winning by Pokémon yields four times the amount bet, and winning by color gives three times as much. Each ball remains on the wheel after being placed; once six balls have been put into play, the wheel is reset. | ||
As only one ball can fit into each space, bets on a Pokémon or color can change their odds and increase their payouts when some of the possibilities are taken off the board. The multiplier of a payout is always equal to 12 divided by the number of empty spaces of the bet type; for example, if a ball has already landed on a Wynaut, that row will have a ×6 multiplier (12/2) instead of the usual ×4 multiplier (12/3), as now there are only two Wynaut spaces left on the wheel instead of three. | |||
There are two roulette wheels, with one having a wager of 1 coin | There are two roulette wheels in the Game Corner, with one having a wager of 1 coin and the other having a wager of 3 coins. On the Game Corner's Service Day, the 3-coin table has a special rate of a 6 coin wager instead. | ||
Sometimes the ball may get stuck between two balls which have already settled. When this happens, either a {{p|Shroomish}} will drop down, causing the ball to fly up into the air and land in another spot, or a {{p|Taillow}} will pick it up and, after hovering with it for a bit, drop it into another spot. | Sometimes the ball may get stuck between two balls which have already settled. When this happens, either a {{p|Shroomish}} will drop down, causing the ball to fly up into the air and land in another spot, or a {{p|Taillow}} will pick it up and, after hovering with it for a bit, drop it into another spot. | ||
====Payout==== | ====Payout==== | ||
{| | {| class="roundy" style="background:#{{gold color}}; border: 2px solid #{{gold color}}" | ||
|- style="background: # | |- | ||
! style="background:#{{gold color light}}; {{roundytl|5px}}" | Spots | |||
! Payout | ! style="background:#{{gold color light}}; {{roundytr|5px}} " | Payout | ||
|- | |- style="background:#FFF" | ||
| 4 | | 4 | ||
| ×3 | | ×3 | ||
|- | |- style="background:#FFF" | ||
| 3 | | 3 | ||
| ×4 | | ×4 | ||
|- | |- style="background:#FFF" | ||
| 2 | | 2 | ||
| ×6 | | ×6 | ||
|- | |- | ||
| 1 | | style="background:#FFF; {{roundybl|5px}}" | 1 | ||
| ×12 | | style="background:#FFF; {{roundybr|5px}}" | ×12 | ||
|} | |} | ||
====Spaces appearance==== | ====Spaces appearance==== | ||
{| | {| class="roundy" style="background:#{{gold color}}; border: 2px solid #{{gold color}}" | ||
|- | |- | ||
| [[File:Game Corner Roulette Wynaut.png|link=Wynaut (Pokémon)]] | | style="background:#FFF; {{roundytl|5px}}" | [[File:Game Corner Roulette Wynaut.png|link=Wynaut (Pokémon)]] | ||
| [[File:Game Corner Roulette Azurill.png|link=Azurill (Pokémon)]] | | style="background:#FFF" | [[File:Game Corner Roulette Azurill.png|link=Azurill (Pokémon)]] | ||
| [[File:Game Corner Roulette Skitty.png|link=Skitty (Pokémon)]] | | style="background:#FFF" | [[File:Game Corner Roulette Skitty.png|link=Skitty (Pokémon)]] | ||
| [[File:Game Corner Roulette Makuhita.png|link=Makuhita (Pokémon)]] | | style="background:#FFF" | [[File:Game Corner Roulette Makuhita.png|link=Makuhita (Pokémon)]] | ||
| rowspan=2|[[File:Game Corner Roulette Ball.png]] | | style="background:#FFF; {{roundyright|5px}}" rowspan="2" | [[File:Game Corner Roulette Ball.png]] | ||
|- | |- | ||
| [[File:Game Corner Roulette Wynaut head.png]] | | style="background:#FFF; {{roundybl|5px}}" | [[File:Game Corner Roulette Wynaut head.png]] | ||
| [[File:Game Corner Roulette Azurill head.png]] | | style="background:#FFF" | [[File:Game Corner Roulette Azurill head.png]] | ||
| [[File:Game Corner Roulette Skitty head.png]] | | style="background:#FFF" | [[File:Game Corner Roulette Skitty head.png]] | ||
| [[File:Game Corner Roulette Makuhita head.png]] | | style="background:#FFF" | [[File:Game Corner Roulette Makuhita head.png]] | ||
|} | |} | ||
==== | |||
==Items== | |||
{{itlisth|building}} | |||
{{Itemlist|Coin Case|From a man to the right of the service counter|Ru=yes|Sa=yes|E=yes|display=20 [[Coin]]s}} | |||
{{Itemlist|None|sprite=Doll Treecko III|From a girl left of the service counter, if the player [[Starter Pokémon|started]] with {{p|Treecko}}|Ru=yes|Sa=yes|E=yes|display=[[Pokémon doll|Treecko Doll]]}} | |||
{{Itemlist|None|sprite=Doll Torchic III|From a girl left of the service counter, if the player [[Starter Pokémon|started]] with {{p|Torchic}}|Ru=yes|Sa=yes|E=yes|display=[[Pokémon doll|Torchic Doll]]}} | |||
{{Itemlist|None|sprite=Doll Mudkip III|From a girl left of the service counter, if the player [[Starter Pokémon|started]] with {{p|Mudkip}}|Ru=yes|Sa=yes|E=yes|display=[[Pokémon doll|Mudkip Doll]]}} | |||
{{itlistfoot|building}} | |||
==Service counter== | |||
The leftmost woman sells coins at the following rates: | |||
{{shop|[[Coin]]s}} | |||
{{shoprow|{{shopitem|Coin|1000|Dollars||Coin Case|display=50 Coins}}|{{shopitem|Coin|10000|Dollars||Coin Case|display=500 Coins}}}} | |||
{{shopfooter}} | |||
==Prize exchange== | |||
The two women on the right side behind the counter exchange coins for prizes. | |||
{{shop|Left woman}} | |||
{{shoprow|{{shopitem|TM32|1500|C||TM Normal|Double Team}}|{{shopitem|TM29|3500|C||TM Psychic|Psychic}}}} | |||
{{shoprow|{{shopitem|TM35|4000|C||TM Fire|Flamethrower}}|{{shopitem|TM24|4000|C||TM Electric|Thunderbolt}}}} | |||
{{shoprow|{{shopitem|TM13|4000|C||TM Ice|Ice Beam}}}} | |||
{{shopfooter|multiple=yes}} | |||
{{shop|Right woman}} | |||
{{shoprow|{{shopdec|Treecko Doll|Doll Treecko III|1000|Coins|6=Pokémon doll#Generation III}}|{{shopdec|Torchic Doll|Doll Torchic III|1000|Coins|6=Pokémon doll#Generation III}}}} | |||
{{shoprow|{{shopdec|Mudkip Doll|Doll Mudkip III|1000|Coins|6=Pokémon doll#Generation III}}}} | |||
{{shopfooter}} | |||
{{gamecorner}} | {{gamecorner}} | ||
{{Hoenn}} | {{Hoenn}}<br/> | ||
{{Project Locations notice}} | {{Project Locations notice}} | ||
| Line 267: | Line 252: | ||
[[de:Malvenfroh City Spielhalle]] | [[de:Malvenfroh City Spielhalle]] | ||
[[ja:キンセツゲームコーナー]] | [[ja:キンセツゲームコーナー]] | ||
[[zh:紫堇游戏中心]] | |||
Revision as of 06:22, 15 December 2016

|
This article is incomplete. Please feel free to edit this article to add missing information and complete it. Reason: Missing other languages section |
| ||||
| ||||
| Location: | Mauville City | |||
|---|---|---|---|---|
| Region: | Hoenn | |||
| Generations: | III | |||
 Location of Mauville Game Corner in Hoenn. | ||||
| Pokémon world locations | ||||

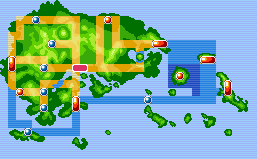
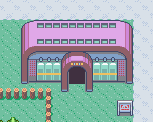
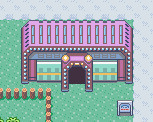
The Mauville Game Corner (Japanese: キンセツゲームコーナー Kinsetsu Game Corner) is a Game Corner located in Mauville City in the Hoenn region in Pokémon Ruby, Sapphire, and Emerald.
In Pokémon Omega Ruby and Alpha Sapphire, it is closed down, and the owner gives the player three dolls. The closure is likely due to PEGI's current classification standards (simulated depictions of gambling must have at least a "12" rating).
Games
Occasionally, the Game Corner will have a Service Day to "improve your luck". When it does, there will be an announcement on Hoenn TV.
Slot machines
There are sixteen slot machines in the Game Corner, with four of them having people already seated at them.
One to three coins can be put in the slot machine each play. One coin will only count the center row across, two coins will count all three rows across, and three coins will count all three rows across as well as both diagonals. The reels stop spinning when the player presses the A button.
Payouts
Note that order matters.
| Series of icons | Payout |
|---|---|
| 300 | |
| 300 | |
| 90 | |
| 90 | |
| 12 | |
| 6 | |
| 4 | |
| 2 | |
| Replay | |
| 3 coins, power |
Reel Time

|
This section is incomplete. Please feel free to edit this section to add missing information and complete it. |
As the player gets more triple lightning bolts, they are tallied up in the power meter at the top of the screen. At a Reel Time opportunity, an animation of a Pikachu charging up a spinner appears. When Reel Time fails (usually when there are very few lightning bolts), the spinner explodes and nothing happens. Otherwise, the spinner will stop on a number up to 5, and the player will earn that many Reel Time spins. The power meter also resets to zero.
As Reel time is so short, what happens during it is not yet precisely documented.
During Reel Time, all the reels will stop exactly where the player directs them to; unlike normal spins, the reels will not "slip" to give or take away prizes. If the player has just lost the previous spin before a Reel Time spin, the reels will also spin quite slowly (very slowly in Emerald) to allow the player to stop them precisely. If the player wins any prize, the reels speed up to normal for the next spin, which does consume one of the Reel Time spins. If the player loses, the reels slow down again. If the player creates a big bonus (three red or blue 7's, for 300 coins), Reel Time immediately ends no matter how many spins were left.
As a patron at the Game Corner notes, the maximum the player can manage to earn (through five Reel Time spins) is four regular bonuses then a big bonus, totaling 660 coins. However, since the reels speed up after a win, it may be more useful to attempt two regular bonuses and a big bonus (i.e. regular bonus, loss, regular bonus, loss, big bonus), for 480 coins.
Video
| |
| This video is not available on Bulbapedia; instead, you can watch the video on YouTube here. | |
Reels
In all versions, the reels have the following symbols. (The reels slide downward, so symbols at the bottom show up first.)
| Left | Mid. | Right |
|---|---|---|
Roulette wheels
- Main article: Roulette
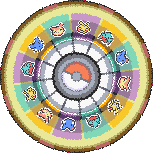
The roulette wheels have twelve spaces. Each space has one of three colors and one of four Pokémon: yellow, green, and purple; Makuhita, Azurill, Skitty, and Wynaut. By betting where a ball will land, players can win Coins.
Bets can be placed in three different ways: by single space, by color, or by Pokémon. Once a bet is placed, a ball will be spun around the wheel until it lands in one of the twelve spaces. Winning a bet on a single space returns twelve times as much as was originally bet, winning by Pokémon yields four times the amount bet, and winning by color gives three times as much. Each ball remains on the wheel after being placed; once six balls have been put into play, the wheel is reset.
As only one ball can fit into each space, bets on a Pokémon or color can change their odds and increase their payouts when some of the possibilities are taken off the board. The multiplier of a payout is always equal to 12 divided by the number of empty spaces of the bet type; for example, if a ball has already landed on a Wynaut, that row will have a ×6 multiplier (12/2) instead of the usual ×4 multiplier (12/3), as now there are only two Wynaut spaces left on the wheel instead of three.
There are two roulette wheels in the Game Corner, with one having a wager of 1 coin and the other having a wager of 3 coins. On the Game Corner's Service Day, the 3-coin table has a special rate of a 6 coin wager instead.
Sometimes the ball may get stuck between two balls which have already settled. When this happens, either a Shroomish will drop down, causing the ball to fly up into the air and land in another spot, or a Taillow will pick it up and, after hovering with it for a bit, drop it into another spot.
Payout
| Spots | Payout |
|---|---|
| 4 | ×3 |
| 3 | ×4 |
| 2 | ×6 |
| 1 | ×12 |
Spaces appearance
Items
| Item | Location | Games | |
|---|---|---|---|
| 20 Coins | From a man to the right of the service counter | R S E | |
| Treecko Doll | From a girl left of the service counter, if the player started with Treecko | R S E | |
| Torchic Doll | From a girl left of the service counter, if the player started with Torchic | R S E | |
| Mudkip Doll | From a girl left of the service counter, if the player started with Mudkip | R S E | |
Service counter
The leftmost woman sells coins at the following rates:
| Coins | |||||||
|---|---|---|---|---|---|---|---|
|
| ||||||
Prize exchange
The two women on the right side behind the counter exchange coins for prizes.
| Left woman | |||||||
|---|---|---|---|---|---|---|---|
|
| ||||||
|
| ||||||
|
|||||||
| Right woman | |||||||
|---|---|---|---|---|---|---|---|
|
| ||||||
|
|||||||
|
| |||||

|
This article is part of Project Locations, a Bulbapedia project that aims to write comprehensive articles on every location in the Pokémon world. |


