
|
This article is incomplete.
Please feel free to edit this article to add missing information and complete it.
Reason: More details about the places of interest, such as specific prizes for restaurants, prices and places for taxi services, better descriptions for the locations like the Museum, etc
|
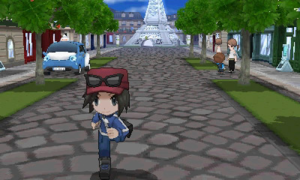
Lumiose City (Japanese: ミアレシティ Miare City) is a large city nestled in the north-central part of the Kalos region. Standing in the center of the city is the Prism Tower, which serves as its symbol. The wide roadways are paved with brick and cobblestone, allowing both automobile and Gogoat traffic safe and easy travel.
Places of interest
Prism Tower
- Main article: Lumiose Gym
Prism Tower is a large tower located in Centrico Plaza in the middle of Lumiose City. It houses the Lumiose City Gym. Prism Tower is based on the real-world Eiffel Tower in Paris, France.
North Boulevard
Lumiose Galettes
A small shop located amongst the tall buildings on the North Boulevard where the player can purchase Lumiose Galettes for $100 ($80 if the player is more stylish) for one hour starting at 3 am, 9 am, 3 pm and 9 pm. Once per day upon purchasing, the player will also receive a Moomoo Milk. Once the player reaches a certain level of stylishness they can purchase Lumiose Galette any time of day.
Lumiose Museum
A large, white building that houses many paintings of people and locations in the Pokémon World. Entrance is free, but audio guides are available for $200 (once the player reaches a certain level of stylishness, the audio guides become free).
Hotel Richissime
A large, dark gray building located on the North Boulevard, serving as a luxury hotel. A man at the reception desk will let the player to stay overnight, healing their Pokémon as well, at the cost of $100,000.
A lady at the reception desk in the lobby will offer the player the opportunity to work as an attendant at the hotel by completing different kinds of tasks. Each task can be completed once per day to get monetary rewards. Both the difficulty and the payment increase as the player succeeds at more tasks, as follows:
- Level 1: $2,000 per successful task, $1,000 per failed task.
- Level 2: $10,000 per successful task, $1,500 per mediocre task, $750 per failed task.
- Level 3: $20,000 per successful task.
- Level 4: $50,000 per successful task.
Room service
The player goes to the reception counter, where they will receive a food order from a guest and must repeat it correctly to the clerk by choosing four phrase options that compose the guest's sentence. Repeating the order wrong will earn the player a failed task payment, while repeating the order right will earn the player a successful task payment.
At level 2, orders from two different guests have to be memorized. Repeating both orders wrong will earn the player a failed task payment, repeating only one of the two orders wrong will earn the player a mediocre task payment, and repeating both orders right will earn the player a successful task payment.
At level 3, the player must memorize three different orders, and at level 4, four different orders.
Making beds
The player goes to one of the floors in the building. Once there, the manager will ask them to make all the beds on the floor within 65 seconds, which is done by entering the four rooms and examining them while avoiding delays from workers running around.
As the difficulty increases, the player will come upon more obstacles in the corridors, like workers moving tables, completely obstructing the path, or maids and Pokémon moving back and forth in the hall, requiring the player to weave around them. The player receives a failed task payment for going over the time limit or a successful task payment for making all four beds under the time limit.
Lost and found
After a maid receives a phone call from a guest, she will accompany the player to said guest's room, indicating that they have to find an item on the floor. The items are fragile, so the player has to be careful to not break them by stepping on them. If the item is stepped on twice, the damages will be irreparable and will earn the player a failed task payment; by stepping on the item once and then picking it up, it will still be retrievable; and picking up the item without stepping on it will earn the player a successful task payment.
At level 2, there are two items to be found. Stepping on one item twice will earn the player a failed task payment, regardless of the status of the second item; stepping once on each item or once on only one item will earn the player a mediocre task payment; and finding both items without stepping on any will earn the player a successful task payment.
At level 3, the player must find three items, but instead of a single room, they must examine the entire floor, comprising four rooms and the hallways connecting them.
Battle Institute
- Main article: Battle Institute
The Battle Institute (Japanese: トライアルハウス Trial House) on the North Boulevard works in the same way as the one in Nimbasa City in Unova. The player can opt for a Battle Test (five consecutive single or double battles) or a Download Test (which can be downloaded either wirelessly or via Wi-Fi at certain time, similar to event Pokémon). The player can win BP here.
Lumiose Station
A very large train station located on the far eastern half of the North Boulevard. Upon defeating the Elite Four and becoming the Champion, Professor Sycamore will meet the player here and give them the TMV Pass which allows them to board the train to Kiloude City.
Looker Bureau
Looker's headquarters during the post-game storyline. It is located in a narrow street between the North Boulevard and Rouge Plaza.
South Boulevard
A pre-release screenshot of Estival Avenue
PR Video Studio
A purple building on the South Boulevard where Trainer PR Videos are filmed. PR Videos filmed here can be shared with passers-by and people who have been given the player's Nintendo 3DS friend code.
Sycamore Pokémon Lab
Professor Sycamore's Pokémon research lab is located directly opposite Vernal Avenue. It is here where the player can receive either Bulbasaur, Charmander or Squirtle upon defeating Professor Sycamore in a Pokémon Battle early in the game, as well as their corresponding Mega Stone.
Coiffure Clips
A small hair dressing salon located opposite the Route 5 entrance. The player can have their hair colored and styled here. More styling options become available once the player reaches a certain level of stylishness.
Autumnal Avenue
Poké Ball Boutique
A specialty shop that specializes in different kinds of Poké Balls. It is notably the only location in any Pokémon game where Premier Balls are sold individually.
Juice Shoppe
A specialty shop that sells juices made from Berries. Two options are available: pre-made juices, available from the man on the left, or custom-blend juices from the lady on the right, made by mixing selected Berries from the player's bag.
Estival Avenue
Loto-ID Center
- Main article: Pokémon Lottery Corner
A shop located on Estival Avenue. Each day, the player may participate in a lottery draw, and prizes are granted depending on the how many digits from a randomly generated ID number match those of any Pokémon in the player's possession.
Lumiose Press
A building located next to the Loto-ID Center on Estival Avenue. Viola's sister, Alexa, will recommend various locations around the city for the player to visit, and offers to take them there.
Vernal Avenue
Friseur Furfrou
A shop on Vernal Avenue that specializes in Furfrou haircuts. They initially offer Star, Diamond and Heart Trims. As the player progresses, more trims that become available are the La Reine, Kabuki, Pharaoh, Debutante, Matron and Dandy Trims.
Herboriste
A specialty shop that sells herbal medicines.
Stone Emporium
A specialty shop that sells evolutionary stones. A man in the store will offer to sell the player the remaining Mega Stones for the two Kanto starter Pokémon they did not receive from Professor Sycamore. The prices of the Mega Stones begin at $1,000,000, but the man will sell them for as as low as $10,000 depending on the player's stylishness.
Boutique Couture
A fancy fashion boutique. The player is only granted access to the boutique once their stylishness reaches a certain level. The clothes and accessories are sold here for a much higher price than those sold at the other boutiques across Kalos. A lady in the store mentions to the player that there is a special Discount Coupon that can be used at the store, which can be obtained with Poké Miles.
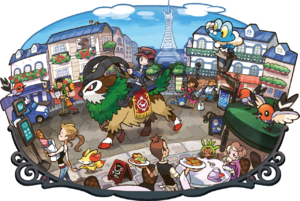
Restaurants
The restaurants of Lumiose City offer an interesting attraction. Each restaurant allows the player to purchase dinner and serves them various dishes to eat, however, each dish served requires a certain amount of time to settle. While settling, the employee that brought out the food will challenge the player to a Pokémon battle, telling him/her how many turns the battle should take to give the dish the perfect taste. The battles occur in a row, but the player's entire party will automatically be healed between each fight. After battling each of the employees in the restaurant, the player will receive items based on the which restaurant he/she is in, how many of their Pokémon fainted during each battle, and if each battle was won in the proper number of turns. For each faint or turn difference, the player will receive one less of the reward item. If the player complete a style of battling perfectly, a ★ appears next to that style of battle at that restaurant. In addition, as the player's style goes up, the restaurants will begin to offer a 10% discount.
The Trainers will often use turn-wasting strategies involving moves like Fly and Protect, flinch-inducing, as well as evasion-increasing Abilities like Snow Cloak, complicating the player's attempts to meet a target turn requirement.
Restaurant Le Nah
Located in South Boulevard, this one is the cheapest to get into at $3,000, but it only offers Double Battles. The perfect reward is 12 Tiny Mushrooms, and each battle is best completed in two turns.
| Trainer
|
Pokémon
|

|
|
|
Chef Roger
ロジェ Roger
Reward: $640
|
|
|
|
|
|
|
|
|
|
|
|
Chef Roger
ロジェ Roger
Reward: $640
|
|
|
|
|
|
|
|
|
|
|
|
Chef Roger
ロジェ Roger
Reward: $640
|
|
|
|
|
|
|
|
Restaurant Le Yeah
Located in Autumnal Avenue, this one costs $15,000 to get into and offers Triple and Rotation Battles. The perfect reward is 20 Big Mushrooms. For the Triple Battles, each battle is best completed in three turns, except for the second battle which is four turns against Garçon Georges. For Rotation Battles, each battle is best completed in six turns.
| Trainer
|
Pokémon
|
|
|
|
|
|
|
|
|
|

|
|
|
Garçon Georges
トウマ Tōma
Reward: $1984
|
|
|
|
|
|
|
|
|
|

|
|
|
Owner Yannick
ヤニック Yannick
Reward: $4960
|
|
|
|
|
|
|
|
|
|
|
|
|
|
Chef Albern
アルベール Albert
Reward: $1984
|
|
|
|
|
|
|
|
|
|
Restaurant Le Wow
Located in Hibernal Avenue, this one costs $100,000 to get into and offers Double, Triple and Rotation Battles. The perfect reward is 25 Balm Mushrooms. For the Double Battles, the Trainers do not use the first Pokémon listed below for each battle and each battle should be completed in two turns, except for the third one which is three turns against Garçon Morris. For the Triple Battles, each battle should be completed in three turns, except the first battle which is four turns against Owner Christophe. For the Rotation Battles, each battle should be completed in six rounds, except the last battle which is four turns against Waitress Paula.
| Trainer
|
Pokémon
|
|
|
|
|
Owner Christophe
クリストフ Christophe
Reward: $10,080
|
|
|
|
|
|
|
|
|
|
|
|
|
|
Owner Christophe
クリストフ Christophe
Reward: $10,080
|
|
|
|
|
|
|
|
|
|
|
|
|
|
Garçon Morris
モリス Morris
Reward: $4032
|
|
|
|
|
|
|
|
|
|
|
|
|
|
Garçon Morris
モリス Morris
Reward: $4032
|
|
|
|
|
|
|
|
|
|
|
|
|
|
|
|
|
|
|
Sushi High Roller
Located near Rouge Plaza, Sushi High Roller is the most expensive and hardest of the four restaurants to get into. The player needs to have become the Champion and have gotten his or her style up in the city to get in. The restaurant costs $500,000 and offers Double, Triple, and Rotation Battles. For Double Battles, the first Pokémon listed is not used by the Trainer in question and the turn requirement for each battle is three. For Triple Battles, the turn requirement is three for each battle except against Owner Kazu where it is five turns. For Rotation Battles, each battle is to be six turns except against Owner Kazu which is to be seven turns. The perfect reward is 25 Big Nuggets. Sushi High Roller is the only restaurant that does not give any profit upon completing a course even after selling the prize (the Big Nuggets), therefore the only real advantage this restaurant has, is the experience points.
| Trainer
|
Pokémon
|
|
|
|
|
|
|
|
|
|
|
|
|
|
|
|
|
|
|
|
|
|
|
|
|
|
|
|
|
|
|
|
|
|
|
|
|
|
|
|
|
Owner Kazu
アガリ Agari
Reward: $10400
|
|
|
|
|
|
|
|
|
|
Lysandre Café
Artwork of Calem riding the Gogoat Shuttle
- Main article: Lysandre Labs
A red café located near Magenta Plaza. It grants the player access to Lysandre Labs, one of Team Flare's hideouts in the Kalos region. Despite the small size, it serves as an important location in both the main plot line and the after story sideline plot with Dr. Xerosic.
Lumi Cab
A taxi service with stops located all around Lumiose City. They enable the player to travel directly to certain locations around the city. If the player does not have enough money, the driver will challenge them to a battle.
Gogoat Shuttle
Signposts located all around Lumiose City, where the player can hire a Gogoat that will take them to a specified location.
Poké Mart
| North/South/Centrico Boulevard - Left Cashier
|
|
|
|
|
|
|
|
|
|
|
|
|
|
|
|
|
|
|
|
|
|
|
|
|
|
|
|
|
|
|
| South Boulevard - Right Cashier
|
|
|
|
|
|
|
|
|
|
| North Boulevard - Right Cashier
|
|
|
|
|
|
|
Items
South Boulevard
| colspan="2" style="background: #Template:City color light; color:#000000; border-top-left-radius: 5px; -moz-border-radius-topleft: 5px; -webkit-border-top-left-radius: 5px; -khtml-border-top-left-radius: 5px; -icab-border-top-left-radius: 5px; -o-border-top-left-radius: 5px;" | Item
|
style="background: #Template:City color light; color:#000000;" | Location
|
style="background: #Template:City color light; color:#000000; border-top-right-radius: 5px; -moz-border-radius-topright: 5px; -webkit-border-top-right-radius: 5px; -khtml-border-top-right-radius: 5px; -icab-border-top-right-radius: 5px; -o-border-top-right-radius: 5px;" | Games
|

|
Lens Case
|
PR Video Studio
|
X Y
|

|
Quick Ball ×3
|
From a man in the second floor of the building across the street from Shutterbug Café
|
X Y
|

|
Timer Ball ×3
|
From a man in the second floor of the building across the street from Shutterbug Café
|
X Y
|

|
Quick Claw
|
From a girl in the first floor of the building across the street from Shutterbug Café
|
X Y
|

|
Scope Lens
|
From backpacker in Shutterbug Café after taking many photos at Photo Spots
|
X Y
|

|
TM27 (Return)
|
From Dexio upon entering Lumiose City
|
X Y
|
| colspan="4" style="background: #Template:City color light; border-bottom-left-radius: 5px; -moz-border-radius-bottomleft: 5px; -webkit-border-bottom-left-radius: 5px; -khtml-border-bottom-left-radius: 5px; -icab-border-bottom-left-radius: 5px; -o-border-bottom-left-radius: 5px; border-bottom-right-radius: 5px; -moz-border-radius-bottomright: 5px; -webkit-border-bottom-right-radius: 5px; -khtml-border-bottom-right-radius: 5px; -icab-border-bottom-right-radius: 5px; -o-border-bottom-right-radius: 5px;" |
|
Sycamore Pokémon Lab
| Item
|
Location
|
Games
|

|
Luxury Ball ×5
|
2F; from a female scientist
|
X Y
|

|
Poké Radar
|
2F; from a male scientist on the second floor after defeating the Elite Four
|
X Y
|
|
|
TM54 (False Swipe)
|
3F; from a female scientist after encountering a certain number of Pokémon
|
X Y
|
|
|
Venusaurite
|
3F; from Professor Sycamore if Bulbasaur is chosen
|
X Y
|
|
|
Charizardite X
|
3F; from Professor Sycamore if Charmander is chosen
|
X
|
|
|
Charizardite Y
|
3F; from Professor Sycamore if Charmander is chosen
|
Y
|
|
|
Blastoisinite
|
3F; from Professor Sycamore if Squirtle is chosen
|
X Y
|

|
Oval Charm
|
3F; from Professor Sycamore after showing him a Pokédex with all* Kalos Pokémon seen
|
X Y
|
|
|
Café Soleil
Café Woof
| Item
|
Location
|
Games
|

|
Pearl String ×2
|
Given by a Madame after showing her a Furfrou that has kept the same trim for 15 days.
|
X Y
|
|
|
Herboriste
North Boulevard
Lumiose Station
| Item
|
Location
|
Games
|
|
|
TMV Pass
|
From Professor Sycamore after defeating the Elite Four
|
X Y
|
|
|
Lumiose Museum
Hotel Richissime
Office Café Building
| Item
|
Location
|
Games
|

|
Star Piece
|
From a woman on the first floor of the building, if one of your pokémon knows Aroma Veil, Flower Veil, or Sweet Veil
|
X Y
|

|
Prism Scale
|
From a little girl on the 4th floor
|
X Y
|
|
|
Fighting Dojo
Autumnal Avenue
Poké Ball Boutique
| Item
|
Location
|
Games
|
|
|
Luxury Ball
|
Randomly given by a Schoolgirl in the Poké Ball Boutique once a day
|
X Y
|

|
Heal Ball ×3
|
Randomly given by a Schoolgirl in the Poké Ball Boutique once a day
|
X Y
|
|
|
Magenta Plaza
Pokémon Center
Backalleys
| colspan="2" style="background: #Template:City color light; color:#000000; border-top-left-radius: 5px; -moz-border-radius-topleft: 5px; -webkit-border-top-left-radius: 5px; -khtml-border-top-left-radius: 5px; -icab-border-top-left-radius: 5px; -o-border-top-left-radius: 5px;" | Item
|
style="background: #Template:City color light; color:#000000;" | Location
|
style="background: #Template:City color light; color:#000000; border-top-right-radius: 5px; -moz-border-radius-topright: 5px; -webkit-border-top-right-radius: 5px; -khtml-border-top-right-radius: 5px; -icab-border-top-right-radius: 5px; -o-border-top-right-radius: 5px;" | Games
|

|
Destiny Knot
|
Given after defeating Beauty Aimee
|
X Y
|

|
Elixir
|
Given after defeating Beauty Anais
|
X Y
|

|
Nugget
|
Given after defeating Beauty Cassandra
|
X Y
|
| colspan="4" style="background: #Template:City color light; border-bottom-left-radius: 5px; -moz-border-radius-bottomleft: 5px; -webkit-border-bottom-left-radius: 5px; -khtml-border-bottom-left-radius: 5px; -icab-border-bottom-left-radius: 5px; -o-border-bottom-left-radius: 5px; border-bottom-right-radius: 5px; -moz-border-radius-bottomright: 5px; -webkit-border-bottom-right-radius: 5px; -khtml-border-bottom-right-radius: 5px; -icab-border-bottom-right-radius: 5px; -o-border-bottom-right-radius: 5px;" |
|
Lysandre Café
| Item
|
Location
|
Games
|

|
King's Rock
|
From Lysandre after defeating Clemont
|
X Y
|
|
|
Parade
| colspan="2" style="background: #Template:City color light; color:#000000; border-top-left-radius: 5px; -moz-border-radius-topleft: 5px; -webkit-border-top-left-radius: 5px; -khtml-border-top-left-radius: 5px; -icab-border-top-left-radius: 5px; -o-border-top-left-radius: 5px;" | Item
|
style="background: #Template:City color light; color:#000000;" | Location
|
style="background: #Template:City color light; color:#000000; border-top-right-radius: 5px; -moz-border-radius-topright: 5px; -webkit-border-top-right-radius: 5px; -khtml-border-top-right-radius: 5px; -icab-border-top-right-radius: 5px; -o-border-top-right-radius: 5px;" | Games
|
|
|
Honor of Kalos
|
From Professor Sycamore during the parade
|
X Y
|
| colspan="4" style="background: #Template:City color light; border-bottom-left-radius: 5px; -moz-border-radius-bottomleft: 5px; -webkit-border-bottom-left-radius: 5px; -khtml-border-bottom-left-radius: 5px; -icab-border-bottom-left-radius: 5px; -o-border-bottom-left-radius: 5px; border-bottom-right-radius: 5px; -moz-border-radius-bottomright: 5px; -webkit-border-bottom-right-radius: 5px; -khtml-border-bottom-right-radius: 5px; -icab-border-bottom-right-radius: 5px; -o-border-bottom-right-radius: 5px;" |
|
Herb Store
Pokémon
| Pokémon
|
Games
|
Location
|
Levels
|
Rate
|
| Gift Pokémon
|
|
|
X
|
Y
|

|
Gift
|
|
10
|
One
|
|
|
X
|
Y
|
|
|
Gift
|
|
10
|
One
|
|
|
X
|
Y
|
|
|
Gift
|
|
10
|
One
|
|
|
X
|
Y
|
|
5
|
One
|
| A colored background means that the Pokémon can be found in this location in the specified game. A white background with a colored letter means that the Pokémon cannot be found here.
|
Trainers
| style="border-top-left-radius: 5px; -moz-border-radius-topleft: 5px; -webkit-border-top-left-radius: 5px; -khtml-border-top-left-radius: 5px; -icab-border-top-left-radius: 5px; -o-border-top-left-radius: 5px; background: #Template:City color light" | Trainer
|
style="border-top-right-radius: 5px; -moz-border-radius-topright: 5px; -webkit-border-top-right-radius: 5px; -khtml-border-top-right-radius: 5px; -icab-border-top-right-radius: 5px; -o-border-top-right-radius: 5px; background: #Template:City color light" | Pokémon
|
|
|
|
|
|
|
|
|
|
|
|
|
|
|
|
|
|
|
|
|
|
|
|
|
|
|
|
|
|
Chef Kamaboko
ロコモコ Locomoco
Reward: $600
|
|
|
|
|
|
|
|
|
|
|

|
|
|
Beauty Cassandra
トロワ Trois
Reward: $680
|
|
|
|
|
|
|
|
|
|
|
|
|
|
|
Garçon Jacopo
ベリーニ Bellini
Reward: $600
|
|
|
|
| style="border-bottom-left-radius: 5px; -moz-border-radius-bottomleft: 5px; -webkit-border-bottom-left-radius: 5px; -khtml-border-bottom-left-radius: 5px; -icab-border-bottom-left-radius: 5px; -o-border-bottom-left-radius: 5px; border-bottom-right-radius: 5px; -moz-border-radius-bottomright: 5px; -webkit-border-bottom-right-radius: 5px; -khtml-border-bottom-right-radius: 5px; -icab-border-bottom-right-radius: 5px; -o-border-bottom-right-radius: 5px; background: #Template:City color light; " colspan="2" width="400px" |
|
South Boulevard
Alleyway
| style="border-top-left-radius: 5px; -moz-border-radius-topleft: 5px; -webkit-border-top-left-radius: 5px; -khtml-border-top-left-radius: 5px; -icab-border-top-left-radius: 5px; -o-border-top-left-radius: 5px; background: #Template:City color light" | Trainer
|
style="border-top-right-radius: 5px; -moz-border-radius-topright: 5px; -webkit-border-top-right-radius: 5px; -khtml-border-top-right-radius: 5px; -icab-border-top-right-radius: 5px; -o-border-top-right-radius: 5px; background: #Template:City color light" | Pokémon
|
| During Chapter 2 of the Looker Bureau
|
|
|
|
|
|
|
|
|
|
|
|
|
|
|
|
|
|
|
|
|
|
|
|
|
| During Chapter 4 of the Looker Bureau
|
|
|
|
| style="border-bottom-left-radius: 5px; -moz-border-radius-bottomleft: 5px; -webkit-border-bottom-left-radius: 5px; -khtml-border-bottom-left-radius: 5px; -icab-border-bottom-left-radius: 5px; -o-border-bottom-left-radius: 5px; border-bottom-right-radius: 5px; -moz-border-radius-bottomright: 5px; -webkit-border-bottom-right-radius: 5px; -khtml-border-bottom-right-radius: 5px; -icab-border-bottom-right-radius: 5px; -o-border-bottom-right-radius: 5px; background: #Template:City color light; " colspan="2" width="400px" |
|
Sycamore Pokémon Lab

|
|
Reward: $1400
|
|
|
|
|
|
Bleu Plaza
| style="border-top-left-radius: 5px; -moz-border-radius-topleft: 5px; -webkit-border-top-left-radius: 5px; -khtml-border-top-left-radius: 5px; -icab-border-top-left-radius: 5px; -o-border-top-left-radius: 5px; background: #Template:City color light" | Trainer
|
style="border-top-right-radius: 5px; -moz-border-radius-topright: 5px; -webkit-border-top-right-radius: 5px; -khtml-border-top-right-radius: 5px; -icab-border-top-right-radius: 5px; -o-border-top-right-radius: 5px; background: #Template:City color light" | Pokémon
|
|
|
|
|
Owner Toro
スケゾウ Sukezō
Reward: $600
|
|
|
|
|
|
|
|
|
| style="border-bottom-left-radius: 5px; -moz-border-radius-bottomleft: 5px; -webkit-border-bottom-left-radius: 5px; -khtml-border-bottom-left-radius: 5px; -icab-border-bottom-left-radius: 5px; -o-border-bottom-left-radius: 5px; border-bottom-right-radius: 5px; -moz-border-radius-bottomright: 5px; -webkit-border-bottom-right-radius: 5px; -khtml-border-bottom-right-radius: 5px; -icab-border-bottom-right-radius: 5px; -o-border-bottom-right-radius: 5px; background: #Template:City color light; " colspan="2" width="400px" |
|
Lysandre Café
North Boulevard
Galette Stand Alleyway
| style="border-top-left-radius: 5px; -moz-border-radius-topleft: 5px; -webkit-border-top-left-radius: 5px; -khtml-border-top-left-radius: 5px; -icab-border-top-left-radius: 5px; -o-border-top-left-radius: 5px; background: #Template:City color light" | Trainer
|
style="border-top-right-radius: 5px; -moz-border-radius-topright: 5px; -webkit-border-top-right-radius: 5px; -khtml-border-top-right-radius: 5px; -icab-border-top-right-radius: 5px; -o-border-top-right-radius: 5px; background: #Template:City color light" | Pokémon
|
| During Chapter 4 of the Looker Bureau
|
|
|
|
|
|
| style="border-bottom-left-radius: 5px; -moz-border-radius-bottomleft: 5px; -webkit-border-bottom-left-radius: 5px; -khtml-border-bottom-left-radius: 5px; -icab-border-bottom-left-radius: 5px; -o-border-bottom-left-radius: 5px; border-bottom-right-radius: 5px; -moz-border-radius-bottomright: 5px; -webkit-border-bottom-right-radius: 5px; -khtml-border-bottom-right-radius: 5px; -icab-border-bottom-right-radius: 5px; -o-border-bottom-right-radius: 5px; background: #Template:City color light; " colspan="2" width="400px" |
|
Café Triste Alleyway
| style="border-top-left-radius: 5px; -moz-border-radius-topleft: 5px; -webkit-border-top-left-radius: 5px; -khtml-border-top-left-radius: 5px; -icab-border-top-left-radius: 5px; -o-border-top-left-radius: 5px; background: #Template:City color light" | Trainer
|
style="border-top-right-radius: 5px; -moz-border-radius-topright: 5px; -webkit-border-top-right-radius: 5px; -khtml-border-top-right-radius: 5px; -icab-border-top-right-radius: 5px; -o-border-top-right-radius: 5px; background: #Template:City color light" | Pokémon
|
| During Chapter 4 of the Looker Bureau
|
|
|
|
|
|
|
|
| style="border-bottom-left-radius: 5px; -moz-border-radius-bottomleft: 5px; -webkit-border-bottom-left-radius: 5px; -khtml-border-bottom-left-radius: 5px; -icab-border-bottom-left-radius: 5px; -o-border-bottom-left-radius: 5px; border-bottom-right-radius: 5px; -moz-border-radius-bottomright: 5px; -webkit-border-bottom-right-radius: 5px; -khtml-border-bottom-right-radius: 5px; -icab-border-bottom-right-radius: 5px; -o-border-bottom-right-radius: 5px; background: #Template:City color light; " colspan="2" width="400px" |
|
Lumiose Station
| Trainer
|
Pokémon
|
| During Chapter 3 of the Looker Bureau
|
|
|
|
|
|
|
|
|
|
|
|
|
|
|
|
|
|
|
|
Looker Bureau
| Trainer
|
Pokémon
|
| During Chapter 4 of the Looker Bureau
|

|
|
|
Butler Chalmers
アカマロ Akamaro
Reward: $4960
|
|
|
|
|
|

|
|
Reward: $10500
|
|
|
|
|
|
Hotel Richissime

|
|
Reward: $12600
|
|
|
|
|
|
Parade

|
|
Reward: N/A
|
|
|
|
|
|
In the anime

Lumiose City in the anime
Ash arrived in Lumiose City with Alexa as his first destination to the Kalos region. Ash wanted to challenge the Gym there but he was denied access and fell several feet above.
Trivia
- Many locations around the Pokémon world are featured in various paintings inside the Lumiose Museum.
- One particular painting on the top floor is likely a reference to Leonardo da Vinci. The audio guide describes the painting's artist as a polymath, and the painting itself is similar in appearance to many of da Vinci's red chalk drawings.
- An Espurr who appears on the third floor of the museum responds with 'De-gahh!' when interacted with. This could be a reference to French Impressionist Edgar Degas, the famous sculptor and painter.
- A woman beside Café Bataille explains that the two Skiddo in front of Lumiose Station were abandoned by their Trainer, and wait by the station for his return. This is a possible reference to the story of Hachikō, an Akita dog who waited at the train station every day for his owner's return, even after his unexpected death. The story is a popular legend in Japanese culture.
- If the player enters Lumiose City and gets on their bicycle, the music does not change.
- At the Magenta Plaza Pokémon Center, a young man mentions Team Plasma "making news a while back in the Unova region," while a young woman mentions Professor Oak's grandson having visited Kalos to study abroad. She also tells how he used to say "Bonjour" while meeting and "Smell ya later!" while leaving. The first quote refers to the way how Blue greets the player while visiting S.S. Anne in the original Generation I games and their remakes, while the latter one was used whenever he left the player's presence.
- The four avenues are named after words pertaining to each of the four seasons.
- The architecture style of Lumiose City is very similar to its real counterpart. Paris itself consists mostly of buildings dating back up to several centuries and the outskirts (also called the Parisian suburbs) were recently urbanised, dating back to the 1960s.
- Similarly to Paris, Lumiose City has roads connecting to all parts of Kalos. The only difference is that Paris' connections to all parts of France are used by railroads.
- On the second floor of the Fighting Dojo, a Hex Maniac Girl will appear and say "No, you're not the one", and float away. The purpose of this in-game "event", if there is one, is not known yet.
- Behind the second TMV timetable in Lumiose Station, some words are written saying "I'm going to go for help. Wait in the usual place." Some people believe that this is related to the Hex Maniac Girl in the second floor of the Fighting Dojo.
Glitches
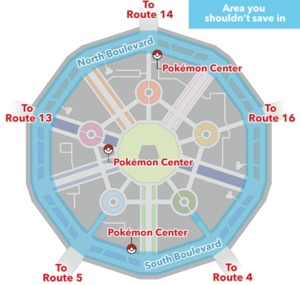
Map of Lumiose City by Nintendo indicating areas unsafe to load saves in
At the time of release of Pokémon X and Y, many players reported being unable to move after loading a save within Lumiose City. According to Nintendo.com, if the player saves the game in certain areas of Lumiose City, then ends the game, the controls will not respond when the saved game is reloaded. They provided a map indicating known areas where the glitch can occur, which includes the entire outer boulevards. On October 25th, 2013, Nintendo released a patch for this glitch via the Nintendo eShop.
Origin
Lumiose City and Prism Tower are based on Paris and the Eiffel Tower respectively.
Name origin
| Language
|
Name
|
Origin
|
| Japanese
|
ミアレシティ Miare City
|
Possibly from 御生れ miare, advent of a deity
|
| English
|
Lumiose City
|
From Paris's nickname La Ville-Lumière (The City of Light), grandiose, and possibly rose
|
| French
|
Illumis
|
From La Ville-Lumière, Paris, lumia, and possibly illuminer (illuminate)
|
| German
|
Illumina City
|
From La Ville-Lumière, lumia, and possibly illuminieren (illuminate)
|
| Italian
|
Luminopoli
|
From La Ville-Lumière, lumia, and luminoso (bright, luminous)
|
| Spanish
|
Ciudad Luminalia
|
From La Ville-Lumière, lumia, and possibly luminoso (bright, luminous) or iluminar (illuminate)
|
| Korean
|
미르시티 Mireu City
|
Possibly from myrrh. Also the native Korean word for dragon
|
References
Style
Unlike most areas, within Lumiose City you have a degree of style with a system of points yet to be determined. Style can be raised by shopping in stores, battling in resturaunts, and participating in the various activities within the city. More style will lower shop prices and allow access to . So far, the best way to determine your style is by visiting the Old Man in the Stone Emporium and observing the change in his offered price. The price can be the following: 1,000,000, 500,000, 300,000, 150,000, 100,000, 70,000 and 10,000.


