|
|
| (35 intermediate revisions by 19 users not shown) |
| Line 13: |
Line 13: |
| }} | | }} |
|
| |
|
| The '''Safari Zone''' (Japanese: '''サファリゾーン''' ''Safari Zone'') is a special {{OBP|Pokémon|species}} preserve in [[Kanto]] where {{pkmn|Trainer}}s can enter to capture certain types of Pokémon in. It is owned by [[Baoba]]. | | The Kanto '''Safari Zone''' (Japanese: '''サファリゾーン''' ''Safari Zone'') is a special {{OBP|Pokémon|species}} preserve in [[Kanto]] that {{pkmn|Trainer}}s can enter to capture Pokémon. It is owned by [[Baoba]]. |
|
| |
|
| For {{PDollar}}500, the player can play the '''Safari Game''' (Japanese: '''サファリゲーム''' ''Safari Game'') and receive 30 {{DL|Poké Ball|Safari Ball}}s. Limited to 500 steps and with a large area to cover, {{pkmn|Trainer}}s must plan out their visit to cover all the areas they wish to. Also taking place is a sweepstakes to find a hidden house in Area 3 of the Safari Zone, called the '''Secret House''' (Japanese: '''トレジャーハウス''' ''Treasure House''), where the winner is rewarded with {{HM|03|Surf}}. | | For {{PDollar}}500, the player can play the '''Safari Game''' (Japanese: '''サファリゲーム''' ''Safari Game'') and receive 30 {{DL|Poké Ball|Safari Ball}}s. {{pkmn|Trainer}}s are limited to 500{{sup/1|RBY}}/600{{sup/3|FRLG}} steps in the Safari Zone before the Game is over. A Safari Zone Exploration Campaign is also taking place, where the goal is for Trainers to find the '''Secret House''' (Japanese: '''トレジャーハウス''' ''Treasure House''), located in the deepest area, Area 3. The prize for finding the house is {{HM|03|Surf}}. |
|
| |
|
| When a [[wild Pokémon]] appears, no Pokémon may be sent out to battle it: catching Pokémon here, as in all Safari Zones, requires sheer luck. There are four options in the battle screen: Throw a {{ball|Safari}}, throw Bait, throw a Rock, and run away. Throwing Bait makes a Pokémon less likely to run, but makes it harder to catch; while throwing a Rock does the reverse, making it easier to catch but more likely to run. If the player takes too long to catch the Pokémon, it will automatically run away.
| | In the Safari Zone, when a [[wild Pokémon]] appears, Trainers cannot send out Pokémon to battle it. Instead, Trainers must face Pokémon only with simple tools, and catching a Pokémon becomes much more reliant on luck, as Pokémon are able to run away from the Trainer at any time. Trainers may throw Bait to make a Pokémon less likely to run, but this also makes it harder to catch. Conversely, throwing Rocks will make a Pokémon easier to catch but more likely to run. |
|
| |
|
| In [[Generation II]], the Safari Zone has closed down while Baoba takes a vacation. In the contemporaneous [[Generation IV]] games, he has opened {{Safari|Johto|another one}} in [[Johto]]. Kanto's [[Pal Park]] can instead be found in this location. | | In [[Generation II]], the Safari Zone has closed down while Baoba takes a vacation. In the contemporaneous [[Generation IV]] games, he has opened {{Safari|Johto|another one}} in [[Johto]] and Kanto's [[Pal Park]] is located here. |
|
| |
|
| ==Areas== | | ==Areas== |
| The Safari Zone is divided into four areas: the entrance known as '''Center Area''' (Japanese: '''ちゅうおうひろば'''), '''Area 1''' (Japanese: '''だい1エリア'''), '''Area 2''' (Japanese: '''だい2エリア'''), and '''Area 3''' (Japanese: '''だい3エリア'''). | | The Safari Zone is divided into four areas: |
| | * The Center Area: where the player enters the Safari Zone |
| | * Area 1: east from the Center Area |
| | * Area 2: north from the Center Area |
| | * Area 3: west from the Center Area |
|
| |
|
| In the [[Generation I]] games, the Center Area refers to both the area itself and Area 1 to the east. For the rest of the article, the Center Area will be referred to by its Western or Eastern sides in the context of Generation I. | | In the [[Generation I]] games, "Center Area" is actually used to refer to both the entrance area that acts as a hub to all the other areas, and the area east from this hub. |
| | |
| Area 2 is northwest of Area 1 while Area 3 is south of Area 2. Both the rightmost southern exit of Area 2 and the southeastern exit of Area 3 lead the player back to the Center Area.
| |
|
| |
|
| ==Safari Game== | | ==Safari Game== |
| As with other Safari Games, Pokémon are made easier or harder to capture by modifying the Pokémon's [[catch rate]]. Pokémon can be in any of three states - angry, eating or neutral - with the angry state making them more likely to run but the eating state making them less likely to. | | As with other Safari Games, Pokémon are made easier or harder to capture by modifying the Pokémon's [[catch rate]]. Pokémon can be in any of three states—angry, eating or neutral—with the angry state making them more likely to run but the eating state making them less likely to. |
|
| |
|
| ===Generation I=== | | ===Generation I=== |
| At the start of an encounter, two counters - an "angry counter" and an "eating counter" - are set to 0. Whenever Bait is thrown, the angry counter is reset while the eating counter increases by a random value between 1 and 5 (but to no more than 255). The opposite occurs if a Rock is thrown: the eating counter is reset and the angry counter increases on the same basis. The catch rate is doubled (to no more than 255) whenever a Rock is thrown, but halved (rounded down) whenever Bait is thrown. | | At the start of an encounter, two counters—an "angry counter" and an "eating counter"—are set to 0. Whenever Bait is thrown, the angry counter is reset while the eating counter increases by a random value between 1 and 5 (but to no more than 255). The opposite occurs if a Rock is thrown: the eating counter is reset and the angry counter increases on the same basis. The catch rate is doubled (to no more than 255) whenever a Rock is thrown, but halved (rounded down) whenever Bait is thrown. |
|
| |
|
| At the end of each turn, if either the angry or eating counter is nonzero, it is decreased by 1; if the angry counter is decreased to 0, the modified catch rate resets to the Pokémon's initial catch rate. A random value between 0 and 255 inclusive is generated, and if this is less than half of the Pokémon's Speed rounded down (if the Pokémon is eating), double the Speed (if the Pokémon is in a neutral state), or four times the Speed (if the Pokémon is angry), the Pokémon escapes. A Pokémon will also always escape if its Speed is 128 or more, even if it is eating. | | At the end of each turn, if either the angry or eating counter is nonzero, it is decreased by 1; if the angry counter is decreased to 0, the modified catch rate resets to the Pokémon's initial catch rate. A random value between 0 and 255 inclusive is generated, and if this is less than half of the Pokémon's Speed rounded down (if the Pokémon is eating), double the Speed (if the Pokémon is in a neutral state), or four times the Speed (if the Pokémon is angry), the Pokémon escapes. A Pokémon will also always escape if its Speed is 128 or more, even if it is eating. |
| Line 64: |
Line 66: |
| ==Items== | | ==Items== |
| {{Itlisth}} | | {{Itlisth}} |
| {{Itemlist|Safari Ball|Safari Game; cannot be kept|R=yes|B=yes|Y=yes|FR=yes|LG=yes|display={{ball|Safari}} ×30}} | | {{Itemlist|Safari Ball|For the Safari Game; cannot be kept|R=yes|B=yes|Y=yes|FR=yes|LG=yes|display={{ball|Safari}} ×30}} |
| {{Itemlist|Nugget|Center Area; on the island (requires {{m|Surf}})|R=yes|B=yes|Y=yes|FR=yes|LG=yes|display={{DL|Valuable item|Nugget}}}} | | {{Itemlist|Nugget|Center Area (hub), on the island (requires {{m|Surf}})|R=yes|B=yes|Y=yes|FR=yes|LG=yes|display={{DL|Valuable item|Nugget}}}} |
| {{Itemlist|Leaf Stone| | | {{Itemlist|Leaf Stone| |
| * Center Area; on the island (requires {{m|Surf}}) ''(hidden)'' | | * Center Area, on the island (requires {{m|Surf}}) ''(hidden)'' |
| * Area 1; on the upper pathway near the rest house|FR=yes|LG=yes|display={{evostone|Leaf Stone}} ×2}} | | * Area 1, on the upper pathway near the rest house|FR=yes|LG=yes|display={{evostone|Leaf Stone}} ×2}} |
| {{Itemlist|Carbos|Eastern Center Area; on the northern portion of the large mountain|R=yes|B=yes|Y=yes|display={{DL|Vitamin|Carbos}}}} | | {{Itemlist|Carbos|Center Area (east), on the northern portion of the large mountain|R=yes|B=yes|Y=yes|display={{DL|Vitamin|Carbos}}}} |
| {{Itemlist|TM Normal|Eastern Center Area; in the grass jutting out over the water|R=yes|B=yes|Y=yes|display={{TM|37|Egg Bomb}}}} | | {{Itemlist|TM Normal|Center Area (east), in the grass jutting out over the water|R=yes|B=yes|Y=yes|display={{TM|37|Egg Bomb}}}} |
| {{Itemlist|TM Fire|Area 1; on the ledge beside the pond|FR=yes|LG=yes|display={{TM|11|Sunny Day}}}} | | {{Itemlist|TM Fire|Area 1, on the ledge beside the pond|FR=yes|LG=yes|display={{TM|11|Sunny Day}}}} |
| {{Itemlist|Max Potion|Eastern Center Area{{sup/1|RGBY}}/Area 1{{sup/3|FRLG}}; far west of the small mountain|R=yes|B=yes|Y=yes|FR=yes|LG=yes|display={{DL|Potion|Max Potion}}}} | | {{Itemlist|Max Potion|Center Area (east){{sup/1|RGBY}}/Area 1{{sup/3|FRLG}}, far west of the small mountain|R=yes|B=yes|Y=yes|FR=yes|LG=yes|display={{DL|Potion|Max Potion}}}} |
| {{Itemlist|Full Restore|Eastern Center Area{{sup/1|RGBY}}/Area 1{{sup/3|FRLG}}; near the rest house|R=yes|B=yes|Y=yes|FR=yes|LG=yes|display={{DL|Potion|Full Restore}}}} | | {{Itemlist|Full Restore|Center Area (east){{sup/1|RGBY}}/Area 1{{sup/3|FRLG}}, near the rest house|R=yes|B=yes|Y=yes|FR=yes|LG=yes|display={{DL|Potion|Full Restore}}}} |
| {{Itemlist|TM Normal|Area 2; on the lower pathway near the rest house|R=yes|B=yes|Y=yes|display={{TM|40|Skull Bash}}}} | | {{Itemlist|TM Normal|Area 2, on the lower pathway near the rest house|R=yes|B=yes|Y=yes|display={{TM|40|Skull Bash}}}} |
| {{Itemlist|Protein|Area 2; on the upper pathway near the rest house|R=yes|B=yes|Y=yes|FR=yes|LG=yes|display={{DL|Vitamin|Protein}}}} | | {{Itemlist|Protein|Area 2, on the upper pathway near the rest house|R=yes|B=yes|Y=yes|FR=yes|LG=yes|display={{DL|Vitamin|Protein}}}} |
| {{Itemlist|TM Steel|Area 2; beside a tree west of the rest house|FR=yes|LG=yes|display={{TM|47|Steel Wing}}}} | | {{Itemlist|TM Steel|Area 2, beside a tree west of the rest house|FR=yes|LG=yes|display={{TM|47|Steel Wing}}}} |
| {{Itemlist|Quick Claw|Area 2; on a grassless patch in the middle of the area|FR=yes|LG=yes|display={{DL|In-battle effect item|Quick Claw}}}} | | {{Itemlist|Quick Claw|Area 2, on a grassless patch in the middle of the area|FR=yes|LG=yes|display={{DL|In-battle effect item|Quick Claw}}}} |
| {{Itemlist|Max Revive|Area 3; in a corner at the southeast base of the mountain|R=yes|B=yes|Y=yes|FR=yes|LG=yes|display={{DL|Revive|Max Revive}}}} | | {{Itemlist|Max Revive|Area 3, in a corner at the southeast base of the mountain|R=yes|B=yes|Y=yes|FR=yes|LG=yes|display={{DL|Revive|Max Revive}}}} |
| {{Itemlist|Max Potion|Area 3; in the grass at the southwest base of the mountain|R=yes|B=yes|Y=yes|FR=yes|LG=yes|display={{DL|Potion|Max Potion}}}} | | {{Itemlist|Max Potion|Area 3, in the grass at the southwest base of the mountain|R=yes|B=yes|Y=yes|FR=yes|LG=yes|display={{DL|Potion|Max Potion}}}} |
| {{Itemlist|Gold Teeth|Area 3; south of the sign asking to find them|R=yes|B=yes|Y=yes|FR=yes|LG=yes|display={{key|I|Gold Teeth|Gold}} {{key|III|Gold Teeth|Teeth}}}} | | {{Itemlist|Gold Teeth|Area 3, south of the sign asking to find them|R=yes|B=yes|Y=yes|FR=yes|LG=yes|display={{key|I|Gold Teeth|Gold}} {{key|III|Gold Teeth|Teeth}}}} |
| {{Itemlist|TM Normal|Area 3; southeast of the Secret House|R=yes|B=yes|Y=yes|FR=yes|LG=yes|display={{TM|32|Double Team}}}} | | {{Itemlist|TM Normal|Area 3, southeast of the Secret House|R=yes|B=yes|Y=yes|FR=yes|LG=yes|display={{TM|32|Double Team}}}} |
| {{Itemlist|Revive|Area 3; on the southeast statue near the Secret House ''(hidden)''|R=yes|B=yes|Y=yes|FR=yes|LG=yes|display={{DL|Revive|Revive}}}} | | {{Itemlist|Revive|Area 3, on the southeast statue near the Secret House ''(hidden)''|R=yes|B=yes|Y=yes|display={{DL|Revive|Revive}}}} |
| {{Itemlist|HM Water|Area 3; from the man in the Secret House|R=yes|B=yes|Y=yes|FR=yes|LG=yes|display={{HM|03|Surf}}}} | | {{Itemlist|Revive|Area 3, three steps south and one step east of the door of the Secret House ''(hidden)''|FR=yes|LG=yes|display={{DL|Revive|Revive}}}} |
| | {{Itemlist|HM Water|Area 3, from the man in the Secret House|R=yes|B=yes|Y=yes|FR=yes|LG=yes|display={{HM|03|Surf}}}} |
| {{Itlistfoot}} | | {{Itlistfoot}} |
|
| |
|
| ==Pokémon== | | ==Pokémon== |
| ===Generation I=== | | ===Generation I=== |
| ====Center Area (West)==== | | ====Center Area (hub)==== |
| {{Catch/header|land|no}} | | {{Catch/header|land|no}} |
| {{Catch/entry1|029|Nidoran♀|no|yes|no|Grass|22|25%|type1=Poison}} | | {{Catch/entry1|029|Nidoran♀|no|yes|no|Grass|22|25%|type1=Poison}} |
| Line 119: |
Line 122: |
| {{Catch/entry1|079|Slowpoke|yes|yes|no|Fish Super|15|25%|type1=Water|type2=Psychic}} | | {{Catch/entry1|079|Slowpoke|yes|yes|no|Fish Super|15|25%|type1=Water|type2=Psychic}} |
| {{Catch/entry1|098|Krabby|yes|yes|no|Fish Super|15|25%|type1=Water}} | | {{Catch/entry1|098|Krabby|yes|yes|no|Fish Super|15|25%|type1=Water}} |
| {{Catch/entry1|129|Magikarp|no|no|yes|Fish Super|5-10|70%|type1=Water}} | | {{Catch/entry1|129|Magikarp|no|no|yes|Fish Super|5, 10|70%|type1=Water}} |
| {{Catch/entry1|147|Dratini|yes|yes|no|Fish Super|15|25%|type1=Dragon}} | | {{Catch/entry1|147|Dratini|yes|yes|no|Fish Super|15|25%|type1=Dragon}} |
| {{Catch/entry1|147|Dratini|no|no|yes|Fish Super|10|20%|type1=Dragon}} | | {{Catch/entry1|147|Dratini|no|no|yes|Fish Super|10|20%|type1=Dragon}} |
| Line 125: |
Line 128: |
| {{Catch/footer|land}} | | {{Catch/footer|land}} |
|
| |
|
| ====Center Area (East)==== | | ====Center Area (east)==== |
| {{Catch/header|land|no}} | | {{Catch/header|land|no}} |
| {{Catch/entry1|029|Nidoran♀|yes|no|no|Grass|24|5%|type1=Poison}} | | {{Catch/entry1|029|Nidoran♀|yes|no|no|Grass|24|5%|type1=Poison}} |
| Line 156: |
Line 159: |
| {{Catch/entry1|079|Slowpoke|yes|yes|no|Fish Super|15|25%|type1=Water|type2=Psychic}} | | {{Catch/entry1|079|Slowpoke|yes|yes|no|Fish Super|15|25%|type1=Water|type2=Psychic}} |
| {{Catch/entry1|098|Krabby|yes|yes|no|Fish Super|15|25%|type1=Water}} | | {{Catch/entry1|098|Krabby|yes|yes|no|Fish Super|15|25%|type1=Water}} |
| {{Catch/entry1|129|Magikarp|no|no|yes|Fish Super|5-15|90%|type1=Water}} | | {{Catch/entry1|129|Magikarp|no|no|yes|Fish Super|5, 10, 15|90%|type1=Water}} |
| {{Catch/entry1|147|Dratini|yes|yes|no|Fish Super|15|25%|type1=Dragon}} | | {{Catch/entry1|147|Dratini|yes|yes|no|Fish Super|15|25%|type1=Dragon}} |
| {{Catch/entry1|147|Dratini|no|no|yes|Fish Super|15|10%|type1=Dragon}} | | {{Catch/entry1|147|Dratini|no|no|yes|Fish Super|15|10%|type1=Dragon}} |
| Line 188: |
Line 191: |
| {{Catch/entry1|060|Poliwag|yes|yes|yes|Fish Good|10|50%|type1=Water}} | | {{Catch/entry1|060|Poliwag|yes|yes|yes|Fish Good|10|50%|type1=Water}} |
| {{Catch/entry1|118|Goldeen|yes|yes|yes|Fish Good|10|50%|type1=Water}} | | {{Catch/entry1|118|Goldeen|yes|yes|yes|Fish Good|10|50%|type1=Water}} |
| {{Catch/entry1|129|Magikarp|no|no|yes|Fish Super|5-15|90%|type1=Water}}
| |
| {{Catch/entry1|054|Psyduck|yes|yes|no|Fish Super|15|25%|type1=Water}} | | {{Catch/entry1|054|Psyduck|yes|yes|no|Fish Super|15|25%|type1=Water}} |
| {{Catch/entry1|079|Slowpoke|yes|yes|no|Fish Super|15|25%|type1=Water|type2=Psychic}} | | {{Catch/entry1|079|Slowpoke|yes|yes|no|Fish Super|15|25%|type1=Water|type2=Psychic}} |
| {{Catch/entry1|098|Krabby|yes|yes|no|Fish Super|15|25%|type1=Water}} | | {{Catch/entry1|098|Krabby|yes|yes|no|Fish Super|15|25%|type1=Water}} |
| | {{Catch/entry1|129|Magikarp|no|no|yes|Fish Super|5, 10, 15|90%|type1=Water}} |
| {{Catch/entry1|147|Dratini|yes|yes|no|Fish Super|15|25%|type1=Dragon}} | | {{Catch/entry1|147|Dratini|yes|yes|no|Fish Super|15|25%|type1=Dragon}} |
| {{Catch/entry1|147|Dratini|no|no|yes|Fish Super|15|10%|type1=Dragon}} | | {{Catch/entry1|147|Dratini|no|no|yes|Fish Super|15|10%|type1=Dragon}} |
| Line 226: |
Line 229: |
| {{Catch/entry1|079|Slowpoke|yes|yes|no|Fish Super|15|25%|type1=Water|type2=Psychic}} | | {{Catch/entry1|079|Slowpoke|yes|yes|no|Fish Super|15|25%|type1=Water|type2=Psychic}} |
| {{Catch/entry1|098|Krabby|yes|yes|no|Fish Super|15|25%|type1=Water}} | | {{Catch/entry1|098|Krabby|yes|yes|no|Fish Super|15|25%|type1=Water}} |
| {{Catch/entry1|129|Magikarp|no|no|yes|Fish Super|5-15|90%|type1=Water}} | | {{Catch/entry1|129|Magikarp|no|no|yes|Fish Super|5, 10, 15|90%|type1=Water}} |
| {{Catch/entry1|147|Dratini|yes|yes|no|Fish Super|15|25%|type1=Dragon}} | | {{Catch/entry1|147|Dratini|yes|yes|no|Fish Super|15|25%|type1=Dragon}} |
| {{Catch/entry1|147|Dratini|no|no|yes|Fish Super|15|10%|type1=Dragon}} | | {{Catch/entry1|147|Dratini|no|no|yes|Fish Super|15|10%|type1=Dragon}} |
| Line 355: |
Line 358: |
|
| |
|
| ==Layout== | | ==Layout== |
| {| style="margin:auto; background: #000; {{roundy|10px}}; border: 5px solid #{{locationcolor/med|land}}" | | {| class="roundy" style="margin:auto; background: #000; border: 3px solid #{{locationcolor/dark|land}}" |
| |- | | |- |
| ! style="background:#{{locationcolor/light|land}}; {{roundytl|5px}};" | Version | | ! style="background:#{{locationcolor/light|land}}; {{roundytl|5px}}" | Version |
| ! style="background:#{{locationcolor/light|land}}" | Center Area<sup>RGBY/FRLG</sup> | | ! style="background:#{{locationcolor/light|land}}" | Center Area (hub) |
| ! style="background:#{{locationcolor/light|land}}" | Center Area<sup>RGBY</sup><br>Area 1<sup>FRLG</sup> | | ! style="background:#{{locationcolor/light|land}}" | Center Area (east)<sup>RGBY</sup><br>Area 1<sup>FRLG</sup> |
| ! style="background:#{{locationcolor/light|land}}" | Area 2 | | ! style="background:#{{locationcolor/light|land}}" | Area 2 |
| ! style="background:#{{locationcolor/light|land}}; {{roundytr|5px}};" | Area 3 | | ! style="background:#{{locationcolor/light|land}}; {{roundytr|5px}}" | Area 3 |
| |- style="background:#000" | | |- |
| ! style="background:#{{red color}}" | {{color2|000|Pokémon Red and Blue Versions|Red}} | | ! style="background:#{{red color}}" | {{color2|000|Pokémon Red and Blue Versions|Red}} |
| | rowspan="3" | [[File:Safari Zone entrance RBY.png|150px]] | | | rowspan="3" | [[File:Safari Zone entrance RBY.png|150px]] |
| Line 369: |
Line 372: |
| | rowspan="3" | [[File:Safari Zone area 3 RBY.png|150px]] | | | rowspan="3" | [[File:Safari Zone area 3 RBY.png|150px]] |
| |- | | |- |
| ! style="background:#{{blue color}}" | {{color2|000|Pokémon Red and Blue Versions|Blue}} | | ! style="background:#{{blue color}}" | {{color2|FFF|Pokémon Red and Blue Versions|Blue}} |
| |- | | |- |
| ! style="background:#{{yellow color}}" | {{color2|000|Pokémon Yellow Version|Yellow}} | | ! style="background:#{{yellow color}}" | {{color2|000|Pokémon Yellow Version|Yellow}} |
| Line 381: |
Line 384: |
| ! style="background:#{{leafgreen color}}" | {{color2|000|Pokémon FireRed and LeafGreen Versions|LeafGreen}} | | ! style="background:#{{leafgreen color}}" | {{color2|000|Pokémon FireRed and LeafGreen Versions|LeafGreen}} |
| |- | | |- |
| | colspan="5" style="background:#{{locationcolor/light|land}}; {{roundybottom|5px}};" | | | | colspan="5" style="background:#{{locationcolor/light|land}}; {{roundybottom|5px}}" | |
| |} | | |} |
|
| |
|
| Line 391: |
Line 394: |
| ===In the main series=== | | ===In the main series=== |
| [[File:Safari Zone anime.png|thumb|300px|The gate of the Safari Zone in the anime]] | | [[File:Safari Zone anime.png|thumb|300px|The gate of the Safari Zone in the anime]] |
| This Safari Zone appears only once in the {{pkmn|anime}}: in [[EP035]], an episode which [[Banned episodes|aired only in Japan]]. | | This Safari Zone appears only once in the {{pkmn|anime}}: in [[EP035]], an episode which [[Banned episodes|aired only in Japan]]. Thus, the Safari Zone has never appeared in the English dub, although it is mentioned in the preceding episodes ''[[EP033|The Flame Pokémon-Athon!]]'' and ''[[EP034|The Kangaskhan Kid]]''. |
|
| |
|
| In the anime, the Safari Zone is run by a gun-toting warden, [[Kaiser]]. Like in the games, Trainers are restricted to only thirty {{ball|Safari}}s per challenge. It is explained that this is because of too many Trainers capturing all the rarest Pokémon too rapidly and due to searching for the extremely rare Pokémon, {{p|Dratini}}. | | In the anime, the Safari Zone is run by a gun-toting warden, [[Kaiser]]. Like in the games, Trainers are restricted to only thirty {{ball|Safari}}s per challenge. It is explained that this is because of too many Trainers capturing all the rarest Pokémon too rapidly and due to searching for the extremely rare Pokémon, {{p|Dratini}}. |
| Line 422: |
Line 425: |
|
| |
|
| ===In Pokémon Origins=== | | ===In Pokémon Origins=== |
| The Kanto Safari Zone appeared briefly in the [[Pokémon Origins]] episode ''[[PO04|File 4 - Charizard]]'', when {{OBP|Red|Origins}} was seen confronting {{p|Chansey}} in there. Initially, he had trouble choosing between throwing a rock or a bait, almost causing the Chansey to run away, but eventually, he managed to catch it and register it with his [[Pokédex]]. | | The Kanto Safari Zone appeared briefly in the [[Pokémon Origins]] episode ''[[PO04|File 4: Charizard]]'', when {{OBP|Red|Origins}} was seen confronting {{p|Chansey}} in there. Initially, he had trouble choosing between throwing a rock or a bait, almost causing the Chansey to run away, but eventually, he managed to catch it and register it with his [[Pokédex]]. |
|
| |
|
| ====Pokémon==== | | ====Pokémon==== |
| {| width="100%" | | {| width="100%" |
| |- | | |- |
| | {{InactivePoké|Red|Chansey|Red Chansey PO.png|Normal|link=no}} | | | {{InactivePoké|Red|Chansey|Red Chansey PO.png|Normal|link=no}} ♀ |
| | | | | |
| |} | | |} |
| Line 433: |
Line 436: |
| ==In the manga== | | ==In the manga== |
| ===In the Pokémon Adventures manga=== | | ===In the Pokémon Adventures manga=== |
| In the {{chap|Red, Green & Blue}}, {{adv|Red}} visits the Safari Zone during ''[[PS020|Meanwhile... Vileplume!]]'', ''[[PS021|Long Live the Nidoking!]]'' and ''[[PS022|A Hollow Victreebel]]''. With the help of the two robots Pidgebot1 and Pidgebot2, Red goes through the jungle on a moving wooden plank. When he encounters two {{p|Nidoking}} fighting over a {{p|Nidoqueen}}, Red decided to capture a Nidoking. The Nidoking blocked the Poké Ball with its arm hitting the Nidoqueen straight on the head capturing the Nidoqueen. This made the Nidoking very angry. It began to rampage and crush everything. Red threw Rocks at Nidoking, hurting it badly and making it even angry, but managed to escape. | | [[File:Kanto Safari Zone Adventures.png|thumb|200px|Safari Zone in Pokémon Adventures]] |
| | In the {{chap|Red, Green & Blue}}, {{adv|Red}} visits the Safari Zone during ''[[PS020|Meanwhile... Vileplume!]]'', ''[[PS021|Long Live the Nidoking!]]'' and ''[[PS022|A Hollow Victreebel]]''. With the help of the two guide robots Pidgebot1 and Pidgebot2, Red goes through the jungle on a raft. He witnesses two {{p|Nidoking}} fighting over a {{p|Nidoqueen}}, and attempts to capture a Nidoking using a Poké Ball he had smuggles in. The targeted Nidoking deflects the Poké Ball, and it instead hits and successfully captures the Nidoqueen. This angers both Nidoking. One of them attacks Red, destroying both the raft and Pidgebot2 and damaging Pidgebot1's wing. Red tries to retaliate by throwing rocks, and though he puts its eye out, he only infuriates it further. Red then manages to flee with Pidgebot1's help. |
|
| |
|
| Later, Red was eaten by a {{p|Victreebel}} (using {{m|Vine Whip}}). He was not digested, however; merely tied up for a feast in the near future. This feast would be to celebrate the [[evolution]] of {{p|Bellsprout}} and {{p|Weepinbell}}. Red and Pidgebot had an idea to use a [[Poké Flute]] to wake the Grass Pokémon up, and distracted them with a [[Poké Doll]] before escaping. Unfortunately, they ran straight into the Nidoking from earlier on. Using a {{pkmn2|caught}} Victreebel, Red was also able to capture the Nidoking. | | Later, Red is captured by a {{p|Victreebel}}. He is not eaten, however, but {{m|Vine Whip|tied up}} and stored with several Pokémon that had also fallen prey. This is necessary for a ritual that will evolve several {{p|Bellsprout}} and {{p|Weepinbell}}. Red and Pidgebot hatch an escape plan, which involves using a [[Poké Flute]] to awaken the sleeping Pokémon and ruin the ritual to cause a commotion, then fleeing using a [[Poké Doll]] as cover. Red also uses Safari Balls to catch some Victreebel in the process. Unfortunately, the two run straight into the Nidoking from earlier on. Using a {{pkmn2|caught}} Victreebel, Red was also able to capture the Nidoking. |
|
| |
|
| ====Pokémon==== | | ====Pokémon==== |
| Line 454: |
Line 458: |
|
| |
|
| ===In the Pokémon Pocket Monsters manga=== | | ===In the Pokémon Pocket Monsters manga=== |
| | [[File:Safari Zone PM.png|thumb|200px|The Safari Zone in Pokémon Pocket Monsters]] |
| {{OBP|Red|Pocket Monsters}} and his Pokémon visit the Safari Zone in ''[[PM014|Rampage At The Safari Zone?!]]''. It ends up being wrecked by {{TP|Red|Clefairy}}'s destructive powers. | | {{OBP|Red|Pocket Monsters}} and his Pokémon visit the Safari Zone in ''[[PM014|Rampage At The Safari Zone?!]]''. It ends up being wrecked by {{TP|Red|Clefairy}}'s destructive powers. |
| | | {{sectionstub}} |
| ====Pokémon==== | | ====Pokémon==== |
| {| width="100%" | | {| width="75%" |
| |- | | |- |
| | {{InactivePoké|Safari Zone|Nidoran♀|Safari Zone Nidoran f PM.png|Poison|link=no}} | | | {{InactivePoké|Safari Zone|Nidoran♀|Safari Zone Nidoran f PM.png|Poison|link=no}} |
| | {{InactivePoké|Isamu Akai|Tauros|Red Tauros PM.png|Normal|link=no}} ♂ | | | {{InactivePoké|Red|Tauros|Red Tauros PM.png|Normal|link=no}} ♂ |
| | {{InactivePoké|Safari Zone|Omanyte|Safari Zone Kabuto Omanyte PM.png|Rock|Water|link=no}} | | | {{InactivePoké|Safari Zone|Omanyte|Safari Zone Kabuto Omanyte PM.png|Rock|Water|link=no}} |
| | |- |
| | {{InactivePoké|Safari Zone|Omastar|Safari Zone Omastar PM.png|Rock|Water|link=no}} | | | {{InactivePoké|Safari Zone|Omastar|Safari Zone Omastar PM.png|Rock|Water|link=no}} |
| |-
| |
| | {{InactivePoké|Safari Zone|Kabuto|Safari Zone Kabuto Omanyte PM.png|Rock|Water|link=no}} | | | {{InactivePoké|Safari Zone|Kabuto|Safari Zone Kabuto Omanyte PM.png|Rock|Water|link=no}} |
| | {{InactivePoké|Safari Zone|Kabutops|Safari Zone Kabutops PM.png|Rock|Water|link=no}} | | | {{InactivePoké|Safari Zone|Kabutops|Safari Zone Kabutops PM.png|Rock|Water|link=no}} |
| | |- |
| | {{InactivePoké|Safari Zone|Aerodactyl|Safari Zone Aerodactyl PM.png|Rock|Flying|link=no}} | | | {{InactivePoké|Safari Zone|Aerodactyl|Safari Zone Aerodactyl PM.png|Rock|Flying|link=no}} |
| | | |
| | | |
| | |} |
| | |
| | ===In the Pokémon Zensho manga=== |
| | [[File:Safari Zone Zensho.png|thumb|200px|Safari Zone in Pokémon Zensho]] |
| | The Safari Zone appeared in ''[[PZ04|Fuchsia City]]''. |
| | {{sectionstub}} |
| | ====Pokémon==== |
| | {| width="75%" |
| | |- |
| | | {{InactivePoké|Safari Zone|Chansey|Safari Zone Chansey Zensho.png|Normal|link=no}} ♀ |
| | | {{InactivePoké|Safari Zone|Doduo|Safari Zone Doduo Rhyhorn Zensho.png|Normal|Flying|link=no}} |
| | | {{InactivePoké|Safari Zone|Rhyhorn|Safari Zone Doduo Rhyhorn Zensho.png|Ground|Rock|link=no}} |
| | |- |
| | | {{InactivePoké|Safari Zone|Kangaskhan|Safari Zone Kangaskhan Zensho.png|Normal|link=no}} ♀ |
| | | {{InactivePoké|Safari Zone|Tauros|Safari Zone Tauros Zensho.png|Normal|link=no}} ♂ |
| | | {{InactivePoké|Safari Zone|Ditto|Satoshi Ditto Zensho.png|Normal|link=no}} |
| | |- |
| | | {{InactivePoké|Safari Zone|Dratini|Satoshi Dratini Zensho.png|Dragon|link=no}} |
| | | {{InactivePoké|Safari Zone|Slowpoke|Satoshi Slowpoke Krabby Psyduck Zensho.png|Water|Psychic|link=no}} |
| | | {{InactivePoké|Safari Zone|Krabby|Satoshi Slowpoke Krabby Psyduck Zensho.png|Water|link=no}} |
| | |- |
| | | {{InactivePoké|Safari Zone|Psyduck|Satoshi Slowpoke Krabby Psyduck Zensho.png|Water|link=no}} |
| | | {{InactivePoké|Safari Zone|Magikarp|Satoshi Magikarp Zensho.png|Water|link=no}} |
| | | | | |
| |} | | |} |
|
| |
|
| ==Trivia== | | ==Trivia== |
| [[File:Beta Safari Zone GSC.png|thumb|200px|right|The unused Safari Zone in Generation II, which uses ''[[Pokémon HeartGold & Pokémon SoulSilver: Super Music Collection|Evolution]]'' as its background music]] | | [[File:Kanto Safari Zone unused GSC.png|thumb|200px|right|The unused Safari Zone in Generation II, which uses ''[[Pokémon HeartGold & Pokémon SoulSilver: Super Music Collection|Evolution]]'' as its background music]] |
| * The background music is ''[[Pokémon FireRed & Pokémon LeafGreen: Super Music Collection|Evolution]]''. | | * The background music is ''[[Pokémon FireRed & Pokémon LeafGreen: Super Music Collection|Evolution]]''. |
| * The Safari Zone is [[Pokémon Gold and Silver#Safari Zone|a location]] in [[Generation II]], but is very minimally programmed into the game. It can only be accessed by changing the warp pointers when a room is entered; however, when it has been accessed, the area is unmistakably the entrance area, complete with music. It is apparently a leftover from the [[Pokémon Gold and Silver beta|development builds]] of {{v2|Gold and Silver|s}}. | | * The Safari Zone is [[Pokémon Gold and Silver#Safari Zone|a location]] in [[Generation II]], but is very minimally programmed into the game. It can only be accessed by changing the warp pointers when a room is entered; however, when it has been accessed, the area is unmistakably the entrance area, complete with music. It is apparently a leftover from the [[Pokémon Gold and Silver beta|development builds]] of {{v2|Gold and Silver|s}}. |
| ** However, in {{2v2|HeartGold|SoulSilver}}, the Safari Zone is replaced with [[Pal Park]]. | | ** However, in {{2v2|HeartGold|SoulSilver}}, the Safari Zone is replaced with [[Pal Park]]. |
| * In {{game|Yellow}}, {{p|Tauros}}'s encounter rate at the Safari Zone is 10%, as opposed to the other [[Generation I]]-based games, where its encounter rate is only 1% or 4%. As the Yellow Version is highly based on the anime, this can be taken as a reference to the anime episode [[EP035]], where {{AP|Tauros}} were seen in large numbers around the Safari Zone, as opposed to its rarity in {{game|Red and Blue|s|the previous games}}. | | * In {{game|Yellow}}, {{p|Tauros}}'s encounter rate at the Safari Zone is 10%, as opposed to the other [[Generation I]]-based games, where its encounter rate is only 1% or 4%, depending on the Area. As the Yellow Version is highly based on the anime, this can be taken as a reference to the anime episode [[EP035]], where {{AP|Tauros}} were seen in large numbers around the Safari Zone, as opposed to its rarity in {{game|Red and Blue|s|the previous games}}. |
| ** Another reference to the aforementioned episode in Yellow may be the fact that {{p|Dragonair}}, which also appeared in EP035, is available in the Yellow Version, but not in the Red and Blue Versions. | | ** Another reference to the aforementioned episode in Yellow may be the fact that {{p|Dragonair}}, which also appeared in EP035, is available in the Yellow Version, but not in the Red and Blue Versions. |
| * In [[Generation I]], a scientist in a house in the top-right corner of Area 2 states, "''You can keep any item you find on the ground here. But, you'll run out of time if you try for all of them at once!''". However, so long as the player can use {{HM|03|Surf}} as soon as they pick it up, it is actually possible to collect all possible items in the Safari Zone in one visit. | | * In [[Generation I]], a scientist in a house in the top-right corner of Area 2 states, "''You can keep any item you find on the ground here. But, you'll run out of time if you try for all of them at once!''". However, so long as the player can use {{HM|03|Surf}} as soon as they pick it up, it is actually possible to collect all possible items in the Safari Zone in one visit. |
| * In Pokémon Yellow, if the player tries to enter the Safari Zone with less than {{PDollar}}500, they can enter the Safari Zone for all of their remaining money but they get a number of Safari Balls proportional to the amount paid. If they have no money, they can enter for free but only receive a single Safari Ball. | | * Although bait makes Pokémon harder to catch, an NPC in Area 4 says it makes them ''easier'' to catch. |
| | * In the Western Generation I games, though the player receives 30 Safari Balls, it is only possible to catch 25 Pokémon: 5 to fill the [[party]] and 20 to fill a [[Pokémon Storage System|Box]]. In the Japanese games, however, the Box capacity is 30 Pokémon. |
| | * In Pokémon Yellow, if the player tries to enter the Safari Zone with less than {{PDollar}}500, they can enter the Safari Zone for all of their remaining money but they get a number of Safari Balls proportional to the amount paid. If they have no money, they can enter for free after multiple attempts to enter, but only receive a single Safari Ball. |
|
| |
|
| {{youtubevid|9KYtKW8o_YI|BungiePhantom|Yellow}} | | {{youtubevid|9KYtKW8o_YI|BungiePhantom|Yellow}} |
| Line 489: |
Line 522: |
| |de=Safarizone | | |de=Safarizone |
| |it=Zona Safari | | |it=Zona Safari |
| |es_eu=Zona Safari}} | | |pt_br=Safari Zone<br>Zona Safári |
| | |es_eu=Zona Safari |
| | |sv=Safarizonen |
| | |vi=Vùng Safari |
| | }} |
| {{-}} | | {{-}} |
| {{SafariNav|Kanto}} | | {{SafariNav|Kanto}} |
| Line 503: |
Line 540: |
|
| |
|
| [[de:Safari-Zone (Kanto)]] | | [[de:Safari-Zone (Kanto)]] |
| [[es:Zona Safari]]
| |
| [[fr:Parc Safari (Kanto)]] | | [[fr:Parc Safari (Kanto)]] |
| [[it:Zona Safari (Kanto)]] | | [[it:Zona Safari (Kanto)]] |
| [[ja:サファリゾーン (カントー地方)]] | | [[ja:サファリゾーン (カントー地方)]] |
| [[zh:关都地方]] | | [[zh:狩猎地带(关都)]] |
| Safari Zone
|
|
サファリゾーン
Safari Zone
|
| "Wild Missingno. appeared!"
|
|
|
|
| Map description:
|
An amusement park outside Fuchsia City where many rare Pokémon can be observed in the wild. Catch them in a popular game!FRLG
|
| Location:
|
North of Fuchsia City
|
| Region:
|
Kanto
|
| Generations:
|
I, III
|
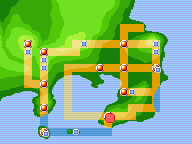
Location of Safari Zone in Kanto.
|
| Pokémon world locations
|
The Kanto Safari Zone (Japanese: サファリゾーン Safari Zone) is a special Pokémon preserve in Kanto that Trainers can enter to capture Pokémon. It is owned by Baoba.
For $500, the player can play the Safari Game (Japanese: サファリゲーム Safari Game) and receive 30 Safari Balls. Trainers are limited to 500RBY/600FRLG steps in the Safari Zone before the Game is over. A Safari Zone Exploration Campaign is also taking place, where the goal is for Trainers to find the Secret House (Japanese: トレジャーハウス Treasure House), located in the deepest area, Area 3. The prize for finding the house is HM03 (Surf).
In the Safari Zone, when a wild Pokémon appears, Trainers cannot send out Pokémon to battle it. Instead, Trainers must face Pokémon only with simple tools, and catching a Pokémon becomes much more reliant on luck, as Pokémon are able to run away from the Trainer at any time. Trainers may throw Bait to make a Pokémon less likely to run, but this also makes it harder to catch. Conversely, throwing Rocks will make a Pokémon easier to catch but more likely to run.
In Generation II, the Safari Zone has closed down while Baoba takes a vacation. In the contemporaneous Generation IV games, he has opened another one in Johto and Kanto's Pal Park is located here.
Areas
The Safari Zone is divided into four areas:
- The Center Area: where the player enters the Safari Zone
- Area 1: east from the Center Area
- Area 2: north from the Center Area
- Area 3: west from the Center Area
In the Generation I games, "Center Area" is actually used to refer to both the entrance area that acts as a hub to all the other areas, and the area east from this hub.
Safari Game
As with other Safari Games, Pokémon are made easier or harder to capture by modifying the Pokémon's catch rate. Pokémon can be in any of three states—angry, eating or neutral—with the angry state making them more likely to run but the eating state making them less likely to.
Generation I
At the start of an encounter, two counters—an "angry counter" and an "eating counter"—are set to 0. Whenever Bait is thrown, the angry counter is reset while the eating counter increases by a random value between 1 and 5 (but to no more than 255). The opposite occurs if a Rock is thrown: the eating counter is reset and the angry counter increases on the same basis. The catch rate is doubled (to no more than 255) whenever a Rock is thrown, but halved (rounded down) whenever Bait is thrown.
At the end of each turn, if either the angry or eating counter is nonzero, it is decreased by 1; if the angry counter is decreased to 0, the modified catch rate resets to the Pokémon's initial catch rate. A random value between 0 and 255 inclusive is generated, and if this is less than half of the Pokémon's Speed rounded down (if the Pokémon is eating), double the Speed (if the Pokémon is in a neutral state), or four times the Speed (if the Pokémon is angry), the Pokémon escapes. A Pokémon will also always escape if its Speed is 128 or more, even if it is eating.
Generation III
The Safari Game mechanics were overhauled to more closely resemble the one in the Hoenn Safari Zone. Like it, there is an additional "catch factor" that begins at 100/1275 of the Pokémon's catch rate (rounded down). Each species of Pokémon also has its own "escape rate", unlike in the Hoenn Safari Zone, which is never modified.
Like Generation I, a Pokémon will be angry or eating whenever Bait or Rocks are thrown. If Bait is thrown, it will be "eating" for 2-6 turns, during which the catch factor is halved. If Rocks are thrown, it will be "angry" for 2-6 turns, during which the catch factor is doubled. Being "angry" or "eating" is mutually exclusive, though modifications to the catch factors will stack (reverting to its original value whenever the Pokémon is neither "angry" nor "eating"). Whenever a Safari Ball is thrown, the catch factor is converted back to a catch rate by multiplying by 1275/100 and rounding down.
At the end of a turn, a random number from 0 to 99 is generated, and is compared to 5 times its "modified escape factor": 1275/100 of the escape rate (rounded down), which is doubled if the Pokémon is "angry" or quartered (rounded down) if the Pokémon is "eating". If the random value is less, the Pokémon escapes.
Closing notices
In Generation II, the sign outside the Safari Zone contains a notice about it being closed in that reads:
The WARDEN is
traveling abroad.
Therefore, the
SAFARI ZONE is
closed.
In HeartGold and SoulSilver, the sign informs that since the Safari Zone is closed, the facility houses Pal Park instead.
There's a notice here...
The Safari Zone is closed.
Instead, we have Pal Park.
Items
| Item
|
Location
|
Games
|

|
Safari Ball ×30
|
For the Safari Game; cannot be kept
|
R B Y FR LG
|

|
Nugget
|
Center Area (hub), on the island (requires Surf)
|
R B Y FR LG
|

|
Leaf Stone ×2
|
- Center Area, on the island (requires Surf) (hidden)
- Area 1, on the upper pathway near the rest house
|
FR LG
|

|
Carbos
|
Center Area (east), on the northern portion of the large mountain
|
R B Y
|

|
TM37 (Egg Bomb)
|
Center Area (east), in the grass jutting out over the water
|
R B Y
|

|
TM11 (Sunny Day)
|
Area 1, on the ledge beside the pond
|
FR LG
|

|
Max Potion
|
Center Area (east)RGBY/Area 1FRLG, far west of the small mountain
|
R B Y FR LG
|

|
Full Restore
|
Center Area (east)RGBY/Area 1FRLG, near the rest house
|
R B Y FR LG
|
|
|
TM40 (Skull Bash)
|
Area 2, on the lower pathway near the rest house
|
R B Y
|

|
Protein
|
Area 2, on the upper pathway near the rest house
|
R B Y FR LG
|

|
TM47 (Steel Wing)
|
Area 2, beside a tree west of the rest house
|
FR LG
|

|
Quick Claw
|
Area 2, on a grassless patch in the middle of the area
|
FR LG
|

|
Max Revive
|
Area 3, in a corner at the southeast base of the mountain
|
R B Y FR LG
|
|
|
Max Potion
|
Area 3, in the grass at the southwest base of the mountain
|
R B Y FR LG
|

|
Gold Teeth
|
Area 3, south of the sign asking to find them
|
R B Y FR LG
|
|
|
TM32 (Double Team)
|
Area 3, southeast of the Secret House
|
R B Y FR LG
|

|
Revive
|
Area 3, on the southeast statue near the Secret House (hidden)
|
R B Y
|
|
|
Revive
|
Area 3, three steps south and one step east of the door of the Secret House (hidden)
|
FR LG
|

|
HM03 (Surf)
|
Area 3, from the man in the Secret House
|
R B Y FR LG
|
|
|
Pokémon
Generation I
Center Area (hub)
| Pokémon
|
Games
|
Location
|
Levels
|
Rate
|
|
|
R
|
B
|
Y
|
|
22
|
25%
|
|
|
R
|
B
|
Y
|
|
36
|
15%
|
|
|
R
|
B
|
Y
|
|
31
|
5%
|
|
|
R
|
B
|
Y
|
|
31
|
10%
|
|
|
R
|
B
|
Y
|
|
22
|
25%
|
|
|
R
|
B
|
Y
|
|
14
|
25%
|
|
|
R
|
B
|
Y
|
|
31
|
10%
|
|
|
R
|
B
|
Y
|
|
31
|
5%
|
|
|
R
|
B
|
Y
|
|
23
|
10%
|
|
|
R
|
B
|
Y
|
|
27
|
5%
|
|
|
R
|
B
|
Y
|
|
30
|
5%
|
|
|
R
|
B
|
Y
|
|
27, 32
|
15%
|
|
|
R
|
B
|
Y
|
|
22
|
15%
|
|
|
R
|
B
|
Y
|
|
24-25
|
20%
|
|
|
R
|
B
|
Y
|
|
24
|
15%
|
|
|
R
|
B
|
Y
|
|
25
|
15%
|
|
|
R
|
B
|
Y
|
|
20
|
10%
|
|
|
R
|
B
|
Y
|
|
23
|
1%
|
|
|
R
|
B
|
Y
|
|
7
|
1%
|
|
|
R
|
B
|
Y
|
|
22
|
4%
|
|
|
R
|
B
|
Y
|
|
23
|
4%
|
|
|
R
|
B
|
Y
|
|
23
|
4%
|
| Fishing
|
|
|
R
|
B
|
Y
|
|
5
|
100%
|
|
|
R
|
B
|
Y
|
|
10
|
50%
|
|
|
R
|
B
|
Y
|
|
10
|
50%
|
|
|
R
|
B
|
Y
|
|
15
|
25%
|
|
|
R
|
B
|
Y
|
|
15
|
25%
|
|
|
R
|
B
|
Y
|
|
15
|
25%
|
|
|
R
|
B
|
Y
|
|
5, 10
|
70%
|
|
|
R
|
B
|
Y
|
|
15
|
25%
|
|
|
R
|
B
|
Y
|
|
10
|
20%
|
|
|
R
|
B
|
Y
|
|
15
|
10%
|
| A colored background means that the Pokémon can be found in this location in the specified game. A white background with a colored letter means that the Pokémon cannot be found here.
|
Center Area (east)
| Pokémon
|
Games
|
Location
|
Levels
|
Rate
|
|
|
R
|
B
|
Y
|
|
24
|
5%
|
|
|
R
|
B
|
Y
|
|
24
|
25%
|
|
|
R
|
B
|
Y
|
|
29
|
25%
|
|
|
R
|
B
|
Y
|
|
33
|
10%
|
|
|
R
|
B
|
Y
|
|
32
|
10%
|
|
|
R
|
B
|
Y
|
|
24
|
25%
|
|
|
R
|
B
|
Y
|
|
24
|
5%
|
|
|
R
|
B
|
Y
|
|
21
|
15%
|
|
|
R
|
B
|
Y
|
|
33
|
10%
|
|
|
R
|
B
|
Y
|
|
22
|
15%
|
|
|
R
|
B
|
Y
|
|
25
|
5%
|
|
|
R
|
B
|
Y
|
|
26
|
15%
|
|
|
R
|
B
|
Y
|
|
23, 25
|
20%
|
|
|
R
|
B
|
Y
|
|
22, 26
|
20%
|
|
|
R
|
B
|
Y
|
|
19
|
10%
|
|
|
R
|
B
|
Y
|
|
24
|
5%
|
|
|
R
|
B
|
Y
|
|
25
|
4%
|
|
|
R
|
B
|
Y
|
|
21
|
4%
|
|
|
R
|
B
|
Y
|
|
28
|
1%
|
|
|
R
|
B
|
Y
|
|
15
|
1%
|
|
|
R
|
B
|
Y
|
|
28
|
1%
|
|
|
R
|
B
|
Y
|
|
21
|
10%
|
| Fishing
|
|
|
R
|
B
|
Y
|
|
5
|
100%
|
|
|
R
|
B
|
Y
|
|
10
|
50%
|
|
|
R
|
B
|
Y
|
|
10
|
50%
|
|
|
R
|
B
|
Y
|
|
15
|
25%
|
|
|
R
|
B
|
Y
|
|
15
|
25%
|
|
|
R
|
B
|
Y
|
|
15
|
25%
|
|
|
R
|
B
|
Y
|
|
5, 10, 15
|
90%
|
|
|
R
|
B
|
Y
|
|
15
|
25%
|
|
|
R
|
B
|
Y
|
|
15
|
10%
|
| A colored background means that the Pokémon can be found in this location in the specified game. A white background with a colored letter means that the Pokémon cannot be found here.
|
Area 2
| Pokémon
|
Games
|
Location
|
Levels
|
Rate
|
|
|
R
|
B
|
Y
|
|
22
|
25%
|
|
|
R
|
B
|
Y
|
|
14
|
15%
|
|
|
R
|
B
|
Y
|
|
30
|
5%
|
|
|
R
|
B
|
Y
|
|
30
|
10%
|
|
|
R
|
B
|
Y
|
|
23
|
10%
|
|
|
R
|
B
|
Y
|
|
22
|
25%
|
|
|
R
|
B
|
Y
|
|
36
|
25%
|
|
|
R
|
B
|
Y
|
|
30
|
10%
|
|
|
R
|
B
|
Y
|
|
30
|
5%
|
|
|
R
|
B
|
Y
|
|
23
|
15%
|
|
|
R
|
B
|
Y
|
|
32
|
5%
|
|
|
R
|
B
|
Y
|
|
25, 27
|
20%
|
|
|
R
|
B
|
Y
|
|
20
|
15%
|
|
|
R
|
B
|
Y
|
|
16
|
5%
|
|
|
R
|
B
|
Y
|
|
26
|
15%
|
|
|
R
|
B
|
Y
|
|
25
|
10%
|
|
|
R
|
B
|
Y
|
|
26
|
4%
|
|
|
R
|
B
|
Y
|
|
28, 33
|
15%
|
|
|
R
|
B
|
Y
|
|
25
|
4%
|
|
|
R
|
B
|
Y
|
|
15
|
1%
|
|
|
R
|
B
|
Y
|
|
28
|
1%
|
| Fishing
|
|
|
R
|
B
|
Y
|
|
5
|
100%
|
|
|
R
|
B
|
Y
|
|
10
|
50%
|
|
|
R
|
B
|
Y
|
|
10
|
50%
|
|
|
R
|
B
|
Y
|
|
15
|
25%
|
|
|
R
|
B
|
Y
|
|
15
|
25%
|
|
|
R
|
B
|
Y
|
|
15
|
25%
|
|
|
R
|
B
|
Y
|
|
5, 10, 15
|
90%
|
|
|
R
|
B
|
Y
|
|
15
|
25%
|
|
|
R
|
B
|
Y
|
|
15
|
10%
|
| A colored background means that the Pokémon can be found in this location in the specified game. A white background with a colored letter means that the Pokémon cannot be found here.
|
Area 3
| Pokémon
|
Games
|
Location
|
Levels
|
Rate
|
|
|
R
|
B
|
Y
|
|
25
|
5%
|
|
|
R
|
B
|
Y
|
|
25
|
25%
|
|
|
R
|
B
|
Y
|
|
21
|
15%
|
|
|
R
|
B
|
Y
|
|
33
|
10%
|
|
|
R
|
B
|
Y
|
|
25
|
25%
|
|
|
R
|
B
|
Y
|
|
25
|
5%
|
|
|
R
|
B
|
Y
|
|
29
|
25%
|
|
|
R
|
B
|
Y
|
|
33
|
10%
|
|
|
R
|
B
|
Y
|
|
32
|
10%
|
|
|
R
|
B
|
Y
|
|
23
|
15%
|
|
|
R
|
B
|
Y
|
|
31
|
5%
|
|
|
R
|
B
|
Y
|
|
26
|
15%
|
|
|
R
|
B
|
Y
|
|
24, 26
|
20%
|
|
|
R
|
B
|
Y
|
|
22, 26
|
20%
|
|
|
R
|
B
|
Y
|
|
19
|
10%
|
|
|
R
|
B
|
Y
|
|
24
|
5%
|
|
|
R
|
B
|
Y
|
|
27
|
1%
|
|
|
R
|
B
|
Y
|
|
28
|
1%
|
|
|
R
|
B
|
Y
|
|
25
|
4%
|
|
|
R
|
B
|
Y
|
|
26
|
4%
|
|
|
R
|
B
|
Y
|
|
21
|
10%
|
| Fishing
|
|
|
R
|
B
|
Y
|
|
5
|
100%
|
|
|
R
|
B
|
Y
|
|
10
|
50%
|
|
|
R
|
B
|
Y
|
|
10
|
50%
|
|
|
R
|
B
|
Y
|
|
15
|
25%
|
|
|
R
|
B
|
Y
|
|
15
|
25%
|
|
|
R
|
B
|
Y
|
|
15
|
25%
|
|
|
R
|
B
|
Y
|
|
5, 10, 15
|
90%
|
|
|
R
|
B
|
Y
|
|
15
|
25%
|
|
|
R
|
B
|
Y
|
|
15
|
10%
|
| A colored background means that the Pokémon can be found in this location in the specified game. A white background with a colored letter means that the Pokémon cannot be found here.
|
Generation III
Center Area
| Pokémon
|
Games
|
Location
|
Levels
|
Rate
|
|
|
FR
|
LG
|
|
22
|
20%
|
|
|
FR
|
LG
|
|
22
|
20%
|
|
|
FR
|
LG
|
|
24-25
|
20%
|
|
|
FR
|
LG
|
|
25
|
20%
|
|
|
FR
|
LG
|
|
22
|
15%
|
|
|
FR
|
LG
|
|
31
|
10%
|
|
|
FR
|
LG
|
|
31
|
5%
|
|
|
FR
|
LG
|
|
31
|
5%
|
|
|
FR
|
LG
|
|
31
|
10%
|
|
|
FR
|
LG
|
|
30
|
5%
|
|
|
FR
|
LG
|
|
23
|
4%
|
|
|
FR
|
LG
|
|
23
|
4%
|
|
|
FR
|
LG
|
|
23
|
1%
|
| Surfing
|
|
|
FR
|
LG
|
|
20-40
|
100%
|
|
|
FR
|
LG
|
|
20-40
|
100%
|
| Fishing
|
|
|
FR
|
LG
|
|
5
|
100%
|
|
|
FR
|
LG
|
|
5-15
|
60%
|
|
|
FR
|
LG
|
|
5-15
|
20%
|
|
|
FR
|
LG
|
|
5-15
|
20%
|
|
|
FR
|
LG
|
|
15-25
|
40%
|
|
|
FR
|
LG
|
|
20-30
|
40%
|
|
|
FR
|
LG
|
|
15-25
|
15%
|
|
|
FR
|
LG
|
|
15-35
|
4%
|
|
|
FR
|
LG
|
|
15-35
|
4%
|
|
|
FR
|
LG
|
|
25-35
|
1%
|
| A colored background means that the Pokémon can be found in this location in the specified game. A white background with a colored letter means that the Pokémon cannot be found here.
|
Area 1
| Pokémon
|
Games
|
Location
|
Levels
|
Rate
|
|
|
FR
|
LG
|
|
24
|
20%
|
|
|
FR
|
LG
|
|
24
|
5%
|
|
|
FR
|
LG
|
|
26
|
20%
|
|
|
FR
|
LG
|
|
23, 25
|
20%
|
|
|
FR
|
LG
|
|
22
|
15%
|
|
|
FR
|
LG
|
|
33
|
10%
|
|
|
FR
|
LG
|
|
33
|
10%
|
|
|
FR
|
LG
|
|
24
|
5%
|
|
|
FR
|
LG
|
|
24
|
20%
|
|
|
FR
|
LG
|
|
25
|
5%
|
|
|
FR
|
LG
|
|
25
|
4%
|
|
|
FR
|
LG
|
|
28
|
1%
|
|
|
FR
|
LG
|
|
28
|
1%
|
| Surfing
|
|
|
FR
|
LG
|
|
20-40
|
100%
|
|
|
FR
|
LG
|
|
20-40
|
100%
|
| Fishing
|
|
|
FR
|
LG
|
|
5
|
100%
|
|
|
FR
|
LG
|
|
5-15
|
60%
|
|
|
FR
|
LG
|
|
5-15
|
20%
|
|
|
FR
|
LG
|
|
5-15
|
20%
|
|
|
FR
|
LG
|
|
15-25
|
40%
|
|
|
FR
|
LG
|
|
20-30
|
40%
|
|
|
FR
|
LG
|
|
15-25
|
15%
|
|
|
FR
|
LG
|
|
15-35
|
4%
|
|
|
FR
|
LG
|
|
15-35
|
4%
|
|
|
FR
|
LG
|
|
25-35
|
1%
|
| A colored background means that the Pokémon can be found in this location in the specified game. A white background with a colored letter means that the Pokémon cannot be found here.
|
Area 2
| Pokémon
|
Games
|
Location
|
Levels
|
Rate
|
|
|
FR
|
LG
|
|
30
|
20%
|
|
|
FR
|
LG
|
|
30
|
20%
|
|
|
FR
|
LG
|
|
25, 27
|
20%
|
|
|
FR
|
LG
|
|
26
|
20%
|
|
|
FR
|
LG
|
|
23
|
15%
|
|
|
FR
|
LG
|
|
30
|
10%
|
|
|
FR
|
LG
|
|
30
|
5%
|
|
|
FR
|
LG
|
|
30
|
5%
|
|
|
FR
|
LG
|
|
30
|
10%
|
|
|
FR
|
LG
|
|
32
|
5%
|
|
|
FR
|
LG
|
|
26
|
4%
|
|
|
FR
|
LG
|
|
28
|
1%
|
| Surfing
|
|
|
FR
|
LG
|
|
20-40
|
100%
|
|
|
FR
|
LG
|
|
20-40
|
100%
|
| Fishing
|
|
|
FR
|
LG
|
|
5
|
100%
|
|
|
FR
|
LG
|
|
5-15
|
60%
|
|
|
FR
|
LG
|
|
5-15
|
20%
|
|
|
FR
|
LG
|
|
5-15
|
20%
|
|
|
FR
|
LG
|
|
15-25
|
40%
|
|
|
FR
|
LG
|
|
20-30
|
40%
|
|
|
FR
|
LG
|
|
15-25
|
15%
|
|
|
FR
|
LG
|
|
15-35
|
4%
|
|
|
FR
|
LG
|
|
15-35
|
4%
|
|
|
FR
|
LG
|
|
25-35
|
1%
|
| A colored background means that the Pokémon can be found in this location in the specified game. A white background with a colored letter means that the Pokémon cannot be found here.
|
Area 3
| Pokémon
|
Games
|
Location
|
Levels
|
Rate
|
|
|
FR
|
LG
|
|
22
|
20%
|
|
|
FR
|
LG
|
|
30
|
5%
|
|
|
FR
|
LG
|
|
26
|
20%
|
|
|
FR
|
LG
|
|
25, 27
|
20%
|
|
|
FR
|
LG
|
|
23
|
15%
|
|
|
FR
|
LG
|
|
30
|
10%
|
|
|
FR
|
LG
|
|
30
|
10%
|
|
|
FR
|
LG
|
|
30
|
5%
|
|
|
FR
|
LG
|
|
22
|
20%
|
|
|
FR
|
LG
|
|
32
|
5%
|
|
|
FR
|
LG
|
|
25
|
4%
|
|
|
FR
|
LG
|
|
28
|
1%
|
| Surfing
|
|
|
FR
|
LG
|
|
20-40
|
100%
|
|
|
FR
|
LG
|
|
20-40
|
100%
|
| Fishing
|
|
|
FR
|
LG
|
|
5
|
100%
|
|
|
FR
|
LG
|
|
5-15
|
60%
|
|
|
FR
|
LG
|
|
5-15
|
20%
|
|
|
FR
|
LG
|
|
5-15
|
20%
|
|
|
FR
|
LG
|
|
15-25
|
40%
|
|
|
FR
|
LG
|
|
20-30
|
40%
|
|
|
FR
|
LG
|
|
15-25
|
15%
|
|
|
FR
|
LG
|
|
15-35
|
4%
|
|
|
FR
|
LG
|
|
15-35
|
4%
|
|
|
FR
|
LG
|
|
25-35
|
1%
|
| A colored background means that the Pokémon can be found in this location in the specified game. A white background with a colored letter means that the Pokémon cannot be found here.
|
Layout
In the spin-off games
In Pokémon Pinball
In Pokémon Pinball, the Safari Zone appears on the Red and Blue tables; catchable Pokémon include Nidoran♀, Nidoran♂, Paras, Doduo, Grimer, Rhyhorn, Chansey, Scyther, Pinsir and Tauros.
In the anime
In the main series
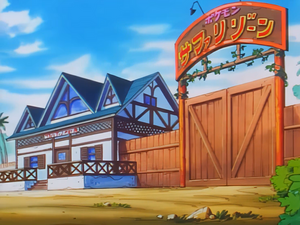
The gate of the Safari Zone in the anime
This Safari Zone appears only once in the anime: in EP035, an episode which aired only in Japan. Thus, the Safari Zone has never appeared in the English dub, although it is mentioned in the preceding episodes The Flame Pokémon-Athon! and The Kangaskhan Kid.
In the anime, the Safari Zone is run by a gun-toting warden, Kaiser. Like in the games, Trainers are restricted to only thirty Safari Balls per challenge. It is explained that this is because of too many Trainers capturing all the rarest Pokémon too rapidly and due to searching for the extremely rare Pokémon, Dratini.
Ash captures thirty Tauros in his Safari challenge.
Pokémon
In Pokémon Origins
The Kanto Safari Zone appeared briefly in the Pokémon Origins episode File 4: Charizard, when Red was seen confronting Chansey in there. Initially, he had trouble choosing between throwing a rock or a bait, almost causing the Chansey to run away, but eventually, he managed to catch it and register it with his Pokédex.
Pokémon
In the manga
In the Pokémon Adventures manga

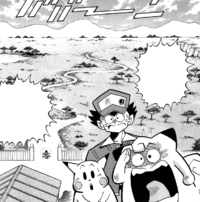
Safari Zone in Pokémon Adventures
In the Red, Green & Blue arc, Red visits the Safari Zone during Meanwhile... Vileplume!, Long Live the Nidoking! and A Hollow Victreebel. With the help of the two guide robots Pidgebot1 and Pidgebot2, Red goes through the jungle on a raft. He witnesses two Nidoking fighting over a Nidoqueen, and attempts to capture a Nidoking using a Poké Ball he had smuggles in. The targeted Nidoking deflects the Poké Ball, and it instead hits and successfully captures the Nidoqueen. This angers both Nidoking. One of them attacks Red, destroying both the raft and Pidgebot2 and damaging Pidgebot1's wing. Red tries to retaliate by throwing rocks, and though he puts its eye out, he only infuriates it further. Red then manages to flee with Pidgebot1's help.
Later, Red is captured by a Victreebel. He is not eaten, however, but tied up and stored with several Pokémon that had also fallen prey. This is necessary for a ritual that will evolve several Bellsprout and Weepinbell. Red and Pidgebot hatch an escape plan, which involves using a Poké Flute to awaken the sleeping Pokémon and ruin the ritual to cause a commotion, then fleeing using a Poké Doll as cover. Red also uses Safari Balls to catch some Victreebel in the process. Unfortunately, the two run straight into the Nidoking from earlier on. Using a caught Victreebel, Red was also able to capture the Nidoking.
Pokémon
Red captures several Pokémon in the Safari Zone. Despite the fact that he was not supposed to bring any regular Poké Balls, Red managed to smuggle one in and catch a Nidoqueen. The others were caught using the custom Safari Balls he was given.
In the Pokémon Pocket Monsters manga
The Safari Zone in Pokémon Pocket Monsters
Red and his Pokémon visit the Safari Zone in Rampage At The Safari Zone?!. It ends up being wrecked by Clefairy's destructive powers.
Pokémon
In the Pokémon Zensho manga

Safari Zone in Pokémon Zensho
The Safari Zone appeared in Fuchsia City.
Pokémon
Trivia

The unused Safari Zone in Generation II, which uses
Evolution as its background music
- The background music is Evolution.
- The Safari Zone is a location in Generation II, but is very minimally programmed into the game. It can only be accessed by changing the warp pointers when a room is entered; however, when it has been accessed, the area is unmistakably the entrance area, complete with music. It is apparently a leftover from the development builds of Gold and Silver.
- In Pokémon Yellow, Tauros's encounter rate at the Safari Zone is 10%, as opposed to the other Generation I-based games, where its encounter rate is only 1% or 4%, depending on the Area. As the Yellow Version is highly based on the anime, this can be taken as a reference to the anime episode EP035, where Tauros were seen in large numbers around the Safari Zone, as opposed to its rarity in the previous games.
- Another reference to the aforementioned episode in Yellow may be the fact that Dragonair, which also appeared in EP035, is available in the Yellow Version, but not in the Red and Blue Versions.
- In Generation I, a scientist in a house in the top-right corner of Area 2 states, "You can keep any item you find on the ground here. But, you'll run out of time if you try for all of them at once!". However, so long as the player can use HM03 (Surf) as soon as they pick it up, it is actually possible to collect all possible items in the Safari Zone in one visit.
- Although bait makes Pokémon harder to catch, an NPC in Area 4 says it makes them easier to catch.
- In the Western Generation I games, though the player receives 30 Safari Balls, it is only possible to catch 25 Pokémon: 5 to fill the party and 20 to fill a Box. In the Japanese games, however, the Box capacity is 30 Pokémon.
- In Pokémon Yellow, if the player tries to enter the Safari Zone with less than $500, they can enter the Safari Zone for all of their remaining money but they get a number of Safari Balls proportional to the amount paid. If they have no money, they can enter for free after multiple attempts to enter, but only receive a single Safari Ball.
|
|
| This video is not available on Bulbapedia; instead, you can watch the video on YouTube here.
|
In other languages


