Great Glacier: Difference between revisions
From Bulbapedia, the community-driven Pokémon encyclopedia.
Jump to navigationJump to search
m (→Items) |
m (r2.7.6) (Robot: Adding ja:大氷河) |
||
| (25 intermediate revisions by 11 users not shown) | |||
| Line 1: | Line 1: | ||
{{DungeonPrevNext| | {{DungeonPrevNext|Telluric Path|Glacial Underpass|5}} | ||
{{Dungeon infobox | {{Dungeon infobox | ||
|colorscheme=Rock | |colorscheme=Rock | ||
|bordercolorscheme=Water | |bordercolorscheme=Water | ||
|name= | |name=Great Glacier | ||
|jname=大氷河 | |jname=大氷河 | ||
|jtrans= | |jtrans=Great Glacier | ||
|image= | |image=Great Glacier PMDGTI.png | ||
|recruitable=Yes | |recruitable=Yes | ||
|floors=14 | |floors=14 | ||
| Line 19: | Line 19: | ||
}} | }} | ||
(Japanese: '''大氷河''' '' | The '''Great Glacier''' (Japanese: '''大氷河''' ''Great Glacier'') is a playable dungeon the player goes through in [[Pokémon Mystery Dungeon: Gates to Infinity]]. It has 14 floors and no boss. This dungeon is accessible immediately after finishing the [[Telluric Path]] dungeon. Recruited Pokémon automatically get sent back to Pokémon Paradise instead of staying with the group. Green locked doors surrounded by ice appear on the second and tenth floors, both of which require a [[Key#Green Key|Green Key]] and a {{type|Fire}} Pokémon on the team to pass through. Hail occasionally falls in the area. | ||
==Pokémon encountered== | ==Pokémon encountered== | ||
{{mdloc/h|Rock}} | {{mdloc/h|Rock}} | ||
{{mdloc|515|Panpour|1- | {{mdloc|515|Panpour|1-14|20|?}} | ||
{{mdloc|562|Yamask|1 | {{mdloc|562|Yamask|1-14|24|?}} | ||
{{mdloc|568|Trubbish|1- | {{mdloc|568|Trubbish|1-14|23|?}} | ||
{{mdloc|609|Chandelure| | {{mdloc|609|Chandelure|1-14|?|?}} | ||
{{mdloc|613|Cubchoo|1- | {{mdloc|613|Cubchoo|1-14|22|?}} | ||
{{mdloc|619|Mienfoo| | {{mdloc|619|Mienfoo|1-14|25|?}} | ||
{{mdloc|628|Braviary|2-14|25|?}} | |||
{{mdloc/f|Rock}} | |||
==Mapless Street== | |||
{{mdloc/h|Rock}} | |||
{{mdloc|221|Piloswine|N/A|?|?}} | |||
{{mdloc|515|Panpour|N/A|?|?}} | |||
{{mdloc|562|Yamask|N/A|?|?}} | |||
{{mdloc|568|Trubbish|N/A|?|?}} | |||
{{mdloc|570|Zorua|N/A|?|?}} | |||
{{mdloc|613|Cubchoo|N/A|?|?}} | |||
{{mdloc|619|Mienfoo|N/A|?|?}} | |||
{{mdloc/f|Rock}} | |||
==Gilded Hall== | |||
{{mdloc/h|Rock}} | |||
{{mdloc|279|Pelipper|N/A|?|?}} | |||
{{mdloc|373|Salamence|N/A|?|?}} | |||
{{mdloc|547|Whimsicott|N/A|?|?}} | |||
{{mdloc|567|Archeops|N/A|?|?}} | |||
{{mdloc/f|Rock}} | {{mdloc/f|Rock}} | ||
==Items== | ==Items== | ||
{{DungeonItem/h|rock}} | {{DungeonItem/h|rock}} | ||
{{DungeonItem|Poké|4=51-119|sprite=Poké currency}} | {{DungeonItem|Poké|4=51-119|sprite=Poké currency|3=1-14}} | ||
{{DungeonItem|Oran Berry}} | {{DungeonItem|Oran Berry|3=1-14}} | ||
{{DungeonItem|Chesto Berry}} | {{DungeonItem|Chesto Berry|3=1-14}} | ||
{{DungeonItem|Cheri Berry}} | {{DungeonItem|Cheri Berry|3=1-14}} | ||
{{DungeonItem|Rawst Berry|sprite=MDBag Rawst Berry | {{DungeonItem|Rawst Berry|sprite=MDBag Rawst Berry Sprite|3=1-14}} | ||
{{DungeonItem|Pecha Berry|sprite=MDBag Pecha Berry | {{DungeonItem|Pecha Berry|sprite=MDBag Pecha Berry Sprite|3=1-14}} | ||
{{DungeonItem|Foe-Hold Orb|Wonder Orb}} | {{DungeonItem|Foe-Hold Orb|Wonder Orb|3=1-14}} | ||
{{DungeonItem|Petrify Orb|Wonder Orb}} | {{DungeonItem|Petrify Orb|Wonder Orb|3=1-14}} | ||
{{DungeonItem| | {{DungeonItem|All Power-Up Orb|Wonder Orb|3=1-14}} | ||
{{DungeonItem| | {{DungeonItem|All-Dodge Orb|Wonder Orb|3=1-14}} | ||
{{DungeonItem|Health Orb|Wonder Orb}} | {{DungeonItem|Health Orb|Wonder Orb|3=1-14}} | ||
{{DungeonItem|Escape Orb|Wonder Orb}} | {{DungeonItem|Escape Orb|Wonder Orb|3=1-14}} | ||
{{DungeonItem|Slow Orb|Wonder Orb}} | {{DungeonItem|Slow Orb|Wonder Orb|3=1-14}} | ||
{{DungeonItem|Rollcall Orb|Wonder Orb}} | {{DungeonItem|Rollcall Orb|Wonder Orb|3=1-14}} | ||
{{DungeonItem|Vile Seed|Seed}} | {{DungeonItem|Vile Seed|Seed|3=1-14}} | ||
{{DungeonItem| | {{DungeonItem|Reviver Seed|Seed|3=1-14}} | ||
{{DungeonItem|Pure Seed|Seed}} | {{DungeonItem|Pure Seed|Seed|3=1-14}} | ||
{{DungeonItem|Blast Seed|Seed}} | {{DungeonItem|Blast Seed|Seed|3=1-14}} | ||
{{DungeonItem|Stun Seed|Seed}} | {{DungeonItem|Stun Seed|Seed|3=1-14}} | ||
{{DungeonItem|Max Elixir|Health drink|sprite=MDBag Health | {{DungeonItem|Max Elixir|Health drink|sprite=MDBag Health drink Sprite|3=1-14}} | ||
|} | |} | ||
==Gallery== | ==Gallery== | ||
<gallery> | <gallery> | ||
File: | File:Great Glacier overhead PMDGTI.png|Great Glacier overhead view | ||
File: | File:Great Glacier entrance 01 PMDGTI.png|Entrance | ||
File: | File:Great Glacier entrance 02 PMDGTI.png|Backside view from the entrance | ||
File: | File:Great Glacier interior PMDGTI.png|2F interior | ||
</gallery> | </gallery> | ||
{{-}} | {{-}} | ||
{{PMD GTI locations}} | |||
{{DoubleProjectTag|Locations|Sidegames}} | {{DoubleProjectTag|Locations|Sidegames}} | ||
[[Category:Pokémon Mystery Dungeon: | [[Category:Pokémon Mystery Dungeon: Gates to Infinity locations]] | ||
[[Category:Mountains]] | [[Category:Mountains]] | ||
[[de:Riesengletscher]] | |||
[[ja:大氷河]] | |||
Revision as of 08:11, 14 August 2015
|
|
|
| ||||||||||||||||||||||||||||||||||||||||||
| ||||||||||||||||||||||||||||||||||||||||||
| ||||||||||||||||||||||||||||||||||||||||||

The Great Glacier (Japanese: 大氷河 Great Glacier) is a playable dungeon the player goes through in Pokémon Mystery Dungeon: Gates to Infinity. It has 14 floors and no boss. This dungeon is accessible immediately after finishing the Telluric Path dungeon. Recruited Pokémon automatically get sent back to Pokémon Paradise instead of staying with the group. Green locked doors surrounded by ice appear on the second and tenth floors, both of which require a Green Key and a Fire-type Pokémon on the team to pass through. Hail occasionally falls in the area.
Pokémon encountered
| Pokémon | Floors | Levels | Recruit Rate | |
|---|---|---|---|---|
| Panpour | 1-14 | 20 | ?% | |
| Yamask | 1-14 | 24 | ?% | |
| Trubbish | 1-14 | 23 | ?% | |
| Chandelure | 1-14 | ? | ?% | |
| Cubchoo | 1-14 | 22 | ?% | |
| Mienfoo | 1-14 | 25 | ?% | |
| Braviary | 2-14 | 25 | ?% | |
Mapless Street
| Pokémon | Floors | Levels | Recruit Rate | |
|---|---|---|---|---|
| Piloswine | N/A | ? | ?% | |
| Panpour | N/A | ? | ?% | |
| Yamask | N/A | ? | ?% | |
| Trubbish | N/A | ? | ?% | |
| Zorua | N/A | ? | ?% | |
| Cubchoo | N/A | ? | ?% | |
| Mienfoo | N/A | ? | ?% | |
Gilded Hall
| Pokémon | Floors | Levels | Recruit Rate | |
|---|---|---|---|---|
| Pelipper | N/A | ? | ?% | |
| Salamence | N/A | ? | ?% | |
| Whimsicott | N/A | ? | ?% | |
| Archeops | N/A | ? | ?% | |
Items
| Item | Floors | |
|---|---|---|
| 51-119 Poké | 1-14F | |
| Oran Berry | 1-14F | |
| Chesto Berry | 1-14F | |
| Cheri Berry | 1-14F | |
| Rawst Berry | 1-14F | |
| Pecha Berry | 1-14F | |
| Foe-Hold Orb | 1-14F | |
| Petrify Orb | 1-14F | |
| All Power-Up Orb | 1-14F | |
| All-Dodge Orb | 1-14F | |
| Health Orb | 1-14F | |
| Escape Orb | 1-14F | |
| Slow Orb | 1-14F | |
| Rollcall Orb | 1-14F | |
| Vile Seed | 1-14F | |
| Reviver Seed | 1-14F | |
| Pure Seed | 1-14F | |
| Blast Seed | 1-14F | |
| Stun Seed | 1-14F | |
| Max Elixir | 1-14F | |
Gallery
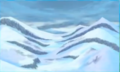
Great Glacier overhead view
Entrance
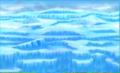
Backside view from the entrance
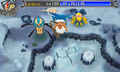
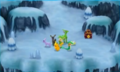
2F interior


| This article is part of both Project Locations and Project Sidegames, Bulbapedia projects that, together, aim to write comprehensive articles on the Pokémon Locations and Sidegames, respectively. |