Dewford Gym: Difference between revisions
NeoCrimson (talk | contribs) |
|||
| (43 intermediate revisions by 16 users not shown) | |||
| Line 3: | Line 3: | ||
|characters=ムロ | |characters=ムロ | ||
|japanese=Muro | |japanese=Muro | ||
|image=Dewford Gym | |image=Dewford Gym Exterior ORAS.png | ||
|imagesize=300px | |||
|location=Dewford Town | |location=Dewford Town | ||
|leader=[[Brawly]] | |leader=[[Brawly]] | ||
|badge=Knuckle Badge | |badge=Knuckle Badge | ||
|type=Fighting | |type=Fighting | ||
|region=Hoenn | |region=Hoenn | ||
|battlefield=Dewford Gym | |battlefield=Dewford Gym Leader Battle Environment ORAS.png | ||
|colordark= | |battlefieldsize=300px | ||
|colorlight= | |colordark=F96 | ||
|colorlight=FC9 | |||
}} | }} | ||
[[File:Brawley's Gym Leader Area ORAS.png|thumb|300px|Brawly's Gym Leader area]] | |||
The '''Dewford Gym''' (Japanese: '''ムロジム''' ''Muro Gym'') is the official [[Gym]] of [[Dewford Town]]. It is the second of the eight official [[Hoenn League]] Gyms. The [[Gym Leader]], [[Brawly]], specializes in {{type|Fighting}} {{OBP|Pokémon|species}}. {{pkmn|Trainer}}s who defeat him will receive the {{Badge|Knuckle}}. | The '''Dewford Gym''' (Japanese: '''ムロジム''' ''Muro Gym'') is the official [[Gym]] of [[Dewford Town]]. It is the second of the eight official [[Hoenn League]] Gyms. The [[Gym Leader]], [[Brawly]], specializes in {{type|Fighting}} {{OBP|Pokémon|species}}. {{pkmn|Trainer}}s who defeat him will receive the {{Badge|Knuckle}}. | ||
==In the games== | ==In the games== | ||
In {{game2|Ruby|Sapphire|Emerald}}, the Dewford Gym is a pitch-black maze, with Gym Trainers hiding in the darkness. As Trainers are defeated, the Gym lights up bit by bit. Once Brawly is beaten, the entire Gym lights up completely. | ===Core series games=== | ||
{{flexheader|gap=0px}} | |||
{{sign|E|header}} | |||
{{sign|E|title|Dewford Town Pokémon Gym<br>Leader: Brawly}} | |||
{{sign|E|A big wave in fighting!}} | |||
{{sign|E|footer}} | |||
{{sign|RS|header}} | |||
{{sign|RS|title|Dewford Town Pokémon Gym<br>Leader: Brawly}} | |||
{{sign|RS|A big wave in fighting!}} | |||
{{sign|RS|footer}} | |||
{{flexfooter}} | |||
In {{game2|Ruby|Sapphire|Emerald}}, the Dewford Gym is a pitch-black maze, with Gym Trainers hiding in the darkness. As Trainers are defeated, the Gym lights up bit by bit. Once Brawly is beaten, the entire Gym lights up completely. In Ruby and Sapphire, {{tc|Battle Girl}} Laura cannot be avoided. | |||
In [[Pokémon Omega Ruby and Alpha Sapphire]], the Gym is redesigned as a darkened exercise gym with a lit central hallway with conveyor belts that restrict movement. The hallway also contains switches on the floor that momentarily light up the side passages through the rest of the gym when stepped on, giving the player a glimpse of the maze before they attempt it to progress. Once Brawly is defeated, the Gym is permanently lit up. | In [[Pokémon Omega Ruby and Alpha Sapphire]], the Gym is redesigned as a darkened exercise gym with a lit central hallway with conveyor belts that restrict movement. The hallway also contains switches on the floor that momentarily light up the side passages through the rest of the gym when stepped on, giving the player a glimpse of the maze before they attempt it to progress. Once Brawly is defeated, the Gym is permanently lit up. | ||
| Line 23: | Line 38: | ||
When defeated, Brawly will give the player the {{badge|Knuckle}} as well as {{TM|08|Bulk Up}} as a reward. | When defeated, Brawly will give the player the {{badge|Knuckle}} as well as {{TM|08|Bulk Up}} as a reward. | ||
===Appearance=== | ====Appearance==== | ||
=====Interior===== | |||
{| class=roundy style="margin:auto; background: #000; border: 3px solid #{{fighting color dark}}" | {| class=roundy style="margin:auto; background: #000; border: 3px solid #{{fighting color dark}}" | ||
! style="background:#{{ruby color}}; {{roundytl|5px}}" | {{color2|fff|Pokémon Ruby and Sapphire Versions|Ruby}} | ! style="background:#{{ruby color}}; {{roundytl|5px}}" | {{color2|fff|Pokémon Ruby and Sapphire Versions|Ruby}} | ||
! style="background:#{{sapphire color}}" | {{color2|fff|Pokémon Ruby and Sapphire Versions|Sapphire}} | ! style="background:#{{sapphire color}}" | {{color2|fff|Pokémon Ruby and Sapphire Versions|Sapphire}} | ||
| Line 34: | Line 49: | ||
| colspan="2" | [[File:Dewford Gym RS.png|180px]] | | colspan="2" | [[File:Dewford Gym RS.png|180px]] | ||
| [[File:Dewford Gym E.png|180px]] | | [[File:Dewford Gym E.png|180px]] | ||
| colspan="2" | [[File:Dewford Gym ORAS.png| | | colspan="2" | [[File:Dewford Gym ORAS.png|180px]] | ||
|- | |- | ||
| colspan="5" style="background:#{{fighting color light}}; {{roundybottom|5px}}" | | | colspan="5" style="background:#{{fighting color light}}; {{roundybottom|5px}}" | | ||
|} | |} | ||
===Vending Machine=== | ====Items==== | ||
In [[Pokémon Omega Ruby and Alpha Sapphire]], there is a [[Vending Machine]] at the Gym's entrance. | {{itlisth|Fighting}} | ||
{{Itemlist|TM Fighting VI|Reward for defeating Brawly|Ru=yes|Sa=yes|E=yes|OR=yes|AS=yes|display={{TM|08|Bulk Up}}}} | |||
{{itlistfoot|Fighting}} | |||
=====Vending Machine===== | |||
In [[Pokémon Omega Ruby and Alpha Sapphire]], there is a [[Vending machine|Vending Machine]] at the Gym's entrance. | |||
{{shop|}} | {{shop|}} | ||
{{shoprow|{{shopitem|Fresh Water|200}}}} | {{shoprow|{{shopitem|Fresh Water|200}}}} | ||
{{shopfooter}} | {{shopfooter}} | ||
===Trainers=== | ====Trainers==== | ||
===={{game|Ruby and Sapphire|s}}==== | ====={{game|Ruby and Sapphire|s}}===== | ||
{{trainerheader|Fighting}} | {{trainerheader|Fighting}} | ||
{{trainerentry|Spr RS Battle Girl.png|Battle Girl|Laura|336|1|307|Meditite|♀|14|36=ミサト|37=Misato}} | {{trainerentry|Spr RS Battle Girl.png|Battle Girl|Laura|336|1|307|Meditite|♀|14|36=ミサト|37=Misato}} | ||
| Line 55: | Line 75: | ||
{{trainerfooter|Fighting|3}} | {{trainerfooter|Fighting|3}} | ||
Brawly uses two [[Super Potion]]s. | |||
{{Party/Single | {{Party/Single | ||
|color={{fighting color}} | |color={{fighting color}} | ||
|headcolor={{fighting color light}} | |headcolor={{fighting color light}} | ||
|bordercolor={{fighting color dark}} | |bordercolor={{fighting color dark}} | ||
|sprite=Spr RS Brawly.png | |sprite=Spr RS Brawly.png | ||
|prize={{PDollar}}1800 | |prize={{PDollar}}1800 | ||
| Line 86: | Line 107: | ||
|level=18 | |level=18 | ||
|type1=Fighting | |type1=Fighting | ||
|ability= | |ability=Thick Fat | ||
|move1=Bulk Up|move1type=Fighting | |move1=Bulk Up|move1type=Fighting | ||
|move2=Knock Off|move2type=Dark | |move2=Knock Off|move2type=Dark | ||
| Line 93: | Line 114: | ||
{{Party/Footer}} | {{Party/Footer}} | ||
===={{game|Emerald}}==== | ====={{game|Emerald}}===== | ||
{{Trainerheader|Fighting}} | {{Trainerheader|Fighting}} | ||
{{Trainerentry|Spr RS Battle Girl.png|Battle Girl|Laura|312|1|307|Meditite|♀|13|36=ミサト|37=Misato}} | {{Trainerentry|Spr RS Battle Girl.png|Battle Girl|Laura|312|1|307|Meditite|♀|13|36=ミサト|37=Misato}} | ||
{{Trainerdiv|Fighting}} | {{Trainerdiv|Fighting}} | ||
{{Trainerentry|Spr RS Battle Girl.png|Battle Girl|Lilith|312<br/><small>[[Double Battle]] with Brenden</small>|1|307|Meditite|♀|13|36=アズミ|37=Azumi}} | {{Trainerentry|Spr RS Battle Girl.png|Battle Girl|Lilith|312<br/><small>{{tt|Potential|Single Battle only if the player has only one Pokémon in their party}} [[Double Battle]] with Brenden</small>|1|307|Meditite|♀|13|36=アズミ|37=Azumi}} | ||
{{Trainerentry|Spr RS Sailor.png|Sailor|Brenden|416<br/><small>[[Double Battle]] with Lilith</small>|1|066|Machop|♂|13|36=カズマサ|37=Kazumasa}} | {{Trainerentry|Spr RS Sailor.png|Sailor|Brenden|416<br/><small>{{tt|Potential|Single Battle only if the player has only one Pokémon in their party}} [[Double Battle]] with Lilith</small>|1|066|Machop|♂|13|36=カズマサ|37=Kazumasa}} | ||
{{Trainerdiv|Fighting}} | {{Trainerdiv|Fighting}} | ||
{{Trainerentry|Spr RS Black Belt.png|Black Belt|Takao|416|1|066|Machop|♂|13|36=タイケイ|37=Taikei}} | {{Trainerentry|Spr RS Black Belt.png|Black Belt|Takao|416|1|066|Machop|♂|13|36=タイケイ|37=Taikei}} | ||
| Line 107: | Line 128: | ||
{{Trainerfooter|Fighting|3}} | {{Trainerfooter|Fighting|3}} | ||
Brawly uses two [[Super Potion]]s in the Gym battle, and three [[Full Restore]]s in the rematches. | |||
{{Party/Single | {{Party/Single | ||
|color={{fighting color}} | |color={{fighting color}} | ||
|headcolor={{fighting color light}} | |headcolor={{fighting color light}} | ||
|bordercolor={{fighting color dark}} | |bordercolor={{fighting color dark}} | ||
|sprite=Spr RS Brawly.png | |sprite=Spr RS Brawly.png | ||
|prize={{PDollar}}1900 | |prize={{PDollar}}1900 | ||
| Line 127: | Line 149: | ||
|type1=Fighting | |type1=Fighting | ||
|ability=Guts | |ability=Guts | ||
|move1= | |move1=Karate Chop|move1type=Fighting | ||
|move2=Low Kick|move2type=Fighting | |move2=Low Kick|move2type=Fighting | ||
|move3= | |move3=Seismic Toss|move3type=Fighting | ||
|move4= | |move4=Bulk Up|move4type=Fighting}} | ||
|{{Pokémon/3 | |{{Pokémon/3 | ||
|game=Emerald | |game=Emerald | ||
| Line 139: | Line 161: | ||
|type1=Fighting|type2=Psychic | |type1=Fighting|type2=Psychic | ||
|ability=Pure Power | |ability=Pure Power | ||
|move1= | |move1=Focus Punch|move1type=Fighting | ||
|move2= | |move2=Light Screen|move2type=Psychic | ||
|move3= | |move3=Reflect|move3type=Psychic | ||
|move4= | |move4=Bulk Up|move4type=Fighting}} | ||
|{{Pokémon/3 | |{{Pokémon/3 | ||
|game=Emerald | |game=Emerald | ||
| Line 151: | Line 173: | ||
|held=Sitrus Berry | |held=Sitrus Berry | ||
|type1=Fighting | |type1=Fighting | ||
|ability= | |ability=Thick Fat | ||
|move1= | |move1=Arm Thrust|move1type=Fighting | ||
|move2=Vital Throw|move2type=Fighting | |move2=Vital Throw|move2type=Fighting | ||
|move3= | |move3=Reversal|move3type=Fighting | ||
|move4= | |move4=Bulk Up|move4type=Fighting}} | ||
{{Party/Footer}} | {{Party/Footer}} | ||
=====First [[rematch]]===== | ======First [[rematch]]====== | ||
{{Party/Single | {{Party/Single | ||
|color={{fighting color}} | |color={{fighting color}} | ||
|headcolor={{fighting color light}} | |headcolor={{fighting color light}} | ||
|bordercolor={{fighting color dark}} | |bordercolor={{fighting color dark}} | ||
|sprite=Spr RS Brawly.png | |sprite=Spr RS Brawly.png | ||
|prize={{PDollar}}7400 | |prize={{PDollar}}7400 | ||
| Line 175: | Line 197: | ||
|ndex=068 | |ndex=068 | ||
|pokemon=Machamp | |pokemon=Machamp | ||
|gender=male | |gender=male | ||
|level=33 | |level=33 | ||
| Line 181: | Line 202: | ||
|ability=Guts | |ability=Guts | ||
|held=Sitrus Berry | |held=Sitrus Berry | ||
|move1= | |move1=Karate Chop|move1type=Fighting | ||
|move2=Rock Slide|move2type=Rock | |move2=Rock Slide|move2type=Rock | ||
|move3= | |move3=Focus Punch|move3type=Fighting | ||
|move4= | |move4=Bulk Up|move4type=Fighting}} | ||
|{{Pokémon/3 | |{{Pokémon/3 | ||
|game=Emerald | |game=Emerald | ||
| Line 195: | Line 216: | ||
|ability=Pure Power | |ability=Pure Power | ||
|move1=Psychic|move1type=Psychic | |move1=Psychic|move1type=Psychic | ||
|move2= | |move2=Light Screen|move2type=Psychic | ||
|move3= | |move3=Reflect|move3type=Psychic | ||
|move4= | |move4=Focus Punch|move4type=Fighting}} | ||
{{Party/Div|color={{fighting color}}}} | {{Party/Div|color={{fighting color}}}} | ||
|{{Pokémon/3 | |{{Pokémon/3 | ||
| Line 219: | Line 240: | ||
|level=37 | |level=37 | ||
|type1=Fighting | |type1=Fighting | ||
|ability= | |ability=Thick Fat | ||
|move1=Fake Out|move1type=Normal | |move1=Fake Out|move1type=Normal | ||
|move2= | |move2=Focus Punch|move2type=Fighting | ||
|move3= | |move3=Belly Drum|move3type=Normal | ||
|move4=Earthquake|move4type=Ground}} | |move4=Earthquake|move4type=Ground}} | ||
{{Party/Footer}} | {{Party/Footer}} | ||
=====Second rematch===== | ======Second rematch====== | ||
{{Party/Single | {{Party/Single | ||
|color={{fighting color}} | |color={{fighting color}} | ||
|headcolor={{fighting color light}} | |headcolor={{fighting color light}} | ||
|bordercolor={{fighting color dark}} | |bordercolor={{fighting color dark}} | ||
|sprite=Spr RS Brawly.png | |sprite=Spr RS Brawly.png | ||
|prize={{PDollar}}8400 | |prize={{PDollar}}8400 | ||
| Line 248: | Line 269: | ||
|type1=Fighting | |type1=Fighting | ||
|ability=Guts | |ability=Guts | ||
|move1= | |move1=Karate Chop|move1type=Fighting | ||
|move2=Rock Slide|move2type=Rock | |move2=Rock Slide|move2type=Rock | ||
|move3= | |move3=Focus Punch|move3type=Fighting | ||
|move4= | |move4=Bulk Up|move4type=Fighting}} | ||
|{{Pokémon/3 | |{{Pokémon/3 | ||
|game=Emerald | |game=Emerald | ||
| Line 261: | Line 282: | ||
|ability=Pure Power | |ability=Pure Power | ||
|move1=Psychic|move1type=Psychic | |move1=Psychic|move1type=Psychic | ||
|move2= | |move2=Light Screen|move2type=Psychic | ||
|move3= | |move3=Reflect|move3type=Psychic | ||
|move4= | |move4=Focus Punch|move4type=Fighting}} | ||
{{Party/Div|color={{fighting color}}}} | {{Party/Div|color={{fighting color}}}} | ||
|{{Pokémon/3 | |{{Pokémon/3 | ||
| Line 285: | Line 306: | ||
|held=Sitrus Berry | |held=Sitrus Berry | ||
|type1=Fighting | |type1=Fighting | ||
|ability= | |ability=Thick Fat | ||
|move1=Fake Out|move1type=Normal | |move1=Fake Out|move1type=Normal | ||
|move2= | |move2=Focus Punch|move2type=Fighting | ||
|move3= | |move3=Belly Drum|move3type=Normal | ||
|move4=Earthquake|move4type=Ground}} | |move4=Earthquake|move4type=Ground}} | ||
{{Party/Footer}} | {{Party/Footer}} | ||
=====Third rematch===== | ======Third rematch====== | ||
{{Party/Single | {{Party/Single | ||
|color={{fighting color}} | |color={{fighting color}} | ||
|headcolor={{fighting color light}} | |headcolor={{fighting color light}} | ||
|bordercolor={{fighting color dark}} | |bordercolor={{fighting color dark}} | ||
|sprite=Spr RS Brawly.png | |sprite=Spr RS Brawly.png | ||
|prize={{PDollar}}9400 | |prize={{PDollar}}9400 | ||
| Line 314: | Line 335: | ||
|ability=Keen Eye | |ability=Keen Eye | ||
|move1=Sky Uppercut|move1type=Fighting | |move1=Sky Uppercut|move1type=Fighting | ||
|move2= | |move2=Protect|move2type=Normal | ||
|move3= | |move3=Fire Punch|move3type=Fire | ||
|move4= | |move4=Ice Punch|move4type=Ice}} | ||
|{{Pokémon/3 | |{{Pokémon/3 | ||
|game=Emerald | |game=Emerald | ||
| Line 324: | Line 345: | ||
|level=43 | |level=43 | ||
|type1=Fighting | |type1=Fighting | ||
|held=Sitrus Berry | |||
|ability=Guts | |ability=Guts | ||
|move1= | |move1=Karate Chop|move1type=Fighting | ||
|move2=Rock Slide|move2type=Rock | |move2=Rock Slide|move2type=Rock | ||
|move3= | |move3=Focus Punch|move3type=Fighting | ||
|move4= | |move4=Bulk Up|move4type=Fighting}} | ||
|{{Pokémon/3 | |{{Pokémon/3 | ||
|game=Emerald | |game=Emerald | ||
| Line 338: | Line 360: | ||
|type2=Psychic | |type2=Psychic | ||
|ability=Pure Power | |ability=Pure Power | ||
|move1= | |move1=Focus Punch|move1type=Fighting | ||
|move2= | |move2=Light Screen|move2type=Psychic | ||
|move3= | |move3=Reflect|move3type=Psychic | ||
|move4= | |move4=Psychic|move4type=Psychic}} | ||
{{Party/Div|color={{fighting color}}}} | {{Party/Div|color={{fighting color}}}} | ||
| style="margin:auto" |{{Pokémon/3 | | style="margin:auto" |{{Pokémon/3 | ||
| Line 363: | Line 385: | ||
|held=Sitrus Berry | |held=Sitrus Berry | ||
|type1=Fighting | |type1=Fighting | ||
|ability= | |ability=Thick Fat | ||
|move1=Fake Out|move1type=Normal | |move1=Fake Out|move1type=Normal | ||
|move2= | |move2=Focus Punch|move2type=Fighting | ||
|move3= | |move3=Belly Drum|move3type=Normal | ||
|move4=Earthquake|move4type=Ground}} | |move4=Earthquake|move4type=Ground}} | ||
{{Party/Footer}} | {{Party/Footer}} | ||
=====Fourth rematch===== | ======Fourth rematch onwards====== | ||
{{Party/Single | {{Party/Single | ||
|color={{fighting color}} | |color={{fighting color}} | ||
|headcolor={{fighting color light}} | |headcolor={{fighting color light}} | ||
|bordercolor={{fighting color dark}} | |bordercolor={{fighting color dark}} | ||
|sprite=Spr RS Brawly.png | |sprite=Spr RS Brawly.png | ||
|prize={{PDollar}}10400 | |prize={{PDollar}}10400 | ||
| Line 391: | Line 413: | ||
|type1=Fighting | |type1=Fighting | ||
|ability=Limber | |ability=Limber | ||
| | |move1=Mega Kick|move1type=Normal | ||
| | |move2=Focus Punch|move2type=Fighting | ||
| | |move3=Earthquake|move3type=Ground | ||
| | |move4=Bulk Up|move4type=Fighting}} | ||
|{{Pokémon/3 | |{{Pokémon/3 | ||
|game=Emerald | |game=Emerald | ||
| Line 403: | Line 425: | ||
|type1=Fighting | |type1=Fighting | ||
|ability=Keen Eye | |ability=Keen Eye | ||
| | |move1=Sky Uppercut|move1type=Fighting | ||
|move2= | |move2=Protect|move2type=Normal | ||
|move3= | |move3=Fire Punch|move3type=Fire | ||
| | |move4=Ice Punch|move4type=Ice}} | ||
|{{Pokémon/3 | |{{Pokémon/3 | ||
|game=Emerald | |game=Emerald | ||
| Line 413: | Line 435: | ||
|gender=male | |gender=male | ||
|level=48 | |level=48 | ||
|held=Sitrus Berry | |||
|type1=Fighting | |type1=Fighting | ||
|ability=Guts | |ability=Guts | ||
|move1= | |move1=Cross Chop|move1type=Fighting | ||
|move2=Rock Slide|move2type=Rock | |move2=Rock Slide|move2type=Rock | ||
|move3= | |move3=Focus Punch|move3type=Fighting | ||
|move4= | |move4=Bulk Up|move4type=Fighting}} | ||
{{Party/Div|color={{fighting color}}}} | {{Party/Div|color={{fighting color}}}} | ||
|{{Pokémon/3 | |{{Pokémon/3 | ||
| Line 428: | Line 451: | ||
|type1=Fighting|type2=Psychic | |type1=Fighting|type2=Psychic | ||
|ability=Pure Power | |ability=Pure Power | ||
| | |move1=Focus Punch|move1type=Fighting | ||
|move2=Light Screen|move2type=Psychic | |move2=Light Screen|move2type=Psychic | ||
| | |move3=Reflect|move3type=Psychic | ||
|move4=Psychic|move4type=Psychic}} | |||
|{{Pokémon/3 | |{{Pokémon/3 | ||
|game=Emerald | |game=Emerald | ||
| Line 440: | Line 463: | ||
|type1=Fighting | |type1=Fighting | ||
|ability=Intimidate | |ability=Intimidate | ||
| | |move1=Pursuit|move1type=Dark | ||
| | |move2=Counter|move2type=Fighting | ||
| | |move3=Protect|move3type=Normal | ||
|move4=Triple Kick|move4type=Fighting}} | |move4=Triple Kick|move4type=Fighting}} | ||
|{{Pokémon/3 | |{{Pokémon/3 | ||
| Line 452: | Line 475: | ||
|held=Sitrus Berry | |held=Sitrus Berry | ||
|type1=Fighting | |type1=Fighting | ||
|ability= | |ability=Thick Fat | ||
|move1=Fake Out|move1type=Normal | |move1=Fake Out|move1type=Normal | ||
|move2= | |move2=Focus Punch|move2type=Fighting | ||
| | |move3=Belly Drum|move3type=Normal | ||
| | |move4=Earthquake|move4type=Ground}} | ||
{{Party/Footer}} | {{Party/Footer}} | ||
===={{g|Omega Ruby and Alpha Sapphire}}==== | ====={{g|Omega Ruby and Alpha Sapphire}}===== | ||
{{trainerheader|Fighting}} | {{trainerheader|Fighting}} | ||
{{trainerentry|VSBattle Girl ORAS.png{{!}}150px|Battle Girl|Laura|416|1|307|Meditite|♀|13|36=ミサト|37=Misato}} | {{trainerentry|VSBattle Girl ORAS.png{{!}}150px|game=6|Battle Girl|Laura|416|1|307|Meditite|♀|13|36=ミサト|37=Misato}} | ||
{{trainerdiv|Fighting}} | {{trainerdiv|Fighting}} | ||
{{trainerentry|VSBlack Belt.png{{!}}150px|Black Belt|Hideki|416|1|066|Machop|♂|13|36=タイキ|37=Taiki}} | {{trainerentry|VSBlack Belt.png{{!}}150px|game=6|Black Belt|Hideki|416|1|066|Machop|♂|13|36=タイキ|37=Taiki}} | ||
{{trainerdiv|Fighting}} | {{trainerdiv|Fighting}} | ||
{{trainerentry|VSBattle Girl ORAS.png{{!}}150px|Battle Girl|{{ho|Shauna|Tessa}}|352|2|307|Meditite|♀|11||066|Machop|♂|11|36=シノブ|37=Shinobu}} | {{trainerentry|VSBattle Girl ORAS.png{{!}}150px|game=6|Battle Girl|{{ho|Shauna|Tessa}}|352|2|307|Meditite|♀|11||066|Machop|♂|11|36=シノブ|37=Shinobu}} | ||
{{trainerfooter|Fighting|3}} | {{trainerfooter|Fighting|3}} | ||
| Line 471: | Line 494: | ||
|color={{fighting color}} | |color={{fighting color}} | ||
|headcolor={{fighting color light}} | |headcolor={{fighting color light}} | ||
|bordercolor={{fighting color dark}} | |bordercolor={{fighting color dark}} | ||
|sprite=VSBrawly.png | |sprite=VSBrawly.png | ||
|size=150px | |size=150px | ||
| Line 505: | Line 528: | ||
{{Party/Footer}} | {{Party/Footer}} | ||
=== | ===Spin-off games=== | ||
{{ | ====[[Pokémon Masters EX]]==== | ||
{{ | Artwork depicting the Dewford Gym is seen in {{mas|Brawly}}'s mindscape. | ||
{| style="margin:auto; text-align:center;background: #7B30B2; {{roundy}}; border: #7B30B2;" | |||
| | |||
{| style="background: #AB60E2; {{roundy}}; border: #AB60E2;" | |||
|- style="text-align:center" | |||
| | |||
{| style="background: #{{fighting color light}}; {{roundy}}; border: #{{fighting color light}}; padding: 0px 5px 5px 5px" | |||
|- | |||
|<big>'''{{color2|000|Brawly (Masters)#Makuhita → Hariyama|Brawly & Hariyama}}'''</big> | |||
|- | |||
| [[File:Brawly Mindscape.png|200px]] | |||
|} | |||
|} | |||
|} | |||
==In the anime== | ==In the anime== | ||
Dewford Gym | [[File:Dewford Gym anime.png|thumb|250px|left|Dewford Gym in the {{pkmn|anime}}]] | ||
[[File:Dewford Gym Battlefield.png|thumb|250px|Dewford Gym's battlefield in the anime]] | |||
Dewford Gym appeared in ''[[AG020|Brave the Wave]]'', where {{Ash}} was seen charging at the Gym, excited to challenge it. Unfortunately for him, he found out that Brawly, the Gym Leader, was off to a surfing practice and would only battle Ash once he was done. | |||
Later, Ash finally got his desired Gym battle, which was set to be a two-on-two battle. First, Ash chose {{AP|Taillow}} against Brawly's {{p|Machop}}, but lost the round despite the type advantage. Next Ash used {{AP|Treecko}}, which beat Machop, and then went up against Brawly's {{p|Makuhita}}. During the battle, Makuhita suddenly evolved into {{TP|Brawly|Hariyama}}, and proceeded to easily defeat Treecko. Ash was disheartened by this defeat, but Brawly encouraged him to go on. | |||
In ''[[AG031|Just One of the Geysers]]'', Ash had a [[rematch]] against Brawly at his private training spot on a small isle off the coast of [[Dewford Town|Dewford Island]], which had a battlefield filled with {{wp|geyser}}s. With the help of his recently caught {{AP|Corphish}}, his diligent {{pkmn|training}}, and some quick thinking to utilize the new battleground to his advantage, Ash was able to defeat Brawly this time around, finally earning him the {{badge|Knuckle}}. | |||
{{-}} | |||
===Gallery=== | |||
{| style="margin:auto; text-align:center; background: #{{fighting color}}; {{roundy}}; border: 3px solid #{{fighting color dark}}" | |||
|- style="background:#{{fighting color}}" | |||
! style="{{roundytl|5px}}{{roundytr|5px}}" | Brawly's training spot battlefield | |||
|- style="background:#fff" | |||
| [[File:Brawly training spot battlefield.png|x200px]] | |||
|} | |||
===Pokémon used in the Gym=== | |||
{{TrainerPoké | {{TrainerPoké | ||
|trainer=Brawly | |trainer=Brawly | ||
| Line 522: | Line 571: | ||
|epnum=AG020 | |epnum=AG020 | ||
|epname=Brave the Wave | |epname=Brave the Wave | ||
|vajp=Shin | |vajp=Shin-ichiro Miki | ||
|vaen=Wayne Grayson | |vaen=Wayne Grayson | ||
|desc={{p|Machop}} was the first Pokémon Brawly used against Ash in both the first Gym battle and the rematch. During the first match it was sent up against {{AP|Taillow}} and although Taillow kept using {{m|Wing Attack}} and hitting it, Machop kept getting up and eventually managed to knock Taillow out with a Cross Chop. | |desc={{p|Machop}} was the first Pokémon Brawly used against Ash in both the first Gym battle and the rematch. During the first match, it was sent up against {{AP|Taillow}}, and although Taillow kept using {{m|Wing Attack}} and hitting it, Machop kept getting up and eventually managed to knock Taillow out with a Cross Chop. Next, Ash used {{AP|Treecko}} which was finally able to defeat it. | ||
In Ash and Brawly's rematch, Machop was again used first. It began to overpower Treecko, but fell to Ash's newly-caught {{AP|Corphish}}. | In Ash and Brawly's rematch, Machop was again used first. It began to overpower Treecko, but fell to Ash's newly-caught {{AP|Corphish}}. | ||
| Line 543: | Line 592: | ||
|vajp=Unshō Ishizuka | |vajp=Unshō Ishizuka | ||
|vaen=Maddie Blaustein | |vaen=Maddie Blaustein | ||
|desc={{p|Hariyama}} first appeared as a {{p|Makuhita}}. During a Gym battle with {{AP|Treecko}}, it evolved into Hariyama and defeated Treecko. After helping the | |desc={{p|Hariyama}} first appeared as a {{p|Makuhita}}. During a Gym battle with {{AP|Treecko}}, it evolved into Hariyama and defeated Treecko. After helping the group to escape from a violent storm, Ash had his rematch against Brawly. Hariyama was able to defeat Corphish and almost defeated Treecko, but thanks to Ash's strategy, Treecko was able to defeat Hariyama after a fierce battle.}} | ||
==In the manga== | ==In the manga== | ||
[[File:Dewford Gym | ===Pokémon Adventures=== | ||
=== | [[File:Dewford Gym Adventures.png|thumb|150px|Dewford Gym in [[Pokémon Adventures]]]] | ||
Dewford Gym | ===={{MangaArc|Ruby & Sapphire}}==== | ||
Dewford Gym appeared in ''[[PS195|Mashing Makuhita]]'' and ''[[PS197|Heavy Hitting Hariyama]]'', when {{adv|Sapphire}} faced Brawly in a Gym battle. Using his surfing tactics to avoid Sapphire's attacks, Brawly easily gained the upper hand, especially when his Makuhita evolved into Hariyama. However, by using [[Chic]]'s {{m|Double Kick}} to bypass Hariyama's {{m|Counter}}, Sapphire was eventually able to defeat Brawly and win the battle, earning herself the {{badge|Knuckle}}. | |||
=== | ====Pokémon used in the Gym==== | ||
Dewford Gym | {{TrainerPoké | ||
|main=yes | |||
|width=80 | |||
|trainer=Brawly | |||
|pkmn=Hariyama | |||
|stage1=Makuhita | |||
|gender=male | |||
|type1=Fighting | |||
|img=Brawly Hariyama Adventures.png | |||
|epnum=PS193 | |||
|epname=Stick This in Your Craw, Crawdaunt! II | |||
|desc={{p|Hariyama}} is Brawly's first known Pokémon. He debuted as a {{p|Makuhita}} surfing with his Trainer. Later, he evolved in Brawly's Gym battle against {{adv|Sapphire}}, but it wasn't enough to win the battle. Since then, he has been used in several other battles.}} | |||
{{TrainerPoké | |||
|trainer=Brawly | |||
|pkmn=Machop | |||
|gender=male | |||
|type1=Fighting | |||
|img=Brawly Machop Adventures.png | |||
|cap=Brawly's Machop | |||
|epnum=PS195 | |||
|epname=Mashing Makuhita | |||
|desc={{p|Machop}} is Brawly's second known Pokémon. It debuted in Brawly's battle against {{adv|Sapphire}}, where it was easily defeated by her {{p|Combusken}}, [[Chic]], and switched out to Makuhita. | |||
Machop's known moves are {{m|Focus Punch}} and {{m|Revenge}}, and his Ability is {{a|Guts}}.}} | |||
===Pokémon Pocket Monsters=== | |||
[[File:Dewford Gym PMRS.png|thumb|200px|Dewford Gym in [[Pokémon Pocket Monsters]]]] | |||
Dewford Gym made its only appearance in ''[[PMRS11|The Haunted Gym]]'', where a {{p|Sableye}} helped {{PPM|Red}} navigate through the Gym since it was too dark for him to see. | |||
{{-}} | {{-}} | ||
==Trivia== | ==Trivia== | ||
* In {{game|Ruby and Sapphire|s}}, the wall behind the right-hand statue behaves like a statue: when the A button is pressed while facing it, it says: "'''DEWFORD TOWN POKéMON GYM'''". This was fixed in {{game|Emerald}}. | * In {{game|Ruby and Sapphire|s}}, the wall behind the right-hand statue behaves like a statue: when the A button is pressed while facing it, it says: "'''DEWFORD TOWN POKéMON GYM'''". This was fixed in {{game|Emerald}}. | ||
* In [[Generation III]], it is possible to postpone this Gym until the player has the {{badge|Heat}}, since it is required to challenge [[Norman]]. This is no longer the case in [[Generation VI]], where the player needs to beat Brawly in order to gain access to {{Steven}}'s room in [[Granite Cave]]. | * In [[Generation III]], it is possible to postpone this Gym until the {{player}} has the {{badge|Heat}}, since it is required to challenge [[Norman]]. This is no longer the case in [[Generation VI]], where the player needs to beat Brawly in order to gain access to {{Steven}}'s room in [[Granite Cave]]. | ||
* Dewford Gym is the only Gym that the player can buy items from. In this case, the player can interact with the [[Vending Machine]] in the lobby to buy | * Dewford Gym is the only Gym outside of [[Galar]] that the player can buy items from. In this case, the player can interact with the [[Vending machine|Vending Machine]] in the lobby to buy [[Fresh Water]]s in Generation VI. | ||
{{-}} | {{-}} | ||
| Line 568: | Line 645: | ||
[[de:Pokémon-Arena von Faustauhaven]] | [[de:Pokémon-Arena von Faustauhaven]] | ||
[[es:Gimnasio Pokémon de Pueblo Azuliza]] | |||
[[fr:Arène de Myokara]] | [[fr:Arène de Myokara]] | ||
[[it:Palestra di Bluruvia]] | |||
[[ja:ムロジム]] | [[ja:ムロジム]] | ||
[[zh:武鬥道館]] | [[zh:武鬥道館]] | ||
Latest revision as of 02:23, 19 April 2024
| Dewford Gym ムロジム Muro Gym | |
| |
| Location | Dewford Town |
| Gym Leader | Brawly |
| Badge | Knuckle Badge |
| Dominant Type | Fighting |
| Region | Hoenn |
| |
| Battlefield | |
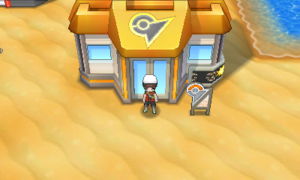
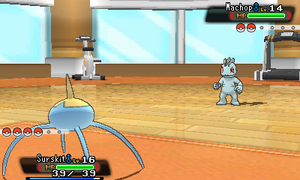
The Dewford Gym (Japanese: ムロジム Muro Gym) is the official Gym of Dewford Town. It is the second of the eight official Hoenn League Gyms. The Gym Leader, Brawly, specializes in Fighting-type Pokémon. Trainers who defeat him will receive the Knuckle Badge.
In the games
Core series games
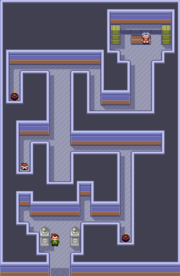
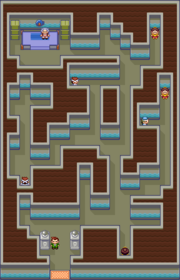
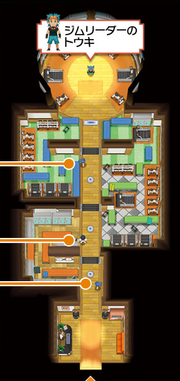
In Pokémon Ruby, Sapphire, and Emerald, the Dewford Gym is a pitch-black maze, with Gym Trainers hiding in the darkness. As Trainers are defeated, the Gym lights up bit by bit. Once Brawly is beaten, the entire Gym lights up completely. In Ruby and Sapphire, Battle Girl Laura cannot be avoided.
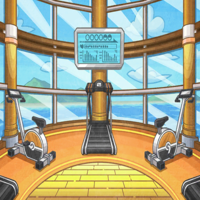
In Pokémon Omega Ruby and Alpha Sapphire, the Gym is redesigned as a darkened exercise gym with a lit central hallway with conveyor belts that restrict movement. The hallway also contains switches on the floor that momentarily light up the side passages through the rest of the gym when stepped on, giving the player a glimpse of the maze before they attempt it to progress. Once Brawly is defeated, the Gym is permanently lit up.
When defeated, Brawly will give the player the Knuckle Badge as well as TM08 (Bulk Up) as a reward.
Appearance
Interior
| Ruby | Sapphire | Emerald | Omega Ruby | Alpha Sapphire |
|---|---|---|---|---|
|
|
| ||
Items
| Item | Location | Games | |
|---|---|---|---|
| TM08 (Bulk Up) | Reward for defeating Brawly | R S E OR AS | |
Vending Machine
In Pokémon Omega Ruby and Alpha Sapphire, there is a Vending Machine at the Gym's entrance.
|
||||
Trainers
Pokémon Ruby and Sapphire
| Trainer | Pokémon | |||||||||||
|---|---|---|---|---|---|---|---|---|---|---|---|---|
|
| |||||||||||
|
| |||||||||||
|
| |||||||||||
| ||||||||||||
| ||||||||||||
| Trainers with a PokéNav by their names will be registered in the Trainer's Eyes or Match Call function after the first battle, and may have a rematch with the player with higher-level Pokémon. | ||||||||||||
Brawly uses two Super Potions.
|
|||||||||||||||||||||||||||||||||||||||||||||||||||
| |||||||||||||||||||||||||||||||||||||||||||||||||||
Pokémon Emerald
| Trainer | Pokémon | |||||||||||
|---|---|---|---|---|---|---|---|---|---|---|---|---|
|
| |||||||||||
|
| |||||||||||
|
| |||||||||||
|
| |||||||||||
|
| |||||||||||
|
| |||||||||||
| Trainers with a PokéNav by their names will be registered in the Trainer's Eyes or Match Call function after the first battle, and may have a rematch with the player with higher-level Pokémon. | ||||||||||||
Brawly uses two Super Potions in the Gym battle, and three Full Restores in the rematches.
|
||||||||||||||||||||||||||||||||||||||||||||||||||||||||||||||||||||||||||||||
| ||||||||||||||||||||||||||||||||||||||||||||||||||||||||||||||||||||||||||||||
First rematch
|
|||||||||||||||||||||||||||||||||||||||||||||||||||||||||||||||||||||||||||||||||||||||||||||||||||||||
| |||||||||||||||||||||||||||||||||||||||||||||||||||||||||||||||||||||||||||||||||||||||||||||||||||||||
Second rematch
|
|||||||||||||||||||||||||||||||||||||||||||||||||||||||||||||||||||||||||||||||||||||||||||||||||||||||
| |||||||||||||||||||||||||||||||||||||||||||||||||||||||||||||||||||||||||||||||||||||||||||||||||||||||
Third rematch
|
||||||||||||||||||||||||||||||||||||||||||||||||||||||||||||||||||||||||||||||||||||||||||||||||||||||||||||||||||||||||||||||||
| ||||||||||||||||||||||||||||||||||||||||||||||||||||||||||||||||||||||||||||||||||||||||||||||||||||||||||||||||||||||||||||||||
Fourth rematch onwards
|
|||||||||||||||||||||||||||||||||||||||||||||||||||||||||||||||||||||||||||||||||||||||||||||||||||||||||||||||||||||||||||||||||||||||||||||||||||||||||
| |||||||||||||||||||||||||||||||||||||||||||||||||||||||||||||||||||||||||||||||||||||||||||||||||||||||||||||||||||||||||||||||||||||||||||||||||||||||||
Pokémon Omega Ruby and Alpha Sapphire
| Trainer | Pokémon | |||||||||||
|---|---|---|---|---|---|---|---|---|---|---|---|---|
|
| |||||||||||
|
| |||||||||||
|
| |||||||||||
| ||||||||||||
| Trainers with a PokéNav by their names will be registered in the Trainer's Eyes or Match Call function after the first battle, and may have a rematch with the player with higher-level Pokémon. | ||||||||||||
|
|||||||||||||||||||||||||||||||||||||||||||||||||||||||||||||||||||
| |||||||||||||||||||||||||||||||||||||||||||||||||||||||||||||||||||
Spin-off games
Pokémon Masters EX
Artwork depicting the Dewford Gym is seen in Brawly's mindscape.
|
In the anime
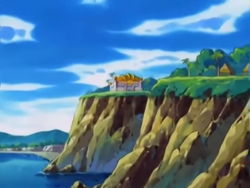
Dewford Gym appeared in Brave the Wave, where Ash was seen charging at the Gym, excited to challenge it. Unfortunately for him, he found out that Brawly, the Gym Leader, was off to a surfing practice and would only battle Ash once he was done.
Later, Ash finally got his desired Gym battle, which was set to be a two-on-two battle. First, Ash chose Taillow against Brawly's Machop, but lost the round despite the type advantage. Next Ash used Treecko, which beat Machop, and then went up against Brawly's Makuhita. During the battle, Makuhita suddenly evolved into Hariyama, and proceeded to easily defeat Treecko. Ash was disheartened by this defeat, but Brawly encouraged him to go on.
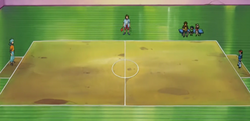
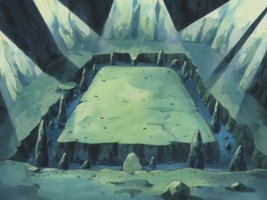
In Just One of the Geysers, Ash had a rematch against Brawly at his private training spot on a small isle off the coast of Dewford Island, which had a battlefield filled with geysers. With the help of his recently caught Corphish, his diligent training, and some quick thinking to utilize the new battleground to his advantage, Ash was able to defeat Brawly this time around, finally earning him the Knuckle Badge.
Gallery
| Brawly's training spot battlefield |
|---|
|
Pokémon used in the Gym
|
||
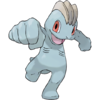
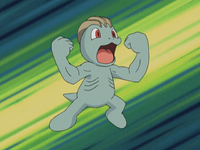
| Machop was the first Pokémon Brawly used against Ash in both the first Gym battle and the rematch. During the first match, it was sent up against Taillow, and although Taillow kept using Wing Attack and hitting it, Machop kept getting up and eventually managed to knock Taillow out with a Cross Chop. Next, Ash used Treecko which was finally able to defeat it.
In Ash and Brawly's rematch, Machop was again used first. It began to overpower Treecko, but fell to Ash's newly-caught Corphish. It reappeared in a flashback in Which Wurmple's Which?. Machop's known moves are Cross Chop and Karate Chop. | ||
| Debut | Brave the Wave | |
|---|---|---|
| Voice actors | ||
| Japanese | Shin-ichiro Miki | |
| English | Wayne Grayson | |

|
||
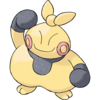
Hariyama first appeared as a Makuhita. During a Gym battle with Treecko, it evolved into Hariyama and defeated Treecko. After helping the group to escape from a violent storm, Ash had his rematch against Brawly. Hariyama was able to defeat Corphish and almost defeated Treecko, but thanks to Ash's strategy, Treecko was able to defeat Hariyama after a fierce battle. | ||
| Debut | Brave the Wave | |
|---|---|---|
| Voice actors | ||
| Japanese | Unshō Ishizuka | |
| English | Maddie Blaustein | |
In the manga
Pokémon Adventures

Ruby & Sapphire arc
Dewford Gym appeared in Mashing Makuhita and Heavy Hitting Hariyama, when Sapphire faced Brawly in a Gym battle. Using his surfing tactics to avoid Sapphire's attacks, Brawly easily gained the upper hand, especially when his Makuhita evolved into Hariyama. However, by using Chic's Double Kick to bypass Hariyama's Counter, Sapphire was eventually able to defeat Brawly and win the battle, earning herself the Knuckle Badge.
Pokémon used in the Gym

|
||
Hariyama is Brawly's first known Pokémon. He debuted as a Makuhita surfing with his Trainer. Later, he evolved in Brawly's Gym battle against Sapphire, but it wasn't enough to win the battle. Since then, he has been used in several other battles. | ||
| Debut | Stick This in Your Craw, Crawdaunt! II | |
|---|---|---|

|
||
| Machop is Brawly's second known Pokémon. It debuted in Brawly's battle against Sapphire, where it was easily defeated by her Combusken, Chic, and switched out to Makuhita.
Machop's known moves are Focus Punch and Revenge, and his Ability is Guts. | ||
| Debut | Mashing Makuhita | |
|---|---|---|
Pokémon Pocket Monsters
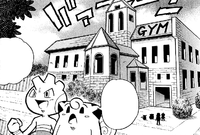
Dewford Gym made its only appearance in The Haunted Gym, where a Sableye helped Red navigate through the Gym since it was too dark for him to see.
Trivia
- In Pokémon Ruby and Sapphire, the wall behind the right-hand statue behaves like a statue: when the A button is pressed while facing it, it says: "DEWFORD TOWN POKéMON GYM". This was fixed in Pokémon Emerald.
- In Generation III, it is possible to postpone this Gym until the player has the Heat Badge, since it is required to challenge Norman. This is no longer the case in Generation VI, where the player needs to beat Brawly in order to gain access to Steven's room in Granite Cave.
- Dewford Gym is the only Gym outside of Galar that the player can buy items from. In this case, the player can interact with the Vending Machine in the lobby to buy Fresh Waters in Generation VI.

|
This article is part of Project Locations, a Bulbapedia project that aims to write comprehensive articles on every location in the Pokémon world. |


