|
|
| (6 intermediate revisions by 2 users not shown) |
| Line 33: |
Line 33: |
| * 1F, area north of second push stone | | * 1F, area north of second push stone |
| * B1F, alcove west of Nugget Brothers ''(hidden)'' | | * B1F, alcove west of Nugget Brothers ''(hidden)'' |
| * B2F, in the east ''(hidden)''|Bl=yes|W=yes|display={{DL|Status ailment healing item|Parlyz Heal}} ×3}} | | * B2F, in the east ''(hidden)''|Bl=yes|W=yes|display={{DL|Status condition healing item|Paralyze Heal|Parlyz Heal}} ×3}} |
| {{Itemlist|Revive|1F, south of two push stones|Bl=yes|W=yes|display={{DL|Revive|Revive}}}} | | {{Itemlist|Revive|1F, south of two push stones|Bl=yes|W=yes|display={{DL|Revive|Revive}}}} |
| {{Itemlist|Heal Ball|1F, northernmost ledge|Bl=yes|W=yes|display={{ball|Heal}}}} | | {{Itemlist|Heal Ball|1F, northernmost ledge|Bl=yes|W=yes|display={{ball|Heal}}}} |
| Line 41: |
Line 41: |
| {{Itemlist|HP Up|1F, accessible by stairs west of Nugget Brothers ''(hidden)''|Bl=yes|W=yes|display={{DL|Vitamin|HP Up}}}} | | {{Itemlist|HP Up|1F, accessible by stairs west of Nugget Brothers ''(hidden)''|Bl=yes|W=yes|display={{DL|Vitamin|HP Up}}}} |
| {{Itemlist|Max Potion|1F, north of {{tc|Hiker}} Hardy ''(hidden)''|Bl=yes|W=yes|display={{DL|Potion|Max Potion}}}} | | {{Itemlist|Max Potion|1F, north of {{tc|Hiker}} Hardy ''(hidden)''|Bl=yes|W=yes|display={{DL|Potion|Max Potion}}}} |
| {{Itemlist|Magnet|1F, east of {{tc|Ace Trainer}} Corky|Bl=yes|W=yes|display={{DL|Type-enhancing item|Magnet}}}} | | {{Itemlist|Magnet|1F, east of {{tc|Ace Trainer}} Corky|Bl=yes|W=yes|B2=yes|W2=yes|display={{DL|Type-enhancing item|Magnet}}}} |
| {{Itemlist|Nugget|B1F, given by Nugget Brothers|Bl=yes|W=yes|B2=yes|W2=yes|display={{DL|Valuable item|Nugget}} ×2}} | | {{Itemlist|Nugget|B1F, given by Nugget Brothers|Bl=yes|W=yes|display={{DL|Valuable item|Nugget}} ×2}} |
| {{Itemlist|Revive|B1F, on wall west of {{tc|Doctor}} Wayne ''(hidden)''|Bl=yes|W=yes|display={{DL|Revive|Revive}}}} | | {{Itemlist|Revive|B1F, on wall west of {{tc|Doctor}} Wayne ''(hidden)''|Bl=yes|W=yes|display={{DL|Revive|Revive}}}} |
| {{Itemlist|Timer Ball|B1F, north of Nugget Brothers|Bl=yes|W=yes|display={{ball|Timer}}}} | | {{Itemlist|Timer Ball|B1F, north of Nugget Brothers|Bl=yes|W=yes|display={{ball|Timer}}}} |
| {{Itemlist|Thunder Stone|B1F, west of Team Plasma|Bl=yes|W=yes|display={{evostone|Thunder Stone}}}} | | {{Itemlist|Thunder Stone|B1F, west of Team Plasma|Bl=yes|W=yes|display={{evostone|Thunder Stone|Thunderstone}}}} |
| {{Itemlist|BrightPowder|B2F, in the northeast|Bl=yes|W=yes|display={{DL|In-battle effect item|BrightPowder}}}} | | {{Itemlist|BrightPowder|B2F, in the northeast|Bl=yes|W=yes|display={{DL|In-battle effect item|Bright Powder|BrightPowder}}}} |
| {{Itemlist|Star Piece|B2F, in the west, downstairs ''(hidden)''|Bl=yes|W=yes|display={{DL|Valuable item|Star Piece}}}} | | {{Itemlist|Star Piece|B2F, in the west, downstairs ''(hidden)''|Bl=yes|W=yes|display={{DL|Valuable item|Star Piece}}}} |
| {{Itemlist|Hyper Potion|B2F, in the west, downstairs|Bl=yes|W=yes|display={{DL|Potion|Hyper Potion}}}} | | {{Itemlist|Hyper Potion|B2F, in the west, downstairs|Bl=yes|W=yes|display={{DL|Potion|Hyper Potion}}}} |
| {{Itemlist|Rare Candy|B2F, in the east, downstairs|Bl=yes|W=yes|display={{DL|Vitamin|Rare Candy}}}} | | {{Itemlist|Rare Candy|B2F, in the east, downstairs|Bl=yes|W=yes|display={{DL|Vitamin|Rare Candy}}}} |
| {{Itemlist|TM Rock|Given by [[Bronius]] post-game|Bl=yes|W=yes|display={{TM|69|Rock Polish}}}} | | {{Itemlist|TM Rock|Given by [[Bronius]] post-game|Bl=yes|W=yes|display={{TM|69|Rock Polish}}}} |
| {{Itemlist|Full Heal|1F, near {{rt|6|Unova}} entrance|B2=yes|W2=yes|display={{DL|Status ailment healing item|Full Heal}}}} | | {{Itemlist|Full Heal|1F, near {{rt|6|Unova}} entrance|B2=yes|W2=yes|display={{DL|Status condition healing item|Full Heal}}}} |
| {{Itemlist|Yellow Shard|1F, north of {{tc|Guitarist}} Anna, under the crystal ''(hidden)''|B2=yes|W2=yes|display={{DL|Shard|Yellow Shard}}}} | | {{Itemlist|Yellow Shard|1F, north of {{tc|Guitarist}} Anna, under the crystal ''(hidden)''|B2=yes|W2=yes|display={{DL|Shard|Yellow Shard}}}} |
| {{Itemlist|Max Repel|1F, south of {{tc|Scientist}} Ronald|B2=yes|W2=yes|display={{DL|Repel|Max Repel}}}} | | {{Itemlist|Max Repel|1F, south of {{tc|Scientist}} Ronald|B2=yes|W2=yes|display={{DL|Repel|Max Repel}}}} |
| Line 57: |
Line 57: |
| *1F, east of {{tc|Guitarist}} Anna | | *1F, east of {{tc|Guitarist}} Anna |
| *1F, north of the bridge ''(hidden)''|B2=yes|W2=yes|display={{DL|Potion|Hyper Potion}} ×2}} | | *1F, north of the bridge ''(hidden)''|B2=yes|W2=yes|display={{DL|Potion|Hyper Potion}} ×2}} |
| | {{Itemlist|Nugget|B1F, given by Nugget Brothers|B2=yes|W2=yes|display={{DL|Valuable item|Nugget}}}} |
| {{Itemlist|Big Nugget|B1F, from the Nugget Brothers|B2=yes|W2=yes|display={{DL|Valuable item|Big Nugget}}}} | | {{Itemlist|Big Nugget|B1F, from the Nugget Brothers|B2=yes|W2=yes|display={{DL|Valuable item|Big Nugget}}}} |
| {{Itemlist|Ultra Ball|B1F, north of the Nugget Brothers ''(hidden)''|B2=yes|W2=yes|display={{ball|Ultra}}}} | | {{Itemlist|Ultra Ball|B1F, north of the Nugget Brothers ''(hidden)''|B2=yes|W2=yes|display={{ball|Ultra}}}} |
| Line 67: |
Line 68: |
| {{Itemlist|Revive|B1F, west of {{tc|Scientist}} Lumi|B2=yes|W2=yes|display={{DL|Revive|Revive}}}} | | {{Itemlist|Revive|B1F, west of {{tc|Scientist}} Lumi|B2=yes|W2=yes|display={{DL|Revive|Revive}}}} |
| {{Itemlist|Iron|B1F, near {{tc|Pokémon Ranger}} Briana|B2=yes|W2=yes|display={{DL|Vitamin|Iron}}}} | | {{Itemlist|Iron|B1F, near {{tc|Pokémon Ranger}} Briana|B2=yes|W2=yes|display={{DL|Vitamin|Iron}}}} |
| {{Itemlist|Magnet|1F, west of {{tc|Ace Trainer}} Corky|B2=yes|W2=yes|display={{DL|Type-enhancing item|Magnet}}}}
| |
| {{Itemlist|Escape Rope|B2F, south of {{tc|Guitarist}} Beverly|B2=yes|W2=yes}} | | {{Itemlist|Escape Rope|B2F, south of {{tc|Guitarist}} Beverly|B2=yes|W2=yes}} |
| {{Itemlist|Thunder Stone|B2F, north of {{tc|Ace Trainer}} Shaye|B2=yes|W2=yes|display={{evostone|Thunder Stone}}}} | | {{Itemlist|Thunder Stone|B2F, north of {{tc|Ace Trainer}} Shaye|B2=yes|W2=yes|display={{evostone|Thunder Stone}}}} |
| Line 147: |
Line 147: |
| {{catch/entry5-2|595|Joltik|yes|yes|Cave|28-30|all=36%|type1=bug|type2=electric}} | | {{catch/entry5-2|595|Joltik|yes|yes|Cave|28-30|all=36%|type1=bug|type2=electric}} |
| {{catch/entry5-2|597|Ferroseed|yes|yes|Cave|30-31|all=20%|type1=grass|type2=steel}} | | {{catch/entry5-2|597|Ferroseed|yes|yes|Cave|30-31|all=20%|type1=grass|type2=steel}} |
| {{catch/entry5-2|599|Klink|yes|yes|Cave|29|all=21%|type1=steel}} | | {{catch/entry5-2|599|Klink|yes|yes|Cave|29, 31|all=21%|type1=steel}} |
| {{catch/entry5-2|602|Tynamo|yes|yes|Cave|31|all=8%|type1=Electric}} | | {{catch/entry5-2|602|Tynamo|yes|yes|Cave|31|all=8%|type1=Electric}} |
| {{catch/div|cave|Dust clouds}} | | {{catch/div|cave|Dust clouds}} |
| Line 314: |
Line 314: |
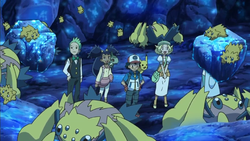
| [[File:Chargestone Cave anime.png|thumb|200px|right|Chargestone Cave in the anime]] | | [[File:Chargestone Cave anime.png|thumb|200px|right|Chargestone Cave in the anime]] |
| Chargestone Cave debuted in ''[[BW056|The Lonely Deino!]]'' during a flashback. It later appeared as a partial setting for ''[[BW062|Crisis at Chargestone Cave!]]'' where [[Professor Juniper]] was doing research. The {{p|Joltik}} and {{p|Galvantula}} that lived there were consuming all the electricity in the vicinity, even kidnapping {{AP|Pikachu}} and {{TP|Bianca|Minccino}}. It was later revealed that {{TRT}} was taking rocks from Chargestone Cave, which serves as an energy source for all the Pokémon that live there, and forcing the Joltik and Galvantula out of the cave. After some help from {{Ash}} and {{ashfr}}, Team Rocket was chased off, and the cave was once again safe for Joltik and Galvantula to live in. It served as a setting again in ''[[BW063|Evolution Exchange Excitement!]]'', where Ash and {{ashfr}} found a group of {{p|Klink}} and a {{p|Klinklang}} that were angered by a pen that was stuck in one of Klinklang's gears, which was later found out to be [[Sunglasses Krokorok]]'s doing. It made a very brief appearance in ''[[BW064|Explorers of the Hero's Ruin!]]''. | | Chargestone Cave debuted in ''[[BW056|The Lonely Deino!]]'' during a flashback. It later appeared as a partial setting for ''[[BW062|Crisis at Chargestone Cave!]]'' where [[Professor Juniper]] was doing research. The {{p|Joltik}} and {{p|Galvantula}} that lived there were consuming all the electricity in the vicinity, even kidnapping {{AP|Pikachu}} and {{TP|Bianca|Minccino}}. It was later revealed that {{TRT}} was taking rocks from Chargestone Cave, which serves as an energy source for all the Pokémon that live there, and forcing the Joltik and Galvantula out of the cave. After some help from {{Ash}} and {{ashfr}}, Team Rocket was chased off, and the cave was once again safe for Joltik and Galvantula to live in. It served as a setting again in ''[[BW063|Evolution Exchange Excitement!]]'', where Ash and {{ashfr}} found a group of {{p|Klink}} and a {{p|Klinklang}} that were angered by a pen that was stuck in one of Klinklang's gears, which was later found out to be [[Sunglasses Krokorok]]'s doing. It made a very brief appearance in ''[[BW064|Explorers of the Hero's Ruin!]]''. |
| | {{-}} |
|
| |
|
| ==In the manga== | | ==In the manga== |
| | | [[File:Chargestone Cave Adventures.png|thumb|150px|Chargestone Cave in Pokémon Adventures]] |
| ===In the [[Pokémon Adventures]] manga=== | | ===In the [[Pokémon Adventures]] manga=== |
| | [[Clay]] led {{adv|Black}} through the Chargestone Cave in ''[[PS493|Underground Showdown]]'' on their way to Mistralton City, where six of the Unova Gym Leaders were due to gather. |
|
| |
|
| [[Clay]] led {{adv|Black}} through the Chargestone Cave on their way to Mistralton City, where six of the Unova Gym Leaders were due to gather.
| | [[Alder]] was defeated by [[N]] in a battle on the mountain range near Chargestone Cave in ''[[PS509|Will the Truth Come Out?]]''. |
| | | {{-}} |
| [[Alder]] was defeated by [[N]] in a battle on the mountain range near Chargestone Cave. | |
|
| |
|
| ==Trivia== | | ==Trivia== |

|
This article is incomplete.
Please feel free to edit this article to add missing information and complete it.
Reason: layout
|
Chargestone Cave (Japanese: 電気石の洞穴 Electric Stone Cave) is a cave within the western half of the Unova region. It is connected to Route 6 at its southern exit, and Mistralton City in the north.
Chargestone Cave has a strong magnetic field that causes Magneton and Nosepass to evolve into Magnezone and Probopass, respectively, when leveled up here. This magnetism is also evident by the cave's puzzle: the player must push stone fragments blocking some passages so they are attracted by larger magnetic rocks, making it possible to continue.
In Black and White, the cave is initially blocked off by a Galvantula web. After defeating Clay, the player will meet him here, where he will remove the web and give the player TM78 (Bulldoze). In Black 2 and White 2, part of the cave is inaccessible due to Bianca and a Worker blocking the way due to the bridge ahead being down, and repairs don't finish until the player has participated in the Pokémon World Tournament and defeated the Team Plasma Grunts on the Plasma Frigate just south of PWT. Additionally, Funfest Mission "Find Mysterious Ores!" can be unlocked by talking to a Lady.
After defeating Ghetsis in Black and White, Bronius of the Seven Sages can be found and arrested here. He is guarded by two Team Plasma Grunts that appear after talking to him, and they must be defeated before Bronius can be arrested. He is the only one of the Seven Sages to do this.
Items
Outside
| Item
|
Location
|
Games
|

|
TM78 (Bulldoze)
|
In front of Chargestone Cave, as the reward for defeating Clay in his Gym
|
B W
|
|
|
Inside
| Item
|
Location
|
Games
|

|
Lucky Egg
|
Received from Professor Juniper
|
B W
|
| Parlyz Heal
|
Parlyz Heal ×3
|
- 1F, area north of second push stone
- B1F, alcove west of Nugget Brothers (hidden)
- B2F, in the east (hidden)
|
B W
|

|
Revive
|
1F, south of two push stones
|
B W
|

|
Heal Ball
|
1F, northernmost ledge
|
B W
|

|
Elixir
|
1F, alcove north of Ace Trainer Jared (hidden)
|
B W
|

|
Hyper Potion
|
1F, east of bridge
|
B W
|

|
Iron
|
1F, south of bridge on east side
|
B W
|

|
HP Up
|
1F, accessible by stairs west of Nugget Brothers (hidden)
|
B W
|

|
Max Potion
|
1F, north of Hiker Hardy (hidden)
|
B W
|

|
Magnet
|
1F, east of Ace Trainer Corky
|
B W B2 W2
|

|
Nugget ×2
|
B1F, given by Nugget Brothers
|
B W
|
|
|
Revive
|
B1F, on wall west of Doctor Wayne (hidden)
|
B W
|

|
Timer Ball
|
B1F, north of Nugget Brothers
|
B W
|

|
Thunderstone
|
B1F, west of Team Plasma
|
B W
|

|
BrightPowder
|
B2F, in the northeast
|
B W
|

|
Star Piece
|
B2F, in the west, downstairs (hidden)
|
B W
|
|
|
Hyper Potion
|
B2F, in the west, downstairs
|
B W
|

|
Rare Candy
|
B2F, in the east, downstairs
|
B W
|

|
TM69 (Rock Polish)
|
Given by Bronius post-game
|
B W
|

|
Full Heal
|
1F, near Route 6 entrance
|
B2 W2
|

|
Yellow Shard
|
1F, north of Guitarist Anna, under the crystal (hidden)
|
B2 W2
|

|
Max Repel
|
1F, south of Scientist Ronald
|
B2 W2
|
|
|
Hyper Potion ×2
|
- 1F, east of Guitarist Anna
- 1F, north of the bridge (hidden)
|
B2 W2
|
|
|
Nugget
|
B1F, given by Nugget Brothers
|
B2 W2
|

|
Big Nugget
|
B1F, from the Nugget Brothers
|
B2 W2
|

|
Ultra Ball
|
B1F, north of the Nugget Brothers (hidden)
|
B2 W2
|

|
Chesto Berry ×2
|
|
B2 W2
|

|
Carbos ×2
|
- 1F, near Hiker Otto
- 1F, southwest of the cave, arriving from B1F (hidden)
|
B2 W2
|
|
|
Revive
|
B1F, west of Scientist Lumi
|
B2 W2
|
|
|
Iron
|
B1F, near Pokémon Ranger Briana
|
B2 W2
|

|
Escape Rope
|
B2F, south of Guitarist Beverly
|
B2 W2
|
|
|
Thunder Stone
|
B2F, north of Ace Trainer Shaye
|
B2 W2
|

|
Metal Coat
|
B2F, south of Ace Trainer Vicki
|
B2 W2
|

|
Electric Gem
|
B2F, at the dead end northeast of Ace Trainer Vicki (hidden)
|
B2 W2
|
|
|
Phenomenon
Pokémon
Pokémon Black and White
| Pokémon
|
Games
|
Location
|
Levels
|
Rate
|
| 1F, B1F
|
|
|
B
|
W
|
|
24
|
10%
|
|
|
B
|
W
|
|
24-27
|
39%
|
|
|
B
|
W
|
|
24-26
|
20%
|
|
|
B
|
W
|
|
25-27
|
29%
|
|
|
B
|
W
|
|
27
|
2%
|
| B2F
|
|
|
B
|
W
|
|
24
|
10%
|
|
|
B
|
W
|
|
24-27
|
36%
|
|
|
B
|
W
|
|
26-27
|
20%
|
|
|
B
|
W
|
|
25-27
|
26%
|
|
|
B
|
W
|
|
27
|
8%
|
| Dust clouds
|
|
|
B
|
W
|
|
24-27
|
100%
|
| A colored background means that the Pokémon can be found in this location in the specified game. A white background with a colored letter means that the Pokémon cannot be found here.
|
Pokémon Black 2 and White 2
| Pokémon
|
Games
|
Location
|
Levels
|
Rate
|
| 1F
|
|
|
B2
|
W2
|
|
27
|
10%
|
|
|
B2
|
W2
|
|
25
|
5%
|
|
|
B2
|
W2
|
|
25-28
|
39%
|
|
|
B2
|
W2
|
|
26-27
|
20%
|
|
|
B2
|
W2
|
|
26, 28
|
24%
|
|
|
B2
|
W2
|
|
28
|
2%
|
| B1F
|
|
|
B2
|
W2
|
|
30
|
10%
|
|
|
B2
|
W2
|
|
28
|
5%
|
|
|
B2
|
W2
|
|
28-30
|
39%
|
|
|
B2
|
W2
|
|
29-30
|
20%
|
|
|
B2
|
W2
|
|
29, 31
|
24%
|
|
|
B2
|
W2
|
|
31
|
2%
|
| B2F
|
|
|
B2
|
W2
|
|
30
|
10%
|
|
|
B2
|
W2
|
|
28
|
5%
|
|
|
B2
|
W2
|
|
28-30
|
36%
|
|
|
B2
|
W2
|
|
30-31
|
20%
|
|
|
B2
|
W2
|
|
29, 31
|
21%
|
|
|
B2
|
W2
|
|
31
|
8%
|
| Dust clouds
|
|
|
B2
|
W2
|
|
25-31
|
100%
|
| N's Pokémon
|
|
|
B2
|
W2
|

|
Only one
|
|
28
|
One
|
|
|
B2
|
W2
|
|
|
Only one
|
|
28
|
One
|
|
|
B2
|
W2
|
|
|
Only one
|
|
28
|
One
|
|
|
B2
|
W2
|
|
|
Only one
|
|
28
|
One
|
| A colored background means that the Pokémon can be found in this location in the specified game. A white background with a colored letter means that the Pokémon cannot be found here.
|
Trainers
Pokémon Black and White
1F
| Trainer
|
Pokémon
|
|
|
|
|
|
|
|
|
|
|

|
|
|
Hiker Hardy
ガク Gaku
Reward: $832
|
|
|
|
|
|
|
|
|
|
|
|
|
|
|
|
|
|
|
|
|
|
|
|
|
|
|
B1F
| Trainer
|
Pokémon
|

|
|
|
Doctor Wayne
ケンイチ Kenichi
Reward: $1740
|
|
|
|
|
|
|
|
|
|
|
|
|
|
|
|
|
|
|
|
|
|
|
|
|
|
|
|
|
|
|
|
|
|
|
|
|
|
|
|
|
|
|
|
|
|
|
|
|
|
|
|
|
|
|
|
|
B2F
| Trainer
|
Pokémon
|
|
|
|
|
|
|
|
|
|
|
|
|
|
|
| Post-game
|
|
|
|
|
|
|
|
|
|
|
|
|
|
|
|
|
|
|
Pokémon Black 2 and White 2
1F
| Trainer
|
Pokémon
|
|
|
|
|
|
|
|
|
|
|
|
|
|
|
|
|
|
|
|
|
|
|
|
|
|
|
|
|
|
|
|

|
|
|
Hiker Otto
カンタ Kanta
Reward: $1024
|
|
|
|
|
|
|
|
B1F
| Trainer
|
Pokémon
|
|
|
|
|
|
|
|

|
|
|
Doctor Kit
ヒロタカ Hirotaka
Reward: $1920
|
|
|
|
|
|
|
|
|
|
|
|
|
|
|
B2F
| Trainer
|
Pokémon
|
|
|
|
|
|
|
|
|
|
|
|
|
|
|
|
|
Hiker Jeremy
ヒデアキ Hideaki
Reward: $1024
|
|
|
|
|
|
|
|
|
|
|
|
|
|
|
|
|
In the anime
Chargestone Cave interior

Chargestone Cave in the anime
Chargestone Cave debuted in The Lonely Deino! during a flashback. It later appeared as a partial setting for Crisis at Chargestone Cave! where Professor Juniper was doing research. The Joltik and Galvantula that lived there were consuming all the electricity in the vicinity, even kidnapping Pikachu and Minccino. It was later revealed that Team Rocket was taking rocks from Chargestone Cave, which serves as an energy source for all the Pokémon that live there, and forcing the Joltik and Galvantula out of the cave. After some help from Ash and his friends, Team Rocket was chased off, and the cave was once again safe for Joltik and Galvantula to live in. It served as a setting again in Evolution Exchange Excitement!, where Ash and his friends found a group of Klink and a Klinklang that were angered by a pen that was stuck in one of Klinklang's gears, which was later found out to be Sunglasses Krokorok's doing. It made a very brief appearance in Explorers of the Hero's Ruin!.
In the manga

Chargestone Cave in Pokémon Adventures
Clay led Black through the Chargestone Cave in Underground Showdown on their way to Mistralton City, where six of the Unova Gym Leaders were due to gather.
Alder was defeated by N in a battle on the mountain range near Chargestone Cave in Will the Truth Come Out?.
Trivia
- In Black and White, when the player enters the cave from Mistralton City, the name of the cave is not displayed on the screen upon entering.
Name origin
The kanji of its Japanese name, 電気石, refers to tourmaline but the games use the Kun reading (いし ishi) for the representation of 石 in kana as opposed to the On reading (せき seki). This results in the term denkiishi (でんきいし), meaning "electric stone" or "electric rock", and not denkiseki (でんきせき), "tourmaline".
In other languages


