Appendix:Yellow walkthrough/Section 8: Difference between revisions
mNo edit summary |
Darth Phazon (talk | contribs) (→Rocket Hideout: Slight location error for the Hyper Potion.) |
||
| (42 intermediate revisions by 21 users not shown) | |||
| Line 1: | Line 1: | ||
== Celadon City == | ==Celadon City== | ||
[[ | [[File:Celadon City RBY.png|thumb|350px|Celadon City]] | ||
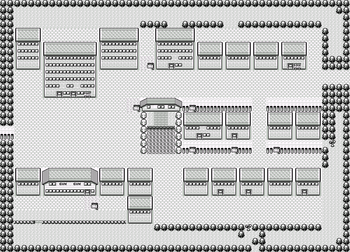
[[Celadon City]] is the second-largest city in the region, and it's got plenty going on to live up to the hype. | [[Celadon City]] is the second-largest city in the region, and it's got plenty going on to live up to the hype. The [[Celadon Department Store]] is an essential stop, since almost anything a Trainer could want is up for sale here. The [[Celadon Condominiums|Celadon Mansion]] is a hotel-of-sorts, and the current tenants are none other than [[Game Freak]], the team that developed Pokémon. The [[Rocket Game Corner|Game Corner]] houses the slot machines, and those coins can be redeemed for valuable prizes in the Prize Corner next door. In addition, Celadon is also home to the [[Celadon Gym]], nestled on a hill in the southwest. | ||
{| class="expandable" align="center" style="background: #c0e7c2; {{roundy}}; border: 5px solid #D5EFD6;" | |||
|- align="center" | |||
! Items | |||
|- | |||
| | |||
{{itlisth|city}} | |||
{{Itemlist|PP Up|In the dead-end path east of the Game Corner (hidden)|Y=yes|display={{DL|Vitamin|PP Up}}}} | |||
{{Itemlist|Coin Case|From a man in the restaurant|Y=yes}} | |||
{{Itemlist|TM Normal|From the man north of the pond (requires {{m|Surf}})|Y=yes|display={{TM|41|Softboiled}}}} | |||
{{catch/div|city|In the Department Store}} | |||
{{Itemlist|TM Fighting|From the clerk on the third floor|Y=yes|display={{TM|18|Counter}}}} | |||
{{Itemlist|TM Ice|From the girl on the roof, in exchange for a Fresh Water|Y=yes|display={{TM|13|Ice Beam}}}} | |||
{{Itemlist|TM Rock|From the girl on the roof, in exchange for a Soda Pop|Y=yes|display={{TM|48|Rock Slide}}}} | |||
{{Itemlist|TM Normal|From the girl on the roof, in exchange for a Lemonade|Y=yes|display={{TM|49|Tri Attack}}}} | |||
{{catch/div|city|In the Gym}} | |||
{{Itemlist|TM Grass|From Erika upon her defeat|Y=yes|display={{TM|21|Mega Drain}}}} | |||
{{itlistfoot|city}} | |||
|} | |||
The tall building in the north of town is Celadon Mansion. | ===Celadon Mansion=== | ||
The tall building in the north of town is Celadon Mansion. On the third floor, [[Game Freak]]'s game designer promises a reward for showing him your completed [[Pokédex]]. Incidentally, you can find a new addition right now; leave the mansion and follow the path behind the Pokémon Center to find a break in the trees where you can enter the mansion through the back door. Make sure that you've got an empty slot in your party, and take the stairs to the top floor to find an {{p|Eevee}}. Eevee is an extremely versatile creature, since it can evolve into one of three different forms. Exposure to a {{evostone|Water Stone}}, {{evostone|Thunderstone}}, or {{evostone|Fire Stone}} results in a {{p|Vaporeon}}, {{p|Jolteon}}, or a {{p|Flareon}}, respectively. Any of those three evolutions will make a powerful addition to your team, especially since they can cover the weaknesses of your {{DL|starter Pokémon|Kanto|starter}}'s final form. These [[Evolutionary stone|stones]] can be purchased only in the Department Store. | |||
===Return of the Rockets=== | |||
If you haven't noticed by now, there are two Rocket grunts loitering around the city. It looks like [[Team Rocket]] has something planned for Celadon... | |||
Stop by the café in the south of town and talk to the guy in the back corner. He lost all his money at the slots, so he has no more use for his [[Coin Case]], and hands it over. Next door to the café is an operation that is shipping 2,000 Pokémon every month to the Game Corner as slot prizes. Those kind of numbers mean big money, and that's got Team Rocket's name written all over it. They're up to something, and as one of the workers points out, it ''surely'' has nothing to do with a hidden switch behind a poster in the Game Corner. | |||
===Celadon Department Store=== | |||
====2nd floor==== | |||
{| align="center" style="background: #{{white color}}; border: 3px solid #{{black color}}; {{roundy|15px}};" cellspacing="1" cellpadding="1" | |||
=== Celadon Department Store === | |- valign="top" | ||
==== 2nd floor ==== | | | ||
{{shop|Left Cashier}} | |||
{| | {{shoprow|{{shopitem|Great Ball|600}}|{{shopitem|Super Potion|700}}}} | ||
|- | {{shoprow|{{shopitem|Revive|1500}}|{{shopitem|Antidote|100}}}} | ||
{{shoprow|{{shopitem|Burn Heal|250}}|{{shopitem|Ice Heal|250}}}} | |||
{{shoprow|{{shopitem|Awakening|200}}|{{shopitem|Parlyz Heal|200}}}} | |||
| | {{shoprow|{{shopitem|Super Repel|500}}}} | ||
{{shopfooter}} | |||
| {{ | | | ||
{{shop|Right Cashier}} | |||
| {{ | {{shoprow|{{shopitem|TM32|1000|PD||TM Normal|Double Team}}|{{shopitem|TM33|1000|PD||TM Psychic|Reflect}}}} | ||
| {{ | {{shoprow|{{shopitem|TM02|2000|PD||TM Normal|Razor Wind}}|{{shopitem|TM07|2000|PD||TM Normal|Horn Drill}}}} | ||
| | {{shoprow|{{shopitem|TM37|2000|PD||TM Normal|Egg Bomb}}|{{shopitem|TM01|3000|PD||TM Normal|Mega Punch}}}} | ||
{{shoprow|{{shopitem|TM05|3000|PD||TM Normal|Mega Kick}}|{{shopitem|TM09|3000|PD||TM Normal|Take Down}}}} | |||
| | {{shoprow|{{shopitem|TM17|3000|PD||TM Fighting|Submission}}}} | ||
{{shopfooter}} | |||
| {{ | |||
| {{ | |||
| {{ | |||
| {{ | |||
| {{ | |||
| {{ | |||
| | |||
| | |||
{| | |||
| | |||
| | |||
| | |||
| {{ | |||
| | |||
| | |||
| {{ | |||
| | |||
| | |||
| {{ | |||
| | |||
| | |||
| {{ | |||
| | |||
| | |||
| {{ | |||
| | |||
| | |||
| {{ | |||
| | |||
| | |||
| {{ | |||
| | |||
| | |||
| {{ | |||
| | |||
| | |||
|} | |} | ||
==== 3rd floor ==== | ====3rd floor==== | ||
There's nothing for sale on the third floor, but you can talk to the clerk to get {{TM|18|Counter}}. | |||
====4th floor==== | |||
If you're looking for the evolution stones, you've come to the right place! Buy your favorite stone, except a {{evostone|Leaf Stone}}, for your new {{p|Eevee}}. Be sure to pick up a [[Poké Doll]] too, as it will be important a little later. | |||
{| align="center" | |||
| | |||
{{shop|}} | |||
{{shoprow|{{shopitem|Poké Doll|1000}}|{{shopitem|Fire Stone|2100}}}} | |||
{{shoprow|{{shopitem|Thunder Stone|2100}}|{{shopitem|Water Stone|2100}}}} | |||
{{shoprow|{{shopitem|Leaf Stone|2100}}}} | |||
{{shopfooter}} | |||
|} | |||
{| | ====5th floor==== | ||
|- | {| align="center" style="background: #{{white color}}; border: 3px solid #{{black color}}; {{roundy|15px}};" cellspacing="1" cellpadding="1" | ||
|- valign="top" | |||
| | |||
| | {{shop|Left Cashier}} | ||
| | {{shoprow|{{shopitem|HP Up|9800}}|{{shopitem|Protein|9800}}}} | ||
| {{ | {{shoprow|{{shopitem|Iron|9800}}|{{shopitem|Calcium|9800}}}} | ||
| | {{shoprow|{{shopitem|Carbos|9800}}}} | ||
| {{ | {{shopfooter}} | ||
| | |||
| | {{shop|Right Cashier}} | ||
| {{ | {{shoprow|{{shopitem|X Attack|500}}|{{shopitem|X Defend|550}}}} | ||
| {{ | {{shoprow|{{shopitem|X Speed|350}}|{{shopitem|X Special|350}}}} | ||
| | {{shoprow|{{shopitem|X Accuracy|950}}|{{shopitem|Guard Spec.|700}}}} | ||
| {{ | {{shoprow|{{shopitem|Dire Hit|650}}}} | ||
| {{ | {{shopfooter}} | ||
| | |||
| {{ | |||
|} | |} | ||
==== | ====Rooftop Square==== | ||
Each Vending Machine dispenses {{DL|Drink|Fresh Water}}, {{DL|Drink|Soda Pop}}, and {{DL|Drink|Lemonade}}. Buy one of each drink to give to the little girl nearby, and she'll give you up to three [[TM]]s as thanks - {{TM|13|Ice Beam}} for a Fresh Water, {{TM|48|Rock Slide}} for a Soda Pop, and {{TM|49|Tri Attack}} for a Lemonade. Pick up an extra drink for the guards at [[Saffron City]]'s borders, and stock up on Lemonade. Like the other drinks, Lemonade can restore your Pokémon's health, but Lemonade is the most potent. It restores 80 {{stat|HP}}, while by comparison, a {{DL|Potion|Super Potion}} only restores 50 HP. | |||
{| | {| align="center" | ||
| | | | ||
{{shop|[[Vending Machine]]}} | |||
{{shoprow|{{shopitem|Fresh Water|200}}|{{shopitem|Soda Pop|300}}}} | |||
{{shoprow|{{shopitem|Lemonade|350}}|}} | |||
{{shopfooter}} | |||
| {{ | |||
| {{ | |||
| {{ | |||
| | |||
| | |||
|} | |} | ||
=== Game Corner === | ===Game Corner=== | ||
At first glance, everything looks normal here. People are relaxed, having fun at the slot machines, but there's something unsettling about the guy glaring at the poster... As soon as you approach him, he picks a fight with you. | |||
{| align="center" | |||
| | |||
{| | {{trainerheader|road}} | ||
| | {{trainerentry|Spr Y Rocket.png|Team Rocket|Grunt|600|2|020|Raticate||20||041|Zubat||20|}} | ||
{{trainerfooter|road|I}} | |||
| | |||
| | |||
| | |||
|} | |} | ||
All the prizes here are offered at extremely high prices, so you' | All the prizes here are offered at extremely high prices, so you'll need a huge supply of coins to get everything. A few can be found dropped on the ground, and talking to the other gamblers gets you some more. Besides that, you can either buy them—50 coins for {{pdollar}}1000—or take your chances with the slots. {{p|Scyther|Some}} {{p|Pinsir|prizes}} are extremely rare, while {{p|Porygon|others}} are one-of-a-kind. You'll definitely be back here, so now let's head to the Gym. To get there, head back to the café in the south of town, and {{m|cut}} down the tree blocking the way. | ||
{| | {| align="center" style="background: #{{white color}}; border: 3px solid #{{black color}}; {{roundy|15px}};" cellspacing="1" cellpadding="1" | ||
|- valign="top" | |||
| | |||
{{shop|Left Window}} | |||
| | {{shoprow|{{shopmon|Abra|063|230}}|{{shopmon|Vulpix|037|1000}}}} | ||
| {{ | {{shoprow|{{shopmon|Wigglytuff|040|2680}}}} | ||
{{shopfooter}} | |||
| | |||
| {{ | {{shop|Center Window}} | ||
{{shoprow|{{shopmon|Scyther|123|6500}}|{{shopmon|Pinsir|127|6500}}}} | |||
{{shoprow|{{shopmon|Porygon|137|9999}}}} | |||
| {{ | {{shopfooter}} | ||
| | | | ||
| | {{shop|Right Window}} | ||
| {{ | {{shoprow|{{shopitem|TM23|3300|C||TM Dragon|Dragon Rage}}|{{shopitem|TM15|5500|C||TM Normal|Hyper Beam}}}} | ||
{{shoprow|{{shopitem|TM50|7700|C||TM Normal|Substitute}}}} | |||
{{shopfooter}} | |||
| {{ | |||
| {{ | |||
| | |||
| | |||
| {{TM | |||
| | |||
| | |||
| | |||
| | |||
| | |||
| | |||
|} | |} | ||
=== Celadon Gym === | ===Celadon Gym=== | ||
[[ | [[File:Celadon Gym RBY.png|thumb|Celadon Gym]] | ||
{{sign|RBY|header}} | {{sign|RBY|header}} | ||
{{sign|RBY|CELADON CITY <br> POKéMON GYM <br> LEADER: ERIKA | {{sign|RBY|title|CELADON CITY<br>POKéMON GYM<br>LEADER: ERIKA}} | ||
{{sign|RBY|The Nature-Loving<br>Princess!}} | |||
{{sign|RBY|footer}} | {{sign|RBY|footer}} | ||
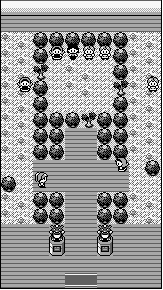
[[Erika]]'s Gym is one of the easiest to defeat, since | [[Erika]]'s Gym is one of the easiest to defeat, since {{t|Grass}} Pokémon have so many weaknesses. {{t|Fire}} and {{t|Flying}} Pokémon have the best advantage. While your own Grass Pokémon take less-than-normal damage from Grass attacks, they need to be careful of {{t|Poison}} moves like {{m|Acid}}. If you haven't used [[TM13]] yet, {{m|Ice Beam}} can be a great help. | ||
{ | {{User:KCorp4000/Gymtag | ||
| | |gym=Celadon | ||
|badge=Rainbow | |||
|type=Grass | |||
|trainers={{Trainerheader|Grass}} | |||
{{trainerentry|Spr Y Lass.png|Lass||345|2|069|Bellsprout||23||070|Weepinbell||23|}} | |||
{{Trainerdiv|Grass}} | |||
{{trainerentry|Spr Y Beauty.png|Beauty||1680|2|069|Bellsprout||24||069|Bellsprout||24|}} | |||
{{Trainerdiv|Grass}} | |||
{{trainerentry|Spr Y Beauty.png|Beauty||1470|4|069|Bellsprout||21||069|Bellsprout||21||043|Oddish||21||043|Oddish||21|}} | |||
{{Trainerdiv|Grass}} | |||
{{trainerentry|Spr Y Jr Trainer F.png|Jr. Trainer♀||480|2|001|Bulbasaur||24||002|Ivysaur||24|}} | |||
{{Trainerdiv|Grass}} | |||
{{trainerentry|Spr Y Beauty.png|Beauty||1820|1|102|Exeggcute||26|}} | |||
{{Trainerdiv|Grass}} | |||
{{trainerentry|Spr Y Cooltrainer F.png|Cooltrainer♀||840|3|070|Weepinbell||24||044|Gloom||24||002|Ivysaur||24|}} | |||
{{Trainerdiv|Grass}} | |||
{{trainerentry|Spr Y Lass.png|Lass||345|2|043|Oddish||23||044|Gloom||23|}} | |||
{{Trainerfooter|Grass|I}} | |||
|leader={{Party/Single | |||
|color={{grass color}} | |||
|headcolor={{grass color light}} | |||
|bordercolor={{grass color dark}} | |||
|sprite=Spr Y Erika.png| | |||
|prize={{pdollar}}3168 | |||
|name={{color2|000000|Erika}} | |||
|game=Y|location=Celadon Gym | |||
|pokemon=3 | |||
}} | |||
!{{Pokémon/1|game=Yellow | |||
|ndex=114|pokemon=Tangela | |||
|type1=Grass | |||
|level=30 | |||
|move1=Bind|move1type=Normal | |||
|move2=Mega Drain|move2type=Grass | |||
|move3=Vine Whip|move3type=Grass | |||
|move4=Constrict|move4type=Normal}} | |||
!{{Pokémon/1|game=Yellow | |||
|ndex=070|pokemon=Weepinbell | |||
|type1=Grass|type2=Poison | |||
|level=32 | |||
|move1=Wrap|move1type=Normal | |||
|move2=Stun Spore|move2type=Grass | |||
|move3=Sleep Powder|move3type=Grass | |||
|move4=Razor Leaf|move4type=Grass}} | |||
== | !{{Pokémon/1|game=Yellow | ||
|ndex=044|pokemon=Gloom | |||
|type1=Grass|type2=Poison | |||
|level=32 | |||
|move1=Acid|move1type=Poison | |||
|move2=Petal Dance|move2type=Grass | |||
|move3=Stun Spore|move3type=Grass | |||
|move4=Sleep Powder|move4type=Grass}} | |||
{{Party/Footer}} | |||
}} | |||
Defeating the [[Celadon Gym]] earns you the {{badge|Rainbow}}, which commands attention from all Pokémon up to level 50, and enables the use of {{m|Strength}} outside of battle. Erika also gives you {{TM|21|Mega Drain}}, a {{type|Grass}} attack that steals energy from the opponent. | |||
With the Gym defeated, it's time to infiltrate [[Team Rocket]]'s Celadon operation. Examine the poster in the Game Corner, which reveals a set of stairs nearby, to descend into their hideout. | |||
==Rocket Hideout== | |||
[[Team Rocket]] is headed by a shadowy figure known as [[Giovanni]]. This mob boss is in possession of the {{key|I|Silph Scope}} prototype, which can identify the ghosts back in [[Pokémon Tower]]. It is impossible to get past the spirits without that item, so make sure he doesn't escape with it! | |||
{| class="expandable" align="center" style="background: #666666; {{roundy|10px}}; border: 5px solid #CC0000;" | |||
|- align="center" | |||
! Trainers | |||
|- | |||
| | |||
{| class="expandable" {{ | {{trainerheader|road}} | ||
|- | {{catch/div|road|B1F (north)}} | ||
! | {{trainerentry|Spr Y Rocket.png|Team Rocket|Grunt|630|2|096|Drowzee||21||066|Machop||21|}} | ||
{{trainerdiv|road}} | |||
{{trainerentry|Spr Y Rocket.png|Team Rocket|Grunt|630|2|020|Raticate||21||020|Raticate||21|}} | |||
| | {{trainerdiv|road}} | ||
| Rocket | {{trainerentry|Spr Y Rocket.png|Team Rocket|Grunt|660|2|088|Grimer||22||109|Koffing||22|}} | ||
| | {{catch/div|road|B2F}} | ||
| {{ | {{trainerentry|Spr Y Rocket.png|Team Rocket|Grunt|510|5|041|Zubat||17||109|Koffing||17||088|Grimer||17||041|Zubat||17||020|Raticate||17|}} | ||
{{catch/div|road|B1F (south)}} | |||
{{trainerentry|Spr Y Rocket.png|Team Rocket|Grunt|570|4|019|Rattata||19||020|Raticate||19||020|Raticate||19||019|Rattata||19|}} | |||
{{trainerdiv|road}} | |||
{{trainerentry|Spr Y Rocket.png|Team Rocket|Grunt|600|3|088|Grimer||20||109|Koffing||20||109|Koffing||20|}} | |||
{{catch/div|road|B3F}} | |||
{{trainerentry|Spr Y Rocket.png|Team Rocket|Grunt|630|2|066|Machop||21||066|Machop||21|}} | |||
{{trainerdiv|road}} | |||
{{trainerentry|Spr Y Rocket.png|Team Rocket|Grunt|600|3|019|Rattata||20||020|Raticate||20||096|Drowzee||20|}} | |||
{{catch/div|road|B4F}} | |||
{{trainerentry|Spr Y Rocket.png|Team Rocket|Grunt|630|2|109|Koffing||21||041|Zubat||21|}} | |||
{{trainerfooter|road|I}} | |||
|} | |} | ||
{| class="expandable" | {| class="expandable" align="center" style="background: #666666; {{roundy|10px}}; border: 5px solid #CC0000;" | ||
|- | |- align="center" | ||
! Items | |||
|- | |||
| | | | ||
| {{DL|Valuable item|Nugget}} | {{itlisth|road}} | ||
| | {{catch/div|road|B1F (north)}} | ||
| | {{itemlist|Escape Rope|In the western room|Y=yes}} | ||
| {{evostone|Moon | {{itemlist|PP Up|In one of the potted plants (hidden)|Y=yes|display={{DL|Vitamin|PP Up}}}} | ||
| | {{catch/div|road|B2F}} | ||
| | {{itemlist|Nugget|Near the north wall|Y=yes|display={{DL|Valuable item|Nugget}}}} | ||
| {{TM|07|Horn Drill}} | {{itemlist|Moon Stone|Near the west wall|Y=yes|display={{evostone|Moon}}}} | ||
| | {{itemlist|TM Normal|Northwest part of the maze|Y=yes|display={{TM|07|Horn Drill}}}} | ||
| | {{itemlist|Super Potion|Southwest part of the maze|Y=yes|display={{DL|Potion|Super Potion}}}} | ||
| {{DL|Potion| | {{catch/div|road|B1F (south)}} | ||
| | {{itemlist|Hyper Potion|On a table past the two Rockets|Y=yes|display={{DL|Potion|Hyper Potion}}}} | ||
{{catch/div|road|B3F}} | |||
{{itemlist|TM Normal|In the eastern room|Y=yes|display={{TM|10|Double-Edge}}}} | |||
{{itemlist|Rare Candy|In the eastern part of the maze|Y=yes|display={{DL|Vitamin|Rare Candy}}}} | |||
{{catch/div|road|B4F}} | |||
{{itemlist|HP Up|On the western table, accessed via the stairs|Y=yes|display={{DL|Vitamin|HP Up}}}} | |||
{{itemlist|TM Normal|On a table near the Rocket with the {{key|I|Lift Key}}, accessed via the stairs|Y=yes|display={{TM|02|Razor Wind}}}} | |||
{{itemlist|Iron|On the southwest table, accessed via elevator|Y=yes|display={{DL|Vitamin|Iron}}}} | |||
{{itemlist|Silph Scope|On the ground near where Giovanni stood, accessed via elevator|Y=yes|display={{key|I|Silph Scope}}}} | |||
{{itlistfoot|road}} | |||
|} | |} | ||
===B1F (north)=== | |||
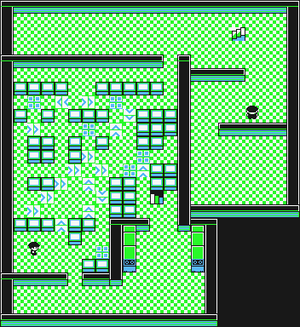
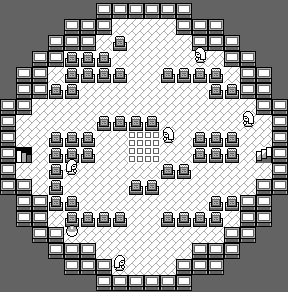
[[File:Rocket Hideout B1F RBY.png|thumb|left|Rocket Hideout, B1F]] | |||
=== B1F ( | |||
| | |||
| | |||
| Rocket | |||
The key to confronting Giovanni in his office is exactly that—a key. The {{key|I|Lift Key}} that operates the elevator is on the fourth floor beneath the Game Corner. | |||
===B2F=== | |||
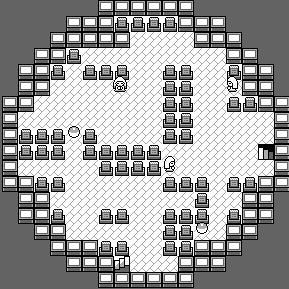
[[File:Rocket Hideout B2F RBY.png|thumb|Rocket Hideout, B2F]] | |||
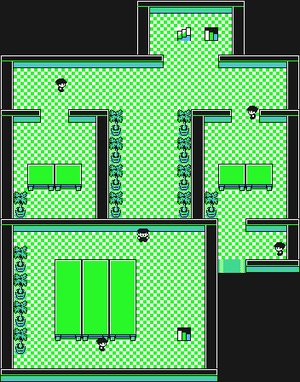
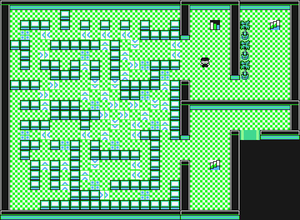
After collecting the items on the second floor, you can climb the southern stairs back up to the first floor, where you'll find a {{DL|Potion|Hyper Potion}} and two more Rockets to battle. | |||
=== | ===B1F (south)=== | ||
Backtrack to the stairs, spin through the maze again, and take the northern stairs down to the 3rd basement floor. | |||
[[File:Rocket Hideout B3F RBY.png|thumb|left|Rocket Hideout, B3F]] | |||
===B3F=== | |||
Beat the two Rockets here, wind through the maze, and take the stairs in the center of the room down to the fourth floor. | |||
| | |||
| | |||
| Rocket | |||
===B4F=== | |||
[[File:Rocket Hideout B4F RBY.png|thumb|Rocket Hideout, B4F]] | |||
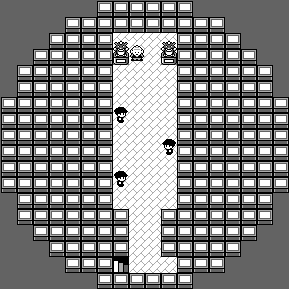
Walk south to find an {{DL|Vitamin|HP Up}} sitting on a table, then go north to find another Rocket. Grab the {{TM|02|Razor Wind}} from the other side of the table, and take out the Rocket. Talk to him after the battle, and he'll drop the {{key|I|Lift Key}}. Swipe it and get back to B2F, spin through the maze again, and enter the elevator in the southeast. Take a second to use any Potions you might have, and step out of the elevator. Right away, you are ambushed by [[Jessie|the same pair of]] [[James|Rockets from Mt. Moon]]. | |||
= | {| align="center" | ||
| | |||
{{Party|color=666666|bordercolor=CC0000|headcolor={{yellow color light}} | {{Party/Single | ||
|sprite= | |color=666666 | ||
|bordercolor=CC0000 | |||
|headcolor={{yellow color light}} | |||
|sprite=Spr Y Jessie James.png | |||
|prize={{Pdollar}}750 | |prize={{Pdollar}}750 | ||
|class= | |class=Rocket|name=Jessie and James | ||
|name=Jessie and James | |game=Y|location=Rocket Hideout | ||
|game= | |||
|location= | |||
|pokemon=3 | |pokemon=3 | ||
| | }} | ||
|level=25 | |{{Pokémon/1|game=Yellow | ||
|ndex=023|pokemon=Ekans | |||
|type1=Poison | |||
|level=25 | |||
|move1=Bite|move1type=Normal | |move1=Bite|move1type=Normal | ||
|move2=Leer|move2type=Normal | |move2=Leer|move2type=Normal | ||
|move3=Poison Sting|move3type=Poison | |move3=Poison Sting|move3type=Poison | ||
|move4=Glare|move4type=Normal}} | |move4=Glare|move4type=Normal}} | ||
| | |||
|level=25 | |{{Pokémon/1|game=Yellow | ||
|type1=Normal | |||
|ndex=052|pokemon=Meowth | |||
|level=25 | |||
|move1=Growl|move1type=Normal | |move1=Growl|move1type=Normal | ||
|move2=Bite|move2type=Normal | |move2=Bite|move2type=Normal | ||
|move3=Pay Day|move3type=Normal | |move3=Pay Day|move3type=Normal | ||
|move4=Screech|move4type=Normal}} | |move4=Screech|move4type=Normal}} | ||
| | |||
|level=25 | |{{Pokémon/1|game=Yellow | ||
|ndex=109|pokemon=Koffing | |||
|type1=Poison | |||
|level=25 | |||
|move1=Tackle|move1type=Normal | |move1=Tackle|move1type=Normal | ||
|move2=Smog|move2type=Poison}} | |move2=Smog|move2type=Poison}} | ||
}} | {{Party/Footer}} | ||
|} | |||
After the battle, grab the {{DL|Vitamin|Iron}} from the table in the southwest and step inside to confront Giovanni. | |||
{{Party|color=666666|bordercolor=CC0000|headcolor=CCCCCC | {| align="center" | ||
|sprite= | | | ||
{{Party/Single | |||
|color=666666 | |||
|bordercolor=CC0000 | |||
|headcolor=CCCCCC | |||
|sprite=Spr Y Giovanni.png | |||
|prize={{pdollar}}2871 | |prize={{pdollar}}2871 | ||
|class=Boss | |class=Boss|name=Giovanni | ||
|name=Giovanni | |game=Y|location=Rocket Hideout | ||
|game= | |||
|location= | |||
|pokemon=3 | |pokemon=3 | ||
| | }} | ||
|{{Pokémon/1|game=Yellow | |||
|ndex=095|pokemon=Onix | |||
|type1=Rock|type2=Ground | |||
|level=25 | |||
|move1=Rock Throw|move1type=Rock | |move1=Rock Throw|move1type=Rock | ||
|move2=Bind|move2type=Normal | |move2=Bind|move2type=Normal | ||
|move3=Rage|move3type=Normal | |move3=Rage|move3type=Normal | ||
|move4=Screech|move4type=Normal}} | |move4=Screech|move4type=Normal}} | ||
| | |||
|{{Pokémon/1|game=Yellow | |||
|ndex=111|pokemon=Rhyhorn | |||
|type1=Ground|type2=Rock | |||
|level=24 | |||
|move1=Horn Attack|move1type=Normal}} | |move1=Horn Attack|move1type=Normal}} | ||
| | |||
|level=29 | |{{Pokémon/1|game=Yellow | ||
|ndex=053|pokemon=Persian | |||
|type1=Normal | |||
|level=29 | |||
|move1=Pay Day|move1type=Normal | |move1=Pay Day|move1type=Normal | ||
|move2=Scratch|move2type=Normal | |move2=Scratch|move2type=Normal | ||
|move3=Bite|move3type=Normal | |move3=Bite|move3type=Normal | ||
|move4=Growl|move4type=Normal}} | |move4=Growl|move4type=Normal}} | ||
{{Party/Footer}} | |||
|} | |} | ||
After the battle, retrieve the {{key|I|Silph Scope}} that he dropped. With this, you can finally battle the ghosts in [[Pokémon Tower]]. Take the elevator to the 1st floor, and beat one last Rocket on the way out. | |||
Make sure you've got an extra [[drink]], and head back east to {{rt|7|Kanto}}. Step into the [[gate]] and the guard will stop you. You'll automatically give him the drink, and since he'll share it with the other three guards, you can now come and go through [[Saffron City]] whenever you want. You may want to stop in the Saffron Poké Mart and grab a few {{DL|Repel|Max Repel}}s on your way back east. | |||
== Lavender Town == | ==Lavender Town== | ||
=== Pokémon Tower === | ===Pokémon Tower=== | ||
[[File:Pokémon Tower 2F RBY.png|thumb|right|Pokémon Tower, 2F]] | |||
{| class="expandable" {{ | {| class="expandable" align="center" style="background: #{{ghost color light}}; {{roundy}}; border: 5px solid #{{ghost color}};" | ||
|- style="background: #{{ | |- align="center" | ||
! | ! Trainers | ||
! | |- | ||
|- | | | ||
| {{ | {| class="expandable" align="center" style="background: #{{ghost color light}}; {{roundy}}; border: 5px solid #{{ghost color}};" | ||
| | |- align="center" | ||
|- | ! 3F | ||
| {{ | |- | ||
| 5% | | | ||
{{trainerheader|building}} | |||
{{trainerentry|Spr Y Channeler.png|Channeler||690|1|092|Gastly||23|}} | |||
{{trainerdiv|building}} | |||
{{trainerentry|Spr Y Channeler.png|Channeler||660|1|092|Gastly||22|}} | |||
{{trainerdiv|building}} | |||
{{trainerentry|Spr Y Channeler.png|Channeler||720|1|092|Gastly||24|}} | |||
{{trainerfooter|building|I}} | |||
|} | |||
{| class="expandable" align="center" style="background: #{{ghost color light}}; {{roundy|10px}}; border: 5px solid #{{ghost color}};" | |||
|- align="center" | |||
! 4F | |||
|- | |||
| | |||
{{trainerheader|building}} | |||
{{trainerentry|Spr Y Channeler.png|Channeler||690|2|092|Gastly||23||092|Gastly||23|}} | |||
{{trainerdiv|building}} | |||
{{trainerentry|Spr Y Channeler.png|Channeler||660|1|092|Gastly||22|}} | |||
{{trainerdiv|building}} | |||
{{trainerentry|Spr Y Channeler.png|Channeler||720|1|092|Gastly||24|}} | |||
{{trainerfooter|building|I}} | |||
|} | |||
{| class="expandable" align="center" style="background: #{{ghost color light}}; {{roundy|10px}}; border: 5px solid #{{ghost color}};" | |||
|- align="center" | |||
! 5F | |||
|- | |||
| | |||
{{trainerheader|building}} | |||
{{trainerentry|Spr Y Channeler.png|Channeler||660|1|092|Gastly||22|}} | |||
{{trainerdiv|building}} | |||
{{trainerentry|Spr Y Channeler.png|Channeler||690|1|093|Haunter||23|}} | |||
{{trainerdiv|building}} | |||
{{trainerentry|Spr Y Channeler.png|Channeler||720|1|092|Gastly||24|}} | |||
{{trainerdiv|building}} | |||
{{trainerentry|Spr Y Channeler.png|Channeler||660|1|093|Haunter||22|}} | |||
{{trainerfooter|building|I}} | |||
|} | |||
{| class="expandable" align="center" style="background: #{{ghost color light}}; {{roundy|10px}}; border: 5px solid #{{ghost color}};" | |||
|- align="center" | |||
! 6F | |||
|- | |||
| | |||
{{trainerheader|building}} | |||
{{trainerentry|Spr Y Channeler.png|Channeler||660|3|092|Gastly||22||092|Gastly||22||092|Gastly||22|}} | |||
{{trainerdiv|building}} | |||
{{trainerentry|Spr Y Channeler.png|Channeler||720|1|092|Gastly||24|}} | |||
{{trainerdiv|building}} | |||
{{trainerentry|Spr Y Channeler.png|Channeler||720|1|092|Gastly||24|}} | |||
{{trainerfooter|building|I}} | |||
|} | |||
|} | |||
{| class="expandable" align="center" style="background: #{{ghost color light}}; {{roundy}}; border: 5px solid #{{ghost color}};" | |||
|- align="center" | |||
! Available Pokémon | |||
|- | |||
| | |||
{{catch/header|building|no}} | |||
{{Catch/div|building|3F-4F}} | |||
{{catch/entry1|092|Gastly|no|no|yes|3F-4F|18-25|95%|type1=Ghost|type2=Poison}} | |||
{{catch/entry1|093|Haunter|no|no|yes|3F-4F|20, 25|5%|type1=Ghost|type2=Poison}} | |||
{{Catch/div|building|5-6F}} | |||
{{catch/entry1|092|Gastly|no|no|yes|5F-6F|21-27|90%|type1=Ghost|type2=Poison}} | |||
{{catch/entry1|093|Haunter|no|no|yes|5F-6F|22, 27|5%|type1=Ghost|type2=Poison}} | |||
{{catch/entry1|104|Cubone|no|no|yes|5F-6F|20|5%|type1=Ground}} | |||
{{Catch/div|building|7F}} | |||
{{catch/entry1|092|Gastly|no|no|yes|7F|23-29|90%|type1=Ghost|type2=Poison}} | |||
{{catch/entry1|093|Haunter|no|no|yes|7F|24, 29|5%|type1=Ghost|type2=Poison}} | |||
{{catch/entry1|104|Cubone|no|no|yes|7F|24|5%|type1=Ground}} | |||
{{catch/div|building|Special}} | |||
{{catch/entry1|105|Ghost Marowak|no|no|yes|Special|30|{{tt|Only one|Cannot be caught}}|type1=ground}} | |||
{{catch/footer|building}} | |||
|} | |||
{| class="expandable" align="center" style="background: #{{ghost color light}}; {{roundy}}; border: 5px solid #{{ghost color}};" | |||
|- align="center" | |||
! Items | |||
|- | |||
| | |||
{{itlisth|building}} | |||
{{itemlist|Escape Rope|3F, near the north wall|Y=yes}} | |||
{{itemlist|Elixir|4F, near the stairs to 3F|Y=yes|display={{DL|Ether|Elixir|Elixer}}}} | |||
{{itemlist|Awakening|4F, in the center of the floor|Y=yes|display={{DL|Status ailment healing item|Awakening}}}} | |||
{{itemlist|HP Up|4F, by the south wall|Y=yes|display={{DL|Vitamin|HP Up}}}} | |||
{{itemlist|Nugget|5F, in the southwest area|Y=yes|display={{DL|Valuable item|Nugget}}}} | |||
{{itemlist|X Accuracy|6F, in the southeast area|Y=yes|display={{DL|Battle item|X Accuracy}}}} | |||
{{itemlist|Rare Candy|6F, in the western area|Y=yes|display={{DL|Vitamin|Rare Candy}}}} | |||
{{itlistfoot|building}} | |||
|} | |} | ||
The {{ | The {{t|Ghost}}s here are totally immune to {{t|Normal}}- and {{type|Fighting}} attacks. Anything with a strong {{type|Psychic}} attack, like {{p|Kadabra}} or {{p|Drowzee}}, are good to bring along. To avoid the random encounters, just spray on the {{DL|Repel|Max Repel}}—after catching a {{p|Gastly}}, of course. | ||
==== 2F ==== | {{-}} | ||
====2F==== | |||
You won't get very far up the tower before being challenged by {{ga|Blue|your rival}} again. | |||
{| align="center" | |||
! If {{p|Eevee}} → {{p|Jolteon}}: | |||
If {{p|Eevee}} | ! If {{p|Eevee}} → {{p|Flareon}}: | ||
! If {{p|Eevee}} → {{p|Vaporeon}}: | |||
{{Party | |- | ||
|{{Party/Single | |||
|color={{yellow color}} | |color={{yellow color}} | ||
|headcolor={{blue color light}} | |headcolor={{blue color light}} | ||
|bordercolor={{yellow color dark}} | |bordercolor={{yellow color dark}} | ||
|sprite=Y | |sprite=Spr Y Blue 2.png | ||
|prize={{ | |prize={{pdollar}}1625 | ||
|class= | |class=Rival|name=Blue | ||
|name= | |game=Y|location=Pokémon Tower | ||
|game= | |||
|location= | |||
|pokemon=5 | |pokemon=5 | ||
| | }} | ||
|{{Pokémon/1 | |||
|game=Yellow | |game=Yellow | ||
|ndex=022 | |ndex=022|pokemon=Fearow | ||
|pokemon=Fearow | |type1=Normal|type2=Flying | ||
|level=25 | |level=25 | ||
|move1=Mirror Move|move1type=Flying | |||
|move2=Growl|move2type=Normal | |||
|move1=Mirror Move | |move3=Leer|move3type=Normal | ||
|move1type=Flying | |move4=Fury Attack|move4type=Normal}} | ||
|move2=Growl | |{{Pokémon/1|game=Yellow | ||
|move2type=Normal | |ndex=027|pokemon=Sandshrew | ||
|type1=Ground | |||
|move3=Leer | |||
|move3type=Normal | |||
|move4=Fury Attack | |||
|move4type=Normal | |||
| | |||
|game=Yellow | |||
|ndex=027 | |||
|pokemon=Sandshrew | |||
|level=20 | |level=20 | ||
|move1=Scratch|move1type=Normal | |||
|move1=Scratch | |move2=Sand-Attack|move2type=Normal | ||
|move1type=Normal | |move3=Slash|move3type=Normal | ||
|move2=Sand-Attack | |||
|move2type=Normal | |||
|move3=Slash | |||
|move3type=Normal | |||
|move3cat=Physical}} | |move3cat=Physical}} | ||
| | |||
|{{Pokémon/1|game=Yellow | |||
|game=Yellow | |ndex=090|pokemon=Shellder | ||
|ndex=090 | |type1=Water | ||
|pokemon=Shellder | |||
|level=23 | |level=23 | ||
|move1=Tackle|move1type=Normal | |||
|move1=Tackle | |move2=Withdraw|move2type=Water | ||
|move1type=Normal | |move3=Supersonic|move3type=Normal | ||
|move4=Clamp|move4type=Water}} | |||
|move2=Withdraw | {{Party/Div|color={{yellow color}}}} | ||
|move2type=Water | | style="margin:auto" |{{Pokémon/1|game=Yellow | ||
|ndex=037|pokemon=Vulpix | |||
|move3=Supersonic | |type1=Fire | ||
|move3type=Normal | |||
|move4=Clamp | |||
|move4type=Water | |||
| | |||
|| | |||
|game=Yellow | |||
|ndex=037 | |||
|pokemon=Vulpix | |||
| | |||
|level=22 | |level=22 | ||
|move1=Ember|move1type=Fire | |||
|move2=Tail Whip|move2type=Normal | |||
|move1=Ember | |move3=Quick Attack|move3type=Normal | ||
|move1type=Fire | |move4=Roar|move4type=Normal}} | ||
|move2=Tail Whip | | style="margin:auto" |{{Pokémon/1|game=Yellow | ||
|move2type=Normal | |ndex=133|pokemon=Eevee | ||
|type1=Normal | |||
|move3=Quick Attack | |||
|move3type=Normal | |||
|move4=Roar | |||
|move4type=Normal | |||
| | |||
|game=Yellow | |||
|ndex=133 | |||
|pokemon=Eevee | |||
|level=25 | |level=25 | ||
|move1=Quick Attack|move1type=Normal | |||
|move1=Quick Attack | |move2=Tail Whip|move2type=Normal | ||
|move1type=Normal | |move3=Sand-Attack|move3type=Normal | ||
|move4=Growl|move4type=Normal}} | |||
|move2=Tail Whip | {{Party/Footer}} | ||
|move2type=Normal | |||
|move3=Sand-Attack | |||
|move3type=Normal | |||
|move4=Growl | |||
|move4type=Normal | |||
}} | |||
{{Party | |{{Party/Single | ||
|color={{yellow color}} | |color={{yellow color}} | ||
|headcolor={{blue color light}} | |headcolor={{blue color light}} | ||
|bordercolor={{yellow color dark}} | |bordercolor={{yellow color dark}} | ||
|sprite=Y | |sprite=Spr Y Blue 2.png | ||
|prize={{ | |prize={{pdollar}}1625 | ||
|class= | |class=Rival|name=Blue | ||
|name= | |game=Y|location=Pokémon Tower | ||
|game= | |||
|location= | |||
|pokemon=5 | |pokemon=5 | ||
| | }} | ||
|{{Pokémon/1|game=Yellow | |||
|game=Yellow | |ndex=022|pokemon=Fearow | ||
|ndex=022 | |type1=Normal|type2=Flying | ||
|pokemon=Fearow | |||
|level=25 | |level=25 | ||
|move1=Mirror Move|move1type=Flying | |||
|move2=Growl|move2type=Normal | |||
|move1=Mirror Move | |move3=Leer|move3type=Normal | ||
|move1type=Flying | |move4=Fury Attack|move4type=Normal}} | ||
|move2=Growl | |{{Pokémon/1|game=Yellow | ||
|move2type=Normal | |ndex=027|pokemon=Sandshrew | ||
|type1=Ground | |||
|move3=Leer | |||
|move3type=Normal | |||
|move4=Fury Attack | |||
|move4type=Normal | |||
| | |||
|game=Yellow | |||
|ndex=027 | |||
|pokemon=Sandshrew | |||
|level=20 | |level=20 | ||
|move1=Scratch|move1type=Normal | |||
|move1=Scratch | |move2=Sand-Attack|move2type=Normal | ||
|move1type=Normal | |move3=Slash|move3type=Normal}} | ||
|move2=Sand-Attack | |{{Pokémon/1|game=Yellow | ||
|move2type=Normal | |ndex=081|pokemon=Magnemite | ||
|type1=Electric | |||
|move3=Slash | |||
|move3type=Normal | |||
| | |||
|game=Yellow | |||
|ndex=081 | |||
|pokemon=Magnemite | |||
|level=23 | |level=23 | ||
|move1=Tackle|move1type=Normal | |||
|move1=Tackle | |move2=SonicBoom|move2type=Normal}} | ||
|move1type=Normal | {{Party/Div|color={{yellow color}}}} | ||
| style="margin:auto" |{{Pokémon/1|game=Yellow | |||
|move2=SonicBoom | |ndex=090|pokemon=Shellder | ||
|move2type=Normal | |type1=Water | ||
| | |||
| | |||
|game=Yellow | |||
|ndex=090 | |||
|pokemon=Shellder | |||
|level=22 | |level=22 | ||
|move1=Tackle|move1type=Normal | |||
|move1=Tackle | |move2=Withdraw|move2type=Water | ||
|move1type=Normal | |move3=Supersonic|move3type=Normal | ||
|move4=Clamp|move4type=Water}} | |||
|move2=Withdraw | |||
|move2type=Water | | style="margin:auto" |{{Pokémon/1|game=Yellow | ||
|ndex=133|pokemon=Eevee | |||
|move3=Supersonic | |type1=Normal | ||
|move3type=Normal | |||
|move4=Clamp | |||
|move4type=Water | |||
| | |||
|game=Yellow | |||
|ndex=133 | |||
|pokemon=Eevee | |||
|level=25 | |level=25 | ||
|move1=Quick Attack|move1type=Normal | |||
|move1=Quick Attack | |move2=Tail Whip|move2type=Normal | ||
|move1type=Normal | |move3=Sand-Attack|move3type=Normal | ||
|move4=Growl|move4type=Normal}} | |||
|move2=Tail Whip | {{Party/Footer}} | ||
|move2type=Normal | |||
|move3=Sand-Attack | |||
|move3type=Normal | |||
|move4=Growl | |||
|move4type=Normal | |||
}} | |||
{{Party | |{{Party/Single | ||
|color={{yellow color}} | |color={{yellow color}} | ||
|headcolor={{blue color light}} | |headcolor={{blue color light}} | ||
|bordercolor={{yellow color dark}} | |bordercolor={{yellow color dark}} | ||
|sprite=Y | |sprite=Spr Y Blue 2.png | ||
|prize={{ | |prize={{pdollar}}1625 | ||
|class= | |class=Rival|name=Blue | ||
|name= | |game=Y|location=Pokémon Tower | ||
|game= | |||
|location= | |||
|pokemon=5 | |pokemon=5 | ||
| | }} | ||
|{{Pokémon/1|game=Yellow | |||
|game=Yellow | |ndex=022|pokemon=Fearow | ||
|ndex=022 | |type1=Normal|type2=Flying | ||
|pokemon=Fearow | |||
|level=25 | |level=25 | ||
|move1=Mirror Move|move1type=Flying | |||
|move2=Growl|move2type=Normal | |||
|move1=Mirror Move | |move3=Leer|move3type=Normal | ||
|move1type=Flying | |move4=Fury Attack|move4type=Normal}} | ||
|move2=Growl | |{{Pokémon/1|game=Yellow | ||
|move2type=Normal | |ndex=027|pokemon=Sandshrew | ||
|type1=Ground | |||
|move3=Leer | |||
|move3type=Normal | |||
|move4=Fury Attack | |||
|move4type=Normal | |||
| | |||
|game=Yellow | |||
|ndex=027 | |||
|pokemon=Sandshrew | |||
|level=20 | |level=20 | ||
|move1=Scratch|move1type=Normal | |||
|move1=Scratch | |move2=Sand-Attack|move2type=Normal | ||
|move1type=Normal | |move3=Slash|move3type=Normal}} | ||
|move2=Sand-Attack | |{{Pokémon/1|game=Yellow | ||
|move2type=Normal | |ndex=037|pokemon=Vulpix | ||
|type1=Fire | |||
|move3=Slash | |||
|move3type=Normal | |||
| | |||
|game=Yellow | |||
|ndex=037 | |||
|pokemon=Vulpix | |||
| | |||
|level=23 | |level=23 | ||
|move1=Ember|move1type=Fire | |||
|move2=Tail Whip|move2type=Normal | |||
|move1=Ember | |move3=Quick Attack|move3type=Normal | ||
|move1type=Fire | |move4=Roar|move4type=Normal}} | ||
{{Party/Div|color={{yellow color}}}} | |||
|move2=Tail Whip | | style="margin:auto" |{{Pokémon/1|game=Yellow | ||
|move2type=Normal | |ndex=081|pokemon=Magnemite | ||
|move3=Quick Attack | |||
|move3type=Normal | |||
|move4=Roar | |||
|move4type=Normal | |||
| | |||
| | |||
|game=Yellow | |||
|ndex=081 | |||
|pokemon=Magnemite | |||
|type1=Electric | |type1=Electric | ||
|move1=Tackle | |level=23 | ||
|move1type=Normal | |move1=Tackle|move1type=Normal | ||
|move2=SonicBoom|move2type=Normal}} | |||
|move2=SonicBoom | |||
|move2type=Normal | | style="margin:auto" |{{Pokémon/1|game=Yellow | ||
|ndex=133|pokemon=Eevee | |||
| | |type1=Normal | ||
|game=Yellow | |||
|ndex=133 | |||
|pokemon=Eevee | |||
|level=25 | |level=25 | ||
|move1=Quick Attack|move1type=Normal | |||
|move1=Quick Attack | |move2=Tail Whip|move2type=Normal | ||
|move1type=Normal | |move3=Sand-Attack|move3type=Normal | ||
|move4=Growl|move4type=Normal}} | |||
|move2=Tail Whip | {{Party/Footer}} | ||
|move2type=Normal | |||
|move3=Sand-Attack | |||
|move3type=Normal | |||
|move4=Growl | |||
|move4type=Normal | |||
|} | |} | ||
{{-}} | |||
[[File:Pokémon Tower 3F RBY.png|thumb|left|Pokémon Tower, 3F]] | |||
====3F==== | |||
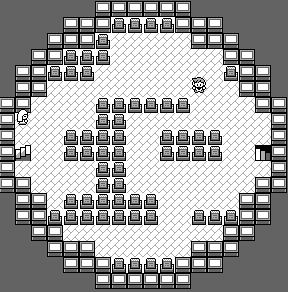
Grab the [[Escape Rope]] by the north wall and climb the stairs to 4F. | |||
==== 4F ==== | [[File:Pokémon Tower 4F RBY.png|thumb|right|Pokémon Tower, 4F]] | ||
====4F==== | |||
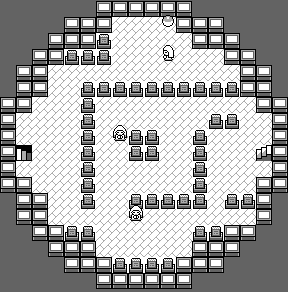
Pick up the {{DL|Ether|Elixir|Elixer}} and {{DL|Status ailment healing item|Awakening}} in the center of the room, and the {{DL|Vitamin|HP Up}} near the south wall. Climb the western stairs. | |||
====5F==== | |||
[[File:Pokémon Tower 5F RBY.png|thumb|left|Pokémon Tower, 5F]] | |||
| | |||
| | |||
| | |||
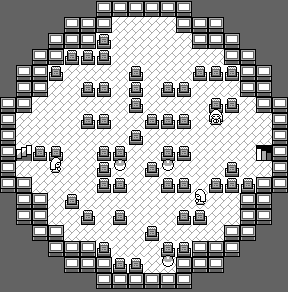
{ | There is a {{tc|Channeler}} in the center of the fifth floor that hasn't been possessed, and she maintains a healing area with her white magic. This protected zone will fully heal every Pokémon in your team, restoring health and eliminating any status problems. This can be done at any time. | ||
| Channeler | |||
====6F==== | |||
[[File:Pokémon Tower 6F RBY.png|thumb|right|Pokémon Tower, 6F]] | |||
As you approach the stairs to the top floor, the [[Ghost (literal)|ghost]] attacks and the {{key|I|Silph Scope}} activates, revealing a level 30 {{p|Marowak}}. It may look like a great addition to your team, but this spirit can't be caught, so all you can do is defeat it. Once the battle is over, the mother Marowak's spirit is calmed and departs to the afterlife, finally able to rest in peace. Take the stairs to the top floor... right into a group of Rockets. | |||
==== | ====7F==== | ||
[[File:Pokémon Tower 7F RBY.png|thumb|left|Pokémon Tower, 7F]] | |||
| | |||
| | |||
| | |||
Once again, the [[Jessie|same two]] [[James|Rocket grunts]] jump you. | Once again, the [[Jessie|same two]] [[James|Rocket grunts]] jump you. | ||
{{Party|color=666666|bordercolor=CC0000|headcolor= | {| align="center" | ||
|sprite= | | | ||
|prize={{ | {{Party/Single | ||
|color=666666 | |||
|name | |bordercolor=CC0000 | ||
|headcolor=CCCCCC | |||
|location= | |sprite=Spr Y Jessie James.png | ||
|prize={{pdollar}}810 | |||
|name={{color2|000|Team Rocket trio|Rocket}} | |||
|game=Y|location=Pokémon Tower | |||
|pokemon=3 | |pokemon=3 | ||
| | }} | ||
| | |{{Pokémon/1|game=Yellow | ||
|ndex=024|pokemon=Arbok | |||
|type1=Poison | |||
|level=27 | |||
|move1=Bite|move1type=Normal | |move1=Bite|move1type=Normal | ||
|move2=Leer|move2type=Normal | |move2=Leer|move2type=Normal | ||
|move3=Poison Sting|move3type=Poison | |move3=Poison Sting|move3type=Poison | ||
|move4=Glare|move4type=Normal}} | |move4=Glare|move4type=Normal}} | ||
| | |||
| | |{{Pokémon/1|game=Yellow | ||
|move1= | |ndex=052|pokemon=Meowth | ||
|move2= | |type1=Normal | ||
|move3= | |level=27 | ||
|move4= | |move1=Bite|move1type=Normal | ||
| | |move2=Growl|move2type=Normal | ||
| | |move3=Screech|move3type=Normal | ||
|move4=Pay Day|move4type=Normal}} | |||
|{{Pokémon/1|game=Yellow | |||
|ndex=110|pokemon=Weezing | |||
|type1=Poison | |||
|level=27 | |||
|move1=Tackle|move1type=Normal | |move1=Tackle|move1type=Normal | ||
|move2=Smog|move2type=Poison}} | |move2=Smog|move2type=Poison | ||
}} | |move3=Sludge|move3type=Poison}} | ||
{{Party/Footer}} | |||
|} | |||
After they run off, talk to [[Mr. Fuji]] and he'll take you to Pokémon House, | After they run off, talk to [[Mr. Fuji]] and he'll take you to his home, Pokémon House, at the foot of the tower. | ||
== Mr. Fuji's house == | ===Mr. Fuji's house=== | ||
Speak with him again and he'll give you the {{key|I|Poké Flute}}, an item that instantly awakens any sleeping Pokémon. This lets you rouse the two {{p|Snorlax}}, west of Celadon and south of Lavender. | |||
Head out west to return to [[Saffron City]]. | |||
{{WalkthroughPrevNext | |||
|game=Yellow | |||
|gamename=Yellow | |||
|prev=yes | |||
|prevsection=7 | |||
|prevname=Rock Tunnel, Route 10, Lavender Town, Route 8, Route 7 | |||
|next=yes | |||
|nextsection=9 | |||
|nextname=Saffron City, Silph Co., Saffron Gym}} | |||
<br> | <br> | ||
{{Project Walkthroughs notice}} | {{Project Walkthroughs notice}} | ||
[[Category:Yellow walkthrough]] | [[Category:Yellow walkthrough]] | ||
Revision as of 07:57, 8 March 2016
Celadon City
Celadon City is the second-largest city in the region, and it's got plenty going on to live up to the hype. The Celadon Department Store is an essential stop, since almost anything a Trainer could want is up for sale here. The Celadon Mansion is a hotel-of-sorts, and the current tenants are none other than Game Freak, the team that developed Pokémon. The Game Corner houses the slot machines, and those coins can be redeemed for valuable prizes in the Prize Corner next door. In addition, Celadon is also home to the Celadon Gym, nestled on a hill in the southwest.
| Items | ||||||||||||||||||||||||||||||||||||||
|---|---|---|---|---|---|---|---|---|---|---|---|---|---|---|---|---|---|---|---|---|---|---|---|---|---|---|---|---|---|---|---|---|---|---|---|---|---|---|
|
Celadon Mansion
The tall building in the north of town is Celadon Mansion. On the third floor, Game Freak's game designer promises a reward for showing him your completed Pokédex. Incidentally, you can find a new addition right now; leave the mansion and follow the path behind the Pokémon Center to find a break in the trees where you can enter the mansion through the back door. Make sure that you've got an empty slot in your party, and take the stairs to the top floor to find an Eevee. Eevee is an extremely versatile creature, since it can evolve into one of three different forms. Exposure to a Water Stone, Thunderstone, or Fire Stone results in a Vaporeon, Jolteon, or a Flareon, respectively. Any of those three evolutions will make a powerful addition to your team, especially since they can cover the weaknesses of your starter's final form. These stones can be purchased only in the Department Store.
Return of the Rockets
If you haven't noticed by now, there are two Rocket grunts loitering around the city. It looks like Team Rocket has something planned for Celadon...
Stop by the café in the south of town and talk to the guy in the back corner. He lost all his money at the slots, so he has no more use for his Coin Case, and hands it over. Next door to the café is an operation that is shipping 2,000 Pokémon every month to the Game Corner as slot prizes. Those kind of numbers mean big money, and that's got Team Rocket's name written all over it. They're up to something, and as one of the workers points out, it surely has nothing to do with a hidden switch behind a poster in the Game Corner.
Celadon Department Store
2nd floor
|
| ||||||||||||||||||||||||||||||||||||||||||||||||||||||||||||||||||||||||||||||
3rd floor
There's nothing for sale on the third floor, but you can talk to the clerk to get TM18 (Counter).
4th floor
If you're looking for the evolution stones, you've come to the right place! Buy your favorite stone, except a Leaf Stone, for your new Eevee. Be sure to pick up a Poké Doll too, as it will be important a little later.
| |||||||||||||||||||||||
5th floor
|
| ||||||||||||||||||||||||||||||||||||||||||||||||||||||
Rooftop Square
Each Vending Machine dispenses Fresh Water, Soda Pop, and Lemonade. Buy one of each drink to give to the little girl nearby, and she'll give you up to three TMs as thanks - TM13 (Ice Beam) for a Fresh Water, TM48 (Rock Slide) for a Soda Pop, and TM49 (Tri Attack) for a Lemonade. Pick up an extra drink for the guards at Saffron City's borders, and stock up on Lemonade. Like the other drinks, Lemonade can restore your Pokémon's health, but Lemonade is the most potent. It restores 80 HP, while by comparison, a Super Potion only restores 50 HP.
| |||||||||||||||
Game Corner
At first glance, everything looks normal here. People are relaxed, having fun at the slot machines, but there's something unsettling about the guy glaring at the poster... As soon as you approach him, he picks a fight with you.
| |||||||||||||||||||||||
All the prizes here are offered at extremely high prices, so you'll need a huge supply of coins to get everything. A few can be found dropped on the ground, and talking to the other gamblers gets you some more. Besides that, you can either buy them—50 coins for $1000—or take your chances with the slots. Some prizes are extremely rare, while others are one-of-a-kind. You'll definitely be back here, so now let's head to the Gym. To get there, head back to the café in the south of town, and cut down the tree blocking the way.
|
|
| |||||||||||||||||||||||||||||||||||||||||||||
Celadon Gym
CELADON CITY
POKéMON GYM
LEADER: ERIKA
The Nature-Loving
Princess!
Erika's Gym is one of the easiest to defeat, since Grass Pokémon have so many weaknesses. Fire and Flying Pokémon have the best advantage. While your own Grass Pokémon take less-than-normal damage from Grass attacks, they need to be careful of Poison moves like Acid. If you haven't used TM13 yet, Ice Beam can be a great help.
| ||||||||||||||||||||||||||||||||||||||||||||||||||||||||||||||||||||||||||||||||||||||||||||||||||||||||||||||||||||||||||||||||||||||||||||||||||||||||||||||||||||||||||||||||||||||||||||||||||||||||||||||||||||||||||||||||||||||||||||||||||||
Defeating the Celadon Gym earns you the Rainbow Badge, which commands attention from all Pokémon up to level 50, and enables the use of Strength outside of battle. Erika also gives you TM21 (Mega Drain), a Grass-type attack that steals energy from the opponent.
With the Gym defeated, it's time to infiltrate Team Rocket's Celadon operation. Examine the poster in the Game Corner, which reveals a set of stairs nearby, to descend into their hideout.
Rocket Hideout
Team Rocket is headed by a shadowy figure known as Giovanni. This mob boss is in possession of the Silph Scope prototype, which can identify the ghosts back in Pokémon Tower. It is impossible to get past the spirits without that item, so make sure he doesn't escape with it!
| Trainers | ||||||||||||||||||||||||||||||||||||||||||||||||||||||||||||||||||||||||||||||||||||||||||||||||||||||||||||||||||||||||||||||||||||||||||||||||||||||||||||||||||||||||||||||||||||||||||||||||||||||||||||||||||||||||||||||||||||||||||||||||||||||||||||||||||||||||||||||||||||||||||||||||||||||||||||
|---|---|---|---|---|---|---|---|---|---|---|---|---|---|---|---|---|---|---|---|---|---|---|---|---|---|---|---|---|---|---|---|---|---|---|---|---|---|---|---|---|---|---|---|---|---|---|---|---|---|---|---|---|---|---|---|---|---|---|---|---|---|---|---|---|---|---|---|---|---|---|---|---|---|---|---|---|---|---|---|---|---|---|---|---|---|---|---|---|---|---|---|---|---|---|---|---|---|---|---|---|---|---|---|---|---|---|---|---|---|---|---|---|---|---|---|---|---|---|---|---|---|---|---|---|---|---|---|---|---|---|---|---|---|---|---|---|---|---|---|---|---|---|---|---|---|---|---|---|---|---|---|---|---|---|---|---|---|---|---|---|---|---|---|---|---|---|---|---|---|---|---|---|---|---|---|---|---|---|---|---|---|---|---|---|---|---|---|---|---|---|---|---|---|---|---|---|---|---|---|---|---|---|---|---|---|---|---|---|---|---|---|---|---|---|---|---|---|---|---|---|---|---|---|---|---|---|---|---|---|---|---|---|---|---|---|---|---|---|---|---|---|---|---|---|---|---|---|---|---|---|---|---|---|---|---|---|---|---|---|---|---|---|---|---|---|---|---|---|---|---|---|---|---|---|---|---|---|---|---|---|---|---|---|---|---|---|---|---|---|---|---|---|---|---|---|---|---|---|---|---|
| ||||||||||||||||||||||||||||||||||||||||||||||||||||||||||||||||||||||||||||||||||||||||||||||||||||||||||||||||||||||||||||||||||||||||||||||||||||||||||||||||||||||||||||||||||||||||||||||||||||||||||||||||||||||||||||||||||||||||||||||||||||||||||||||||||||||||||||||||||||||||||||||||||||||||||||
| Items | |||||||||||||||||||||||||||||||||||||||||||||||||||||||||||||||||||||||||||||||||||||||||||||||||||||||||||||||||||||||||||||||||||||||
|---|---|---|---|---|---|---|---|---|---|---|---|---|---|---|---|---|---|---|---|---|---|---|---|---|---|---|---|---|---|---|---|---|---|---|---|---|---|---|---|---|---|---|---|---|---|---|---|---|---|---|---|---|---|---|---|---|---|---|---|---|---|---|---|---|---|---|---|---|---|---|---|---|---|---|---|---|---|---|---|---|---|---|---|---|---|---|---|---|---|---|---|---|---|---|---|---|---|---|---|---|---|---|---|---|---|---|---|---|---|---|---|---|---|---|---|---|---|---|---|---|---|---|---|---|---|---|---|---|---|---|---|---|---|---|---|
| |||||||||||||||||||||||||||||||||||||||||||||||||||||||||||||||||||||||||||||||||||||||||||||||||||||||||||||||||||||||||||||||||||||||
B1F (north)
The key to confronting Giovanni in his office is exactly that—a key. The Lift Key that operates the elevator is on the fourth floor beneath the Game Corner.
B2F
After collecting the items on the second floor, you can climb the southern stairs back up to the first floor, where you'll find a Hyper Potion and two more Rockets to battle.
B1F (south)
Backtrack to the stairs, spin through the maze again, and take the northern stairs down to the 3rd basement floor.
B3F
Beat the two Rockets here, wind through the maze, and take the stairs in the center of the room down to the fourth floor.
B4F
Walk south to find an HP Up sitting on a table, then go north to find another Rocket. Grab the TM02 (Razor Wind) from the other side of the table, and take out the Rocket. Talk to him after the battle, and he'll drop the Lift Key. Swipe it and get back to B2F, spin through the maze again, and enter the elevator in the southeast. Take a second to use any Potions you might have, and step out of the elevator. Right away, you are ambushed by the same pair of Rockets from Mt. Moon.
| |||||||||||||||||||||||||||||||||||||||||||||||||||||||||||||||||||||||||||||||||
After the battle, grab the Iron from the table in the southwest and step inside to confront Giovanni.
| ||||||||||||||||||||||||||||||||||||||||||||||||||||||||||||||||||||||||||||||||||||||||
After the battle, retrieve the Silph Scope that he dropped. With this, you can finally battle the ghosts in Pokémon Tower. Take the elevator to the 1st floor, and beat one last Rocket on the way out.
Make sure you've got an extra drink, and head back east to Route 7. Step into the gate and the guard will stop you. You'll automatically give him the drink, and since he'll share it with the other three guards, you can now come and go through Saffron City whenever you want. You may want to stop in the Saffron Poké Mart and grab a few Max Repels on your way back east.
Lavender Town
Pokémon Tower
| Trainers | |||||||||||||||||||||||||||||||||||||||||||||||||||||||||||||||||||||||||||||||||||||||||||||||||||||||||||||||||||||||||||||||||||||||||||||||||||||||||||||||||||||||||||||||||||||||||||||||||||||||||||||||||||||||||||||||||||||
|---|---|---|---|---|---|---|---|---|---|---|---|---|---|---|---|---|---|---|---|---|---|---|---|---|---|---|---|---|---|---|---|---|---|---|---|---|---|---|---|---|---|---|---|---|---|---|---|---|---|---|---|---|---|---|---|---|---|---|---|---|---|---|---|---|---|---|---|---|---|---|---|---|---|---|---|---|---|---|---|---|---|---|---|---|---|---|---|---|---|---|---|---|---|---|---|---|---|---|---|---|---|---|---|---|---|---|---|---|---|---|---|---|---|---|---|---|---|---|---|---|---|---|---|---|---|---|---|---|---|---|---|---|---|---|---|---|---|---|---|---|---|---|---|---|---|---|---|---|---|---|---|---|---|---|---|---|---|---|---|---|---|---|---|---|---|---|---|---|---|---|---|---|---|---|---|---|---|---|---|---|---|---|---|---|---|---|---|---|---|---|---|---|---|---|---|---|---|---|---|---|---|---|---|---|---|---|---|---|---|---|---|---|---|---|---|---|---|---|---|---|---|---|---|---|---|---|---|---|---|
| |||||||||||||||||||||||||||||||||||||||||||||||||||||||||||||||||||||||||||||||||||||||||||||||||||||||||||||||||||||||||||||||||||||||||||||||||||||||||||||||||||||||||||||||||||||||||||||||||||||||||||||||||||||||||||||||||||||
| Available Pokémon | ||||||||||||||||||||||||||||||||||||||||||||||||||||||||||||||||||||||||||||||||||||||||||||||||||||||||||||||||||||||||||||||||||||||||||||||||||||||||||||||||||||||||||||||||||||||||||||||||||||||||||||||||||||||||||||||||||||||
|---|---|---|---|---|---|---|---|---|---|---|---|---|---|---|---|---|---|---|---|---|---|---|---|---|---|---|---|---|---|---|---|---|---|---|---|---|---|---|---|---|---|---|---|---|---|---|---|---|---|---|---|---|---|---|---|---|---|---|---|---|---|---|---|---|---|---|---|---|---|---|---|---|---|---|---|---|---|---|---|---|---|---|---|---|---|---|---|---|---|---|---|---|---|---|---|---|---|---|---|---|---|---|---|---|---|---|---|---|---|---|---|---|---|---|---|---|---|---|---|---|---|---|---|---|---|---|---|---|---|---|---|---|---|---|---|---|---|---|---|---|---|---|---|---|---|---|---|---|---|---|---|---|---|---|---|---|---|---|---|---|---|---|---|---|---|---|---|---|---|---|---|---|---|---|---|---|---|---|---|---|---|---|---|---|---|---|---|---|---|---|---|---|---|---|---|---|---|---|---|---|---|---|---|---|---|---|---|---|---|---|---|---|---|---|---|---|---|---|---|---|---|---|---|---|---|---|---|---|---|---|
| ||||||||||||||||||||||||||||||||||||||||||||||||||||||||||||||||||||||||||||||||||||||||||||||||||||||||||||||||||||||||||||||||||||||||||||||||||||||||||||||||||||||||||||||||||||||||||||||||||||||||||||||||||||||||||||||||||||||
| Items | ||||||||||||||||||||||||||||||||||||
|---|---|---|---|---|---|---|---|---|---|---|---|---|---|---|---|---|---|---|---|---|---|---|---|---|---|---|---|---|---|---|---|---|---|---|---|---|
| ||||||||||||||||||||||||||||||||||||
The Ghosts here are totally immune to Normal- and Fighting-type attacks. Anything with a strong Psychic-type attack, like Kadabra or Drowzee, are good to bring along. To avoid the random encounters, just spray on the Max Repel—after catching a Gastly, of course.
2F
You won't get very far up the tower before being challenged by your rival again.
3F
Grab the Escape Rope by the north wall and climb the stairs to 4F.
4F
Pick up the Elixer and Awakening in the center of the room, and the HP Up near the south wall. Climb the western stairs.
5F
There is a Channeler in the center of the fifth floor that hasn't been possessed, and she maintains a healing area with her white magic. This protected zone will fully heal every Pokémon in your team, restoring health and eliminating any status problems. This can be done at any time.
6F
As you approach the stairs to the top floor, the ghost attacks and the Silph Scope activates, revealing a level 30 Marowak. It may look like a great addition to your team, but this spirit can't be caught, so all you can do is defeat it. Once the battle is over, the mother Marowak's spirit is calmed and departs to the afterlife, finally able to rest in peace. Take the stairs to the top floor... right into a group of Rockets.
7F
Once again, the same two Rocket grunts jump you.
| |||||||||||||||||||||||||||||||||||||||||||||||||||||||||||||||||||||||||||||
After they run off, talk to Mr. Fuji and he'll take you to his home, Pokémon House, at the foot of the tower.
Mr. Fuji's house
Speak with him again and he'll give you the Poké Flute, an item that instantly awakens any sleeping Pokémon. This lets you rouse the two Snorlax, west of Celadon and south of Lavender.
Head out west to return to Saffron City.
|
Yellow walkthrough |
|

|
This article is part of Project Walkthroughs, a Bulbapedia project that aims to write comprehensive step-by-step guides on each Pokémon game. |
