Appendix:Yellow walkthrough/Section 3: Difference between revisions
m (→Pewter City) |
|||
| (24 intermediate revisions by 16 users not shown) | |||
| Line 1: | Line 1: | ||
== Pewter City == | {{WalkthroughNotice|Y}} | ||
==Route 2== | |||
===Viridian Forest=== | |||
[[File:Viridian Forest RBY.png|thumb|200px|Viridian Forest]] | |||
[[Viridian Forest]] is a sprawling, wooded area located on {{rt|2|Kanto}}. A natural maze, it is easy to get lost inside. | |||
{| class="expandable" align="center" style="background: #{{locationcolor/med|forest}}; {{roundy}}; border: 5px solid #{{locationcolor/light|forest}};" | |||
|- align="center" | |||
! Trainers | |||
|- | |||
| | |||
{{Trainerheader|forest}} | |||
{{Trainerentry|Spr Y Lass.png|game=1|Lass||90|2|029|Nidoran♀||6||032|Nidoran♂||6|||}} | |||
{{Trainerdiv|forest}} | |||
{{Trainerentry|Spr Y Bug Catcher.png|game=1|Bug Catcher||70|2|010|Caterpie||7||010|Caterpie||7|||}} | |||
{{Trainerdiv|forest}} | |||
{{Trainerentry|Spr Y Bug Catcher.png|game=1|Bug Catcher||60|3|011|Metapod||6||010|Caterpie||6||011|Metapod||6|||}} | |||
{{Trainerdiv|forest}} | |||
{{Trainerentry|Spr Y Bug Catcher.png|game=1|Bug Catcher||80|2|010|Caterpie||8||011|Metapod||8|||}} | |||
{{Trainerdiv|forest}} | |||
{{Trainerentry|Spr Y Bug Catcher.png|game=1|Bug Catcher||100|1|010|Caterpie||10|||}} | |||
{{Trainerfooter|forest|I}} | |||
|} | |||
{| class="expandable" align="center" style="background: #{{locationcolor/med|forest}}; {{roundy}}; border: 5px solid #{{locationcolor/light|forest}};" | |||
|- align="center" | |||
! Available Pokémon | |||
|- | |||
| | |||
{{catch/header|forest|no}} | |||
{{catch/entry1|010|Caterpie|no|no|yes|Grass|3-6|55%|type1=bug}} | |||
{{catch/entry1|016|Pidgey|no|no|yes|Grass|4, 6, 8|24%|type1=normal|type2=flying}} | |||
{{catch/entry1|011|Metapod|no|no|yes|Grass|4, 6|20%|type1=bug}} | |||
{{catch/entry1|017|Pidgeotto|no|no|yes|Grass|9|1%|type1=normal|type2=flying}} | |||
{{catch/footer|forest}} | |||
|} | |||
{| class="expandable" align="center" style="background: #{{locationcolor/med|forest}}; {{roundy}}; border: 5px solid #{{locationcolor/light|forest}};" | |||
|- align="center" | |||
! Items | |||
|- | |||
| | |||
{{Itlisth|forest}} | |||
{{Itemlist|Poké Ball|Dead-end grassy path northwest of the south entrance|R=yes|B=yes|display={{i|Poké Ball}}}} | |||
{{Itemlist|Antidote|West side of the lone tree near the south entrance ''(hidden)''|R=yes|B=yes|display=[[Antidote]]}} | |||
{{Itemlist|Potion| | |||
* Dead-end path southeast of the north exit | |||
* Northeast area of the forest, past a [[Trainer Tips]] sign | |||
* In front of the last Bug Catcher near the north exit ''(hidden)''|R=yes|B=yes|display=[[Potion]] ×3}} | |||
{{Itlistfoot|forest}} | |||
|} | |||
Follow the trail to the northwest to reach a [[Poké Ball]] in the tall grass. Return to the entrance, and this time head eastward. Battle the first {{tc|Bug Catcher}} on the east side of the forest, then continue north to fight the second. Grab the nearby [[Potion]] and turn west to the tall grass. Zigzag westward through the trees to reach a signpost. Explore the dead-end path to the southeast to get another Potion, then continue westward. Defeat one last Bug Catcher to reach the northern edge of the forest. Leave the gate to re-emerge on {{rt|2|Kanto}} and continue north to [[Pewter City]]. | |||
{{-}} | |||
==Pewter City== | |||
[[File:Pewter City RBY.png|thumb|300px|Pewter City]] | [[File:Pewter City RBY.png|thumb|300px|Pewter City]] | ||
[[Pewter City]] is a quiet city nestled in the northern mountains. | [[Pewter City]] is a quiet city nestled in the northern mountains between {{rt|2|Kanto}} and {{rt|3|Kanto}}. The [[Pewter Museum of Science]] and the [[Pewter Gym]] are located here. | ||
{| class="expandable" align="center" style="background: #ABAEB0; {{roundy}}; border: 5px solid #C7C9CA;" | {| class="expandable" align="center" style="background: #ABAEB0; {{roundy}}; border: 5px solid #C7C9CA;" | ||
| Line 10: | Line 65: | ||
| | | | ||
{{itlisth|road}} | {{itlisth|road}} | ||
{{itemlist|TM Normal|From Brock after defeating him|Y=yes|display={{TM|34|Bide}}}} | {{itemlist|TM Normal|From Brock, after defeating him|Y=yes|display={{TM|34|Bide}}}} | ||
{{ | {{catch/div|road|Later visit}} | ||
{{itemlist|Old Amber|Pewter Museum; from a Scientist in the employee-only section (requires {{m|Cut}})|Y=yes}} | |||
{{itlistfoot|road}} | {{itlistfoot|road}} | ||
|} | |} | ||
=== | ===Calling All Challengers=== | ||
The [[ | The local [[Gym Leader]] is looking for challengers, and the kid blocking the city's east exit will escort you to the Gym if you try to leave. Be sure to visit the Poké Mart to stock up on [[Potion]]s before taking up the challenge. | ||
The | ===Pewter Museum of Science=== | ||
The [[Pewter Museum of Science]] is located on the north side of the city. It hosts a wide range of artifacts and exhibits, with a focus on [[fossil]] excavation and space exploration. Admission to the main building is {{pdollar}}50 for a child's ticket. The smaller building next door is closed to the public. | |||
=== Pewter Gym === | ===Pewter Gym=== | ||
[[File:Pewter Gym RBY.png|thumb|Pewter Gym]] | [[File:Pewter Gym RBY.png|thumb|Pewter Gym]] | ||
{{sign|RBY|header}} | {{sign|RBY|header}} | ||
{{sign|RBY|PEWTER CITY | {{sign|RBY|title|PEWTER CITY POKéMON GYM<br>LEADER: BROCK}} | ||
{{sign|RBY|The Rock Solid POKéMON Trainer!}} | |||
{{sign|RBY|footer}} | {{sign|RBY|footer}} | ||
The [[Pewter Gym]] specializes in {{type|Rock}} Pokémon. Rock-type moves are super effective against {{t|Bug}}-, {{t|Fire}}-, {{t|Flying}}-, and {{type|Ice}} Pokémon, while Rock-type Pokémon are weak to {{t|Fighting}}-, {{t|Grass}}-, {{t|Ground}}-, and {{type|Water}} moves. All of the Pokémon in the Pewter Gym are partly Ground type, as well, leaving them immune to [[Red's Pikachu|Pikachu]]'s {{t|Electric}} attacks. Instead, {{p|Mankey}}, {{p|Nidoran♀}}, and {{p|Nidoran♂}} can all be found on {{rt|22|Kanto}}, and their Fighting moves would give them an advantage. Brock's {{p|Geodude}} and {{p|Onix}} have a poor {{stat|Special}} stat, so evolving a {{p|Caterpie}} into {{p|Butterfree}} and having it learn {{m|Confusion}} would also be useful. If Brock's Onix uses {{m|Bide}}, spend the next few turns using stat-lowering moves, as any damage it endures during this time will be returned for twice as much! | |||
{| align="center" | {| align="center" | ||
| Line 35: | Line 93: | ||
{| align="center" style="background: #{{rock color}}; {{roundy}}; border: 5px solid #{{rock color light}};" | {| align="center" style="background: #{{rock color}}; {{roundy}}; border: 5px solid #{{rock color light}};" | ||
|- align="center" | |- align="center" | ||
! Pewter Gym <br> [[File:Boulder Badge.png|35px| | ! Pewter Gym<br>[[File:Boulder Badge.png|35px|Boulder Badge]]<br><br> | ||
|- | |- | ||
| | | | ||
| Line 43: | Line 101: | ||
|- | |- | ||
| | | | ||
{{ | {{Trainerheader|Rock}} | ||
{{ | {{Trainerentry|Spr Y Jr Trainer M.png|game=1|Jr. Trainer♂||180|2|050|Diglett||9|None|027|Sandshrew||9|None}} | ||
{{ | {{Trainerfooter|Rock|I}} | ||
|} | |} | ||
{| | {| style="margin: auto;" | ||
| | | | ||
{{Party|color={{rock color}}|bordercolor={{rock color dark}}|headcolor={{rock color light}} | {{Party/Single | ||
|color={{rock color}} | |||
|bordercolor={{rock color dark}} | |||
|headcolor={{rock color light}} | |||
|sprite=Spr Y Brock.png | |sprite=Spr Y Brock.png | ||
|prize={{PDollar}}1188 | |prize={{PDollar}}1188 | ||
|name={{color2| | |name={{color2|000|Brock}} | ||
|game=Y|location=Pewter Gym | |game=Y | ||
|pokemon=2 | |location=Pewter Gym | ||
|pokemon=2}} | |||
| | |{{Pokémon/1 | ||
|ndex=074|pokemon=Geodude | |ndex=074 | ||
|pokemon=Geodude | |||
|game=Yellow | |||
|level=10 | |||
|type1=Rock|type2=Ground | |type1=Rock|type2=Ground | ||
|move1=Tackle|move1type=Normal}} | |move1=Tackle|move1type=Normal}} | ||
|{{Pokémon/1 | |||
| | |ndex=095 | ||
|ndex=095|pokemon=Onix | |pokemon=Onix | ||
|game=Yellow | |||
|level=12 | |||
|type1=Rock|type2=Ground | |type1=Rock|type2=Ground | ||
|move1=Tackle|move1type=Normal | |move1=Tackle|move1type=Normal | ||
|move2=Screech|move2type=Normal | |move2=Screech|move2type=Normal | ||
|move3=Bide|move3type=Normal | |||
| | |move4=Bind|move4type=Normal}} | ||
{{Party/Footer}} | |||
| | |||
{{ | |||
|} | |} | ||
|} | |} | ||
|} | |} | ||
After the battle, [[Brock]] awards you the {{badge|Boulder}}, which gives your Pokémon a slight {{stat|Attack}} boost during battle and enables the use of {{m|Flash}} in the field. He also gives you {{TM|34|Bide}} as a prize. | |||
With the [[Pewter Gym]] defeated, your next destination is [[Cerulean City]] to the east. Visit the Poké Mart for Potions, Poké Balls, and an [[Escape Rope]] or two for the cave up ahead. Once you are ready, head east to reach {{rt|3|Kanto}}. | |||
{ | |||
{ | |||
| Line 334: | Line 152: | ||
|game=Yellow | |game=Yellow | ||
|gamename=Yellow | |gamename=Yellow | ||
|prevsection=2 | |prevsection=2 | ||
|prevname=Viridian City, | |prevname=Route 1, Viridian City, Oak's Lab, Route 2 | ||
| | |nextsection=4 | ||
|nextname= | |nextname=Route 3, Mt. Moon, Route 4 | ||
}} | |||
<br> | <br> | ||
{{Project Walkthroughs notice}} | {{Project Walkthroughs notice}} | ||
[[Category:Yellow walkthrough]] | [[Category:Yellow walkthrough]] | ||
Latest revision as of 16:49, 24 February 2024
These pages follow the original Game Boy iteration, not Pokémon: Let's Go, Pikachu! and Let's Go, Eevee!. The guide for those games can be found here.
Route 2
Viridian Forest
Viridian Forest is a sprawling, wooded area located on Route 2. A natural maze, it is easy to get lost inside.
| Trainers | |||||||||||||||||||||||||||||||||||||||||||||||||||||||||||||||||||||||||||||||||||||||
|---|---|---|---|---|---|---|---|---|---|---|---|---|---|---|---|---|---|---|---|---|---|---|---|---|---|---|---|---|---|---|---|---|---|---|---|---|---|---|---|---|---|---|---|---|---|---|---|---|---|---|---|---|---|---|---|---|---|---|---|---|---|---|---|---|---|---|---|---|---|---|---|---|---|---|---|---|---|---|---|---|---|---|---|---|---|---|---|
| |||||||||||||||||||||||||||||||||||||||||||||||||||||||||||||||||||||||||||||||||||||||
| Available Pokémon | ||||||||||||||||||||||||||||||||||||||||||||||||||||||||||||||||||||||||||||||||||||||||||
|---|---|---|---|---|---|---|---|---|---|---|---|---|---|---|---|---|---|---|---|---|---|---|---|---|---|---|---|---|---|---|---|---|---|---|---|---|---|---|---|---|---|---|---|---|---|---|---|---|---|---|---|---|---|---|---|---|---|---|---|---|---|---|---|---|---|---|---|---|---|---|---|---|---|---|---|---|---|---|---|---|---|---|---|---|---|---|---|---|---|---|
| ||||||||||||||||||||||||||||||||||||||||||||||||||||||||||||||||||||||||||||||||||||||||||
| Items | ||||||||||||||||||||
|---|---|---|---|---|---|---|---|---|---|---|---|---|---|---|---|---|---|---|---|---|
| ||||||||||||||||||||
Follow the trail to the northwest to reach a Poké Ball in the tall grass. Return to the entrance, and this time head eastward. Battle the first Bug Catcher on the east side of the forest, then continue north to fight the second. Grab the nearby Potion and turn west to the tall grass. Zigzag westward through the trees to reach a signpost. Explore the dead-end path to the southeast to get another Potion, then continue westward. Defeat one last Bug Catcher to reach the northern edge of the forest. Leave the gate to re-emerge on Route 2 and continue north to Pewter City.
Pewter City
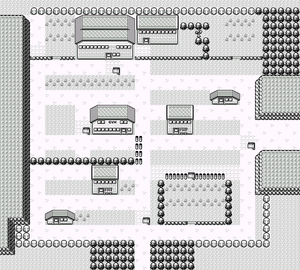
Pewter City is a quiet city nestled in the northern mountains between Route 2 and Route 3. The Pewter Museum of Science and the Pewter Gym are located here.
| Items | |||||||||||||||||||||||||||||||
|---|---|---|---|---|---|---|---|---|---|---|---|---|---|---|---|---|---|---|---|---|---|---|---|---|---|---|---|---|---|---|---|
| |||||||||||||||||||||||||||||||
Calling All Challengers
The local Gym Leader is looking for challengers, and the kid blocking the city's east exit will escort you to the Gym if you try to leave. Be sure to visit the Poké Mart to stock up on Potions before taking up the challenge.
Pewter Museum of Science
The Pewter Museum of Science is located on the north side of the city. It hosts a wide range of artifacts and exhibits, with a focus on fossil excavation and space exploration. Admission to the main building is $50 for a child's ticket. The smaller building next door is closed to the public.
Pewter Gym
PEWTER CITY POKéMON GYM
LEADER: BROCK
The Rock Solid POKéMON Trainer!
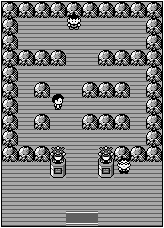
The Pewter Gym specializes in Rock-type Pokémon. Rock-type moves are super effective against Bug-, Fire-, Flying-, and Ice-type Pokémon, while Rock-type Pokémon are weak to Fighting-, Grass-, Ground-, and Water-type moves. All of the Pokémon in the Pewter Gym are partly Ground type, as well, leaving them immune to Pikachu's Electric attacks. Instead, Mankey, Nidoran♀, and Nidoran♂ can all be found on Route 22, and their Fighting moves would give them an advantage. Brock's Geodude and Onix have a poor Special stat, so evolving a Caterpie into Butterfree and having it learn Confusion would also be useful. If Brock's Onix uses Bide, spend the next few turns using stat-lowering moves, as any damage it endures during this time will be returned for twice as much!
| ||||||||||||||||||||||||||||||||||||||||||||||||||||||||||||||||||||||||||||||||||||||||||
After the battle, Brock awards you the Boulder Badge, which gives your Pokémon a slight Attack boost during battle and enables the use of Flash in the field. He also gives you TM34 (Bide) as a prize.
With the Pewter Gym defeated, your next destination is Cerulean City to the east. Visit the Poké Mart for Potions, Poké Balls, and an Escape Rope or two for the cave up ahead. Once you are ready, head east to reach Route 3.
|
Yellow walkthrough |
|

|
This article is part of Project Walkthroughs, a Bulbapedia project that aims to write comprehensive step-by-step guides on each Pokémon game. |


