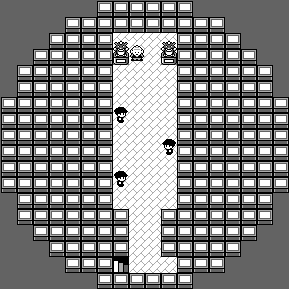
Appendix:Red and Blue walkthrough/Section 9: Difference between revisions
Tiddlywinks (talk | contribs) m (Undo revision 2248836 by Allan Aguilar (talk)Not according to Celadon Game Corner or my (very old/vague) memory) |
|||
| (6 intermediate revisions by 2 users not shown) | |||
| Line 1: | Line 1: | ||
{{WalkthroughNotice}} | {{WalkthroughNotice}} | ||
==Celadon City== | |||
== Celadon City == | |||
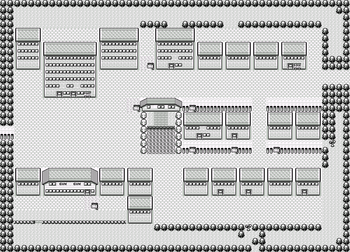
[[File:Celadon City RBY.png|thumb|350px|Celadon City]] | [[File:Celadon City RBY.png|thumb|350px|Celadon City]] | ||
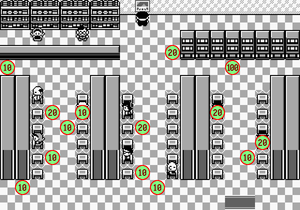
[[File:Game corner coins gen1.png|thumb|Locations of hidden coins]] | |||
[[Celadon City]] is the second-largest city in the region, and it's got plenty going on to live up to the hype. The [[Celadon Department Store]] is an essential stop, since almost anything a Trainer could want is up for sale here. The [[Celadon Condominiums|Celadon Mansion]] is a hotel-of-sorts, and the current tenants are none other than [[Game Freak]], the team that developed Pokémon. The [[Rocket Game Corner|Game Corner]] houses the slot machines, and those coins can be redeemed for valuable prizes in the Prize Corner next door. In addition, Celadon is also home to the [[Celadon Gym]], nestled on a hill in the southwest. | [[Celadon City]] is the second-largest city in the region, and it's got plenty going on to live up to the hype. The [[Celadon Department Store]] is an essential stop, since almost anything a Trainer could want is up for sale here. The [[Celadon Condominiums|Celadon Mansion]] is a hotel-of-sorts, and the current tenants are none other than [[Game Freak]], the team that developed Pokémon. The [[Rocket Game Corner|Game Corner]] houses the slot machines, and those coins can be redeemed for valuable prizes in the Prize Corner next door. In addition, Celadon is also home to the [[Celadon Gym]], nestled on a hill in the southwest. | ||
{| class="expandable" align="center" style="background: # | {| class="expandable" align="center" style="background: #{{blue color light}}; {{roundy}}; border: 5px solid #{{red color light}};" | ||
|- align="center" | |||
! Available Pokémon | |||
|- | |||
| | |||
{{Catch/header|road|no}} | |||
{{Catch/div|road|Gift Pokémon}} | |||
{{Catch/entry1|133|Eevee|yes|yes|no|Gift|25|One|type1=Normal}} | |||
{{Catch/div|water|Fishing}} | |||
{{Catch/entry1|129|Magikarp|yes|yes|no|Fish Old|5|100%|type1=Water}} | |||
{{Catch/entry1|060|Poliwag|yes|yes|no|Fish Good|10|50%|type1=Water}} | |||
{{Catch/entry1|118|Goldeen|yes|yes|no|Fish Good|10|50%|type1=Water}} | |||
{{Catch/entry1|061|Poliwhirl|yes|yes|no|Fish Super|23|50%|type1=Water}} | |||
{{Catch/entry1|079|Slowpoke|yes|yes|no|Fish Super|15|50%|type1=Water|type2=Psychic}} | |||
{{Catch/footer|road}} | |||
|} | |||
{| class="expandable" align="center" style="background: #{{blue color light}}; {{roundy}}; border: 5px solid #{{red color light}};" | |||
|- align="center" | |- align="center" | ||
! Items | ! Items | ||
|- | |- | ||
| | | | ||
{{itlisth| | {{itlisth|road}} | ||
{{Itemlist|PP Up| | {{Itemlist|PP Up|At the end of the short path beyond the {{m|cut}}table bush ''(hidden)''|R=yes|B=yes|display={{DL|Vitamin|PP Up}}}} | ||
{{Itemlist| | {{Itemlist|TM Fighting|Received from a clerk on the third floor of the [[Celadon Department Store]]|R=yes|B=yes|display={{TM|18|Counter}}}} | ||
{{Itemlist|TM Normal| | {{Itemlist|TM Ice|Received from a girl on the roof of the Celadon Department Store in exchange for {{DL|Drink|Fresh Water}}|R=yes|B=yes|display={{TM|13|Ice Beam}}}} | ||
{{ | {{Itemlist|TM Rock|Received from a girl on the roof of the Celadon Department Store in exchange for {{DL|Drink|Soda Pop}}|R=yes|B=yes|display={{TM|48|Rock Slide}}}} | ||
{{Itemlist| | {{Itemlist|TM Normal|Received from a girl on the roof of the Celadon Department Store in exchange for {{DL|Drink|Lemonade}}|R=yes|B=yes|display={{TM|49|Tri Attack}}}} | ||
{{Itemlist| | {{Itemlist|TM Normal|Received from the man across the pond (requires {{m|Surf}})|R=yes|B=yes|display={{TM|41|Softboiled}}}} | ||
{{Itemlist| | {{Itemlist|Coin Case|Received from a man in the restaurant|R=yes|B=yes}} | ||
{{Itemlist| | {{Itemlist|Coin Case|From the {{tc|Fisherman}}|R=yes|B=yes|display=10 [[Coin]]s}} | ||
{{ | {{Itemlist|Coin Case|From the {{tc|Gentleman}}|R=yes|B=yes|display=20 [[Coin]]s}} | ||
{{Itemlist|Coin Case|From the {{tc|Scientist}}|R=yes|B=yes|display=20 [[Coin]]s}} | |||
{{Itemlist|Coin Case|One tile to the north and two tiles to the east of the right-hand side of the top of the third cluster of slot machines from the west ''(hidden)''|R=yes|B=yes|display=100 [[Coin]]s}} | |||
{{Itemlist|Coin Case|One tile to the east of the second slot machine from the bottom of the first cluster of slot machines from the west ''(hidden)''|R=yes|B=yes|display=10 [[Coin]]s}} | |||
{{Itemlist|Coin Case|Two tiles to the north of the top slot machine on the left side of the second cluster of slot machines from the east ''(hidden)''|R=yes|B=yes|display=20 [[Coin]]s}} | |||
{{Itemlist|Coin Case|One tile south and one tile east of the [[Gym guide]] in the center aisle of slot machines ''(hidden)''|R=yes|B=yes|display=10 [[Coin]]s}} | |||
{{Itemlist|Coin Case|Two tiles south and two tiles east from the Gym guide ''(hidden)''|R=yes|B=yes|display=10 [[Coin]]s}} | |||
{{Itemlist|Coin Case|One tile west and one tile south of the Gentleman in the east-most aisle ''(hidden)''|R=yes|B=yes|display=10 [[Coin]]s}} | |||
{{Itemlist|Coin Case|One tile south and one tile east of the woman in the center aisle ''(hidden)''|R=yes|B=yes|display=20 [[Coin]]s}} | |||
{{Itemlist|Coin Case|One tile south and one tile east of the woman in the west-most aisle ''(hidden)''|R=yes|B=yes|display=10 [[Coin]]s}} | |||
{{Itemlist|Coin Case|Two tiles west of the Fisherman ''(hidden)''|R=yes|B=yes|display=20 [[Coin]]s}} | |||
{{Itemlist|Coin Case|One tile south and one tile west of the Fisherman ''(hidden)''|R=yes|B=yes|display=10 [[Coin]]s}} | |||
{{Itemlist|Coin Case|Between the counter and the west-most cluster of slot machines ''(hidden)''|R=yes|B=yes|display=10 [[Coin]]s}} | |||
{{Itemlist|TM Grass|From Erika upon her defeat|R=yes|B=yes|display={{TM|21|Mega Drain}}}} | {{Itemlist|TM Grass|From Erika upon her defeat|R=yes|B=yes|display={{TM|21|Mega Drain}}}} | ||
{{itlistfoot| | {{itlistfoot|road}} | ||
|} | |} | ||
=== Celadon Mansion === | |||
===Celadon Mansion=== | |||
The tall building in the north of town is Celadon Mansion. On the third floor, [[Game Freak]]'s game designer promises a reward for showing him your completed [[Pokédex]]. Incidentally, you can find a new addition right now; leave the mansion and follow the path behind the Pokémon Center to find a break in the trees where you can enter the mansion through the back door. Make sure that you've got an empty slot in your party, and take the stairs to the top floor to find an {{p|Eevee}}. Eevee is an extremely versatile creature, since it can evolve into one of three different forms. Exposure to a {{evostone|Water Stone}}, {{evostone|Thunderstone}}, or {{evostone|Fire Stone}} results in a {{p|Vaporeon}}, {{p|Jolteon}}, or a {{p|Flareon}}, respectively. Any of those three evolutions will make a powerful addition to your team, especially since they can cover the weaknesses of your {{DL|Starter Pokémon|Kanto|starter}}'s final form. These [[Evolutionary stone|stones]] can be purchased only in the Department Store. | The tall building in the north of town is Celadon Mansion. On the third floor, [[Game Freak]]'s game designer promises a reward for showing him your completed [[Pokédex]]. Incidentally, you can find a new addition right now; leave the mansion and follow the path behind the Pokémon Center to find a break in the trees where you can enter the mansion through the back door. Make sure that you've got an empty slot in your party, and take the stairs to the top floor to find an {{p|Eevee}}. Eevee is an extremely versatile creature, since it can evolve into one of three different forms. Exposure to a {{evostone|Water Stone}}, {{evostone|Thunderstone}}, or {{evostone|Fire Stone}} results in a {{p|Vaporeon}}, {{p|Jolteon}}, or a {{p|Flareon}}, respectively. Any of those three evolutions will make a powerful addition to your team, especially since they can cover the weaknesses of your {{DL|Starter Pokémon|Kanto|starter}}'s final form. These [[Evolutionary stone|stones]] can be purchased only in the Department Store. | ||
{| | {| align="center" | ||
| | | | ||
{{ | {{Pokémon/1|game=Red | ||
|ndex=133|pokemon=Eevee | |||
|type1=Normal | |||
|level=25 | |||
|move1=Tackle|move1type=Normal | |||
|move2=Sand-Attack|move2type=Normal | |||
}} | |||
|} | |} | ||
===Return of the Rockets=== | === Return of the Rockets === | ||
If you haven't noticed by now, there are two Rocket grunts loitering around the city. It looks like [[Team Rocket]] has something planned for Celadon... | If you haven't noticed by now, there are two Rocket grunts loitering around the city. It looks like [[Team Rocket]] has something planned for Celadon... | ||
Stop by the café in the south of town and talk to the guy in the back corner. He lost all his money at the slots, so he has no more use for his [[Coin Case]], and hands it over. Next door to the café is an operation that is shipping 2,000 Pokémon every month to the Game Corner as slot prizes. Those kind of numbers mean big money, and that's got Team Rocket's name written all over it. They're up to something, and as one of the workers points out, it ''surely'' has nothing to do with a hidden switch behind a poster in the Game Corner. | Stop by the café in the south of town and talk to the guy in the back corner. He lost all his money at the slots, so he has no more use for his [[Coin Case]], and hands it over. Next door to the café is an operation that is shipping 2,000 Pokémon every month to the Game Corner as slot prizes. Those kind of numbers mean big money, and that's got Team Rocket's name written all over it. They're up to something, and as one of the workers points out, it ''surely'' has nothing to do with a hidden switch behind a poster in the Game Corner. | ||
===Celadon Department Store=== | === Celadon Department Store === | ||
====2nd floor==== | |||
==== 2nd floor ==== | |||
{| align="center" style="background: #{{white color}}; border: 3px solid #{{black color}}; {{roundy|15px}};" cellspacing="1" cellpadding="1" | {| align="center" style="background: #{{white color}}; border: 3px solid #{{black color}}; {{roundy|15px}};" cellspacing="1" cellpadding="1" | ||
|- valign="top" | |- valign="top" | ||
| Line 65: | Line 97: | ||
|} | |} | ||
==== 3rd floor ==== | |||
====3rd floor==== | |||
There's nothing for sale on the third floor, but you can talk to the clerk to get {{TM|18|Counter}}. | There's nothing for sale on the third floor, but you can talk to the clerk to get {{TM|18|Counter}}. | ||
====4th floor==== | ==== 4th floor ==== | ||
The evolutionary stones are on sale here. Pick up any but a {{evostone|Leaf Stone}} for your new {{p|Eevee}}. Be sure to pick up a [[Poké Doll]] too, as it will be important a little later. | The evolutionary stones are on sale here. Pick up any but a {{evostone|Leaf Stone}} for your new {{p|Eevee}}. Be sure to pick up a [[Poké Doll]] too, as it will be important a little later. | ||
| Line 81: | Line 112: | ||
|} | |} | ||
==== 5th floor ==== | |||
====5th floor==== | |||
{| align="center" style="background: #{{white color}}; border: 3px solid #{{black color}}; {{roundy|15px}};" cellspacing="1" cellpadding="1" | {| align="center" style="background: #{{white color}}; border: 3px solid #{{black color}}; {{roundy|15px}};" cellspacing="1" cellpadding="1" | ||
|- valign="top" | |- valign="top" | ||
| Line 100: | Line 130: | ||
|} | |} | ||
==== Rooftop Square ==== | |||
====Rooftop Square==== | |||
Each Vending Machine dispenses {{DL|Drink|Fresh Water}}, {{DL|Drink|Soda Pop}}, and {{DL|Drink|Lemonade}}. Buy one of each drink to give to the little girl nearby, and she'll give you up to three [[TM]]s as thanks - {{TM|13|Ice Beam}} for a Fresh Water, {{TM|48|Rock Slide}} for a Soda Pop, and {{TM|49|Tri Attack}} for a Lemonade. Pick up an extra drink for the guards at [[Saffron City]]'s borders, and stock up on Lemonade. Like the other drinks, Lemonade can restore your Pokémon's health, but Lemonade is the most potent. It restores 80 {{stat|HP}}, while by comparison, a {{DL|Potion|Super Potion}} only restores 50 HP. | Each Vending Machine dispenses {{DL|Drink|Fresh Water}}, {{DL|Drink|Soda Pop}}, and {{DL|Drink|Lemonade}}. Buy one of each drink to give to the little girl nearby, and she'll give you up to three [[TM]]s as thanks - {{TM|13|Ice Beam}} for a Fresh Water, {{TM|48|Rock Slide}} for a Soda Pop, and {{TM|49|Tri Attack}} for a Lemonade. Pick up an extra drink for the guards at [[Saffron City]]'s borders, and stock up on Lemonade. Like the other drinks, Lemonade can restore your Pokémon's health, but Lemonade is the most potent. It restores 80 {{stat|HP}}, while by comparison, a {{DL|Potion|Super Potion}} only restores 50 HP. | ||
| Line 112: | Line 141: | ||
|} | |} | ||
===Celadon Gym=== | === Celadon Gym === | ||
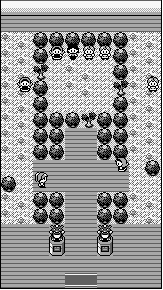
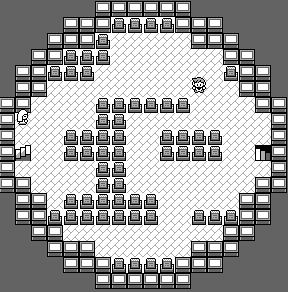
[[File:Celadon Gym RBY.png|thumb|Celadon Gym]] | [[File:Celadon Gym RBY.png|thumb|Celadon Gym]] | ||
| Line 122: | Line 151: | ||
The [[Celadon Gym]] specializes in {{type|Grass}} Pokémon. This will likely be one of the easiest Gyms to defeat, as Grass Pokémon have multiple weaknesses. These plants fare poorly against {{t|Fire}}-, {{t|Ice}}-, {{t|Flying}}-, and {{type|Bug}} attacks. The majority of Pokémon here are also part-{{t|Poison}}, which adds a weakness to {{t|Psychic}} moves. While your own Grass Pokémon take less-than-normal damage from Grass attacks, they need to be careful of {{t|Poison}} moves like {{m|Acid}}. If you haven't used [[TM13]] yet, {{m|Ice Beam}} can be a great help. | The [[Celadon Gym]] specializes in {{type|Grass}} Pokémon. This will likely be one of the easiest Gyms to defeat, as Grass Pokémon have multiple weaknesses. These plants fare poorly against {{t|Fire}}-, {{t|Ice}}-, {{t|Flying}}-, and {{type|Bug}} attacks. The majority of Pokémon here are also part-{{t|Poison}}, which adds a weakness to {{t|Psychic}} moves. While your own Grass Pokémon take less-than-normal damage from Grass attacks, they need to be careful of {{t|Poison}} moves like {{m|Acid}}. If you haven't used [[TM13]] yet, {{m|Ice Beam}} can be a great help. | ||
{{ | {| align="center" | ||
| | |- align="center" valign="top" | ||
| | | | ||
| | {| align="center" style="background: #{{grass color}}; {{roundy}}; border: 5px solid #{{grass color light}};" | ||
|- align="center" | |||
| | ! Celadon Gym <br /> [[File:Rainbow Badge.png|35px|Rainbow Badge]] <br /><br /> | ||
|- | |||
| | |||
{| align="center" class="expandable" style="background: #{{grass color}}; {{roundy}}; border: 5px solid #{{grass color light}};" | |||
|- align="center" | |||
! Trainers | |||
|- | |||
| | |||
{{Trainerheader|Grass}} | |||
{{Trainerentry|Spr RG Lass.png|Lass||345|2|069|Bellsprout||23|None|070|Weepinbell||23|None}} | {{Trainerentry|Spr RG Lass.png|Lass||345|2|069|Bellsprout||23|None|070|Weepinbell||23|None}} | ||
{{Trainerdiv|Grass}} | |||
{{Trainerentry|Spr RG Beauty.png|Beauty||1470|4|043|Oddish||21|None|069|Bellsprout||21|None|043|Oddish||21|None|069|Bellsprout||21|None}} | |||
{{Trainerdiv|Grass}} | {{Trainerdiv|Grass}} | ||
{{Trainerentry|Spr RG Beauty.png|Beauty||1680|2|069|Bellsprout||24|None|069|Bellsprout||24|None}} | {{Trainerentry|Spr RG Beauty.png|Beauty||1680|2|069|Bellsprout||24|None|069|Bellsprout||24|None}} | ||
{{Trainerdiv|Grass}} | {{Trainerdiv|Grass}} | ||
{{Trainerentry|Spr RG Jr Trainer F.png|Jr. Trainer♀||480|2|001|Bulbasaur||24|None|002|Ivysaur||24|None}} | {{Trainerentry|Spr RG Jr Trainer F.png|Jr. Trainer♀||480|2|001|Bulbasaur||24|None|002|Ivysaur||24|None}} | ||
| Line 141: | Line 178: | ||
{{Trainerdiv|Grass}} | {{Trainerdiv|Grass}} | ||
{{Trainerentry|Spr RG Lass.png|Lass||345|2|043|Oddish||23|None|044|Gloom||23|None}} | {{Trainerentry|Spr RG Lass.png|Lass||345|2|043|Oddish||23|None|044|Gloom||23|None}} | ||
{{Trainerfooter|Grass| | {{Trainerfooter|Grass|1|inside}} | ||
|} | |||
{{Party/Single | |||
|color={{grass color}} | |color={{grass color}} | ||
|headcolor={{grass color light}} | |headcolor={{grass color light}} | ||
| Line 150: | Line 188: | ||
|prize={{pdollar}}2871 | |prize={{pdollar}}2871 | ||
|name={{color2|000000|Erika}} | |name={{color2|000000|Erika}} | ||
|game=RGB|location=Celadon Gym | |game=RGB | ||
|pokemon=3 | |location=Celadon Gym | ||
}} | |pokemon=3}} | ||
|{{Pokémon/1 | |||
|ndex=071|pokemon=Victreebel | |game=Red | ||
|ndex=071 | |||
|pokemon=Victreebel | |||
|level=29 | |||
|type1=Grass|type2=Poison | |type1=Grass|type2=Poison | ||
|move1=Razor Leaf|move1type=Grass | |||
|move2=Wrap|move2type=Normal | |||
|move3=PoisonPowder|move3type=Poison | |||
|move4=Sleep Powder|move4type=Grass}} | |||
|{{Pokémon/1 | |||
|game=Red | |||
|ndex=114 | |||
|pokemon=Tangela | |||
|level=24 | |||
|type1=Grass | |||
|move1=Constrict|move1type=Normal | |||
|move2=Bind|move2type=Normal}} | |||
|{{Pokémon/1 | |||
|game=Red | |||
|ndex=045 | |||
|pokemon=Vileplume | |||
|level=29 | |level=29 | ||
|move1= | |type1=Grass|type2=Poison | ||
|move1=Petal Dance|move1type=Grass | |||
|move2=PoisonPowder|move2type=Poison | |move2=PoisonPowder|move2type=Poison | ||
|move3= | |move3=Mega Drain|move3type=Grass | ||
|move4 | |move4=Sleep Powder|move4type=Grass}} | ||
{{Party/Footer}} | {{Party/Footer}} | ||
}} | |} | ||
|} | |||
Defeating the [[Celadon Gym]] earns you the {{badge|Rainbow}}, which commands all Pokémon up to level 50, and enables the use of {{m|Strength}} outside of battle. [[Erika]] also gives out {{TM|21|Mega Drain}}, a {{type|Grass}} move that damages the opponent while restoring the user's health. | Defeating the [[Celadon Gym]] earns you the {{badge|Rainbow}}, which commands all Pokémon up to level 50, and enables the use of {{m|Strength}} outside of battle. [[Erika]] also gives out {{TM|21|Mega Drain}}, a {{type|Grass}} move that damages the opponent while restoring the user's health. | ||
===Game Corner=== | === Game Corner === | ||
All the prizes here are offered at extremely high prices, so you'll need a huge supply of coins to get everything. A few can be found dropped on the ground, and talking to the other gamblers gets you some more. Besides that, you can either buy them—50 coins for {{pdollar}}1000—or take your chances with the slots. {{p|Scyther|Some}} {{p|Pinsir|prizes}} are extremely rare, while {{p|Porygon|others}} can be found only here. | All the prizes here are offered at extremely high prices, so you'll need a huge supply of coins to get everything. A few can be found dropped on the ground, and talking to the other gamblers gets you some more. Besides that, you can either buy them—50 coins for {{pdollar}}1000—or take your chances with the slots. {{p|Scyther|Some}} {{p|Pinsir|prizes}} are extremely rare, while {{p|Porygon|others}} can be found only here. | ||
| Line 212: | Line 254: | ||
{{shopfooter}} | {{shopfooter}} | ||
|} | |} | ||
At first glance, everything looks normal here. People are relaxed, having fun at the slot machines, but there's something unsettling about the guy glaring at the poster... As soon as you approach him, he picks a fight with you. | At first glance, everything looks normal here. People are relaxed, having fun at the slot machines, but there's something unsettling about the guy glaring at the poster... As soon as you approach him, he picks a fight with you. | ||
{| align="center" | {| class="expandable" align="center" style="background: #{{blue color light}}; {{roundy}}; border: 5px solid #{{red color light}};" | ||
| | |- align="center" | ||
{{ | ! Trainers | ||
{{ | |- | ||
{{ | | | ||
{{Trainerheader|building}} | |||
{{Trainerentry|Spr RG Rocket.png|Rocket||600|2|020|Raticate||20||041|Zubat||20||}} | |||
{{Trainerfooter|building|1}} | |||
|} | |} | ||
He runs off, leaving the poster exposed. Examine it to flip the switch, which reveals a set of stairs nearby, and descend into their hideout. | He runs off, leaving the poster exposed. Examine it to flip the switch, which reveals a set of stairs nearby, and descend into their hideout. | ||
=== Rocket Hideout === | |||
===Rocket Hideout=== | |||
[[Team Rocket]] is headed by a shadowy figure known as [[Giovanni]]. This mob boss is in possession of the {{key|I|Silph Scope}} prototype, which can identify the ghosts back in [[Pokémon Tower]]. It is impossible to get past the spirits without that item, so make sure he doesn't escape with it! | [[Team Rocket]] is headed by a shadowy figure known as [[Giovanni]]. This mob boss is in possession of the {{key|I|Silph Scope}} prototype, which can identify the ghosts back in [[Pokémon Tower]]. It is impossible to get past the spirits without that item, so make sure he doesn't escape with it! | ||
{| class="expandable" align="center" style="background: # | {| class="expandable" align="center" style="background: #{{blue color light}}; {{roundy}}; border: 5px solid #{{red color light}};" | ||
|- align="center" | |- align="center" | ||
! Trainers | ! Trainers | ||
|- | |- | ||
| | | | ||
{{ | {| class="expandable" align="center" style="background: #{{blue color light}}; {{roundy}}; border: 5px solid #{{red color light}};" | ||
{{ | |- align="center" | ||
{{ | ! B1F | ||
{{ | |- | ||
{{ | | | ||
{{ | {{Trainerheader|building}} | ||
{{ | {{Trainerentry|Spr RG Rocket.png|Rocket||630|2|096|Drowzee||21|None|066|Machop||21|None|}} | ||
{{ | {{Trainerdiv|building}} | ||
{{ | {{Trainerentry|Spr RG Rocket.png|Rocket||630|2|020|Raticate||21|None|020|Raticate||21|None|}} | ||
{{ | {{Trainerdiv|building}} | ||
{{ | {{Trainerentry|Spr RG Rocket.png|Rocket||660|2|088|Grimer||22|None|109|Koffing||22|None|}} | ||
{{ | {{Trainerdiv|building}} | ||
{{ | {{Trainerentry|Spr RG Rocket.png|Rocket||570|4|019|Rattata||19|None|020|Raticate||19|None|020|Raticate||19|None|019|Rattata||19|None|}} | ||
{{ | {{Trainerdiv|building}} | ||
{{ | {{Trainerentry|Spr RG Rocket.png|Rocket||600|3|088|Grimer||20|None|109|Koffing||20|None|109|Koffing||20|None|}} | ||
{{Trainerfooter|building|1}} | |||
|} | |||
{{ | {| class="expandable" align="center" style="background: #{{blue color light}}; {{roundy}}; border: 5px solid #{{red color light}};" | ||
{{ | |- align="center" | ||
{{ | ! B2F | ||
{{ | |- | ||
{{ | | | ||
{{ | {{Trainerheader|building}} | ||
{{ | {{Trainerentry|Spr RG Rocket.png|Rocket||510|5|041|Zubat||17|None|109|Koffing||17|None|088|Grimer||17|None|041|Zubat||17|None|020|Raticate||17|None|}} | ||
{{Trainerfooter|building|1}} | |||
|} | |||
{| class="expandable" align="center" style="background: #{{blue color light}}; {{roundy}}; border: 5px solid #{{red color light}};" | |||
|- align="center" | |||
! B3F | |||
|- | |||
| | |||
{{Trainerheader|building}} | |||
{{Trainerentry|Spr RG Rocket.png|Rocket||630|2|066|Machop||21|None|066|Machop||21|None|}} | |||
{{Trainerdiv|building}} | |||
{{Trainerentry|Spr RG Rocket.png|Rocket||600|3|019|Rattata||20|None|020|Raticate||20|None|096|Drowzee||20|None|}} | |||
{{Trainerfooter|building|1}} | |||
|} | |} | ||
{| class="expandable" align="center" style="background: # | {| class="expandable" align="center" style="background: #{{blue color light}}; {{roundy}}; border: 5px solid #{{red color light}};" | ||
|- align="center" | |- align="center" | ||
! | ! B4F | ||
|- | |- | ||
| | | | ||
{{ | {{Trainerheader|building}} | ||
{{ | {{Trainerentry|Spr RG Rocket.png|Rocket||630|2|109|Koffing||21|None|041|Zubat||21|None|}} | ||
{{Trainerdiv|building}} | |||
{{Trainerentry|Spr RG Rocket.png|Rocket||690|3|027|Sandshrew||23|None|023|Ekans||23|None|028|Sandslash||23|None|}} | |||
{{Trainerdiv|building}} | |||
{{Trainerentry|Spr RG Rocket.png|Rocket||690|3|023|Ekans||23|None|027|Sandshrew||23|None|024|Arbok||23|None|}} | |||
{{ | {{Trainerfooter|building|1}} | ||
{{ | |} | ||
{{ | |||
{{ | |||
{{ | |||
|} | |} | ||
{| class="expandable" align="center" style="background: #{{blue color light}}; {{roundy}}; border: 5px solid #{{red color light}};" | |||
|- align="center" | |||
! Items | |||
|- | |||
| | |||
{{itlisth|building}} | |||
{{Itemlist|PP Up|B1F; in the bottom right plant pot in the entrance hall ''(hidden)''|R=yes|B=yes|display={{DL|Vitamin|PP Up}}}} | |||
{{Itemlist|Escape Rope|B1F; in the room west of the entrance|R=yes|B=yes}} | |||
{{Itemlist|Hyper Potion|B1F; in the room reached from the B2F|R=yes|B=yes|display={{DL|Potion|Hyper Potion}}}} | |||
{{Itemlist|Moon Stone|B2F; on the west wall of the spinner maze|R=yes|B=yes|display={{evostone|Moon Stone}}}} | |||
{{Itemlist|Nugget| | |||
*B2F; on the north wall of the spinner maze | |||
*B3F; in the empty center-east room; next to TM10 ''(hidden)''|R=yes|B=yes|display={{DL|Valuable item|Nugget}} ×2}} | |||
{{Itemlist|TM Normal|B2F; in the upper center of the spinner maze|R=yes|B=yes|display={{TM|07|Horn Drill}}}} | |||
{{Itemlist|Super Potion|B2F; near the southwest corner of the spinner maze|R=yes|B=yes|display={{DL|Potion|Super Potion}}}} | |||
{{Itemlist|TM Normal|B3F; in the center-east room|R=yes|B=yes|display={{TM|10|Double-Edge}}}} | |||
{{Itemlist|Rare Candy|B3F; on the east wall of the spinner maze|R=yes|B=yes|display={{DL|Vitamin|Rare Candy}}}} | |||
{{Itemlist|HP Up|B4F; in the room west of the stairway|R=yes|B=yes|display={{DL|Vitamin|HP Up}}}} | |||
{{Itemlist|TM Normal|B4F; in the northwest room|R=yes|B=yes|display={{TM|02|Razor Wind}}}} | |||
{{Itemlist|Lift Key|B4F; talk to the Team Rocket Grunt in the northwest room after defeat|R=yes|B=yes|display={{key|I|Lift Key|Lift}} {{key|III|Lift Key|Key}}}} | |||
{{Itemlist|Iron|B4F; on a table southwest of Giovanni's office|R=yes|B=yes|display={{DL|Vitamin|Iron}}}} | |||
{{Itemlist|Silph Scope|B4F; dropped by Giovanni after defeat|R=yes|B=yes}} | |||
{{Itemlist|Super Potion|B4F; in the machine behind Giovanni ''(hidden)''|R=yes|B=yes|display={{DL|Potion|Super Potion}}}} | |||
{{itlistfoot|building}} | |||
|} | |||
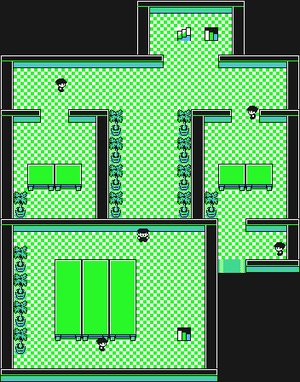
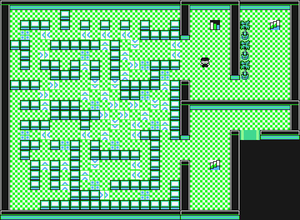
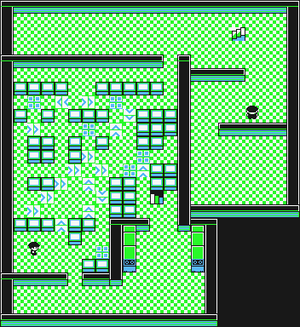
[[File:Rocket Hideout B1F RBY.png|thumb|left|Rocket Hideout, B1F]] | [[File:Rocket Hideout B1F RBY.png|thumb|left|Rocket Hideout, B1F]] | ||
| Line 294: | Line 359: | ||
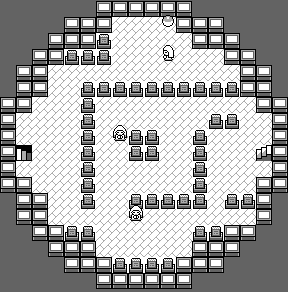
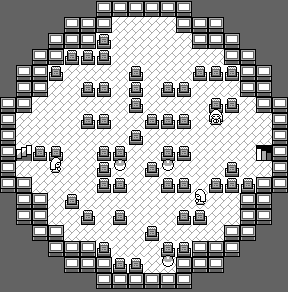
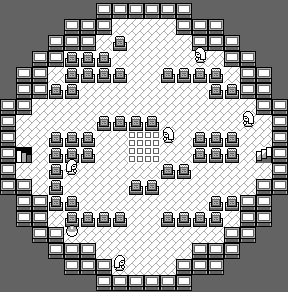
[[File:Rocket Hideout B3F RBY.png|thumb|left|Rocket Hideout, B3F]] | [[File:Rocket Hideout B3F RBY.png|thumb|left|Rocket Hideout, B3F]] | ||
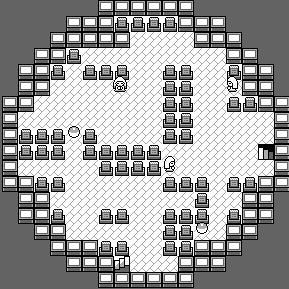
[[File:Rocket Hideout B4F RBY.png|thumb|Rocket Hideout, B4F]] | [[File:Rocket Hideout B4F RBY.png|thumb|Rocket Hideout, B4F]] | ||
====B1F (north)==== | |||
==== B1F (north) ==== | |||
The key to confronting Giovanni in his office is exactly that—a key. The {{key|I|Lift Key}} that operates the elevator is on the fourth floor beneath the Game Corner. | The key to confronting Giovanni in his office is exactly that—a key. The {{key|I|Lift Key}} that operates the elevator is on the fourth floor beneath the Game Corner. | ||
====B2F==== | ==== B2F ==== | ||
This floor is the first area that you encounter [[ | This floor is the first area that you encounter [[spin tile]]s; these send you spinning until you land on a stopper tile. | ||
Enter the maze, and follow the | Enter the maze, and follow the spin tiles to the stopper tile in the northwest. Backtrack to get the {{DL|Valuable item|Nugget}} from the northeast corner. On your way south you'll find a {{evostone|Moon Stone}}, {{TM|07|Horn Drill}}, and a {{DL|Potion|Super Potion}}. Climb the stairs to the east to find two more Rockets and a {{DL|Potion|Hyper Potion}}, then backtrack through the maze and head down the northern stairs. | ||
====B3F==== | ==== B3F ==== | ||
Go south past the lone Rocket to get {{TM|10|Double-Edge}}, and the hidden {{DL|Valuable item|Nugget}} nearby, then enter the second | Go south past the lone Rocket to get {{TM|10|Double-Edge}}, and the hidden {{DL|Valuable item|Nugget}} nearby, then enter the second spin tile maze. This one isn't as large as the last, so spin around a little and grab the {{DL|Vitamin|Rare Candy}} on your way south. Beat up the Rocket here and go downstairs to B4F. | ||
====B4F==== | ==== B4F ==== | ||
[[File:Lift Key RBY.png|thumb|left|One quick battle and the Lift Key is yours!]] | |||
When you first reach B4F, you can only reach the two rooms on the west side. Walk south to find an {{DL|Vitamin|HP Up}} sitting on a table, then check out the northern room. By the far wall is {{TM|02|Razor Wind}}, and to the north, another Rocket. | When you first reach B4F, you can only reach the two rooms on the west side. Walk south to find an {{DL|Vitamin|HP Up}} sitting on a table, then check out the northern room. By the far wall is {{TM|02|Razor Wind}}, and to the north, another Rocket. | ||
| Line 314: | Line 380: | ||
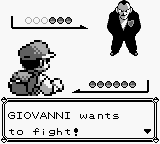
When you exit the elevator, go west to find an {{DL|Vitamin|Iron}}. Take out Giovanni's guards, then step inside to confront the criminal mastermind. His {{p|Onix}} and {{p|Rhyhorn}} are both susceptible to {{t|Grass}}- and {{type|Water}} moves, while his {{p|Kangaskhan}} is vulnerable only to {{type|Fighting}} attacks. | When you exit the elevator, go west to find an {{DL|Vitamin|Iron}}. Take out Giovanni's guards, then step inside to confront the criminal mastermind. His {{p|Onix}} and {{p|Rhyhorn}} are both susceptible to {{t|Grass}}- and {{type|Water}} moves, while his {{p|Kangaskhan}} is vulnerable only to {{type|Fighting}} attacks. | ||
[[File:Giovanni first battle RBY.png|thumb|Take out the boss!]] | |||
{| align="center" | {| align="center" | ||
| | | | ||
{{Party/Single | {{Party/Single | ||
|color=666666|bordercolor=CC0000|headcolor=CCCCCC | |color=666666 | ||
|bordercolor=CC0000 | |||
|headcolor=CCCCCC | |||
|sprite=Spr RG Giovanni.png | |sprite=Spr RG Giovanni.png | ||
|prize={{ | |prize={{PDollar}}2871 | ||
|name={{color2|000000|Giovanni}} | |name={{color2|000000|Giovanni}} | ||
|game=RGB|location=Rocket Hideout | |game=RGB | ||
|pokemon=3 | |location=Rocket Hideout | ||
}} | |pokemon=3}} | ||
|{{Pokémon/1|game=Red and Blue | |{{Pokémon/1 | ||
|ndex=095|pokemon=Onix | |game=Red and Blue | ||
|ndex=095 | |||
|pokemon=Onix | |||
|level=25 | |||
|type1=Rock|type2=Ground | |type1=Rock|type2=Ground | ||
|move1=Screech|move1type=Normal | |||
|move1= | |||
|move2=Bind|move2type=Normal | |move2=Bind|move2type=Normal | ||
|move3= | |move3=Rock Throw|move3type=Rock | ||
|move4= | |move4=Rage|move4type=Normal}} | ||
|{{Pokémon/1 | |||
|{{Pokémon/1|game=Red and Blue | |game=Red and Blue | ||
|ndex=111|pokemon=Rhyhorn | |ndex=111 | ||
|pokemon=Rhyhorn | |||
|level=24 | |||
|type1=Ground|type2=Rock | |type1=Ground|type2=Rock | ||
|move1=Horn Attack|move1type=Normal}} | |move1=Horn Attack|move1type=Normal}} | ||
|{{Pokémon/1 | |||
|{{Pokémon/1|game=Red and Blue | |game=Red and Blue | ||
|ndex=115|pokemon=Kangaskhan | |ndex=115 | ||
|pokemon=Kangaskhan | |||
|level=29 | |||
|type1=Normal | |type1=Normal | ||
|move1=Comet Punch|move1type=Normal | |move1=Comet Punch|move1type=Normal | ||
|move2=Rage|move2type=Normal | |move2=Rage|move2type=Normal | ||
| Line 350: | Line 422: | ||
{{Party/Footer}} | {{Party/Footer}} | ||
|} | |} | ||
After the battle, Giovanni and the other Rockets disappear. Pick up the [[Silph Scope]] that he left behind; now you can climb to the very top of [[Pokémon Tower]]. Take the elevator up to the first floor, and beat one last Rocket on the way out. | After the battle, Giovanni and the other Rockets disappear. Pick up the [[Silph Scope]] that he left behind; now you can climb to the very top of [[Pokémon Tower]]. Take the elevator up to the first floor, and beat one last Rocket on the way out. | ||
| Line 356: | Line 427: | ||
Now you can finally leave Celadon. Bring along that extra [[drink]] and head east to {{rt|7|Kanto}}. Step inside the [[gate]] to be stopped by the guard. He automatically sniffs out the drink, and as he shares it with the other three guards, you are now free to come and go through [[Saffron City]]. The Saffron Poké Mart offers the powerful {{DL|Repel|Max Repel}}, and it may be a good idea to buy a few for the haunted tower. Ignore the rest of the city for now, and continue east to [[Lavender Town]]. | Now you can finally leave Celadon. Bring along that extra [[drink]] and head east to {{rt|7|Kanto}}. Step inside the [[gate]] to be stopped by the guard. He automatically sniffs out the drink, and as he shares it with the other three guards, you are now free to come and go through [[Saffron City]]. The Saffron Poké Mart offers the powerful {{DL|Repel|Max Repel}}, and it may be a good idea to buy a few for the haunted tower. Ignore the rest of the city for now, and continue east to [[Lavender Town]]. | ||
==Lavender Town== | == Lavender Town == | ||
===Pokémon Tower=== | |||
=== Pokémon Tower === | |||
[[File:Pokémon Tower 2F RBY.png|thumb|right|Pokémon Tower, 2F]] | [[File:Pokémon Tower 2F RBY.png|thumb|right|Pokémon Tower, 2F]] | ||
[[File:Pokémon Tower purified zone RBY.png|thumb|Visit 5F for a quick rest.]] | |||
{| class="expandable" align="center" style="background: #{{ | {| class="expandable" align="center" style="background: #{{blue color light}}; {{roundy}}; border: 5px solid #{{red color light}};" | ||
|- align="center" | |- align="center" | ||
! Trainers | ! Trainers | ||
|- | |- | ||
| | | | ||
{| class="expandable" align="center" style="background: #{{ | {| class="expandable" align="center" style="background: #{{blue color light}}; {{roundy}}; border: 5px solid #{{red color light}};" | ||
|- align="center" | |- align="center" | ||
! 3F | ! 3F | ||
| Line 372: | Line 444: | ||
| | | | ||
{{trainerheader|building}} | {{trainerheader|building}} | ||
{{trainerentry|Spr RG Channeler.png|Channeler||690|1|092|Gastly||23|}} | {{trainerentry|Spr RG Channeler.png|Channeler||690|1|092|Gastly||23|||}} | ||
{{trainerdiv|building}} | {{trainerdiv|building}} | ||
{{trainerentry|Spr RG Channeler.png|Channeler||660|1|092|Gastly||22|}} | {{trainerentry|Spr RG Channeler.png|Channeler||660|1|092|Gastly||22|||}} | ||
{{trainerdiv|building}} | {{trainerdiv|building}} | ||
{{trainerentry|Spr RG Channeler.png|Channeler||720|1|092|Gastly||24|}} | {{trainerentry|Spr RG Channeler.png|Channeler||720|1|092|Gastly||24|||}} | ||
{{trainerfooter|building| | {{trainerfooter|building|1}} | ||
|} | |} | ||
{| class="expandable" align="center" style="background: #{{ | {| class="expandable" align="center" style="background: #{{blue color light}}; {{roundy}}; border: 5px solid #{{red color light}};" | ||
|- align="center" | |- align="center" | ||
! 4F | ! 4F | ||
| Line 385: | Line 457: | ||
| | | | ||
{{trainerheader|building}} | {{trainerheader|building}} | ||
{{trainerentry|Spr RG Channeler.png|Channeler||690|2|092|Gastly||23||092|Gastly||23|}} | {{trainerentry|Spr RG Channeler.png|Channeler||690|2|092|Gastly||23||092|Gastly||23|||}} | ||
{{trainerdiv|building}} | {{trainerdiv|building}} | ||
{{trainerentry|Spr RG Channeler.png|Channeler||660|1|092|Gastly||22|}} | {{trainerentry|Spr RG Channeler.png|Channeler||660|1|092|Gastly||22|||}} | ||
{{trainerdiv|building}} | {{trainerdiv|building}} | ||
{{trainerentry|Spr RG Channeler.png|Channeler||720|1|092|Gastly||24|}} | {{trainerentry|Spr RG Channeler.png|Channeler||720|1|092|Gastly||24|||}} | ||
{{trainerfooter|building| | {{trainerfooter|building|1}} | ||
|} | |} | ||
{| class="expandable" align="center" style="background: #{{ | {| class="expandable" align="center" style="background: #{{blue color light}}; {{roundy}}; border: 5px solid #{{red color light}};" | ||
|- align="center" | |- align="center" | ||
! 5F | ! 5F | ||
| Line 398: | Line 470: | ||
| | | | ||
{{trainerheader|building}} | {{trainerheader|building}} | ||
{{trainerentry|Spr RG Channeler.png|Channeler||660|1|092|Gastly||22|}} | {{trainerentry|Spr RG Channeler.png|Channeler||660|1|092|Gastly||22|||}} | ||
{{trainerdiv|building}} | {{trainerdiv|building}} | ||
{{trainerentry|Spr RG Channeler.png|Channeler||690|1|093|Haunter||23|}} | {{trainerentry|Spr RG Channeler.png|Channeler||690|1|093|Haunter||23|||}} | ||
{{trainerdiv|building}} | {{trainerdiv|building}} | ||
{{trainerentry|Spr RG Channeler.png|Channeler||720|1|092|Gastly||24|}} | {{trainerentry|Spr RG Channeler.png|Channeler||720|1|092|Gastly||24|||}} | ||
{{trainerdiv|building}} | {{trainerdiv|building}} | ||
{{trainerentry|Spr RG Channeler.png|Channeler||660|1|093|Haunter||22|}} | {{trainerentry|Spr RG Channeler.png|Channeler||660|1|093|Haunter||22|||}} | ||
{{trainerfooter|building| | {{trainerfooter|building|1}} | ||
|} | |} | ||
{| class="expandable" align="center" style="background: #{{ | {| class="expandable" align="center" style="background: #{{blue color light}}; {{roundy}}; border: 5px solid #{{red color light}};" | ||
|- align="center" | |- align="center" | ||
! 6F | ! 6F | ||
| Line 413: | Line 485: | ||
| | | | ||
{{trainerheader|building}} | {{trainerheader|building}} | ||
{{trainerentry|Spr RG Channeler.png|Channeler||660|3|092|Gastly||22||092|Gastly||22||092|Gastly||22|}} | {{trainerentry|Spr RG Channeler.png|Channeler||660|3|092|Gastly||22||092|Gastly||22||092|Gastly||22|||}} | ||
{{trainerdiv|building}} | {{trainerdiv|building}} | ||
{{trainerentry|Spr RG Channeler.png|Channeler||720|1|092|Gastly||24|}} | {{trainerentry|Spr RG Channeler.png|Channeler||720|1|092|Gastly||24|||}} | ||
{{trainerdiv|building}} | {{trainerdiv|building}} | ||
{{trainerentry|Spr RG Channeler.png|Channeler||720|1|092|Gastly||24|}} | {{trainerentry|Spr RG Channeler.png|Channeler||720|1|092|Gastly||24|||}} | ||
{{trainerfooter|building| | {{trainerfooter|building|1}} | ||
|} | |||
{| class="expandable" align="center" style="background: #{{blue color light}}; {{roundy}}; border: 5px solid #{{red color light}};" | |||
|- align="center" | |||
! 7F | |||
|- | |||
| | |||
{{trainerheader|building}} | |||
{{trainerentry|Spr RG Rocket.png|Rocket||750|3|041|Zubat||25||041|Zubat||25||042|Golbat||25|||}} | |||
{{trainerdiv|building}} | |||
{{trainerentry|Spr RG Rocket.png|Rocket||780|2|109|Koffing||26||096|Drowzee||26|||}} | |||
{{trainerdiv|building}} | |||
{{trainerentry|Spr RG Rocket.png|Rocket||690|4|041|Zubat||23||019|Rattata||23||020|Raticate||23||041|Zubat||23|||}} | |||
{{trainerfooter|building|1}} | |||
|} | |} | ||
|} | |} | ||
{| class="expandable" align="center" style="background: #{{ | {| class="expandable" align="center" style="background: #{{blue color light}}; {{roundy}}; border: 5px solid #{{red color light}};" | ||
|- align="center" | |- align="center" | ||
! Available Pokémon | ! Available Pokémon | ||
| Line 428: | Line 513: | ||
{{catch/header|building|no}} | {{catch/header|building|no}} | ||
{{Catch/div|building|3F}} | {{Catch/div|building|3F}} | ||
{{catch/entry1|092|Gastly|yes|yes|no|3F|18-24|90%|type1= | {{catch/entry1|092|Gastly|yes|yes|no|3F|18-24|90%|type1=ghost|type2=poison}} | ||
{{catch/entry1|104|Cubone|yes|yes|no|3F|20, 22|9%|type1= | {{catch/entry1|104|Cubone|yes|yes|no|3F|20, 22|9%|type1=ground}} | ||
{{catch/entry1|093|Haunter|yes|yes|no|3F|25|1%|type1= | {{catch/entry1|093|Haunter|yes|yes|no|3F|25|1%|type1=ghost|type2=poison}} | ||
{{Catch/div|building|4F-5F}} | {{Catch/div|building|4F}} | ||
{{catch/entry1|092|Gastly|yes|yes|no| | {{catch/entry1|092|Gastly|yes|yes|no|4F|18-24|86%|type1=ghost|type2=poison}} | ||
{{catch/entry1|104|Cubone|yes|yes|no| | {{catch/entry1|104|Cubone|yes|yes|no|4F|20, 22|9%|type1=ground}} | ||
{{catch/entry1|093|Haunter|yes|yes|no| | {{catch/entry1|093|Haunter|yes|yes|no|4F|25|5%|type1=ghost|type2=poison}} | ||
{{Catch/div|building|5F}} | |||
{{catch/entry1|092|Gastly|yes|yes|no|5F|18-24|86%|type1=ghost|type2=poison}} | |||
{{catch/entry1|104|Cubone|yes|yes|no|5F|20, 22|9%|type1=ground}} | |||
{{catch/entry1|093|Haunter|yes|yes|no|5F|25|5%|type1=ghost|type2=poison}} | |||
{{Catch/div|building|6F}} | {{Catch/div|building|6F}} | ||
{{catch/entry1|092|Gastly|yes|yes|no|6F|19-24| | {{catch/entry1|092|Gastly|yes|yes|no|6F|19-24|85%|type1=ghost|type2=poison}} | ||
{{catch/entry1|104|Cubone|yes|yes|no|6F|22, 24|9%|type1= | {{catch/entry1|104|Cubone|yes|yes|no|6F|22, 24|9%|type1=ground}} | ||
{{catch/entry1|093|Haunter|yes|yes|no|6F|26, 28| | {{catch/entry1|093|Haunter|yes|yes|no|6F|26, 28|6%|type1=ghost|type2=poison}} | ||
{{Catch/div|building|7F}} | {{Catch/div|building|7F}} | ||
{{catch/entry1|092|Gastly|yes|yes|no|7F|20-24|75%|type1= | {{catch/entry1|092|Gastly|yes|yes|no|7F|20-24|75%|type1=ghost|type2=poison}} | ||
{{catch/entry1|093|Haunter|yes|yes|no|7F|28, 30|15%|type1= | {{catch/entry1|093|Haunter|yes|yes|no|7F|28, 30|15%|type1=ghost|type2=poison}} | ||
{{catch/entry1|104|Cubone|yes|yes|no|7F|22, 24|10%|type1= | {{catch/entry1|104|Cubone|yes|yes|no|7F|22, 24|10%|type1=ground}} | ||
{{catch/div|building|Special}} | {{catch/div|building|Special}} | ||
{{catch/entry1|105|Ghost Marowak|yes|yes|no|Special|30|{{tt|One|Cannot be caught}}|type1= | {{catch/entry1|105|Ghost Marowak|yes|yes|no|Special|30|{{tt|One|Cannot be caught}}|type1=ground}} | ||
{{catch/footer|building}} | {{catch/footer|building}} | ||
|} | |} | ||
{| class="expandable" align="center" style="background: #{{ | |||
{| class="expandable" align="center" style="background: #{{blue color light}}; {{roundy}}; border: 5px solid #{{red color light}};" | |||
|- align="center" | |- align="center" | ||
! Items | ! Items | ||
|- | |- | ||
| | | | ||
{{itlisth|building}} | {{itlisth|building}} | ||
{{Itemlist|Escape Rope|3F, north side|R=yes|B=yes}} | |||
{{Itemlist|Escape Rope| | {{Itemlist|Elixir|4F, near the staircase leading to the third floor|R=yes|B=yes|display={{DL|Ether|Elixir}}}} | ||
{{Itemlist|Awakening|4F, in the center of the floor|R=yes|B=yes|display={{DL|Status ailment healing item|Awakening}}}} | |||
{{Itemlist|Elixir| | {{Itemlist|HP Up|4F, south side|R=yes|B=yes|display={{DL|Vitamin|HP Up}}}} | ||
{{Itemlist|Awakening| | {{Itemlist|Elixir|5F, on the south wall near the west staircase ''(hidden)''|R=yes|B=yes|display={{DL|Ether|Elixir}}}} | ||
{{Itemlist|HP Up| | {{Itemlist|Nugget|5F, south side, near the healing spot|R=yes|B=yes|display={{DL|Valuable item|Nugget}}}} | ||
{{ | {{Itemlist|X Accuracy|6F, near the staircase from the fifth floor|R=yes|B=yes|display={{DL|Battle item|X Accuracy}}}} | ||
{{Itemlist|Nugget| | {{Itemlist|Rare Candy|6F, south side|R=yes|B=yes|display={{DL|Vitamin|Rare Candy}}}} | ||
{{Itemlist|X Accuracy| | |||
{{Itemlist|Rare Candy| | |||
{{itlistfoot|building}} | {{itlistfoot|building}} | ||
|} | |} | ||
The {{t|Ghost}}s here are totally immune to {{t|Normal}}- and {{type|Fighting}} attacks. Anything with a strong {{type|Psychic}} attack, like {{p|Kadabra}} or {{p|Drowzee}}, is good to bring along. To avoid the random encounters, just spray on the {{DL|Repel|Max Repel}}—after catching a {{p|Gastly}}, of course. One opponent is unavoidable; {{ga|Blue|your rival}} is waiting on the second floor. | The {{t|Ghost}}s here are totally immune to {{t|Normal}}- and {{type|Fighting}} attacks. Anything with a strong {{type|Psychic}} attack, like {{p|Kadabra}} or {{p|Drowzee}}, is good to bring along. To avoid the random encounters, just spray on the {{DL|Repel|Max Repel}}—after catching a {{p|Gastly}}, of course. One opponent is unavoidable; {{ga|Blue|your rival}} is waiting on the second floor. | ||
{{-}} | {{-}} | ||
====2F==== | |||
==== 2F ==== | |||
By this point, he has assembled a team that includes {{t|Grass}}, {{t|Fire}}, and {{t|Water}} Pokémon. In addition to his starter Pokémon, the others that make up this trio may be either {{p|Exeggcute}}, {{p|Growlithe}}, or {{p|Gyarados}}; whichever is absent is the same type as his starter. These new additions have forced him to swap out his {{p|Raticate}}, so its {{m|Hyper Fang}} is a thing of the past. | By this point, he has assembled a team that includes {{t|Grass}}, {{t|Fire}}, and {{t|Water}} Pokémon. In addition to his starter Pokémon, the others that make up this trio may be either {{p|Exeggcute}}, {{p|Growlithe}}, or {{p|Gyarados}}; whichever is absent is the same type as his starter. These new additions have forced him to swap out his {{p|Raticate}}, so its {{m|Hyper Fang}} is a thing of the past. | ||
| Line 486: | Line 573: | ||
|bordercolor={{blue color dark}} | |bordercolor={{blue color dark}} | ||
|sprite=Spr RG Blue 2.png | |sprite=Spr RG Blue 2.png | ||
|prize={{ | |prize={{PDollar}}1625 | ||
|name= | |name=Blue | ||
|game=RGB|location=Pokémon Tower | |game=RGB | ||
|location=Pokémon Tower | |||
|pokemon=5 | |pokemon=5 | ||
}} | }} | ||
|{{Pokémon/1|game=Blue | |{{Pokémon/1 | ||
|ndex=017|pokemon=Pidgeotto | |game=Blue | ||
|ndex=017 | |||
|pokemon=Pidgeotto | |||
|level=25 | |level=25 | ||
|move1=Gust|move1type=Normal | |type1=Normal | ||
|move2=Sand-Attack|move2type=Normal | |type2=Flying | ||
|move3=Quick Attack|move3type=Normal | |move1=Gust | ||
|move4=Whirlwind|move4type=Normal}} | |move1type=Normal | ||
|move1cat=Special | |||
|{{Pokémon/1|game=Blue | |move2=Sand-Attack | ||
|ndex=102|pokemon=Exeggcute | |move2type=Normal | ||
| | |move2cat=Special | ||
|move3=Quick Attack | |||
|move3type=Normal | |||
|move3cat=Physical | |||
|move4=Whirlwind | |||
|move4type=Normal | |||
|move4cat=Status}} | |||
|{{Pokémon/1 | |||
|game=Blue | |||
|ndex=102 | |||
|pokemon=Exeggcute | |||
|gender= | |||
|level=23 | |level=23 | ||
|move1=Barrage|move1type=Normal | |type1=Grass | ||
|move2=Hypnosis|move2type=Psychic}} | |type2=Psychic | ||
|move1=Barrage | |||
|{{Pokémon/1|game=Blue | |move1type=Normal | ||
|ndex=130|pokemon=Gyarados | |move1cat=Physical | ||
| | |move2=Hypnosis | ||
|move2type=Psychic | |||
|move2cat=Status}} | |||
|{{Pokémon/1 | |||
|game=Blue | |||
|ndex=130 | |||
|pokemon=Gyarados | |||
|gender= | |||
|level=22 | |level=22 | ||
|move1= | |ability= | ||
|move2= | |type1=Water | ||
|move3=Bite|move3type=Normal}} | |type2=Flying | ||
|move1=Leer | |||
|move1type=Normal | |||
|move1cat=Special | |||
|move2=Dragon Rage | |||
|move2type=Dragon | |||
|move2cat=Special | |||
|move3=Bite | |||
|move3type=Normal | |||
|move3cat=Physical | |||
|move4=Hydro Pump | |||
|move4type=Water | |||
|move4cat=Special}} | |||
{{Party/Div|color={{blue color}}}} | {{Party/Div|color={{blue color}}}} | ||
| style="margin:auto" |{{Pokémon/1|game=Blue | | style="margin:auto" |{{Pokémon/1 | ||
|ndex=064|pokemon=Kadabra | |game=Blue | ||
|ndex=064 | |||
|pokemon=Kadabra | |||
|level=20 | |||
|type1=Psychic | |type1=Psychic | ||
|move1=Teleport | |||
|move1=Teleport|move1type=Psychic | |move1type=Psychic | ||
|move2=Confusion|move2type=Psychic | |move1cat=Status | ||
|move3=Disable|move3type=Normal}} | |move2=Confusion | ||
|move2type=Psychic | |||
| style="margin:auto" |{{Pokémon/1|game=Blue | |move2cat=Special | ||
|ndex=005|pokemon=Charmeleon | |move3=Disable | ||
|move3type=Normal | |||
|move3cat=Status}} | |||
| style="margin:auto" |{{Pokémon/1 | |||
|game=Blue | |||
|ndex=005 | |||
|pokemon=Charmeleon | |||
|level=25 | |||
|type1=Fire | |type1=Fire | ||
|move1=Growl | |||
|move1=Growl|move1type=Normal | |move1type=Normal | ||
|move2=Ember|move2type=Fire | |move1cat=Status | ||
|move3=Leer|move3type=Normal | |move2=Ember | ||
|move4=Rage|move4type=Normal}} | |move2type=Fire | ||
|move2cat=Special | |||
|move3=Leer | |||
|move3type=Normal | |||
|move3cat=Status | |||
|move4=Rage | |||
|move4type=Normal | |||
|move4cat=Physical}} | |||
{{Party/Footer}} | {{Party/Footer}} | ||
| Line 538: | Line 674: | ||
|bordercolor={{blue color dark}} | |bordercolor={{blue color dark}} | ||
|sprite=Spr RG Blue 2.png | |sprite=Spr RG Blue 2.png | ||
|prize={{ | |prize={{PDollar}}1625 | ||
|name= | |name=Blue | ||
|game=RGB|location=Pokémon Tower | |game=RGB | ||
|location=Pokémon Tower | |||
|pokemon=5 | |pokemon=5 | ||
}} | }} | ||
|{{Pokémon/1|game=Blue | |{{Pokémon/1 | ||
|ndex=017|pokemon=Pidgeotto | |game=Blue | ||
|ndex=017 | |||
|pokemon=Pidgeotto | |||
|level=25 | |level=25 | ||
|move1=Gust|move1type=Normal | |type1=Normal | ||
|move2=Sand-Attack|move2type=Normal | |type2=Flying | ||
|move3=Quick Attack|move3type=Normal | |move1=Gust | ||
|move4=Whirlwind|move4type=Normal}} | |move1type=Normal | ||
|move1cat=Special | |||
|{{Pokémon/1|game=Blue | |move2=Sand-Attack | ||
|ndex=058|pokemon=Growlithe | |move2type=Normal | ||
|move2cat=Special | |||
|move3=Quick Attack | |||
|move3type=Normal | |||
|move3cat=Physical | |||
|move4=Whirlwind | |||
|move4type=Normal | |||
|move4cat=Status}} | |||
|{{Pokémon/1 | |||
|game=Blue | |||
|ndex=058 | |||
|pokemon=Growlithe | |||
|level=23 | |||
|type1=Fire | |type1=Fire | ||
|move1=Bite | |||
|move1=Bite|move1type=Normal | |move1type=Normal | ||
|move2=Roar|move2type=Normal | |move1cat=Physical | ||
|move3=Ember|move3type=Fire}} | |move2=Roar | ||
|move2type=Normal | |||
|{{Pokémon/1|game=Blue | |move2cat=Status | ||
|ndex=102|pokemon=Exeggcute | |move3=Ember | ||
| | |move3type=Fire | ||
|move3cat=Special}} | |||
|{{Pokémon/1 | |||
|game=Blue | |||
|ndex=102 | |||
|pokemon=Exeggcute | |||
|gender= | |||
|level=22 | |level=22 | ||
|move1=Barrage|move1type=Normal | |type1=Grass | ||
|move2=Hypnosis|move2type=Psychic}} | |type2=Psychic | ||
|move1=Barrage | |||
|move1type=Normal | |||
|move1cat=Physical | |||
|move2=Hypnosis | |||
|move2type=Psychic | |||
|move2cat=Status}} | |||
{{Party/Div|color={{blue color}}}} | {{Party/Div|color={{blue color}}}} | ||
| style="margin:auto" |{{Pokémon/1|game=Blue | | style="margin:auto" |{{Pokémon/1 | ||
|ndex=064|pokemon=Kadabra | |game=Blue | ||
|ndex=064 | |||
|pokemon=Kadabra | |||
|level=20 | |||
|type1=Psychic | |type1=Psychic | ||
|move1=Teleport | |||
|move1=Teleport|move1type=Psychic | |move1type=Psychic | ||
|move2=Confusion|move2type=Psychic | |move1cat=Status | ||
|move3=Disable|move3type=Normal}} | |move2=Confusion | ||
|move2type=Psychic | |||
| style="margin:auto" |{{Pokémon/1|game=Blue | |move2cat=Special | ||
|ndex=008|pokemon=Wartortle | |move3=Disable | ||
|move3type=Normal | |||
|move3cat=Status}} | |||
| style="margin:auto" |{{Pokémon/1 | |||
|game=Blue | |||
|ndex=008 | |||
|pokemon=Wartortle | |||
|level=25 | |||
|type1=Water | |type1=Water | ||
|move1=Tail Whip | |||
|move1=Tail Whip|move1type=Normal | |move1type=Normal | ||
|move2=Bubble|move2type=Water | |move1cat=Status | ||
|move3=Water Gun|move3type=Water | |move2=Bubble | ||
|move4=Bite|move4type=Normal}} | |move2type=Water | ||
|move2cat=Special | |||
|move3=Water Gun | |||
|move3type=Water | |||
|move3cat=Special | |||
|move4=Bite | |||
|move4type=Normal | |||
|move4cat=Physical}} | |||
{{Party/Footer}} | {{Party/Footer}} | ||
| Line 590: | Line 769: | ||
|bordercolor={{blue color dark}} | |bordercolor={{blue color dark}} | ||
|sprite=Spr RG Blue 2.png | |sprite=Spr RG Blue 2.png | ||
|prize={{ | |prize={{PDollar}}1625 | ||
|name= | |name=Blue | ||
|game=RGB|location=Pokémon Tower | |game=RGB | ||
|location=Pokémon Tower | |||
|pokemon=5 | |pokemon=5 | ||
}} | }} | ||
|{{Pokémon/1|game=Blue | |{{Pokémon/1 | ||
|ndex=017|pokemon=Pidgeotto | |game=Blue | ||
|ndex=017 | |||
|pokemon=Pidgeotto | |||
|level=25 | |level=25 | ||
|move1=Gust|move1type=Normal | |type1=Normal | ||
|move2=Sand-Attack|move2type=Normal | |type2=Flying | ||
|move3=Quick Attack|move3type=Normal | |move1=Gust | ||
|move4=Whirlwind|move4type=Normal}} | |move1type=Normal | ||
|move1cat=Special | |||
|{{Pokémon/1|game=Blue | |move2=Sand-Attack | ||
|ndex=130|pokemon=Gyarados | |move2type=Normal | ||
| | |move2cat=Special | ||
|move3=Quick Attack | |||
|move3type=Normal | |||
|move3cat=Physical | |||
|move4=Whirlwind | |||
|move4type=Normal | |||
|move4cat=Status}} | |||
|{{Pokémon/1 | |||
|game=Blue | |||
|ndex=130 | |||
|pokemon=Gyarados | |||
|gender= | |||
|level=23 | |level=23 | ||
|move1= | |ability= | ||
|move2= | |type1=Water | ||
|move3=Bite|move3type=Normal}} | |type2=Flying | ||
|move1=Leer | |||
|{{Pokémon/1|game=Blue | |move1type=Normal | ||
|ndex=058|pokemon=Growlithe | |move1cat=Special | ||
|move2=Dragon Rage | |||
|move2type=Dragon | |||
|move2cat=Special | |||
|move3=Bite | |||
|move3type=Normal | |||
|move3cat=Physical | |||
|move4=Hydro Pump | |||
|move4type=Water | |||
|move4cat=Special}} | |||
|{{Pokémon/1 | |||
|game=Blue | |||
|ndex=058 | |||
|pokemon=Growlithe | |||
|level=22 | |||
|type1=Fire | |type1=Fire | ||
|move1=Bite | |||
|move1=Bite|move1type=Normal | |move1type=Normal | ||
|move2=Roar|move2type=Normal | |move1cat=Physical | ||
|move3=Ember|move3type=Fire}} | |move2=Roar | ||
|move2type=Normal | |||
|move2cat=Status | |||
|move3=Ember | |||
|move3type=Fire | |||
|move3cat=Special}} | |||
{{Party/Div|color={{blue color}}}} | {{Party/Div|color={{blue color}}}} | ||
| style="margin:auto" |{{Pokémon/1|game=Blue | | style="margin:auto" |{{Pokémon/1 | ||
|ndex=064|pokemon=Kadabra | |game=Blue | ||
|ndex=064 | |||
|pokemon=Kadabra | |||
|level=20 | |||
|type1=Psychic | |type1=Psychic | ||
|move1=Teleport | |||
|move1=Teleport|move1type=Psychic | |move1type=Psychic | ||
|move2=Confusion|move2type=Psychic | |move1cat=Status | ||
|move3=Disable|move3type=Normal}} | |move2=Confusion | ||
|move2type=Psychic | |||
| style="margin:auto" |{{Pokémon/1|game=Blue | |move2cat=Special | ||
|ndex=002|pokemon=Ivysaur | |move3=Disable | ||
|move3type=Normal | |||
|move3cat=Status}} | |||
| style="margin:auto" |{{Pokémon/1 | |||
|game=Blue | |||
|ndex=002 | |||
|pokemon=Ivysaur | |||
|level=25 | |level=25 | ||
|move1=Growl|move1type=Normal | |type1=Grass | ||
|move2=Leech Seed|move2type=Grass | |type2=Poison | ||
|move3=Vine Whip|move3type=Grass | |move1=Growl | ||
|move4=PoisonPowder|move4type=Poison}} | |move1type=Normal | ||
|move1cat=Status | |||
|move2=Leech Seed | |||
|move2type=Grass | |||
|move2cat=Status | |||
|move3=Vine Whip | |||
|move3type=Grass | |||
|move3cat=Physical | |||
|move4=PoisonPowder | |||
|move4type=Poison | |||
|move4cat=Status}} | |||
{{Party/Footer}} | {{Party/Footer}} | ||
|} | |} | ||
{{-}} | |||
==== 3F ==== | |||
[[File:Pokémon Tower 3F RBY.png|thumb|left|Pokémon Tower, 3F]] | [[File:Pokémon Tower 3F RBY.png|thumb|left|Pokémon Tower, 3F]] | ||
Grab the [[Escape Rope]] by the north wall and climb the stairs to 4F. | Grab the [[Escape Rope]] by the north wall and climb the stairs to 4F. | ||
==== 4F ==== | |||
[[File:Pokémon Tower 4F RBY.png|thumb|right|Pokémon Tower, 4F]] | [[File:Pokémon Tower 4F RBY.png|thumb|right|Pokémon Tower, 4F]] | ||
Pick up the {{DL|Ether|Elixir|Elixer}} and {{DL|Status ailment healing item|Awakening}} in the center of the room, and the {{DL|Vitamin|HP Up}} near the south wall. Climb the western stairs. | Pick up the {{DL|Ether|Elixir|Elixer}} and {{DL|Status ailment healing item|Awakening}} in the center of the room, and the {{DL|Vitamin|HP Up}} near the south wall. Climb the western stairs. | ||
====5F==== | ==== 5F ==== | ||
[[File:Pokémon Tower 5F RBY.png|thumb|left|Pokémon Tower, 5F]] | [[File:Pokémon Tower 5F RBY.png|thumb|left|Pokémon Tower, 5F]] | ||
There is a {{tc|Channeler}} in the center of the fifth floor that hasn't been possessed, and she maintains a healing area with her white magic. This protected zone will fully heal every Pokémon in your team, restoring health and eliminating any status problems. This can be done at any time. | There is a {{tc|Channeler}} in the center of the fifth floor that hasn't been possessed, and she maintains a healing area with her white magic. This protected zone will fully heal every Pokémon in your team, restoring health and eliminating any status problems. This can be done at any time. | ||
====6F==== | ==== 6F ==== | ||
[[File:Pokémon Tower 6F RBY.png|thumb|right|Pokémon Tower, 6F]] | [[File:Pokémon Tower 6F RBY.png|thumb|right|Pokémon Tower, 6F]] | ||
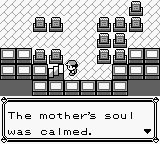
As you approach the stairs to the top floor, the [[Ghost (literal)|ghost]] attacks and the {{key|I|Silph Scope}} activates, revealing a level 30 {{p|Marowak}}. It may look like a great addition to your team, but this spirit can't be caught, so all you can do is defeat it. Once the battle is over, the mother Marowak's spirit is calmed and departs to the afterlife, finally able to rest in peace. Take the stairs to the top floor... right into a group of Rockets. | As you approach the stairs to the top floor, the [[Ghost (literal)|ghost]] attacks and the {{key|I|Silph Scope}} activates, revealing a level 30 {{p|Marowak}}. It may look like a great addition to your team, but this spirit can't be caught, so all you can do is defeat it. Once the battle is over, the mother Marowak's spirit is calmed and departs to the afterlife, finally able to rest in peace. Take the stairs to the top floor... right into a group of Rockets. | ||
====7F==== | ==== 7F ==== | ||
[[File:Pokémon Tower 7F RBY.png|thumb|left|Pokémon Tower, 7F]] | [[File:Pokémon Tower 7F RBY.png|thumb|left|Pokémon Tower, 7F]] | ||
[[File:Marowak calmed soul RBY.png|thumb|Marowak's soul is calmed]] | |||
After they run off, talk to [[Mr. Fuji]] and he'll take you to his home, Pokémon House, at the foot of the tower. | After they run off, talk to [[Mr. Fuji]] and he'll take you to his home, Pokémon House, at the foot of the tower. | ||
===Mr. Fuji's house=== | === Mr. Fuji's house === | ||
Speak with him again and he'll give you the {{key|I|Poké Flute}}, an item that instantly awakens any sleeping Pokémon. This lets you rouse the two {{p|Snorlax}}, west of Celadon and south of Lavender. | Speak with him again and he'll give you the {{key|I|Poké Flute}}, an item that instantly awakens any sleeping Pokémon. This lets you rouse the two {{p|Snorlax}}, west of Celadon and south of Lavender. | ||
Head out west to return to [[Saffron City]]. | Head out west to return to [[Saffron City]]. | ||
{{WalkthroughPrevNext | {{WalkthroughPrevNext | ||
| Line 699: | Line 913: | ||
}} | }} | ||
<br> | <br /> | ||
{{Project Walkthroughs notice}} | {{Project Walkthroughs notice}} | ||
[[Category:Red and Blue walkthrough]] | |||
[[Category:Red and Blue walkthrough|R09]] | |||
Revision as of 22:09, 20 June 2015
Celadon City
Celadon City is the second-largest city in the region, and it's got plenty going on to live up to the hype. The Celadon Department Store is an essential stop, since almost anything a Trainer could want is up for sale here. The Celadon Mansion is a hotel-of-sorts, and the current tenants are none other than Game Freak, the team that developed Pokémon. The Game Corner houses the slot machines, and those coins can be redeemed for valuable prizes in the Prize Corner next door. In addition, Celadon is also home to the Celadon Gym, nestled on a hill in the southwest.
| Available Pokémon | ||||||||||||||||||||||||||||||||||||||||||||||||||||||||||||||||||||||||||||||||||||||||||||||||||||||||||||||||||||||||||||||||||||||||||||||||||||||||
|---|---|---|---|---|---|---|---|---|---|---|---|---|---|---|---|---|---|---|---|---|---|---|---|---|---|---|---|---|---|---|---|---|---|---|---|---|---|---|---|---|---|---|---|---|---|---|---|---|---|---|---|---|---|---|---|---|---|---|---|---|---|---|---|---|---|---|---|---|---|---|---|---|---|---|---|---|---|---|---|---|---|---|---|---|---|---|---|---|---|---|---|---|---|---|---|---|---|---|---|---|---|---|---|---|---|---|---|---|---|---|---|---|---|---|---|---|---|---|---|---|---|---|---|---|---|---|---|---|---|---|---|---|---|---|---|---|---|---|---|---|---|---|---|---|---|---|---|---|---|---|---|---|
| ||||||||||||||||||||||||||||||||||||||||||||||||||||||||||||||||||||||||||||||||||||||||||||||||||||||||||||||||||||||||||||||||||||||||||||||||||||||||
| Items | ||||||||||||||||||||||||||||||||||||||||||||||||||||||||||||||||||||||||||||||||||||||||||||||||
|---|---|---|---|---|---|---|---|---|---|---|---|---|---|---|---|---|---|---|---|---|---|---|---|---|---|---|---|---|---|---|---|---|---|---|---|---|---|---|---|---|---|---|---|---|---|---|---|---|---|---|---|---|---|---|---|---|---|---|---|---|---|---|---|---|---|---|---|---|---|---|---|---|---|---|---|---|---|---|---|---|---|---|---|---|---|---|---|---|---|---|---|---|---|---|---|---|
| ||||||||||||||||||||||||||||||||||||||||||||||||||||||||||||||||||||||||||||||||||||||||||||||||
Celadon Mansion
The tall building in the north of town is Celadon Mansion. On the third floor, Game Freak's game designer promises a reward for showing him your completed Pokédex. Incidentally, you can find a new addition right now; leave the mansion and follow the path behind the Pokémon Center to find a break in the trees where you can enter the mansion through the back door. Make sure that you've got an empty slot in your party, and take the stairs to the top floor to find an Eevee. Eevee is an extremely versatile creature, since it can evolve into one of three different forms. Exposure to a Water Stone, Thunderstone, or Fire Stone results in a Vaporeon, Jolteon, or a Flareon, respectively. Any of those three evolutions will make a powerful addition to your team, especially since they can cover the weaknesses of your starter's final form. These stones can be purchased only in the Department Store.
| ||||||||||||||||||||||||||
Return of the Rockets
If you haven't noticed by now, there are two Rocket grunts loitering around the city. It looks like Team Rocket has something planned for Celadon...
Stop by the café in the south of town and talk to the guy in the back corner. He lost all his money at the slots, so he has no more use for his Coin Case, and hands it over. Next door to the café is an operation that is shipping 2,000 Pokémon every month to the Game Corner as slot prizes. Those kind of numbers mean big money, and that's got Team Rocket's name written all over it. They're up to something, and as one of the workers points out, it surely has nothing to do with a hidden switch behind a poster in the Game Corner.
Celadon Department Store
2nd floor
|
| ||||||||||||||||||||||||||||||||||||||||||||||||||||||||||||||||||||||||||||||
3rd floor
There's nothing for sale on the third floor, but you can talk to the clerk to get TM18 (Counter).
4th floor
The evolutionary stones are on sale here. Pick up any but a Leaf Stone for your new Eevee. Be sure to pick up a Poké Doll too, as it will be important a little later.
| |||||||||||||||||||||||
5th floor
|
| ||||||||||||||||||||||||||||||||||||||||||||||||||||||
Rooftop Square
Each Vending Machine dispenses Fresh Water, Soda Pop, and Lemonade. Buy one of each drink to give to the little girl nearby, and she'll give you up to three TMs as thanks - TM13 (Ice Beam) for a Fresh Water, TM48 (Rock Slide) for a Soda Pop, and TM49 (Tri Attack) for a Lemonade. Pick up an extra drink for the guards at Saffron City's borders, and stock up on Lemonade. Like the other drinks, Lemonade can restore your Pokémon's health, but Lemonade is the most potent. It restores 80 HP, while by comparison, a Super Potion only restores 50 HP.
| |||||||||||||||
Celadon Gym
CELADON CITY
POKéMON GYM
LEADER: ERIKA
The Nature Loving
Princess!
The Celadon Gym specializes in Grass-type Pokémon. This will likely be one of the easiest Gyms to defeat, as Grass Pokémon have multiple weaknesses. These plants fare poorly against Fire-, Ice-, Flying-, and Bug-type attacks. The majority of Pokémon here are also part-Poison, which adds a weakness to Psychic moves. While your own Grass Pokémon take less-than-normal damage from Grass attacks, they need to be careful of Poison moves like Acid. If you haven't used TM13 yet, Ice Beam can be a great help.
| |||||||||||||||||||||||||||||||||||||||||||||||||||||||||||||||||||||||||||||||||||||||||||||||||||||||||||||||||||||||||||||||||||||||||||||||||||||||||||||||||||||||||||||||||||||||||||||||||||||||||||||||||||||||||||||||||||||||||||||||||||||||||
Defeating the Celadon Gym earns you the Rainbow Badge, which commands all Pokémon up to level 50, and enables the use of Strength outside of battle. Erika also gives out TM21 (Mega Drain), a Grass-type move that damages the opponent while restoring the user's health.
Game Corner
All the prizes here are offered at extremely high prices, so you'll need a huge supply of coins to get everything. A few can be found dropped on the ground, and talking to the other gamblers gets you some more. Besides that, you can either buy them—50 coins for $1000—or take your chances with the slots. Some prizes are extremely rare, while others can be found only here.
|
|
| |||||||||||||||||||||||||||||||||||||||||||||||||||||||||||||||||||||||||||
At first glance, everything looks normal here. People are relaxed, having fun at the slot machines, but there's something unsettling about the guy glaring at the poster... As soon as you approach him, he picks a fight with you.
| Trainers | |||||||||||||||||||||||
|---|---|---|---|---|---|---|---|---|---|---|---|---|---|---|---|---|---|---|---|---|---|---|---|
| |||||||||||||||||||||||
He runs off, leaving the poster exposed. Examine it to flip the switch, which reveals a set of stairs nearby, and descend into their hideout.
Rocket Hideout
Team Rocket is headed by a shadowy figure known as Giovanni. This mob boss is in possession of the Silph Scope prototype, which can identify the ghosts back in Pokémon Tower. It is impossible to get past the spirits without that item, so make sure he doesn't escape with it!
| Trainers | |||||||||||||||||||||||||||||||||||||||||||||||||||||||||||||||||||||||||||||||||||||||||||||||||||||||||||||||||||||||||||||||||||||||||||||||||||||||||||||||||||||||||||||||||||||||||||||||||||||||||||||||||||||||||||||||||||||||||||||||||||||||||||||||||||||||||||||||||||||||||||||||||||||||||||||
|---|---|---|---|---|---|---|---|---|---|---|---|---|---|---|---|---|---|---|---|---|---|---|---|---|---|---|---|---|---|---|---|---|---|---|---|---|---|---|---|---|---|---|---|---|---|---|---|---|---|---|---|---|---|---|---|---|---|---|---|---|---|---|---|---|---|---|---|---|---|---|---|---|---|---|---|---|---|---|---|---|---|---|---|---|---|---|---|---|---|---|---|---|---|---|---|---|---|---|---|---|---|---|---|---|---|---|---|---|---|---|---|---|---|---|---|---|---|---|---|---|---|---|---|---|---|---|---|---|---|---|---|---|---|---|---|---|---|---|---|---|---|---|---|---|---|---|---|---|---|---|---|---|---|---|---|---|---|---|---|---|---|---|---|---|---|---|---|---|---|---|---|---|---|---|---|---|---|---|---|---|---|---|---|---|---|---|---|---|---|---|---|---|---|---|---|---|---|---|---|---|---|---|---|---|---|---|---|---|---|---|---|---|---|---|---|---|---|---|---|---|---|---|---|---|---|---|---|---|---|---|---|---|---|---|---|---|---|---|---|---|---|---|---|---|---|---|---|---|---|---|---|---|---|---|---|---|---|---|---|---|---|---|---|---|---|---|---|---|---|---|---|---|---|---|---|---|---|---|---|---|---|---|---|---|---|---|---|---|---|---|---|---|---|---|---|---|---|---|---|---|---|
| |||||||||||||||||||||||||||||||||||||||||||||||||||||||||||||||||||||||||||||||||||||||||||||||||||||||||||||||||||||||||||||||||||||||||||||||||||||||||||||||||||||||||||||||||||||||||||||||||||||||||||||||||||||||||||||||||||||||||||||||||||||||||||||||||||||||||||||||||||||||||||||||||||||||||||||
| Items | ||||||||||||||||||||||||||||||||||||||||||||||||||||||||||||||||||||
|---|---|---|---|---|---|---|---|---|---|---|---|---|---|---|---|---|---|---|---|---|---|---|---|---|---|---|---|---|---|---|---|---|---|---|---|---|---|---|---|---|---|---|---|---|---|---|---|---|---|---|---|---|---|---|---|---|---|---|---|---|---|---|---|---|---|---|---|---|
| ||||||||||||||||||||||||||||||||||||||||||||||||||||||||||||||||||||
B1F (north)
The key to confronting Giovanni in his office is exactly that—a key. The Lift Key that operates the elevator is on the fourth floor beneath the Game Corner.
B2F
This floor is the first area that you encounter spin tiles; these send you spinning until you land on a stopper tile.
Enter the maze, and follow the spin tiles to the stopper tile in the northwest. Backtrack to get the Nugget from the northeast corner. On your way south you'll find a Moon Stone, TM07 (Horn Drill), and a Super Potion. Climb the stairs to the east to find two more Rockets and a Hyper Potion, then backtrack through the maze and head down the northern stairs.
B3F
Go south past the lone Rocket to get TM10 (Double-Edge), and the hidden Nugget nearby, then enter the second spin tile maze. This one isn't as large as the last, so spin around a little and grab the Rare Candy on your way south. Beat up the Rocket here and go downstairs to B4F.
B4F
When you first reach B4F, you can only reach the two rooms on the west side. Walk south to find an HP Up sitting on a table, then check out the northern room. By the far wall is TM02 (Razor Wind), and to the north, another Rocket.
Talk to him after the battle, and he's so upset that he drops the Lift Key. Now climb back to B2F and spin through the maze one last time to reach the elevator in the southeast. Ride back down to B4F to reach the east side.
When you exit the elevator, go west to find an Iron. Take out Giovanni's guards, then step inside to confront the criminal mastermind. His Onix and Rhyhorn are both susceptible to Grass- and Water-type moves, while his Kangaskhan is vulnerable only to Fighting-type attacks.
| ||||||||||||||||||||||||||||||||||||||||||||||||||||||||||||||||||||||||||||||||||||||||||
After the battle, Giovanni and the other Rockets disappear. Pick up the Silph Scope that he left behind; now you can climb to the very top of Pokémon Tower. Take the elevator up to the first floor, and beat one last Rocket on the way out.
Now you can finally leave Celadon. Bring along that extra drink and head east to Route 7. Step inside the gate to be stopped by the guard. He automatically sniffs out the drink, and as he shares it with the other three guards, you are now free to come and go through Saffron City. The Saffron Poké Mart offers the powerful Max Repel, and it may be a good idea to buy a few for the haunted tower. Ignore the rest of the city for now, and continue east to Lavender Town.
Lavender Town
Pokémon Tower
| Trainers | ||||||||||||||||||||||||||||||||||||||||||||||||||||||||||||||||||||||||||||||||||||||||||||||||||||||||||||||||||||||||||||||||||||||||||||||||||||||||||||||||||||||||||||||||||||||||||||||||||||||||||||||||||||||||||||||||||||||||||||||||||||||||||||||||||||||||||||||||||||||||||||||||||||||||||||||||||||||||||
|---|---|---|---|---|---|---|---|---|---|---|---|---|---|---|---|---|---|---|---|---|---|---|---|---|---|---|---|---|---|---|---|---|---|---|---|---|---|---|---|---|---|---|---|---|---|---|---|---|---|---|---|---|---|---|---|---|---|---|---|---|---|---|---|---|---|---|---|---|---|---|---|---|---|---|---|---|---|---|---|---|---|---|---|---|---|---|---|---|---|---|---|---|---|---|---|---|---|---|---|---|---|---|---|---|---|---|---|---|---|---|---|---|---|---|---|---|---|---|---|---|---|---|---|---|---|---|---|---|---|---|---|---|---|---|---|---|---|---|---|---|---|---|---|---|---|---|---|---|---|---|---|---|---|---|---|---|---|---|---|---|---|---|---|---|---|---|---|---|---|---|---|---|---|---|---|---|---|---|---|---|---|---|---|---|---|---|---|---|---|---|---|---|---|---|---|---|---|---|---|---|---|---|---|---|---|---|---|---|---|---|---|---|---|---|---|---|---|---|---|---|---|---|---|---|---|---|---|---|---|---|---|---|---|---|---|---|---|---|---|---|---|---|---|---|---|---|---|---|---|---|---|---|---|---|---|---|---|---|---|---|---|---|---|---|---|---|---|---|---|---|---|---|---|---|---|---|---|---|---|---|---|---|---|---|---|---|---|---|---|---|---|---|---|---|---|---|---|---|---|---|---|---|---|---|---|---|---|---|---|---|---|---|---|---|
| ||||||||||||||||||||||||||||||||||||||||||||||||||||||||||||||||||||||||||||||||||||||||||||||||||||||||||||||||||||||||||||||||||||||||||||||||||||||||||||||||||||||||||||||||||||||||||||||||||||||||||||||||||||||||||||||||||||||||||||||||||||||||||||||||||||||||||||||||||||||||||||||||||||||||||||||||||||||||||
| Available Pokémon | ||||||||||||||||||||||||||||||||||||||||||||||||||||||||||||||||||||||||||||||||||||||||||||||||||||||||||||||||||||||||||||||||||||||||||||||||||||||||||||||||||||||||||||||||||||||||||||||||||||||||||||||||||||||||||||||||||||||||||||||||||||||||||||||||||||||||||||||||||||||||||||||||||||||||||||||||||||||||||||||||||||||||||||||||||||||||||||||||||||||||||||||||||||
|---|---|---|---|---|---|---|---|---|---|---|---|---|---|---|---|---|---|---|---|---|---|---|---|---|---|---|---|---|---|---|---|---|---|---|---|---|---|---|---|---|---|---|---|---|---|---|---|---|---|---|---|---|---|---|---|---|---|---|---|---|---|---|---|---|---|---|---|---|---|---|---|---|---|---|---|---|---|---|---|---|---|---|---|---|---|---|---|---|---|---|---|---|---|---|---|---|---|---|---|---|---|---|---|---|---|---|---|---|---|---|---|---|---|---|---|---|---|---|---|---|---|---|---|---|---|---|---|---|---|---|---|---|---|---|---|---|---|---|---|---|---|---|---|---|---|---|---|---|---|---|---|---|---|---|---|---|---|---|---|---|---|---|---|---|---|---|---|---|---|---|---|---|---|---|---|---|---|---|---|---|---|---|---|---|---|---|---|---|---|---|---|---|---|---|---|---|---|---|---|---|---|---|---|---|---|---|---|---|---|---|---|---|---|---|---|---|---|---|---|---|---|---|---|---|---|---|---|---|---|---|---|---|---|---|---|---|---|---|---|---|---|---|---|---|---|---|---|---|---|---|---|---|---|---|---|---|---|---|---|---|---|---|---|---|---|---|---|---|---|---|---|---|---|---|---|---|---|---|---|---|---|---|---|---|---|---|---|---|---|---|---|---|---|---|---|---|---|---|---|---|---|---|---|---|---|---|---|---|---|---|---|---|---|---|---|---|---|---|---|---|---|---|---|---|---|---|---|---|---|---|---|---|---|---|---|---|---|---|---|---|---|---|---|---|---|---|---|---|---|---|---|---|---|---|---|---|---|---|---|---|---|---|---|---|---|---|---|---|---|---|---|---|
| ||||||||||||||||||||||||||||||||||||||||||||||||||||||||||||||||||||||||||||||||||||||||||||||||||||||||||||||||||||||||||||||||||||||||||||||||||||||||||||||||||||||||||||||||||||||||||||||||||||||||||||||||||||||||||||||||||||||||||||||||||||||||||||||||||||||||||||||||||||||||||||||||||||||||||||||||||||||||||||||||||||||||||||||||||||||||||||||||||||||||||||||||||||
| Items | ||||||||||||||||||||||||||||||||||||||||
|---|---|---|---|---|---|---|---|---|---|---|---|---|---|---|---|---|---|---|---|---|---|---|---|---|---|---|---|---|---|---|---|---|---|---|---|---|---|---|---|---|
| ||||||||||||||||||||||||||||||||||||||||
The Ghosts here are totally immune to Normal- and Fighting-type attacks. Anything with a strong Psychic-type attack, like Kadabra or Drowzee, is good to bring along. To avoid the random encounters, just spray on the Max Repel—after catching a Gastly, of course. One opponent is unavoidable; your rival is waiting on the second floor.
2F
By this point, he has assembled a team that includes Grass, Fire, and Water Pokémon. In addition to his starter Pokémon, the others that make up this trio may be either Exeggcute, Growlithe, or Gyarados; whichever is absent is the same type as his starter. These new additions have forced him to swap out his Raticate, so its Hyper Fang is a thing of the past.
His Pidgeotto, despite leveling up and learning a new move, is still not much of a threat. Exeggcute can cause problems with its Sleep-inducing Hypnosis, but its Barrage has relatively low power. His Growlithe is still just a pup, and cannot deal serious damage yet. Gyarados' high Attack makes it a decent threat, so take the sea serpent down quickly with Electric or Rock attacks. His Kadabra can inflict decent damage with Confusion, but its other moves are no real threat. His starter has grown to level 25 and learned some new moves, but play to its weaknesses to take it down with little effort.
3F
Grab the Escape Rope by the north wall and climb the stairs to 4F.
4F
Pick up the Elixer and Awakening in the center of the room, and the HP Up near the south wall. Climb the western stairs.
5F
There is a Channeler in the center of the fifth floor that hasn't been possessed, and she maintains a healing area with her white magic. This protected zone will fully heal every Pokémon in your team, restoring health and eliminating any status problems. This can be done at any time.
6F
As you approach the stairs to the top floor, the ghost attacks and the Silph Scope activates, revealing a level 30 Marowak. It may look like a great addition to your team, but this spirit can't be caught, so all you can do is defeat it. Once the battle is over, the mother Marowak's spirit is calmed and departs to the afterlife, finally able to rest in peace. Take the stairs to the top floor... right into a group of Rockets.
7F
After they run off, talk to Mr. Fuji and he'll take you to his home, Pokémon House, at the foot of the tower.
Mr. Fuji's house
Speak with him again and he'll give you the Poké Flute, an item that instantly awakens any sleeping Pokémon. This lets you rouse the two Snorlax, west of Celadon and south of Lavender.
Head out west to return to Saffron City.
|
Red and Blue walkthrough |
|

|
This article is part of Project Walkthroughs, a Bulbapedia project that aims to write comprehensive step-by-step guides on each Pokémon game. |
