Appendix:Red and Blue walkthrough/Section 1: Difference between revisions
m (→Home: Nintendo officially calls it "+Control Pad") |
Zesty Cactus (talk | contribs) mNo edit summary |
||
| (11 intermediate revisions by 4 users not shown) | |||
| Line 1: | Line 1: | ||
{{ | {{WalkthroughNotice}} | ||
==Introduction== | |||
== Introduction == | |||
[[File:Title Screen RB.png|thumb|Title screen]] | [[File:Title Screen RB.png|thumb|Title screen]] | ||
| Line 26: | Line 27: | ||
| colspan="2" style="background: #{{kanto color light}}; {{roundybottom|5px}};" | | | colspan="2" style="background: #{{kanto color light}}; {{roundybottom|5px}};" | | ||
|} | |} | ||
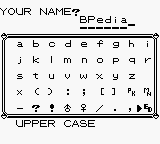
If you don't want any of the preset names, go to ''New Name'' and press A. Here it's a simple case of moving around to the letter you want and pressing A to select it. To remove the last letter, press B. Once you're done entering your name, select ''End'' in the bottom right corner or press START. This stumped a lot of people when the game was first released. | If you don't want any of the preset names, go to ''New Name'' and press A. Here it's a simple case of moving around to the letter you want and pressing A to select it. To remove the last letter, press B. Once you're done entering your name, select ''End'' in the bottom right corner or press START. This stumped a lot of people when the game was first released. | ||
| Line 33: | Line 33: | ||
== Home == | == Home == | ||
The game begins in your bedroom, with you standing in front of your | The game begins in your bedroom, with you standing in front of your [[SNES]]. First of all, here's a recap of the controls: | ||
{| align="center" style="background: #{{kanto color}}; {{roundy}}; border: 2px solid #{{kanto color dark}};" colspan="2" cellspacing="2" cellpadding="4" | {| align="center" style="background: #{{kanto color}}; {{roundy}}; border: 2px solid #{{kanto color dark}};" colspan="2" cellspacing="2" cellpadding="4" | ||
| Line 40: | Line 40: | ||
! style="background: #{{kanto color light}}; {{roundytr|5px}};" | Effects | ! style="background: #{{kanto color light}}; {{roundytr|5px}};" | Effects | ||
|- style="background: #FFFFFF;" | |- style="background: #FFFFFF;" | ||
| align="center" | +Control Pad<br><small>(D-Pad/Arrows)</small> | | align="center" | +Control Pad<br /><small>(D-Pad/Arrows)</small> | ||
| align="center" | Moves the character; moves the cursor in a menu | | align="center" | Moves the character; moves the cursor in a menu | ||
|- style="background: #FFFFFF;" | |- style="background: #FFFFFF;" | ||
| Line 54: | Line 54: | ||
| colspan="2" style="background: #{{kanto color light}}; {{roundybottom|5px}};" | | | colspan="2" style="background: #{{kanto color light}}; {{roundybottom|5px}};" | | ||
|} | |} | ||
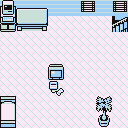
The PC in the corner is your item storage system. Your backpack can only hold 20 different items, while the PC can hold up to 50. ''Deposit Item'' and ''Withdraw Item'' are self-explanatory, and ''Toss Item'' lets you get rid of an item permanently. The PC already has a [[Potion]], so select ''Withdraw Item'' and choose ''Potion ×1''. Press the B Button to close the menus and return to your bedroom. | The PC in the corner is your item storage system. Your backpack can only hold 20 different items, while the PC can hold up to 50. ''Deposit Item'' and ''Withdraw Item'' are self-explanatory, and ''Toss Item'' lets you get rid of an item permanently. The PC already has a [[Potion]], so select ''Withdraw Item'' and choose ''Potion ×1''. Press the B Button to close the menus and return to your bedroom. | ||
| Line 60: | Line 59: | ||
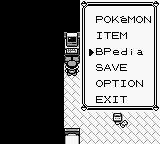
To save the game, press START. Select ''Save'', and then ''Yes''. When the menu disappears, your progress is saved. You could then turn off the [[Game Boy]] and start from this point at a later time. | To save the game, press START. Select ''Save'', and then ''Yes''. When the menu disappears, your progress is saved. You could then turn off the [[Game Boy]] and start from this point at a later time. | ||
To go downstairs, step on the stairs in the top-right corner of the room. | To go downstairs, step on the stairs in the top-right corner of the room. {{ka|Mom}} is sitting at the table, and tells you that [[Professor Oak]] has been looking for you. To leave the building, step on the mat along the south wall, and press down on the +Control Pad. Welcome to Pallet Town! | ||
==Pallet Town== | == Pallet Town == | ||
[[File:Pallet Town RBY.png|left|thumb|250px|Pallet Town]] | [[File:Pallet Town RBY.png|left|thumb|250px|Pallet Town]] | ||
[[File:Player Bedroom RBY.png|thumb|Your bedroom]] | [[File:Player Bedroom RBY.png|thumb|Your bedroom]] | ||
| Line 68: | Line 67: | ||
[[File:Rb walkthrough6.png|thumb|Busted!]] | [[File:Rb walkthrough6.png|thumb|Busted!]] | ||
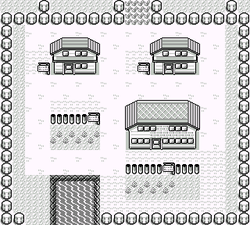
[[Pallet Town]] is a rather boring, quaint town, with only three houses. The house to the west is yours, the one to the east is your rival's house, and the big building to the south is [[Professor Oak]]'s [[Oak's lab|Lab]]. You can walk all around town and talk to everyone, but Oak is nowhere to be found. Looks like there's nothing else to do but leave town, so walk into the tall grass north of the town... | [[Pallet Town]] is a rather boring, quaint town, with only three houses. The house to the west is yours, the one to the east is your rival's house, and the big building to the south is [[Professor Oak]]'s [[Oak's lab|Lab]]. You can walk all around town and talk to everyone, but Oak is nowhere to be found. Looks like there's nothing else to do but leave town, so walk into the tall grass north of the town... | ||
From out of nowhere, Oak appears! He yells at you for trying to leave by yourself, without a Pokémon of your own for defense against the wild Pokémon roaming around. He drags you back to the lab, and lets you choose your very first Pokémon. Each one has its advantages and disadvantages, and some are more challenging to raise than the others. | From out of nowhere, Oak appears! He yells at you for trying to leave by yourself, without a Pokémon of your own for defense against the wild Pokémon roaming around. He drags you back to the lab, and lets you choose your very first Pokémon. Each one has its advantages and disadvantages, and some are more challenging to raise than the others. | ||
| Line 74: | Line 73: | ||
{| align="center" style="background: #{{kanto color dark}}; font-size: 85%; {{roundy}}; border: 5px solid #{{kanto color}};" | {| align="center" style="background: #{{kanto color dark}}; font-size: 85%; {{roundy}}; border: 5px solid #{{kanto color}};" | ||
|- align="center" | |- align="center" | ||
! colspan="2" style="width: 80px; background: #{{kanto color light}}; {{roundytl|5px}};" | {{spr|001|Red and Blue}}<br>'''{{pcolor|Bulbasaur|{{kanto color dark}}}}''' | ! colspan="2" style="width: 80px; background: #{{kanto color light}}; {{roundytl|5px}};" | {{spr|001|Red and Blue}}<br />'''{{pcolor|Bulbasaur|{{kanto color dark}}}}''' | ||
! colspan="2" style="width: 80px; background: #{{kanto color light}};" | {{spr|004|Red and Blue}}<br>'''{{pcolor|Charmander|{{kanto color dark}}}}'''<br> | ! colspan="2" style="width: 80px; background: #{{kanto color light}};" | {{spr|004|Red and Blue}}<br />'''{{pcolor|Charmander|{{kanto color dark}}}}'''<br /> | ||
! colspan="2" style="width: 80px; background: #{{kanto color light}}; {{roundytr|5px}};" | {{spr|007|Red and Blue}}<br>'''{{pcolor|Squirtle|{{kanto color dark}}}}''' | ! colspan="2" style="width: 80px; background: #{{kanto color light}}; {{roundytr|5px}};" | {{spr|007|Red and Blue}}<br />'''{{pcolor|Squirtle|{{kanto color dark}}}}''' | ||
|- align="center" | |- align="center" | ||
| style="background: #{{grass color}}" | {{t|Grass|{{color|FFF|Grass}}}} | | style="background: #{{grass color}}" | {{t|Grass|{{color|FFF|Grass}}}} | ||
| Line 112: | Line 111: | ||
* {{p|Bulbasaur}} is perfect for beginners. It can easily mop up Pokémon in the {{gy|Pewter}}, {{gy|Cerulean}}, and {{gy|Viridian}} Gyms, and resists the Pokémon in the {{gy|Vermilion}} and {{gy|Celadon}} Gyms. It is also unaffected by the {{status|Poison}} status ailment. It may have trouble with the {{gy|Saffron}} and {{gy|Cinnabar}} Gyms, but at that point in the game you should have some great Pokémon to back it up. | * {{p|Bulbasaur}} is perfect for beginners. It can easily mop up Pokémon in the {{gy|Pewter}}, {{gy|Cerulean}}, and {{gy|Viridian}} Gyms, and resists the Pokémon in the {{gy|Vermilion}} and {{gy|Celadon}} Gyms. It is also unaffected by the {{status|Poison}} status ailment. It may have trouble with the {{gy|Saffron}} and {{gy|Cinnabar}} Gyms, but at that point in the game you should have some great Pokémon to back it up. | ||
* {{p|Charmander}} is the most difficult Pokémon for beginners to use, since it will be at a disadvantage in the first two Gyms, with its only advantage against the Celadon Gym. His final evolution, {{p|Charizard}}, is noted for being quite powerful, though it may not usually have a type advantage in battle. | * {{p|Charmander}} is the most difficult Pokémon for beginners to use, since it will be at a disadvantage in the first two Gyms, with its only advantage against the Celadon Gym. His final evolution, {{p|Charizard}}, is noted for being quite powerful, though it may not usually have a type advantage in battle. | ||
* {{p|Squirtle}} is the second-easiest to train. It can defeat the Pewter, Cinnabar, and Viridian Gyms without much effort. However, its movepool is relatively limited, and it may have trouble against the other {{t|Water}} Pokémon in the Cerulean Gym. | * {{p|Squirtle}} is the second-easiest to train. It can defeat the Pewter, Cinnabar, and Viridian Gyms without much effort. However, its movepool is relatively limited, and it may have trouble against the other {{t|Water}} Pokémon in the Cerulean Gym. | ||
| Line 126: | Line 123: | ||
|- | |- | ||
|{{Party/Single | |{{Party/Single | ||
|color={{ | |color={{Blue color}} | ||
|headcolor={{ | |headcolor={{Blue color light}} | ||
|bordercolor={{ | |bordercolor={{Blue color dark}} | ||
|sprite=Spr RG Blue 1.png | |sprite=Spr RG Blue 1.png | ||
|prize={{PDollar}}175 | |prize={{PDollar}}175 | ||
|class=Rival | |||
|name=Blue | |name=Blue | ||
|game=RGB|location=Professor Oak's Laboratory | |game=RGB | ||
|location=Professor Oak's Laboratory | |||
|pokemon=1 | |pokemon=1 | ||
}} | }} | ||
| style="margin:auto" |{{Pokémon/1|game=Blue | |style="margin:auto" |{{Pokémon/1 | ||
|ndex=004|pokemon=Charmander | |game=Blue | ||
|ndex=004 | |||
|pokemon=Charmander | |||
|level=5 | |||
|type1=Fire | |type1=Fire | ||
|move1=Scratch|move1type=Normal | |move1=Scratch|move1type=Normal | ||
|move2=Growl|move2type=Normal}} | |move2=Growl|move2type=Normal}} | ||
{{Party/Footer}} | {{Party/Footer}} | ||
|{{Party/Single | |{{Party/Single | ||
|color={{ | |color={{Blue color}} | ||
|headcolor={{ | |headcolor={{Blue color light}} | ||
|bordercolor={{ | |bordercolor={{Blue color dark}} | ||
|sprite=Spr RG Blue 1.png | |sprite=Spr RG Blue 1.png | ||
|prize={{PDollar}}175 | |prize={{PDollar}}175 | ||
|name=Blue | |class=Rival | ||
|game=RGB|location=Professor Oak's Laboratory | |name=Blue|game=RGB | ||
|location=Professor Oak's Laboratory | |||
|pokemon=1 | |pokemon=1 | ||
}} | }} | ||
| style="margin:auto" |{{Pokémon/1|game=Blue | | style="margin:auto" |{{Pokémon/1 | ||
|ndex=007|pokemon=Squirtle | |game=Blue | ||
|ndex=007 | |||
|pokemon=Squirtle | |||
|level=5 | |||
|type1=Water | |type1=Water | ||
|move1=Tackle|move1type=Normal | |move1=Tackle|move1type=Normal | ||
|move2=Tail Whip|move2type=Normal}} | |move2=Tail Whip|move2type=Normal}} | ||
{{Party/Footer}} | {{Party/Footer}} | ||
|{{Party/Single | |{{Party/Single | ||
|color={{ | |color={{Blue color}} | ||
|headcolor={{ | |headcolor={{Blue color light}} | ||
|bordercolor={{ | |bordercolor={{Blue color dark}} | ||
|sprite=Spr RG Blue 1.png | |sprite=Spr RG Blue 1.png | ||
|prize={{PDollar}}175 | |prize={{PDollar}}175 | ||
|name=Blue | |class=Rival | ||
|game=RGB|location=Professor Oak's Laboratory | |name=Blue|game=RGB | ||
|location=Professor Oak's Laboratory | |||
|pokemon=1 | |pokemon=1 | ||
}} | }} | ||
| style="margin:auto" |{{Pokémon/1|game=Blue | | style="margin:auto" |{{Pokémon/1 | ||
|ndex=001|pokemon=Bulbasaur | |game=Blue | ||
|ndex=001 | |||
|pokemon=Bulbasaur | |||
|level=5 | |level=5 | ||
|move1=Tackle|move1type=Normal | |type1=Grass | ||
|move2=Growl|move2type=Normal}} | |type2=Poison | ||
|move1=Tackle | |||
|move1type=Normal | |||
|move2=Growl | |||
|move2type=Normal}} | |||
{{Party/Footer}} | {{Party/Footer}} | ||
|} | |} | ||
When battling, you'll each send out your Pokémon; they are [[Level]] 5, which is shown by the '':L5'' aside each Pokémon. Under that is the health bar, showing each Pokémon's remaining {{stat|HP}}. You win a battle when you take all of your opponents Pokémon down to 0 HP; you will lose the battle if all of your Pokémon reach 0 HP. | When battling, you'll each send out your Pokémon; they are [[Level]] 5, which is shown by the '':L5'' aside each Pokémon. Under that is the health bar, showing each Pokémon's remaining {{stat|HP}}. You win a battle when you take all of your opponents Pokémon down to 0 HP; you will lose the battle if all of your Pokémon reach 0 HP. | ||
| Line 186: | Line 195: | ||
Leave Oak's lab and head north to reach {{rt|1|Kanto}}. | Leave Oak's lab and head north to reach {{rt|1|Kanto}}. | ||
{| class="expandable" align="center" style="background: #{{blue color light}}; {{roundy}}; border: 5px solid #{{red color light}};" | |||
|- align="center" | |||
! Available Pokémon | |||
|- | |||
| | |||
{{Catch/header|water|no}} | |||
{{Catch/div|water|Fishing}} | |||
{{Catch/entry1|129|Magikarp|yes|yes|no|Fish Old|5|100%|type1=Water}} | |||
{{Catch/entry1|060|Poliwag|yes|yes|no|Fish Good|10|50%|type1=Water}} | |||
{{Catch/entry1|118|Goldeen|yes|yes|no|Fish Good|10|50%|type1=Water}} | |||
{{Catch/entry1|060|Poliwag|yes|yes|no|Fish Super|15|50%|type1=Water}} | |||
{{Catch/entry1|072|Tentacool|yes|yes|no|Fish Super|15|50%|type1=Water|type2=Poison}} | |||
{{Catch/div|building|Gift Pokémon}} | |||
{{Catch/entry1|001|Bulbasaur|yes|yes|no|Starter|5|One|type1=Grass|type2=Poison}} | |||
{{Catch/entry1|004|Charmander|yes|yes|no|Starter|5|One|type1=Fire}} | |||
{{Catch/entry1|007|Squirtle|yes|yes|no|Starter|5|One|type1=Water}} | |||
{{Catch/footer|water}} | |||
|} | |||
{| class="expandable" align="center" style="background: #{{blue color light}}; {{roundy}}; border: 5px solid #{{red color light}};" | |||
|- align="center" | |||
! Items | |||
|- | |||
| | |||
{{itlisth|building}} | |||
{{itemlist|Potion|Retrievable from the [[PC]] in the {{player}}'s room|R=yes|B=yes|display={{DL|Potion|Potion}}}} | |||
{{itemlist|Poké Ball|Obtained from {{prof|Oak}} after defeating the {{ga|Blue|rival}} on {{rt|22|Kanto}} if the player hasn't bought or found any Poké Balls and has added no caught data to the Pokédex|R=yes|B=yes|display={{ball|Poké}} ×5}} | |||
{{itemlist|None|Obtained from Oak after he receives his parcel|R=yes|B=yes|display=[[Pokédex]]|sprite=Kanto Pokédex III OD}} | |||
{{itemlist|Town Map|Obtained from [[Daisy Oak|Daisy]] after the player obtains a Pokédex|R=yes|B=yes|sprite=Bag Town Map III Sprite}} | |||
{{itlistfoot|building}} | |||
|} | |||
{{WalkthroughPrevNext | {{WalkthroughPrevNext | ||
| Line 194: | Line 234: | ||
|next=yes | |next=yes | ||
|nextsection=2 | |nextsection=2 | ||
|prevname=no | |||
|nextname=Route 1, Viridian City, back to Pallet Town, Route 2 | |nextname=Route 1, Viridian City, back to Pallet Town, Route 2 | ||
}} | }} | ||
<br> | <br /> | ||
{{Project Walkthroughs notice}} | {{Project Walkthroughs notice}} | ||
[[Category:Red and Blue walkthrough]] | |||
[[Category:Red and Blue walkthrough|R01]] | |||
Revision as of 04:59, 26 January 2016
Introduction
Turn the Game Boy on. After the intro, press A or Start on the title screen and you'll see the main menu.
You should be able to select from New Game and Option. (You may have Continue as a selection; this is if you have already started and saved a game on this cartridge.)
Moving the cursor to Option and pressing A will show three topics. You don't need to touch them, but it's a good idea to put the Text Speed to Fast. Go down to Cancel and press A, and you'll be back on the main menu. Select New Game and press A.
Professor Oak appears! He briefly introduces the world of Pokémon and the Pokémon themselves. Then he asks for your name.
| Game | Default Names |
|---|---|
| Red | Red, Ash, John |
| Blue | Blue, Gary, Jack |
If you don't want any of the preset names, go to New Name and press A. Here it's a simple case of moving around to the letter you want and pressing A to select it. To remove the last letter, press B. Once you're done entering your name, select End in the bottom right corner or press START. This stumped a lot of people when the game was first released.
Now you are introduced to your rival! Choose his name in the same way, and you'll be teleported off to your bedroom in Pallet Town!
Home
The game begins in your bedroom, with you standing in front of your SNES. First of all, here's a recap of the controls:
| Button | Effects |
|---|---|
| +Control Pad (D-Pad/Arrows) |
Moves the character; moves the cursor in a menu |
| A Button | Talk to people, push buttons, examine things |
| B Button | Cancels selection, exit a menu |
| START | Opens the menu |
The PC in the corner is your item storage system. Your backpack can only hold 20 different items, while the PC can hold up to 50. Deposit Item and Withdraw Item are self-explanatory, and Toss Item lets you get rid of an item permanently. The PC already has a Potion, so select Withdraw Item and choose Potion ×1. Press the B Button to close the menus and return to your bedroom.
To save the game, press START. Select Save, and then Yes. When the menu disappears, your progress is saved. You could then turn off the Game Boy and start from this point at a later time.
To go downstairs, step on the stairs in the top-right corner of the room. Mom is sitting at the table, and tells you that Professor Oak has been looking for you. To leave the building, step on the mat along the south wall, and press down on the +Control Pad. Welcome to Pallet Town!
Pallet Town
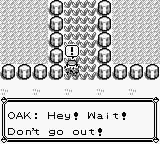
Pallet Town is a rather boring, quaint town, with only three houses. The house to the west is yours, the one to the east is your rival's house, and the big building to the south is Professor Oak's Lab. You can walk all around town and talk to everyone, but Oak is nowhere to be found. Looks like there's nothing else to do but leave town, so walk into the tall grass north of the town...
From out of nowhere, Oak appears! He yells at you for trying to leave by yourself, without a Pokémon of your own for defense against the wild Pokémon roaming around. He drags you back to the lab, and lets you choose your very first Pokémon. Each one has its advantages and disadvantages, and some are more challenging to raise than the others.
 Bulbasaur |
 Charmander |
 Squirtle | |||
|---|---|---|---|---|---|
| Grass | Poison | Fire | Water | ||

|
Ivysaur | 
|
Charmeleon | 
|
Wartortle |
| Grass | Poison | Fire | Water | ||

|
Venusaur | 
|
Charizard | 
|
Blastoise |
| Grass | Poison | Fire | Flying | Water | |
- Bulbasaur is perfect for beginners. It can easily mop up Pokémon in the Pewter, Cerulean, and Viridian Gyms, and resists the Pokémon in the Vermilion and Celadon Gyms. It is also unaffected by the Poison status ailment. It may have trouble with the Saffron and Cinnabar Gyms, but at that point in the game you should have some great Pokémon to back it up.
- Charmander is the most difficult Pokémon for beginners to use, since it will be at a disadvantage in the first two Gyms, with its only advantage against the Celadon Gym. His final evolution, Charizard, is noted for being quite powerful, though it may not usually have a type advantage in battle.
- Squirtle is the second-easiest to train. It can defeat the Pewter, Cinnabar, and Viridian Gyms without much effort. However, its movepool is relatively limited, and it may have trouble against the other Water Pokémon in the Cerulean Gym.
Once you have chosen a Pokémon, it's your rival's turn; he will always choose the Pokémon with an advantage against yours. When you turn to leave, he will challenge you to your first battle!
 If the player chose Bulbasaur: If the player chose Bulbasaur:
|
 If the player chose Charmander: If the player chose Charmander:
|
 If the player chose Squirtle: If the player chose Squirtle:
| |||||||||||||||||||||||||||||||||||||||||||||||||||||||||||||||||||||||||||||||||||||||||||||||||||||||||||||||||||||||
|---|---|---|---|---|---|---|---|---|---|---|---|---|---|---|---|---|---|---|---|---|---|---|---|---|---|---|---|---|---|---|---|---|---|---|---|---|---|---|---|---|---|---|---|---|---|---|---|---|---|---|---|---|---|---|---|---|---|---|---|---|---|---|---|---|---|---|---|---|---|---|---|---|---|---|---|---|---|---|---|---|---|---|---|---|---|---|---|---|---|---|---|---|---|---|---|---|---|---|---|---|---|---|---|---|---|---|---|---|---|---|---|---|---|---|---|---|---|---|---|---|---|
|
|
| |||||||||||||||||||||||||||||||||||||||||||||||||||||||||||||||||||||||||||||||||||||||||||||||||||||||||||||||||||||||
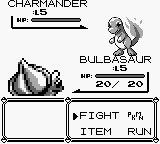
When battling, you'll each send out your Pokémon; they are Level 5, which is shown by the :L5 aside each Pokémon. Under that is the health bar, showing each Pokémon's remaining HP. You win a battle when you take all of your opponents Pokémon down to 0 HP; you will lose the battle if all of your Pokémon reach 0 HP.
Choosing Fight will allow you to choose an attack to use against your opponent. Your Pokémon will have two attacks regardless of who you chose. The first will damage the opponent, and the other one will lower one of the opponent's stats. Keep using the attacking one, either Tackle or Scratch. If your Pokémon starts to lose a lot of HP, you could use that Potion we got out of the PC earlier; go to Item and it will bring up a list of the items you are holding. You only have a Potion, so select it and then select your Pokémon. This is the same way you use the Item menu outside of battle. Once you have defeated your rival, you will get $175, and he will leave. If you win the battle, your Pokémon will gain enough experience to grow to level 6.
Leave Oak's lab and head north to reach Route 1.
| Available Pokémon | ||||||||||||||||||||||||||||||||||||||||||||||||||||||||||||||||||||||||||||||||||||||||||||||||||||||||||||||||||||||||||||||||||||||||||||||||||||||||||||||||||||||||||||||||||||||||
|---|---|---|---|---|---|---|---|---|---|---|---|---|---|---|---|---|---|---|---|---|---|---|---|---|---|---|---|---|---|---|---|---|---|---|---|---|---|---|---|---|---|---|---|---|---|---|---|---|---|---|---|---|---|---|---|---|---|---|---|---|---|---|---|---|---|---|---|---|---|---|---|---|---|---|---|---|---|---|---|---|---|---|---|---|---|---|---|---|---|---|---|---|---|---|---|---|---|---|---|---|---|---|---|---|---|---|---|---|---|---|---|---|---|---|---|---|---|---|---|---|---|---|---|---|---|---|---|---|---|---|---|---|---|---|---|---|---|---|---|---|---|---|---|---|---|---|---|---|---|---|---|---|---|---|---|---|---|---|---|---|---|---|---|---|---|---|---|---|---|---|---|---|---|---|---|---|---|---|---|---|---|---|---|---|
| ||||||||||||||||||||||||||||||||||||||||||||||||||||||||||||||||||||||||||||||||||||||||||||||||||||||||||||||||||||||||||||||||||||||||||||||||||||||||||||||||||||||||||||||||||||||||
| Items | ||||||||||||||||||||||||
|---|---|---|---|---|---|---|---|---|---|---|---|---|---|---|---|---|---|---|---|---|---|---|---|---|
| ||||||||||||||||||||||||
| Red and Blue walkthrough |
|

|
This article is part of Project Walkthroughs, a Bulbapedia project that aims to write comprehensive step-by-step guides on each Pokémon game. |

