Appendix:HeartGold and SoulSilver walkthrough/Section 21: Difference between revisions
mNo edit summary |
|||
| Line 3: | Line 3: | ||
----- | ----- | ||
== Route 16 == | ==Route 16== | ||
[[File:Kanto Route 16 HGSS.png|thumb|350px|Route 16]] | [[File:Kanto Route 16 HGSS.png|thumb|350px|Route 16]] | ||
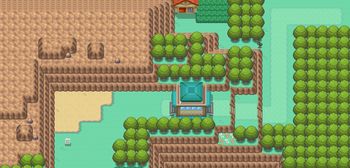
There isn't much going on around {{rt|16|Kanto}}, but a pair of Pokémon species prowl around here. | There isn't much going on around {{rt|16|Kanto}}, but a pair of Pokémon species prowl around here. The {{type|Fire}} {{p|Slugma}} and the {{2t|Dark|Flying}}-type {{p|Murkrow}} were first discovered in the [[Johto]] region, but seem to prefer living in [[Kanto]]. The {{ka|Cycling Road}} starts just south of here, and leads you right to [[Fuchsia City]] on the region's southern peninsula. There are no Trainers to fight here, but an old man in the lone house will tell you a trendy saying once per day. | ||
{| class="expandable" align="center" style="background: #{{soulsilver color light}}; -moz-border-radius: 1em; border: 5px solid #{{heartgold color light}};" | {| class="expandable" align="center" style="background: #{{soulsilver color light}}; -moz-border-radius: 1em; border: 5px solid #{{heartgold color light}};" | ||
| Line 26: | Line 26: | ||
|} | |} | ||
== Route 17 == | ==Route 17== | ||
[[File:Kanto Route 17 HGSS.png|thumb|100px|Route 17]] | [[File:Kanto Route 17 HGSS.png|thumb|100px|Route 17]] | ||
{{rt|17|Kanto}} is {{ka|Cycling Road}} itself, connecting {{rt|16|Kanto}} in the north to {{rt|18|Kanto}} in the south. | {{rt|17|Kanto}} is {{ka|Cycling Road}} itself, connecting {{rt|16|Kanto}} in the north to {{rt|18|Kanto}} in the south. There are only a few Trainers around, but you have the opportunity to catch wild {{p|Slugma}} and {{p|Muk}} in the patch of grass on the north end. | ||
{| class="expandable" align="center" style="background: #{{soulsilver color light}}; -moz-border-radius: 1em; border: 5px solid #{{heartgold color light}};" | {| class="expandable" align="center" style="background: #{{soulsilver color light}}; -moz-border-radius: 1em; border: 5px solid #{{heartgold color light}};" | ||
| Line 81: | Line 81: | ||
Pedal south over the bridge, and head east to {{rt|18|Kanto}}. | Pedal south over the bridge, and head east to {{rt|18|Kanto}}. | ||
== Route 18 == | ==Route 18== | ||
[[File:Kanto Route 18 HGSS.png|thumb|350px|left|Route 18]] | [[File:Kanto Route 18 HGSS.png|thumb|350px|left|Route 18]] | ||
| Line 119: | Line 119: | ||
|} | |} | ||
== Fuchsia City == | ==Fuchsia City== | ||
[[File:Fuchsia City HGSS.png|thumb|350px|Fuchsia City]] | [[File:Fuchsia City HGSS.png|thumb|350px|Fuchsia City]] | ||
Your quest for your fifth Kanto | Your quest for your fifth Kanto Badge takes you to [[Fuchsia City]], a place that blends both the ancient and the modern. [[Pal Park]], the city's new attraction, now stands on the former site of the {{safari|Kanto}}. | ||
=== Pal Park === | ===Pal Park=== | ||
The [[Pal Park]] is available after [[Professor Oak]] upgrades your [[Pokédex]] to the National mode. | The [[Pal Park]] is available after [[Professor Oak]] upgrades your [[Pokédex]] to the National mode. You can migrate up to six Pokémon at a time from any of the [[Generation III]] games ({{5v|Ruby|Sapphire|Emerald|FireRed|LeafGreen}}). | ||
The park itself is split into five main areas — forest, mountain, pond, field, sea — and each migrated Pokémon appears in the area that closest resembles its natural habitat. | The park itself is split into five main areas — forest, mountain, pond, field, sea — and each migrated Pokémon appears in the area that closest resembles its natural habitat. If you put on a good Catching Show by catching rare Pokémon or quickly catching them all, you'll earn extra points. Aim for a high score and the prizes that come with it! | ||
# More points are awarded for catching rare and valuable Pokémon | # More points are awarded for catching rare and valuable Pokémon | ||
| Line 135: | Line 135: | ||
# More points are awarded for quicker captures | # More points are awarded for quicker captures | ||
You can earn Berries by scoring points in the Catching Show. | You can earn Berries by scoring points in the Catching Show. The random Berry you receive depends on your point total. | ||
{| align="center" style="background: #{{grass color}}; -moz-border-radius: 10px; border: 5px solid #{{grass color}}" | {| align="center" style="background: #{{grass color}}; -moz-border-radius: 10px; border: 5px solid #{{grass color}}" | ||
| Line 156: | Line 156: | ||
You can also speak to the woman with a hat on the second floor to receive different Accessories depending on which [[Generation III]] game is inserted into your [[Nintendo DS]]. | You can also speak to the woman with a hat on the second floor to receive different Accessories depending on which [[Generation III]] game is inserted into your [[Nintendo DS]]. If it's FireRed, she'll give you the Crown; or the Tiara for LeafGreen. If it's Ruby, Sapphire, or Emerald, she'll hand over a Backdrop; Underground, Seafloor, or Sky, respectively. | ||
=== Trade Shards for Berries === | ===Trade Shards for Berries=== | ||
The Juggler on the north side of town is a Shard collector, and is willing to trade a few Berries for each type. | The Juggler on the north side of town is a Shard collector, and is willing to trade a few Berries for each type. You can find Shards by {{m|Rock Smash|smash}}ing open rocks, and he'll trade you a group of Berries that matches the color of the Shard. There is another Juggler in [[Violet City]] that will trade you Berries from Sets A, B, C, and D. | ||
{| align="center" style="background: #{{grass color light}}; -moz-border-radius: 10px; border: 5px solid #{{grass color light}}" | {| align="center" style="background: #{{grass color light}}; -moz-border-radius: 10px; border: 5px solid #{{grass color light}}" | ||
| Line 188: | Line 188: | ||
=== Fuchsia Gym === | ===Fuchsia Gym=== | ||
[[File:Fuchsia Gym HGSS.png|thumb|Fuchsia Gym]] | [[File:Fuchsia Gym HGSS.png|thumb|Fuchsia Gym]] | ||
| Line 195: | Line 195: | ||
{{sign|DPcity|footer}} | {{sign|DPcity|footer}} | ||
The [[Fuchsia Gym]] is the same ninja training ground that it has always been, complete with its famed invisible walls. | The [[Fuchsia Gym]] is the same ninja training ground that it has always been, complete with its famed invisible walls. However, [[Koga]]'s promotion to the {{ka|Elite Four}} left a vacant [[Gym Leader]] position - a title now held by his daughter, [[Janine]]. She and her recruits are adept at disguise, dressing similarly to conceal the Gym Leader's true location. {{type|Poison}}s rule the Fuchsia Gym, so {{t|Psychic}}- and {{type|Ground}}s are the best offense. As for Janine, blast her team with a few psychic attacks, and scorch her {{type|Bug}} {{p|Ariados}} and {{p|Venomoth}} if needed. Her Venomoth can raise its evasion with {{m|Double Team}}, so you may want to have some moves with perfect accuracy. | ||
{| align="center" | {| align="center" | ||
| Line 221: | Line 221: | ||
|} | |} | ||
{{Party | {{Party/Single | ||
|color={{poison color}} | |color={{poison color}} | ||
|bordercolor={{poison color dark}} | |bordercolor={{poison color dark}} | ||
| Line 231: | Line 231: | ||
|game=HGSS | |game=HGSS | ||
|location=Fuchsia Gym | |location=Fuchsia Gym | ||
|pokemon=5 | |pokemon=5}} | ||
| | |{{Pokémon/4 | ||
|game=HeartGold | |game=HeartGold | ||
|ndex=169 | |ndex=169 | ||
| Line 245: | Line 245: | ||
|move3=Wing Attack|move3type=Flying|move3cat=Physical | |move3=Wing Attack|move3type=Flying|move3cat=Physical | ||
|move4=Supersonic|move4type=Normal|move4cat=Status}} | |move4=Supersonic|move4type=Normal|move4cat=Status}} | ||
| | |{{Pokémon/4 | ||
|game=HeartGold | |game=HeartGold | ||
|ndex=110 | |ndex=110 | ||
| Line 257: | Line 257: | ||
|move3=Explosion|move3type=Normal|move3cat=Physical | |move3=Explosion|move3type=Normal|move3cat=Physical | ||
|move4=Double Hit|move4type=Normal|move4cat=Physical}} | |move4=Double Hit|move4type=Normal|move4cat=Physical}} | ||
| | |{{Pokémon/4 | ||
|game=HeartGold | |game=HeartGold | ||
|ndex=168 | |ndex=168 | ||
| Line 270: | Line 270: | ||
|move3=Poison Jab|move3type=Poison|move3cat=Physical | |move3=Poison Jab|move3type=Poison|move3cat=Physical | ||
|move4=Pin Missile|move4type=Bug|move4cat=Physical}} | |move4=Pin Missile|move4type=Bug|move4cat=Physical}} | ||
| | {{Party/Div|color={{poison color}}}} | ||
|style="margin:auto"|{{Pokémon/4 | |||
|game=HeartGold | |game=HeartGold | ||
|ndex=168 | |ndex=168 | ||
| Line 283: | Line 284: | ||
|move3=Screech|move3type=Normal|move3cat=Status | |move3=Screech|move3type=Normal|move3cat=Status | ||
|move4=Pin Missile|move4type=Bug|move4cat=Physical}} | |move4=Pin Missile|move4type=Bug|move4cat=Physical}} | ||
| | |style="margin:auto"|{{Pokémon/4 | ||
|game=HeartGold | |game=HeartGold | ||
|ndex=049 | |ndex=049 | ||
| Line 297: | Line 298: | ||
|move3=Sludge Bomb|move3type=Poison|move3cat=Special | |move3=Sludge Bomb|move3type=Poison|move3cat=Special | ||
|move4=Signal Beam|move4type=Bug|move4cat=Special}} | |move4=Signal Beam|move4type=Bug|move4cat=Special}} | ||
}} | {{Party/Footer}} | ||
|} | |} | ||
|} | |} | ||
| Line 304: | Line 305: | ||
After her defeat, [[Janine]] hands over the {{badge|Soul}}, which slightly raises {{stat|Defense}}, as well as {{TM|84|Poison Jab}}. | After her defeat, [[Janine]] hands over the {{badge|Soul}}, which slightly raises {{stat|Defense}}, as well as {{TM|84|Poison Jab}}. | ||
The [[Kanto Route 19|southern]] [[Kanto Route 20|waterway]] to [[Cinnabar Island]] is blocked off by boulders, having been left here after Cinnabar's volcano erupted. | The [[Kanto Route 19|southern]] [[Kanto Route 20|waterway]] to [[Cinnabar Island]] is blocked off by boulders, having been left here after Cinnabar's volcano erupted. With nowhere else to go, head east to {{rt|15|Kanto}}. | ||
Revision as of 14:37, 2 March 2014
The guide for those can be found here.
Route 16
There isn't much going on around Route 16, but a pair of Pokémon species prowl around here. The Fire-type Slugma and the Dark/Flying-type Murkrow were first discovered in the Johto region, but seem to prefer living in Kanto. The Cycling Road starts just south of here, and leads you right to Fuchsia City on the region's southern peninsula. There are no Trainers to fight here, but an old man in the lone house will tell you a trendy saying once per day.
| Available Pokémon | ||||||||||||||||||||||||||||||||||||||||||||||||||||||||||||||||||||||||||||||||||||||||||||||||||||||||||||||||||||||||||||||||||||||||||||||||||||||||||||||||||||||||||||
|---|---|---|---|---|---|---|---|---|---|---|---|---|---|---|---|---|---|---|---|---|---|---|---|---|---|---|---|---|---|---|---|---|---|---|---|---|---|---|---|---|---|---|---|---|---|---|---|---|---|---|---|---|---|---|---|---|---|---|---|---|---|---|---|---|---|---|---|---|---|---|---|---|---|---|---|---|---|---|---|---|---|---|---|---|---|---|---|---|---|---|---|---|---|---|---|---|---|---|---|---|---|---|---|---|---|---|---|---|---|---|---|---|---|---|---|---|---|---|---|---|---|---|---|---|---|---|---|---|---|---|---|---|---|---|---|---|---|---|---|---|---|---|---|---|---|---|---|---|---|---|---|---|---|---|---|---|---|---|---|---|---|---|---|---|---|---|---|---|---|---|---|---|
| ||||||||||||||||||||||||||||||||||||||||||||||||||||||||||||||||||||||||||||||||||||||||||||||||||||||||||||||||||||||||||||||||||||||||||||||||||||||||||||||||||||||||||||
Route 17
Route 17 is Cycling Road itself, connecting Route 16 in the north to Route 18 in the south. There are only a few Trainers around, but you have the opportunity to catch wild Slugma and Muk in the patch of grass on the north end.
| Trainers | |||||||||||||||||||||||||||||||||||||||||||||||||||||||||||||||||||||||||||||||||||||||||||||||||||||||||||||||||||||||||||||||||||||||||||||||||||||||||||||||||||||||||||||||||||||||||||||||||||||||||||||||||
|---|---|---|---|---|---|---|---|---|---|---|---|---|---|---|---|---|---|---|---|---|---|---|---|---|---|---|---|---|---|---|---|---|---|---|---|---|---|---|---|---|---|---|---|---|---|---|---|---|---|---|---|---|---|---|---|---|---|---|---|---|---|---|---|---|---|---|---|---|---|---|---|---|---|---|---|---|---|---|---|---|---|---|---|---|---|---|---|---|---|---|---|---|---|---|---|---|---|---|---|---|---|---|---|---|---|---|---|---|---|---|---|---|---|---|---|---|---|---|---|---|---|---|---|---|---|---|---|---|---|---|---|---|---|---|---|---|---|---|---|---|---|---|---|---|---|---|---|---|---|---|---|---|---|---|---|---|---|---|---|---|---|---|---|---|---|---|---|---|---|---|---|---|---|---|---|---|---|---|---|---|---|---|---|---|---|---|---|---|---|---|---|---|---|---|---|---|---|---|---|---|---|---|---|---|---|---|---|---|---|
| |||||||||||||||||||||||||||||||||||||||||||||||||||||||||||||||||||||||||||||||||||||||||||||||||||||||||||||||||||||||||||||||||||||||||||||||||||||||||||||||||||||||||||||||||||||||||||||||||||||||||||||||||
| Available Pokémon | ||||||||||||||||||||||||||||||||||||||||||||||||||||||||||||||||||||||||||||||||||||||||||||||||||||||||||||||||||||||||||||||||||||||||||||||||||||||||||||||||||||||||||||
|---|---|---|---|---|---|---|---|---|---|---|---|---|---|---|---|---|---|---|---|---|---|---|---|---|---|---|---|---|---|---|---|---|---|---|---|---|---|---|---|---|---|---|---|---|---|---|---|---|---|---|---|---|---|---|---|---|---|---|---|---|---|---|---|---|---|---|---|---|---|---|---|---|---|---|---|---|---|---|---|---|---|---|---|---|---|---|---|---|---|---|---|---|---|---|---|---|---|---|---|---|---|---|---|---|---|---|---|---|---|---|---|---|---|---|---|---|---|---|---|---|---|---|---|---|---|---|---|---|---|---|---|---|---|---|---|---|---|---|---|---|---|---|---|---|---|---|---|---|---|---|---|---|---|---|---|---|---|---|---|---|---|---|---|---|---|---|---|---|---|---|---|---|
| ||||||||||||||||||||||||||||||||||||||||||||||||||||||||||||||||||||||||||||||||||||||||||||||||||||||||||||||||||||||||||||||||||||||||||||||||||||||||||||||||||||||||||||
Pedal south over the bridge, and head east to Route 18.
Route 18
Route 18 is a short route with only a handful of Trainers to battle.
Head east to Fuchsia City.
| Trainers | |||||||||||||||||||||||||||||||||||||||||||||||||||||||||||||||||||||||
|---|---|---|---|---|---|---|---|---|---|---|---|---|---|---|---|---|---|---|---|---|---|---|---|---|---|---|---|---|---|---|---|---|---|---|---|---|---|---|---|---|---|---|---|---|---|---|---|---|---|---|---|---|---|---|---|---|---|---|---|---|---|---|---|---|---|---|---|---|---|---|---|
| |||||||||||||||||||||||||||||||||||||||||||||||||||||||||||||||||||||||
| Available Pokémon | ||||||||||||||||||||||||||||||||||||||||||||||||||||||||||||||||||||||||||||||||||||||||||||||||||||||||||||||||||||||||||||||||||||||||||||||||||||||||||||||||||||||||||||
|---|---|---|---|---|---|---|---|---|---|---|---|---|---|---|---|---|---|---|---|---|---|---|---|---|---|---|---|---|---|---|---|---|---|---|---|---|---|---|---|---|---|---|---|---|---|---|---|---|---|---|---|---|---|---|---|---|---|---|---|---|---|---|---|---|---|---|---|---|---|---|---|---|---|---|---|---|---|---|---|---|---|---|---|---|---|---|---|---|---|---|---|---|---|---|---|---|---|---|---|---|---|---|---|---|---|---|---|---|---|---|---|---|---|---|---|---|---|---|---|---|---|---|---|---|---|---|---|---|---|---|---|---|---|---|---|---|---|---|---|---|---|---|---|---|---|---|---|---|---|---|---|---|---|---|---|---|---|---|---|---|---|---|---|---|---|---|---|---|---|---|---|---|
| ||||||||||||||||||||||||||||||||||||||||||||||||||||||||||||||||||||||||||||||||||||||||||||||||||||||||||||||||||||||||||||||||||||||||||||||||||||||||||||||||||||||||||||
Fuchsia City
Your quest for your fifth Kanto Badge takes you to Fuchsia City, a place that blends both the ancient and the modern. Pal Park, the city's new attraction, now stands on the former site of the Safari Zone.
Pal Park
The Pal Park is available after Professor Oak upgrades your Pokédex to the National mode. You can migrate up to six Pokémon at a time from any of the Generation III games (Ruby, Sapphire, Emerald, FireRed, and LeafGreen Versions).
The park itself is split into five main areas — forest, mountain, pond, field, sea — and each migrated Pokémon appears in the area that closest resembles its natural habitat. If you put on a good Catching Show by catching rare Pokémon or quickly catching them all, you'll earn extra points. Aim for a high score and the prizes that come with it!
- More points are awarded for catching rare and valuable Pokémon
- Earn points by catching six Pokémon of different types
- Earn points by catching a Pokémon whose type differs from that of the last Pokémon you caught
- More points are awarded for quicker captures
You can earn Berries by scoring points in the Catching Show. The random Berry you receive depends on your point total.
| Points Earned | Prizes | |
|---|---|---|
| 3,500 or more | ||
| 3,300 - 3,499 | ||
| 3,000 - 3,299 | ||
| 3,000 or less | ||
You can also speak to the woman with a hat on the second floor to receive different Accessories depending on which Generation III game is inserted into your Nintendo DS. If it's FireRed, she'll give you the Crown; or the Tiara for LeafGreen. If it's Ruby, Sapphire, or Emerald, she'll hand over a Backdrop; Underground, Seafloor, or Sky, respectively.
Trade Shards for Berries
The Juggler on the north side of town is a Shard collector, and is willing to trade a few Berries for each type. You can find Shards by smashing open rocks, and he'll trade you a group of Berries that matches the color of the Shard. There is another Juggler in Violet City that will trade you Berries from Sets A, B, C, and D.
| Shard | Berry Set | Berries |
|---|---|---|
Red Shard |
E | |
Blue Shard |
F | |
Yellow Shard |
G | |
Green Shard |
H |
Fuchsia Gym
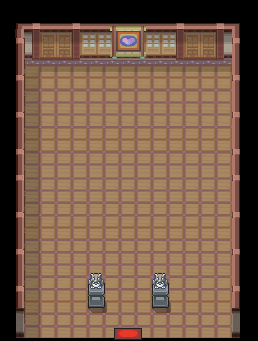
The Fuchsia Gym is the same ninja training ground that it has always been, complete with its famed invisible walls. However, Koga's promotion to the Elite Four left a vacant Gym Leader position - a title now held by his daughter, Janine. She and her recruits are adept at disguise, dressing similarly to conceal the Gym Leader's true location. Poison-types rule the Fuchsia Gym, so Psychic- and Ground-types are the best offense. As for Janine, blast her team with a few psychic attacks, and scorch her Bug-type Ariados and Venomoth if needed. Her Venomoth can raise its evasion with Double Team, so you may want to have some moves with perfect accuracy.
| |||||||||||||||||||||||||||||||||||||||||||||||||||||||||||||||||||||||||||||||||||||||||||||||||||||||||||||||||||||||||||||||||||||||||||||||||||||||||||||||||||||||||||||||||||||||||||||||||||||||||||||||||||||||||||||||||||||||||||||||||||||||||||||||||||||||||||||||||||
After her defeat, Janine hands over the Soul Badge, which slightly raises Defense, as well as TM84 (Poison Jab).
The southern waterway to Cinnabar Island is blocked off by boulders, having been left here after Cinnabar's volcano erupted. With nowhere else to go, head east to Route 15.
|
HeartGold and SoulSilver walkthrough |
|

|
This article is part of Project Walkthroughs, a Bulbapedia project that aims to write comprehensive step-by-step guides on each Pokémon game. |


