Appendix:Emerald walkthrough/Section 8: Difference between revisions
NeoCrimson (talk | contribs) No edit summary |
m (→Petalburg Gym) |
||
| (6 intermediate revisions by 2 users not shown) | |||
| Line 1: | Line 1: | ||
== | ==Mt. Chimney== | ||
As mentioned before, several trainers appear around the crater and are available for battle. | As mentioned before, several trainers appear around the crater and are available for battle. | ||
{| class="expandable" align="center" style="background: #{{emerald color light}}; -moz-border-radius: 1em; {{roundy}}; border: 5px solid #{{emerald color}};" | {| class="expandable" align="center" style="background: #{{emerald color light}}; -moz-border-radius: 1em; {{roundy}}; border: 5px solid #{{emerald color}};" | ||
| Line 25: | Line 25: | ||
With the [[Go-Goggles]] in your possession, you will have access to the desert part of {{rt|111|Hoenn}}. Try to battle all of the [[Pokémon Trainer]]s here in order to level up your [[Pokémon]]. West of the [[Mirage Tower|tower]] near the desert's entrance is a [[Stardust]]. In the most southern area of the desert you can find {{TM|37|Sandstorm}}. Finally, head into [[Mirage Tower]]; but first, make sure you have the [[Mach Bike]] and a Pokémon that knows {{m|Rock Smash}}. | With the [[Go-Goggles]] in your possession, you will have access to the desert part of {{rt|111|Hoenn}}. Try to battle all of the [[Pokémon Trainer]]s here in order to level up your [[Pokémon]]. West of the [[Mirage Tower|tower]] near the desert's entrance is a [[Stardust]]. In the most southern area of the desert you can find {{TM|37|Sandstorm}}. Finally, head into [[Mirage Tower]]; but first, make sure you have the [[Mach Bike]] and a Pokémon that knows {{m|Rock Smash}}. | ||
You can find {{p|Trapinch}} and {{p|Cacnea}} here and decide to catch them. Trapinch can learn [[Dig]] at level 41 (without evolve). Whereas with wild Cacnea, have a 5% chance of holding {{DL|Type-enhancing item|Poison Barb}} which enhances {{type|Poison}} moves. | |||
{| class="expandable" align="center" style="background: #{{emerald color light}}; -moz-border-radius: 1em; {{roundy}}; border: 5px solid #{{emerald color}};" | {| class="expandable" align="center" style="background: #{{emerald color light}}; -moz-border-radius: 1em; {{roundy}}; border: 5px solid #{{emerald color}};" | ||
| Line 31: | Line 32: | ||
|- | |- | ||
| | | | ||
{{trainerheader| | {{trainerheader|sand}} | ||
{{trainerdiv|sand|Desert}} | {{trainerdiv|sand|Desert}} | ||
{{trainerentry|Spr RS Picnicker.png|Picnicker|Heidi|352|2|027|Sandshrew|♀|22|None|343|Baltoy||22|None||}} | {{trainerentry|Spr RS Picnicker.png|Picnicker|Heidi|352|2|027|Sandshrew|♀|22|None|343|Baltoy||22|None||}} | ||
| Line 46: | Line 47: | ||
{{trainerentry|Spr RS Ruin Maniac.png|Ruin Maniac|Bryan|1320<br><small>Potential [[Double Battle]] with Celia or Branden</small>|2|027|Sandshrew|♂|22|None|028|Sandslash|♂|22|None||}} | {{trainerentry|Spr RS Ruin Maniac.png|Ruin Maniac|Bryan|1320<br><small>Potential [[Double Battle]] with Celia or Branden</small>|2|027|Sandshrew|♂|22|None|028|Sandslash|♂|22|None||}} | ||
{{trainerentry|Spr RS Camper.png|Camper|Branden|352<br><small>Potential [[Double Battle]] with Bryan</small>|2|276|Taillow|♂|22|None|274|Nuzleaf|♂|22|None||}} | {{trainerentry|Spr RS Camper.png|Camper|Branden|352<br><small>Potential [[Double Battle]] with Bryan</small>|2|276|Taillow|♂|22|None|274|Nuzleaf|♂|22|None||}} | ||
{{trainerfooter| | {{trainerfooter|sand|3}} | ||
|} | |} | ||
| Line 69: | Line 70: | ||
|- | |- | ||
| | | | ||
{{itlisth|sand}} | {{itlisth}} | ||
{{catch/div|sand|Desert}} | |||
{{itemlist|Stardust|Directly north of the southern terminus of Route 112|E=yes|display={{DL|Valuable item|Stardust}}}} | {{itemlist|Stardust|Directly north of the southern terminus of Route 112|E=yes|display={{DL|Valuable item|Stardust}}}} | ||
{{itemlist|Stardust|In a rock a Ruin Maniac is running around ''(hidden)''|E=yes|display={{DL|Valuable item|Stardust}}}} | {{itemlist|Stardust|In a rock a Ruin Maniac is running around ''(hidden)''|E=yes|display={{DL|Valuable item|Stardust}}}} | ||
| Line 75: | Line 77: | ||
{{itemlist|Rare Candy|In a rock ''(hidden)''|E=yes|display={{DL|Vitamin|Rare Candy}}}} | {{itemlist|Rare Candy|In a rock ''(hidden)''|E=yes|display={{DL|Vitamin|Rare Candy}}}} | ||
{{itemlist|TM Rock VI|Southernmost point, south of the Desert Ruins|E=yes|display={{TM|37|Sandstorm}}}} | {{itemlist|TM Rock VI|Southernmost point, south of the Desert Ruins|E=yes|display={{TM|37|Sandstorm}}}} | ||
{{itlistfoot | {{itlistfoot}} | ||
|} | |} | ||
===Mirage Tower=== | ===Mirage Tower=== | ||
| Line 101: | Line 104: | ||
When you make your decision and exit the tower, it will begin to shake and then sink into the sand. The tower will never appear again. However, you can still obtain the remaining Fossil by finding it in the [[Desert Underpass]] at the back of the [[Fossil Maniac]]'s house on {{rt|114|Hoenn}}, which is accessible after you obtain the [[National Pokédex]]. | When you make your decision and exit the tower, it will begin to shake and then sink into the sand. The tower will never appear again. However, you can still obtain the remaining Fossil by finding it in the [[Desert Underpass]] at the back of the [[Fossil Maniac]]'s house on {{rt|114|Hoenn}}, which is accessible after you obtain the [[National Pokédex]]. | ||
==Route 113, Fallarbor Town, Meteor Falls, Route 115== | ==Route 113, Fallarbor Town, Meteor Falls, Route 115== | ||
| Line 147: | Line 151: | ||
Heal your Pokémon, buy items, and do anything else you need to do before challenging the [[Petalburg Gym]] — [[Norman|your father]]'s Gym. | Heal your Pokémon, buy items, and do anything else you need to do before challenging the [[Petalburg Gym]] — [[Norman|your father]]'s Gym. | ||
==Petalburg Gym== | |||
[[File:Petalburg Gym E.png|thumb|180px|Petalburg Gym's layout]] | |||
This Gym will be less of a challenge if you have any strong {{type|Fighting}} Pokémon. For each room you enter, the Trainer therein will focus on the type of battle that is described on that room's door, so choose your battles wisely. [[Gym Leader]] [[Norman]] focuses on {{type|Normal}} moves, as well as some {{t|Psychic}} and {{t|Dark}} ones. All four of Norman's Pokemon use the move {{m|Facade}} move, which doubles in power when used while under a status condition such as {{status|Poison}}, {{status|Paralysis}}, or {{status|Burn}}. | |||
This Gym will be less of a challenge if you have any strong {{type|Fighting}} Pokémon. For each room you enter, the Trainer therein will focus on the type of battle that is described on that room's door, so choose your battles wisely. [[Gym Leader]] [[Norman]] focuses on {{type|Normal}} moves, as well as some {{t|Psychic}} and {{t|Dark}} ones. | |||
| Line 187: | Line 185: | ||
{{trainerdiv|Normal|One-Hit KO Room}} | {{trainerdiv|Normal|One-Hit KO Room}} | ||
{{trainerentry|Spr RS Cooltrainer M.png|Cooltrainer|Berke|1248|1|288|Vigoroth|♂|26|None|}} | {{trainerentry|Spr RS Cooltrainer M.png|Cooltrainer|Berke|1248|1|288|Vigoroth|♂|26|None|}} | ||
{{trainerfooter|Normal|3 | {{trainerfooter|Normal|3}} | ||
|} | |} | ||
| Line 257: | Line 255: | ||
When you defeat your father, he will hand over the {{badge|Balance}}, which allows you to use {{HM|03|Surf}} outside of battle. He will also give you {{TM|42|Facade}}. | When you defeat your father, he will hand over the {{badge|Balance}}, which allows you to use {{HM|03|Surf}} outside of battle. He will also give you {{TM|42|Facade}}. {{ga|Wally}}'s father will drag you out of the Gym after the battle and give you {{HM|03|Surf}}. You can optionally return home, where your mother will give you the [[Amulet Coin]], a item that doubles money earned from Trainer battles. Now continue your journey to {{ci|Mauville}}, in search of [[Fortree City]] and the {{badge|Feather}}. | ||
| Line 268: | Line 266: | ||
prevsection=7 | | prevsection=7 | | ||
nextsection=9 | | nextsection=9 | | ||
prevname=Route 115, Mt. Chimney, Jagged Pass, Lavaridge Town, Lavaridge | prevname=Route 115, Mt. Chimney, Jagged Pass, Lavaridge Town, Lavaridge Gym | | ||
nextname=New Mauville, Route 118, Route 119 | nextname=Route 105, Route 107, Route 108, Abandoned Ship, New Mauville, Route 118, Route 123, Route 119, Weather Institute, Fortree City, Route 120, Fortree Gym | ||
}} | }} | ||
<br> | |||
{{Project Walkthroughs notice}} | {{Project Walkthroughs notice}} | ||
[[Category:Emerald walkthrough]] | [[Category:Emerald walkthrough]] | ||
Revision as of 21:12, 21 November 2015
Mt. Chimney
As mentioned before, several trainers appear around the crater and are available for battle.
| Trainers | |||||||||||||||||||||||||||||||||||||||||||||||||||||||||||||||||||||||||||||||||||
|---|---|---|---|---|---|---|---|---|---|---|---|---|---|---|---|---|---|---|---|---|---|---|---|---|---|---|---|---|---|---|---|---|---|---|---|---|---|---|---|---|---|---|---|---|---|---|---|---|---|---|---|---|---|---|---|---|---|---|---|---|---|---|---|---|---|---|---|---|---|---|---|---|---|---|---|---|---|---|---|---|---|---|---|
| |||||||||||||||||||||||||||||||||||||||||||||||||||||||||||||||||||||||||||||||||||
Route 111

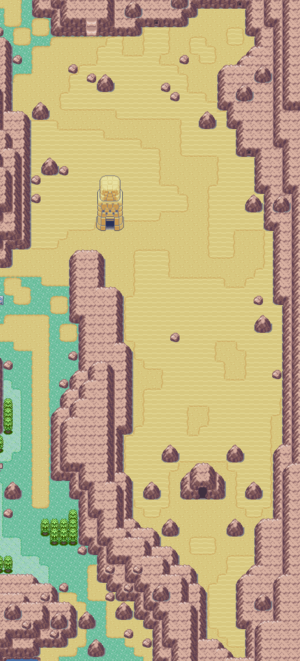
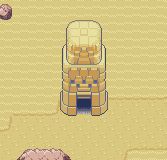
With the Go-Goggles in your possession, you will have access to the desert part of Route 111. Try to battle all of the Pokémon Trainers here in order to level up your Pokémon. West of the tower near the desert's entrance is a Stardust. In the most southern area of the desert you can find TM37 (Sandstorm). Finally, head into Mirage Tower; but first, make sure you have the Mach Bike and a Pokémon that knows Rock Smash.
You can find Trapinch and Cacnea here and decide to catch them. Trapinch can learn Dig at level 41 (without evolve). Whereas with wild Cacnea, have a 5% chance of holding Poison Barb which enhances Poison-type moves.
| Trainers | ||||||||||||||||||||||||||||||||||||||||||||||||||||||||||||||||||||||||||||||||||||||||||||||||||||||||||||||||||||||||||||||||||||||||||||||||||||||||||||||||||
|---|---|---|---|---|---|---|---|---|---|---|---|---|---|---|---|---|---|---|---|---|---|---|---|---|---|---|---|---|---|---|---|---|---|---|---|---|---|---|---|---|---|---|---|---|---|---|---|---|---|---|---|---|---|---|---|---|---|---|---|---|---|---|---|---|---|---|---|---|---|---|---|---|---|---|---|---|---|---|---|---|---|---|---|---|---|---|---|---|---|---|---|---|---|---|---|---|---|---|---|---|---|---|---|---|---|---|---|---|---|---|---|---|---|---|---|---|---|---|---|---|---|---|---|---|---|---|---|---|---|---|---|---|---|---|---|---|---|---|---|---|---|---|---|---|---|---|---|---|---|---|---|---|---|---|---|---|---|---|---|---|---|---|
| ||||||||||||||||||||||||||||||||||||||||||||||||||||||||||||||||||||||||||||||||||||||||||||||||||||||||||||||||||||||||||||||||||||||||||||||||||||||||||||||||||
| Available Pokémon | |||||||||||||||||||||||||||||||||||||||||||||||||||||||||||||||||||||||||||||||||||||||||||||||||||||||||||||||||||||||||
|---|---|---|---|---|---|---|---|---|---|---|---|---|---|---|---|---|---|---|---|---|---|---|---|---|---|---|---|---|---|---|---|---|---|---|---|---|---|---|---|---|---|---|---|---|---|---|---|---|---|---|---|---|---|---|---|---|---|---|---|---|---|---|---|---|---|---|---|---|---|---|---|---|---|---|---|---|---|---|---|---|---|---|---|---|---|---|---|---|---|---|---|---|---|---|---|---|---|---|---|---|---|---|---|---|---|---|---|---|---|---|---|---|---|---|---|---|---|---|---|---|---|
| |||||||||||||||||||||||||||||||||||||||||||||||||||||||||||||||||||||||||||||||||||||||||||||||||||||||||||||||||||||||||
| Items | |||||||||||||||||||||||||||||||||||||||||||
|---|---|---|---|---|---|---|---|---|---|---|---|---|---|---|---|---|---|---|---|---|---|---|---|---|---|---|---|---|---|---|---|---|---|---|---|---|---|---|---|---|---|---|---|
| |||||||||||||||||||||||||||||||||||||||||||
Mirage Tower
Inside, you must use the Mach Bike to ride quickly over the crumbling floor tiles. If you walk, run, or use the Acro Bike, then you will fall through the floor and restart from the previous level. At the top, you will get to choose the Claw Fossil or the Root Fossil. These Fossils can be resurrected into Pokémon later in the game. When restored, the Claw Fossil will become the Rock/Bug-type Anorith and the Root Fossil will become the Rock/Grass-type Lileep. Anorith has high Attack and low defensive stats, and Lileep has high defensive stats but low Attack and Special Attack. Both evolve at Level 40, and their evolutions have much higher, more balanced stats, although their Speed remains very low.
| Available Pokémon | |||||||||||||||||||||||||||||||||||||||||||||||||||||||||||||||||||||||||
|---|---|---|---|---|---|---|---|---|---|---|---|---|---|---|---|---|---|---|---|---|---|---|---|---|---|---|---|---|---|---|---|---|---|---|---|---|---|---|---|---|---|---|---|---|---|---|---|---|---|---|---|---|---|---|---|---|---|---|---|---|---|---|---|---|---|---|---|---|---|---|---|---|---|
| |||||||||||||||||||||||||||||||||||||||||||||||||||||||||||||||||||||||||
| Item | Location | Games | |
|---|---|---|---|
| Claw Fossil | Top floor of the tower (disappears if the Root Fossil is chosen) | E | |
| Root Fossil | Top floor of the tower (disappears if the Claw Fossil is chosen) | E | |
When you make your decision and exit the tower, it will begin to shake and then sink into the sand. The tower will never appear again. However, you can still obtain the remaining Fossil by finding it in the Desert Underpass at the back of the Fossil Maniac's house on Route 114, which is accessible after you obtain the National Pokédex.
Route 113, Fallarbor Town, Meteor Falls, Route 115
Make your way north from Route 111 to Routes 112 and 113, Fallarbor Town, Route 114, Meteor Falls, and Route 115 beyond, all the way back to Rustboro City.
Rustboro City
When you enter the city, take your Fossil to the second floor of the Devon Corporation building, and give it to a scientist there for him to restore. Exit the room, come back in, and receive your newly resurrected Pokémon, then continue on to through Route 104 to Petalburg City.
Route 104, Petalburg Woods
Traverse Route 104 and Petalburg Woods to reach Petalburg City, the home of your next Badge.
Petalburg City
| Available Pokémon | ||||||||||||||||||||||||||||||||||||||||||||||||||||||||||||||||||||||||||||||||||||||||||||||||||||||||||||||||||||||||||||||||||||||||||||||||||||||||||||||||||||||||
|---|---|---|---|---|---|---|---|---|---|---|---|---|---|---|---|---|---|---|---|---|---|---|---|---|---|---|---|---|---|---|---|---|---|---|---|---|---|---|---|---|---|---|---|---|---|---|---|---|---|---|---|---|---|---|---|---|---|---|---|---|---|---|---|---|---|---|---|---|---|---|---|---|---|---|---|---|---|---|---|---|---|---|---|---|---|---|---|---|---|---|---|---|---|---|---|---|---|---|---|---|---|---|---|---|---|---|---|---|---|---|---|---|---|---|---|---|---|---|---|---|---|---|---|---|---|---|---|---|---|---|---|---|---|---|---|---|---|---|---|---|---|---|---|---|---|---|---|---|---|---|---|---|---|---|---|---|---|---|---|---|---|---|---|---|---|---|---|---|
| ||||||||||||||||||||||||||||||||||||||||||||||||||||||||||||||||||||||||||||||||||||||||||||||||||||||||||||||||||||||||||||||||||||||||||||||||||||||||||||||||||||||||
| Items | ||||||||||||||||||||||||
|---|---|---|---|---|---|---|---|---|---|---|---|---|---|---|---|---|---|---|---|---|---|---|---|---|
| ||||||||||||||||||||||||
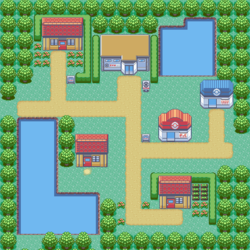
Heal your Pokémon, buy items, and do anything else you need to do before challenging the Petalburg Gym — your father's Gym.
Petalburg Gym
This Gym will be less of a challenge if you have any strong Fighting-type Pokémon. For each room you enter, the Trainer therein will focus on the type of battle that is described on that room's door, so choose your battles wisely. Gym Leader Norman focuses on Normal-type moves, as well as some Psychic and Dark ones. All four of Norman's Pokemon use the move Facade move, which doubles in power when used while under a status condition such as Poison, Paralysis, or Burn.
| |||||||||||||||||||||||||||||||||||||||||||||||||||||||||||||||||||||||||||||||||||||||||||||||||||||||||||||||||||||||||||||||||||||||||||||||||||||||||||||||||||||||||||||||||||||||||||||||||||||||||||||||||||||||||||||||||
When you defeat your father, he will hand over the Balance Badge, which allows you to use HM03 (Surf) outside of battle. He will also give you TM42 (Facade). Wally's father will drag you out of the Gym after the battle and give you HM03 (Surf). You can optionally return home, where your mother will give you the Amulet Coin, a item that doubles money earned from Trainer battles. Now continue your journey to Mauville, in search of Fortree City and the Feather Badge.

|
This article is part of Project Walkthroughs, a Bulbapedia project that aims to write comprehensive step-by-step guides on each Pokémon game. |


