Appendix:Emerald walkthrough/Section 11: Difference between revisions
NeoCrimson (talk | contribs) No edit summary |
HoopsterJohn (talk | contribs) m (→Rival Battle 5) |
||
| (5 intermediate revisions by 2 users not shown) | |||
| Line 1: | Line 1: | ||
== | ==Jagged Pass== | ||
[[File:Magma Hideout entrance E.png|thumb|Magma Hideout entrance]] | |||
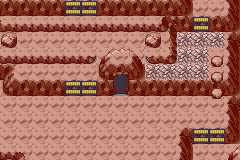
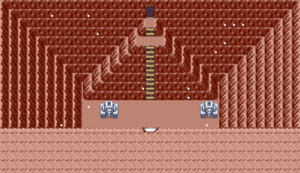
Having received the {{key|III|Magma Emblem}} from the caretakers atop [[Mt. Pyre]], the next step is to use it. {{m|Fly}} back to [[Lavaridge Town]] and {{rt|112|Hoenn}}, then either enter [[Jagged Pass]] from the south and use the {{key|III|Acro Bike}} to scale the cliffs, or ride the cable car to the summit and descend. Hike through the area until you reach the halfway point, where you passed that Magma Grunt on your first visit. Just then, a suspicious-looking part of the cliffside begins shaking in response to the Magma Emblem. By the time the tremor subsides, a gaping hole has appeared in the rock! | |||
[[ | |||
[[ | |||
[[File:Magma Hideout 1F E.png|thumb|left|Magma Hideout, 1F]] | |||
[[File:Magma Hideout 2F1R E.png|thumb|Magma Hideout, 2F]] | |||
[[File:Magma Hideout 2F2R E.png|thumb|left|Magma Hideout, 2F (Room 2)]] | |||
[[File:Magma Hideout 3F1R E.png|thumb|Magma Hideout, 3F]] | |||
[[File:Magma Hideout 3F2R E.png|thumb|left|Magma Hideout, 3F (Room 2)]] | |||
[[File:Magma Hideout 4F E.png|thumb|Magma Hideout, 4F]] | |||
[[File:Magma Hideout 3F3R E.png|thumb|left|Magma Hideout, 3F (Room 3)]] | |||
[[File:Magma Hideout 2F3R E.png|thumb|Magma Hideout, 2F (Room 3)]] | |||
===Magma Hideout=== | |||
Located deep in the side of [[Mt. Chimney]], the [[Team Magma Hideout]] serves as the terrestrial team's base of operations. Many strange machines can be found inside, and one chamber even holds excavation equipment for further expansion. | |||
{| class="expandable" style="margin:auto; background: #{{ | {| class="expandable" style="margin: auto; background: #{{locationcolor/med|volcano}}; {{roundy}}; border: 5px solid #{{locationcolor/light|volcano}};" | ||
|- | |- align="center" | ||
! Trainers | ! Trainers | ||
|- | |- | ||
|{{trainerheader| | | | ||
{{trainerentry|Spr RS Team | {{trainerheader|volcano}} | ||
{{trainerdiv| | {{catch/div|volcano|1F}} | ||
{{trainerentry|Spr RS Team | {{trainerentry|Spr RS Team Magma Grunt M.png|Team Magma Grunt||580|1|261|Poochyena|♂|29|}} | ||
{{trainerdiv| | {{trainerdiv|volcano}} | ||
{{trainerentry|Spr RS Team | {{trainerentry|Spr RS Team Magma Grunt M.png|Team Magma Grunt||580|1|041|Zubat|♂|29|}} | ||
{{trainerentry|Spr RS Team | {{catch/div|volcano|2F}} | ||
{{trainerdiv| | {{trainerentry|Spr RS Team Magma Grunt M.png|Team Magma Grunt||580|1|322|Numel|♂|29|}} | ||
{{trainerentry|Spr RS Team | {{trainerdiv|volcano}} | ||
{{trainerdiv| | {{trainerentry|Spr RS Team Magma Grunt F.png|Team Magma Grunt||580|1|262|Mightyena|♀|29|}} | ||
{{trainerentry|Spr RS Team | {{trainerdiv|volcano}} | ||
{{trainerdiv| | {{trainerentry|Spr RS Team Magma Grunt M.png|Team Magma Grunt||560<br/><small>Potential [[Double Battle]] with the following Grunt</small>|2|343|Baltoy||28||322|Numel|♂|28|}} | ||
{{trainerentry|Spr RS Team | {{trainerdiv|volcano}} | ||
{{trainerentry|Spr RS Team | {{trainerentry|Spr RS Team Magma Grunt M.png|Team Magma Grunt||560<br/><small>Potential [[Double Battle]] with the preceding Grunt</small>|2|343|Baltoy||28||041|Zubat|♂|28|}} | ||
{{trainerfooter| | {{catch/div|volcano|2F (Room 2)}} | ||
{{trainerentry|Spr RS Team Magma Grunt F.png|Team Magma Grunt||580<br/><small>[[Double Battle]] with the following Grunt</small>|1|322|Numel|♀|29|}} | |||
{{trainerentry|Spr RS Team Magma Grunt M.png|Team Magma Grunt||580<br/><small>[[Double Battle]] with the preceding Grunt</small>|1|262|Mightyena|♂|29|}} | |||
{{trainerdiv|volcano}} | |||
{{trainerentry|Spr RS Team Magma Grunt M.png|Team Magma Grunt||580|1|041|Zubat|♂|29|}} | |||
{{trainerdiv|volcano}} | |||
{{trainerentry|Spr RS Team Magma Grunt M.png|Team Magma Grunt||580|1|261|Poochyena|♂|29|}} | |||
{{catch/div|volcano|3F}} | |||
{{trainerentry|Spr RS Team Magma Grunt M.png|Team Magma Grunt||580|1|041|Zubat|♂|29|}} | |||
{{trainerdiv|volcano}} | |||
{{trainerentry|Spr RS Team Magma Grunt F.png|Team Magma Grunt||580|1|343|Baltoy||29|}} | |||
{{catch/div|volcano|3F (Room 3)}} | |||
{{trainerentry|Spr RS Team Magma Grunt M.png|Team Magma Grunt||580|1|262|Mightyena|♂|29|}} | |||
{{catch/div|volcano|4F}} | |||
{{trainerentry|Spr RS Team Magma Grunt M.png|Team Magma Grunt||580|1|343|Baltoy||29|}} | |||
{{trainerdiv|volcano}} | |||
{{trainerentry|Spr RS Team Magma Grunt M.png|Team Magma Grunt||580<br/><small>Potential [[Double Battle]] with the following Grunt</small>|1|322|Numel|♂|29|}} | |||
{{trainerdiv|volcano}} | |||
{{trainerentry|Spr RS Team Magma Grunt M.png|Team Magma Grunt||580<br/><small>Potential [[Double Battle]] with the preceding Grunt</small>|1|041|Zubat|♂|29|}} | |||
{{trainerfooter|volcano|I}} | |||
|} | |} | ||
{| class="expandable" style="margin: auto; background: #{{locationcolor/med|volcano}}; {{roundy}}; border: 5px solid #{{locationcolor/light|volcano}};" | |||
{| class="expandable" style="margin:auto; background: #{{ | |- align="center" | ||
|- | |||
! Available Pokémon | ! Available Pokémon | ||
|- | |- | ||
|{{Catch/header| | | | ||
{{ | {{Catch/header|volcano|no}} | ||
{{Catch/entry3| | {{Catch/entry3|074|Geodude|no|no|yes|Cave|27-30|55%|type1=Rock|type2=Ground}} | ||
{{Catch/footer| | {{Catch/entry3|324|Torkoal|no|no|yes|Cave|28, 30|30%|type1=Fire}} | ||
{{Catch/entry3|075|Graveler|no|no|yes|Cave|30-33|15%|type1=Rock|type2=Ground}} | |||
{{Catch/footer|volcano}} | |||
|} | |} | ||
{| class="expandable" style="margin: auto; background: #{{locationcolor/med|volcano}}; {{roundy}}; border: 5px solid #{{locationcolor/light|volcano}};" | |||
{| class="expandable" style="margin:auto; background: #{{ | |- align="center" | ||
|- | |||
! Items | ! Items | ||
|- | |- | ||
|{{itlisth| | | | ||
{{itemlist| | {{itlisth|volcano}} | ||
{{itemlist| | {{catch/div|volcano|1F}} | ||
{{itemlist|Max Elixir| | {{itemlist|Rare Candy|West side of the elevated path, accessible via 2F (Room 2)|E=yes|display={{DL|Vitamin|Rare Candy}}}} | ||
{{itemlist| | {{catch/div|volcano|2F (Room 2)}} | ||
{{catch/div| | {{itemlist|Full Restore|West of the lava pool|E=yes|display={{DL|Potion|Full Restore}}}} | ||
{{itemlist| | {{itemlist|Max Elixir|East of the lava pool|E=yes|display={{DL|Ether|Max Elixir}}}} | ||
{{catch/div|volcano|3F}} | |||
{{itemlist|Nugget|West side of the lower lava pool|E=yes|display={{DL|Valuable item|Nugget}}}} | |||
{{itlistfoot| | {{catch/div|volcano|3F (Room 2)}} | ||
{{itemlist|PP Max|West side|E=yes|display={{DL|Vitamin|PP Max}}}} | |||
{{catch/div|volcano|4F}} | |||
{{itemlist|Max Revive|Northwest of Groudon's lava pool|E=yes|display={{DL|Revive|Max Revive}}}} | |||
{{catch/div|volcano|3F (Room 3)}} | |||
{{itemlist|Escape Rope|Southwest corner|E=yes}} | |||
{{itlistfoot|volcano}} | |||
|} | |} | ||
{| style="margin:auto" | ====1F==== | ||
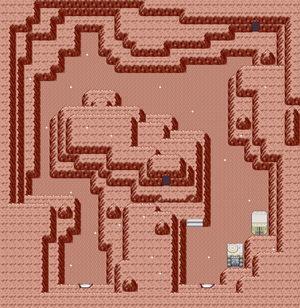
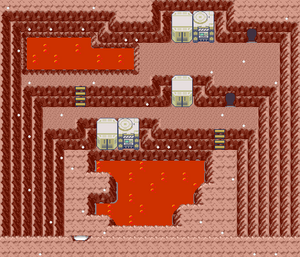
|{{Party/Single | Enter the base, turn the corner, and use {{m|Strength}} to move past the group of boulders. Continue on to battle the Grunt on the east side of the chamber, then take the southeast doorway. | ||
|color={{ | |||
|headcolor={{ | ====2F==== | ||
|bordercolor={{ | Make your way down the cliffside, battling four more Grunts along the way. After that, head through the mid-level doorway to detour for a handful of items. | ||
|sprite=Spr RS | |||
|prize={{PDollar}} | ====2F (Room 2)==== | ||
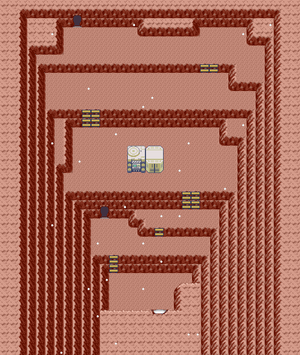
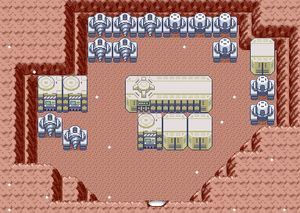
|class= | Go north to fight a couple of Grunts in a [[Double Battle]], then collect the {{DL|Potion|Full Restore}} just beyond them. Head back south, then turn east to battle another two Grunts and grab the {{DL|Ether|Max Elixir}} to the northwest. Continue eastward and head through the northeast doorway. | ||
|name= | |||
|game=E | Back on 1F, follow the elevated path to the southwest, battling a single Grunt along the way to the path's end, where you find a {{DL|Vitamin|Rare Candy}}. Backtrack through 2F (Room 2) to the southwest doorway to return to 2F. | ||
|location=Team | |||
|pokemon= | ====2F==== | ||
}}|{{Pokémon/3 | Continue down the cliffside and go through the doorway at the bottom. | ||
|game=Emerald | |||
|ndex= | ====3F==== | ||
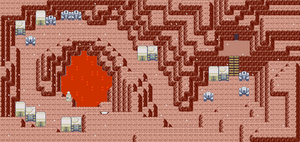
| | Head west around the lava pool to battle the first Grunt. Walk down the stairway and go through the doorway to the east. | ||
|gender=male | |||
| | ====3F (Room 2)==== | ||
Pick up a {{DL|Vitamin|PP Max}} to the northwest and battle the Grunt to the northeast, then return to the previous chamber. | |||
====3F==== | |||
Walk down the stairway and fight the second Grunt. Go west and collect the {{DL|Valuable item|Nugget}} before heading south through the doorway. | |||
====4F==== | |||
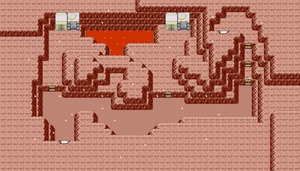
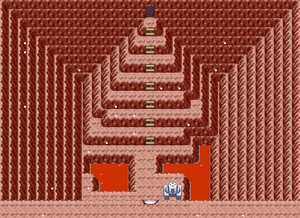
Head down the stairway and go west, battling three more Grunts along the way. Continue westward and you are stopped by Magma Admin [[Tabitha]]. He tells you that [[Maxie]] is up ahead, and draws you into battle to buy some time for his boss. | |||
=====VS Tabitha===== | |||
{| style="margin: auto;" | |||
| | |||
{{Party/Single | |||
|color={{ruby color light}}|headcolor={{ground color}}|bordercolor={{ruby color}} | |||
|sprite=Spr RS Tabitha.png | |||
|prize={{PDollar}}1320 | |||
|class=Magma Admin|name={{color2|000|Tabitha}} | |||
|game=E|location=Team Magma Hideout | |||
|pokemon=4}} | |||
|{{Pokémon/3|game=Emerald | |||
|ndex=322|pokemon=Numel | |||
|type1=Fire|type2=Ground | |||
|level=26|gender=male | |||
|ability=Oblivious | |||
|move1=Tackle|move1type=Normal | |||
|move2=Ember|move2type=Fire | |||
|move3=Magnitude|move3type=Ground | |||
|move4=Focus Energy|move4type=Normal}} | |||
|{{Pokémon/3|game=Emerald | |||
|ndex=262|pokemon=Mightyena | |||
|type1=Dark | |type1=Dark | ||
|level=28|gender=male | |||
|ability=Intimidate | |ability=Intimidate | ||
|move1= | |move1=Bite|move1type=Dark | ||
|move2= | |move2=Odor Sleuth|move2type=Normal | ||
|move3= | |move3=Roar|move3type=Normal | ||
|move4= | |move4=Swagger|move4type=Normal}} | ||
|{{Pokémon/3 | {{Party/Div|color={{ruby color light}}}} | ||
|game=Emerald | |{{Pokémon/3|game=Emerald | ||
|ndex= | |ndex=041|pokemon=Zubat | ||
|pokemon= | |||
|type1=Poison|type2=Flying | |type1=Poison|type2=Flying | ||
|level=30|gender=male | |||
|ability=Inner Focus | |ability=Inner Focus | ||
|move1=Astonish|move1type=Ghost | |move1=Astonish|move1type=Ghost | ||
| Line 95: | Line 154: | ||
|move3=Wing Attack|move3type=Flying | |move3=Wing Attack|move3type=Flying | ||
|move4=Confuse Ray|move4type=Ghost}} | |move4=Confuse Ray|move4type=Ghost}} | ||
|{{Pokémon/3|game=Emerald | |||
|ndex=323|pokemon=Camerupt | |||
|type1=Fire|type2=Ground | |||
|level=33|gender=male | |||
|ability=Magma Armor | |||
|move1=Focus Energy|move1type=Normal | |||
|move2=Take Down|move2type=Normal | |||
|move3=Amnesia|move3type=Psychic | |||
|move4=Rock Slide|move4type=Rock}} | |||
{{Party/Footer}} | {{Party/Footer}} | ||
|} | |} | ||
Collect a {{DL|Revive|Max Revive}} from the northwest corner, then turn south. Up ahead, you find Maxie standing on the edge of a lava pool, talking to the sleeping form of the super-ancient Pokémon, {{p|Groudon}}. He holds the {{key|III|Blue Orb}} high, and its light awakens the ancient beast, which immediately escapes. Maxie blames you, accusing you of some "cheap stunt", and prepares for battle! | |||
=====VS Maxie===== | |||
{| style="margin: auto;" | |||
| | |||
{{Party/Single | |||
|color={{ruby color light}}|headcolor={{ground color}}|bordercolor={{ruby color}} | |||
|sprite=Spr RS Maxie.png | |||
|prize={{PDollar}}3120 | |||
|class=Magma Leader|classlink=Maxie|name={{color2|000|Maxie}} | |||
|game=E|location=Team Magma Hideout | |||
|pokemon=3}} | |||
|{{Pokémon/3|game=Emerald | |||
|ndex=262|pokemon=Mightyena | |||
|type1=Dark | |||
|level=37|gender=male | |||
|ability=Intimidate | |||
|move1=Roar|move1type=Normal | |||
|move2=Swagger|move2type=Normal | |||
|move3=Scary Face|move3type=Normal | |||
|move4=Take Down|move4type=Normal}} | |||
== | |{{Pokémon/3|game=Emerald | ||
|ndex=169|pokemon=Crobat | |||
|type1=Poison|type2=Flying | |||
|level=38|gender=male | |||
|ability=Inner Focus | |||
|move1=Bite|move1type=Dark | |||
|move2=Wing Attack|move2type=Flying | |||
|move3=Confuse Ray|move3type=Ghost | |||
|move4=Air Cutter|move4type=Flying}} | |||
|{{Pokémon/3|game=Emerald | |||
| | |ndex=323|pokemon=Camerupt | ||
|type1=Fire|type2=Ground | |||
| | |level=39|gender=male | ||
| | |ability=Magma Armor | ||
|move1=Take Down|move1type=Normal | |||
|move2=Amnesia|move2type=Psychic | |||
|move3=Rock Slide|move3type=Rock | |||
|move4=Earthquake|move4type=Ground}} | |||
{{Party/Footer}} | |||
{{ | |||
|} | |} | ||
Defeated, Maxie flees to search for Groudon. Take the south doorway for a shortcut back to the entrance, and collect the [[Escape Rope]] along the way through 3F (Room 3) and 2F (Room 3). | |||
==Slateport City== | |||
When you arrive in {{ci|Slateport}}, head straight for the northeast part of town. Outside Slateport Harbor, you find [[Captain Stern]] wrapping up a TV interview in front of a small crowd. Afterwards, you catch up with him for a little chat where he informs you of his newest discovery. He's found an underwater cavern on {{rt|128|Hoenn}}, and believes it to be the den of a super-ancient Pokémon long though to have been extinct. Just then, you hear a voice booming out from a megaphone. It's [[Archie]], who mocks the captain and thanks him for the [[Submarine Explorer 1|submarine]]. | |||
| | |||
== | ===Slateport Harbor=== | ||
[[ | After rushing inside the building, you find [[Archie]] and a Grunt standing near the sub, ready to depart. He accepts that you won't simply leave him to his plans, and wonders if you will visit their hideout in [[Lilycove City]]. But he's come too far to be stopped now, and he and the Grunt quickly escape in the sub. | ||
[[ | ==Lilycove City== | ||
[[File:Lilycove City E.png|thumb|300px|Lilycove City]] | |||
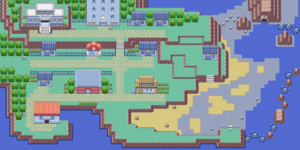
A port city, {{ci|Lilycove}} mirrors {{ci|Slateport}} with its impressive size, its scenic lighthouse, and its spacious harbor. The main attraction is the [[Lilycove Department Store]], while the [[Pokémon Contest|Contest Hall]], [[Lilycove Museum]], and [[Cove Lily Motel]] are also located here. | |||
{| class="expandable" style="margin:auto; background: # | {| class="expandable" style="margin: auto; background: #519EE2; {{roundy}}; border: 5px solid #5CB3FF;" | ||
|- | |- align="center" | ||
! Available Pokémon | ! Available Pokémon | ||
|- | |- | ||
|{{Catch/header| | | | ||
{{Catch/header|water|no}} | |||
{{Catch/div|water|Surfing}} | {{Catch/div|water|Surfing}} | ||
{{Catch/entry3|072|Tentacool|no|no|yes|Surf|5-35|60%|type1=Water|type2=Poison}} | {{Catch/entry3|072|Tentacool|no|no|yes|Surf|5-35|60%|type1=Water|type2=Poison}} | ||
| Line 199: | Line 240: | ||
{{Catch/entry3|129|Magikarp|no|no|yes|Fish Old|5-10|70%|type1=Water}} | {{Catch/entry3|129|Magikarp|no|no|yes|Fish Old|5-10|70%|type1=Water}} | ||
{{Catch/entry3|072|Tentacool|no|no|yes|Fish Old|5-10|30%|type1=Water|type2=Poison}} | {{Catch/entry3|072|Tentacool|no|no|yes|Fish Old|5-10|30%|type1=Water|type2=Poison}} | ||
{{Catch/entry3|129|Magikarp|no|no|yes|Fish Good|10-30|60%|type1=Water }} | {{Catch/entry3|129|Magikarp|no|no|yes|Fish Good|10-30|60%|type1=Water}} | ||
{{Catch/entry3|072|Tentacool|no|no|yes|Fish Good|10-30|20%|type1=Water|type2=Poison}} | {{Catch/entry3|072|Tentacool|no|no|yes|Fish Good|10-30|20%|type1=Water|type2=Poison}} | ||
{{Catch/entry3|320|Wailmer|no|no|yes|Fish Good|10-30|20%|type1=Water}} | {{Catch/entry3|320|Wailmer|no|no|yes|Fish Good|10-30|20%|type1=Water}} | ||
{{Catch/footer|water}} | |||
{{Catch/footer| | |||
|} | |} | ||
{| class="expandable" style="margin: auto; background: #519EE2; {{roundy}}; border: 5px solid #5CB3FF;" | |||
{| class="expandable" style="margin:auto; background: # | |- align="center" | ||
|- | |||
! Items | ! Items | ||
|- | |- | ||
|{{itlisth| | | | ||
{{ | {{itlisth|city}} | ||
{{ | {{itemlist|Max Repel|On the peninsula in the southeast|E=yes|display={{DL|Repel|Max Repel}}}} | ||
{{ | {{itemlist|TM Psychic|From a man in the easternmost house|E=yes|display={{TM|44|Rest}}}} | ||
{{ | {{itemlist|Poké Ball|On a rock, in the shallow water (hidden)|E=yes|display={{ball|Poké}}}} | ||
{{itlistfoot| | {{itemlist|Heart Scale|On a rock, on the southwest part of the beach (hidden)|E=yes|display={{DL|Exchangeable item|Heart Scale}}}} | ||
{{itemlist|PP Up|Just outside the Team Aqua Hideout (hidden)|E=yes|display={{DL|Vitamin|PP Up}}}} | |||
{{itlistfoot|city}} | |||
|} | |} | ||
===Pokémon Trainer Fan Club=== | |||
Members of the [[Pokémon Trainer Fan Club]] discuss popular Pokémon Trainers and Gym Leaders. After entering the [[Hall of Fame]], several members announce themselves as your fans, as well. | |||
=== | ===Cove Lily Motel=== | ||
Team Aqua's hideout on the edge of town has kept most tourists away, bringing the [[Cove Lily Motel]]'s business to a halt. As a result, there's nothing of interest here at the moment. After resolving the conflict with the villainous team and entering the [[Hall of Fame]], the Game Freak staff will visit the motel during their trip to Hoenn. The Game Designer will give Trainers the Poké [[Diploma]] after completing the [[Hoenn Pokédex]]. | |||
[[Scott]] can be found napping at a table on the upper level. He thinks Pokémon Contests are entertaining, but still prefers battles and tough Trainers. He urges you to enjoy every kind of trial--Gyms, Contests, Battle Tents, the works! | |||
== | ===Pokémon Contest Hall=== | ||
[[ | The [[Pokémon Contest|Contest Hall]] stands on the south side of town. This building hosts all four Contest levels—Normal Rank, Super Rank, Hyper Rank, and Master Rank. | ||
===Pokéblock Master's House=== | |||
| | The Pokéblock Master's house stands to the north of the harbor. Talk to her and her family to learn tips on crafting potent [[Pokéblock]]s. | ||
| | ===Rival Battle 5=== | ||
When you approach the Department Store, you find {{ga|May}}/{{ga|Brendan}} waiting outside. She/He offers to battle you to determine which Trainer has been doing a better job of raising their Pokémon. | |||
===={{MSP|252|Treecko}} Player chose {{p|Treecko}}==== | |||
{| style="margin: auto;" | |||
| | | | ||
{{ | {{Party/Single | ||
{{ | |color={{{{#switch: {{#expr: {{#time: U}} mod 2}}|0=Sapphire|1=Ruby}} color}} | ||
{{ | |headcolor={{{{#switch: {{#expr: {{#time: U}} mod 2}}|0=Sapphire|1=Ruby}} color light}} | ||
{{ | |bordercolor={{{{#switch: {{#expr: {{#time: U}} mod 2}}|0=Sapphire|1=Ruby}} color dark}} | ||
{{ | |sprite=Spr E {{#switch: {{#expr: {{#time: U}} mod 2}}|0=May|1=Brendan}}.png | ||
{{ | |prize={{Pdollar}}2040 | ||
{{ | |class={{PK}}{{MN}} Trainer|classlink=Pokémon Trainer | ||
{{ | |name={{color2|000|{{#switch: {{#expr: {{#time: U}} mod 2}}|0=May|1=Brendan}} (game)|{{#switch: {{#expr: {{#time: U}} mod 2}}|0=May|1=Brendan}}}} | ||
{{ | |game=E|location=Lilycove City | ||
|pokemon=4}} | |||
{{ | |||
{{ | |{{Pokémon/3|game=Emerald | ||
|ndex=357|pokemon=Tropius | |||
|type1=Grass|type2=Flying | |||
{{ | |level=31|gender={{#switch: {{#expr: {{#time: U}} mod 2}}|0=female|1=male}} | ||
|ability=Chlorophyll | |||
|move1=Stomp|move1type=Normal | |||
|move2=Sweet Scent|move2type=Normal | |||
|move3=Whirlwind|move3type=Normal | |||
|move4=Magical Leaf|move4type=Grass}} | |||
|{{Pokémon/3|game=Emerald | |||
|ndex=279|pokemon=Pelipper | |||
|type1=Water|type2=Flying | |||
|level=32|gender={{#switch: {{#expr: {{#time: U}} mod 2}}|0=female|1=male}} | |||
|ability=Keen Eye | |||
|move1=Wing Attack|move1type=Flying | |||
|move2=Supersonic|move2type=Normal | |||
|move3=Mist|move3type=Ice | |||
|move4=Protect|move4type=Normal}} | |||
{{Party/Div|color={{{{#switch: {{#expr: {{#time: U}} mod 2}}|0=Sapphire|1=Ruby}} color}}}} | |||
|{{Pokémon/3|game=Emerald | |||
|ndex=272|pokemon=Ludicolo | |||
|type1=Water|type2=Grass | |||
|level=32|gender={{#switch: {{#expr: {{#time: U}} mod 2}}|0=female|1=male}} | |||
|ability=Swift Swim | |||
|move1=Astonish|move1type=Ghost | |||
|move2=Growl|move2type=Normal | |||
|move3=Absorb|move3type=Grass | |||
|move4=Nature Power|move4type=Normal}} | |||
|{{Pokémon/3|game=Emerald | |||
|ndex=256|pokemon=Combusken | |||
|type1=Fire|type2=Fighting | |||
|level=34|gender=male | |||
|ability=Blaze | |||
|move1=Peck|move1type=Flying | |||
|move2=Sand-Attack|move2type=Ground | |||
|move3=Bulk Up|move3type=Fighting | |||
|move4=Quick Attack|move4type=Normal}} | |||
{{Party/Footer}} | |||
{{ | |||
|} | |} | ||
== | ===={{MSP|255|Torchic}} Player chose {{p|Torchic}}==== | ||
{| style="margin: auto;" | |||
| | |||
{{Party/Single | |||
|color={{{{#switch: {{#expr: {{#time: U}} mod 2}}|0=Sapphire|1=Ruby}} color}} | |||
|headcolor={{{{#switch: {{#expr: {{#time: U}} mod 2}}|0=Sapphire|1=Ruby}} color light}} | |||
|bordercolor={{{{#switch: {{#expr: {{#time: U}} mod 2}}|0=Sapphire|1=Ruby}} color dark}} | |||
|sprite=Spr E {{#switch: {{#expr: {{#time: U}} mod 2}}|0=May|1=Brendan}}.png | |||
|prize={{Pdollar}}2040 | |||
|class={{PK}}{{MN}} Trainer|classlink=Pokémon Trainer | |||
|name={{color2|000|{{#switch: {{#expr: {{#time: U}} mod 2}}|0=May|1=Brendan}} (game)|{{#switch: {{#expr: {{#time: U}} mod 2}}|0=May|1=Brendan}}}} | |||
|game=E|location=Lilycove City | |||
|pokemon=4}} | |||
|{{Pokémon/3|game=Emerald | |||
|ndex=357|pokemon=Tropius | |||
|type1=Grass|type2=Flying | |||
|level=31|gender={{#switch: {{#expr: {{#time: U}} mod 2}}|0=female|1=male}} | |||
|ability=Chlorophyll | |||
|move1=Stomp|move1type=Normal | |||
|move2=Sweet Scent|move2type=Normal | |||
|move3=Whirlwind|move3type=Normal | |||
|move4=Magical Leaf|move4type=Grass}} | |||
{| | |{{Pokémon/3|game=Emerald | ||
| | |ndex=272|pokemon=Ludicolo | ||
|type1=Water|type2=Grass | |||
| | |level=32|gender={{#switch: {{#expr: {{#time: U}} mod 2}}|0=female|1=male}} | ||
| | |ability=Swift Swim | ||
|move1=Astonish|move1type=Ghost | |||
{{ | |move2=Growl|move2type=Normal | ||
|move3=Absorb|move3type=Grass | |||
|move4=Nature Power|move4type=Normal}} | |||
{{Party/Div|color={{{{#switch: {{#expr: {{#time: U}} mod 2}}|0=Sapphire|1=Ruby}} color}}}} | |||
|{{Pokémon/3|game=Emerald | |||
|ndex=218|pokemon=Slugma | |||
{{ | |type1=Fire | ||
{{ | |level=32|gender={{#switch: {{#expr: {{#time: U}} mod 2}}|0=female|1=male}} | ||
{{ | |ability=Flame Body | ||
|move1=Ember|move1type=Fire | |||
|move2=Rock Throw|move2type=Rock | |||
{{ | |move3=Harden|move3type=Normal | ||
|move4=Amnesia|move4type=Psychic}} | |||
{{ | |||
|{{Pokémon/3|game=Emerald | |||
{{ | |ndex=259|pokemon=Marshtomp | ||
|type1=Water|type2=Ground | |||
|level=34|gender=male | |||
|ability=Torrent | |||
|move1=Mud Shot|move1type=Ground | |||
{{ | |move2=Foresight|move2type=Normal | ||
|move3=Mud Sport|move3type=Ground | |||
|move4=Take Down|move4type=Normal}} | |||
{{Party/Footer}} | |||
|} | |} | ||
===={{MSP|258|Mudkip}} Player chose {{p|Mudkip}}==== | |||
{| style="margin: auto;" | |||
| | | | ||
{{ | {{Party/Single | ||
{{ | |color={{{{#switch: {{#expr: {{#time: U}} mod 2}}|0=Sapphire|1=Ruby}} color}} | ||
|headcolor={{{{#switch: {{#expr: {{#time: U}} mod 2}}|0=Sapphire|1=Ruby}} color light}} | |||
{{ | |bordercolor={{{{#switch: {{#expr: {{#time: U}} mod 2}}|0=Sapphire|1=Ruby}} color dark}} | ||
|sprite=Spr E {{#switch: {{#expr: {{#time: U}} mod 2}}|0=May|1=Brendan}}.png | |||
{{ | |prize={{Pdollar}}2040 | ||
|class={{PK}}{{MN}} Trainer|classlink=Pokémon Trainer | |||
|name={{color2|000|{{#switch: {{#expr: {{#time: U}} mod 2}}|0=May|1=Brendan}} (game)|{{#switch: {{#expr: {{#time: U}} mod 2}}|0=May|1=Brendan}}}} | |||
|game=E|location=Lilycove City | |||
|pokemon=4}} | |||
{{ | |||
{{ | |||
{{ | |||
|} | |||
|{{Pokémon/3|game=Emerald | |||
|ndex=357|pokemon=Tropius | |||
|type1=Grass|type2=Flying | |||
|level=31|gender={{#switch: {{#expr: {{#time: U}} mod 2}}|0=female|1=male}} | |||
|ability=Chlorophyll | |||
|move1=Stomp|move1type=Normal | |||
|move2=Sweet Scent|move2type=Normal | |||
|move3=Whirlwind|move3type=Normal | |||
|move4=Magical Leaf|move4type=Grass}} | |||
|{{Pokémon/3|game=Emerald | |||
|ndex=218|pokemon=Slugma | |||
|type1=Fire | |||
|level=32|gender={{#switch: {{#expr: {{#time: U}} mod 2}}|0=female|1=male}} | |||
|ability=Flame Body | |||
|move1=Ember|move1type=Fire | |||
|move2=Rock Throw|move2type=Rock | |||
|move3=Harden|move3type=Normal | |||
|move4=Amnesia|move4type=Psychic}} | |||
{{Party/Div|color={{Ruby color}}}} | |||
|{{Pokémon/3|game=Emerald | |||
|ndex=279|pokemon=Pelipper | |||
|type1=Water|type2=Flying | |||
|level=32|gender={{#switch: {{#expr: {{#time: U}} mod 2}}|0=female|1=male}} | |||
|ability=Keen Eye | |||
|move1=Wing Attack|move1type=Flying | |||
|move2=Supersonic|move2type=Normal | |||
|move3=Mist|move3type=Ice | |||
|move4=Protect|move4type=Normal}} | |||
|{{Pokémon/3|game=Emerald | |||
|ndex=253|pokemon=Grovyle | |||
|type1=Grass | |||
|level=34|gender=male | |||
|ability=Overgrow | |||
|move1=Fury Cutter|move1type=Bug | |||
|move2=Pursuit|move2type=Dark | |||
|move3=Screech|move3type=Normal | |||
|move4=Leaf Blade|move4type=Grass}} | |||
{{Party/Footer}} | |||
|} | |} | ||
Once the battle ends, your friend heads back to [[Littleroot Town]] to continue working on her/his Pokédex. | |||
===Lilycove Department Store=== | |||
Welcome to the [[Lilycove Department Store]]! This massive shopping center offers a wide array of merchandise, so Trainers can find almost any item for sale here. | |||
====1F: Service Counter, Lottery Corner==== | |||
The {{DL|Lilycove Department Store|first floor}} is a welcome center. The receptionist on the left greets visitors, while the one on the right runs the [[Pokémon Lottery Corner]]. Talk to her to draw a random Pokémon Loto Ticket. If the ticket's number matches up with any of your Pokémon's [[Trainer ID number|ID numbers]], you win a prize! You can draw one Loto Ticket per day. | |||
{| style="margin:auto; background: #{{ | {| style="margin: auto; background: #{{locationcolor/med|building}}; {{roundy}}; border: 2px solid #{{locationcolor/dark|building}};" cellspacing="2" cellpadding="4" | ||
|- | |- | ||
! | ! style="background: #{{locationcolor/light|building}}; {{roundytl|5px}};" | Matching Digits | ||
| | ! colspan="2" style="background: #{{locationcolor/light|building}}; {{roundytr|5px}};" | Prize | ||
|- style="background: #FFF;" | |||
| 2 digits || {{bag|PP Up}} || {{DL|Vitamin|PP Up}} | |||
| | |- style="background: #FFF;" | ||
| 3 digits || {{bag|Exp. Share}} || {{DL|Experience-affecting item|Exp. Share}} | |||
| | |- style="background: #FFF;" | ||
| | | 4 digits || {{bag|Max Revive}} || {{DL|Revive|Max Revive}} | ||
{{ | |- style="background: #FFF;" | ||
{{ | | 5 digits || {{bag|Master Ball}} || {{ball|Master}} | ||
|- | |||
{{ | | colspan="3" style="background: #{{locationcolor/light|building}}; {{roundybottom|5px}};" | | ||
{{ | |||
{{ | |||
{{ | |||
{{ | |||
{{ | |||
{{ | |||
{{ | |||
|} | |} | ||
====2F: Trainers' Zone==== | |||
The {{DL|Lilycove Department Store|second floor}} offers items that are useful during battle. The left clerk sells Poké Balls and items to cure status ailments, while the right clerk sells Potions, Repels, and other items. | |||
====3F: Battle Collection==== | |||
The {{DL|Lilycove Department Store|third floor}} sells stat-enhancing items. The left clerk offers [[Vitamin]]s that permanently boost their respective stat, like {{DL|Vitamin|Protein}}. The right clerk offers [[Battle items]] that give a temporary boost in battle, like {{DL|Battle item|X Attack}}. | |||
====4F: TM Corner==== | |||
The {{DL|Lilycove Department Store|fourth floor}} offers eight different [[TM]]s for sale. Speak to the left clerk to buy TMs containing offensive moves, and the right clerk for TMs containing defensive moves. | |||
| | |||
====5F: Decoration Floor==== | |||
The {{DL|Lilycove Department Store|fifth floor}} is dedicated to [[Secret Base]] fanatics. Here you'll find a wide selection of [[Decoration]]s to deck out your Base, including dolls, mats, posters, and cushions. | |||
====Rooftop Plaza==== | |||
After entering the [[Hall of Fame]], the store occasionally holds a {{DL|Lilycove Department Store|Rooftop Sale|major clearance sale}}. A special selection of Secret Base Decorations are offered, with items listed anywhere from {{pdollar}}200 to {{pdollar}}10,000. Though this sale rarely occurs, many of the items available for purchase cannot be obtained anywhere else. | |||
Also on the rooftop, a girl fantasizes about copying herself and living several different lives. Speak to her, and she offers to teach the move {{m|Substitute}} to a Pokémon, one time only. | |||
== | ===Lilycove Museum=== | ||
[[ | The [[Lilycove Museum]] stands in the northwest part of town. The museum's curator initially blocks the stairs to the second floor because the upper level is empty. He is still searching for modern and vibrant artwork to display there, and asks you to search for such artwork. If you happen to win a Master Rank [[Pokémon Contest]] with at least 800 points, an artist will approach you saying that he's done a painting that might even look good in a museum, at which point you direct him to the Lilycove Museum. If you collect one painting for each of the five Contest categories, the curator will reward you with a {{DL|Ornament|Glass Ornament}} for your [[Secret Base]]. | ||
===Move Deleter's House=== | |||
The first house to the east of the Department Store is home to the [[Move Deleter]], an absent-minded man with the power to make a Pokémon forget any move. This is the only way for a Pokémon to forget an [[HM]] move. Unlike the [[Move Reminder]] in [[Fallarbor Town]], the Move Deleter's services are free of charge. | |||
===A Berry A Day=== | |||
Speak to the Gentleman to the east of the Move Deleter's house to get one random Berry. This kind old man will give you either a {{b|Cheri}}, {{b|Chesto}}, {{b|Pecha}}, {{b|Rawst}}, {{b|Aspear}}, {{b|Leppa}}, {{b|Oran}}, {{b|Persim}}, {{b|Lum}}, or [[Sitrus Berry]] every day. | |||
{{ | |||
{{ | |||
{{ | |||
{{ | |||
{{ | |||
{{ | |||
{{ | |||
{{ | |||
{{ | |||
{{ | {{WalkthroughPrevNext | ||
|game=Emerald | |game=Emerald | ||
| | |gamename=Emerald | ||
|prevsection=10 | |||
|prevname=Routes 120 and 121, Safari Zone, Route 122, Mt. Pyre, Route 123 | |||
|nextsection=12 | |||
|nextname=Team Aqua Hideout, Route 124 | |||
}} | |||
| | |||
| | |||
nextsection=12 | |||
nextname= | |||
<br> | |||
{{Project Walkthroughs notice}} | {{Project Walkthroughs notice}} | ||
[[Category:Emerald walkthrough]] | [[Category:Emerald walkthrough]] | ||
Revision as of 16:52, 20 December 2016
Jagged Pass
Having received the Magma Emblem from the caretakers atop Mt. Pyre, the next step is to use it. Fly back to Lavaridge Town and Route 112, then either enter Jagged Pass from the south and use the Acro Bike to scale the cliffs, or ride the cable car to the summit and descend. Hike through the area until you reach the halfway point, where you passed that Magma Grunt on your first visit. Just then, a suspicious-looking part of the cliffside begins shaking in response to the Magma Emblem. By the time the tremor subsides, a gaping hole has appeared in the rock!
Magma Hideout
Located deep in the side of Mt. Chimney, the Team Magma Hideout serves as the terrestrial team's base of operations. Many strange machines can be found inside, and one chamber even holds excavation equipment for further expansion.
| Trainers | ||||||||||||||||||||||||||||||||||||||||||||||||||||||||||||||||||||||||||||||||||||||||||||||||||||||||||||||||||||||||||||||||||||||||||||||||||||||||||||||||||||||||||||||||||||||||||||||||||||||||||||||||||||||||||||||||||||||||||||||||||||||||||||||||||||||||||||||||||||||||||||||||||||||||||||||||||||||||||||||||||||||||||||
|---|---|---|---|---|---|---|---|---|---|---|---|---|---|---|---|---|---|---|---|---|---|---|---|---|---|---|---|---|---|---|---|---|---|---|---|---|---|---|---|---|---|---|---|---|---|---|---|---|---|---|---|---|---|---|---|---|---|---|---|---|---|---|---|---|---|---|---|---|---|---|---|---|---|---|---|---|---|---|---|---|---|---|---|---|---|---|---|---|---|---|---|---|---|---|---|---|---|---|---|---|---|---|---|---|---|---|---|---|---|---|---|---|---|---|---|---|---|---|---|---|---|---|---|---|---|---|---|---|---|---|---|---|---|---|---|---|---|---|---|---|---|---|---|---|---|---|---|---|---|---|---|---|---|---|---|---|---|---|---|---|---|---|---|---|---|---|---|---|---|---|---|---|---|---|---|---|---|---|---|---|---|---|---|---|---|---|---|---|---|---|---|---|---|---|---|---|---|---|---|---|---|---|---|---|---|---|---|---|---|---|---|---|---|---|---|---|---|---|---|---|---|---|---|---|---|---|---|---|---|---|---|---|---|---|---|---|---|---|---|---|---|---|---|---|---|---|---|---|---|---|---|---|---|---|---|---|---|---|---|---|---|---|---|---|---|---|---|---|---|---|---|---|---|---|---|---|---|---|---|---|---|---|---|---|---|---|---|---|---|---|---|---|---|---|---|---|---|---|---|---|---|---|---|---|---|---|---|---|---|---|---|---|---|---|---|---|---|---|---|---|---|---|---|---|---|---|---|---|---|---|---|---|
| ||||||||||||||||||||||||||||||||||||||||||||||||||||||||||||||||||||||||||||||||||||||||||||||||||||||||||||||||||||||||||||||||||||||||||||||||||||||||||||||||||||||||||||||||||||||||||||||||||||||||||||||||||||||||||||||||||||||||||||||||||||||||||||||||||||||||||||||||||||||||||||||||||||||||||||||||||||||||||||||||||||||||||||
| Available Pokémon | ||||||||||||||||||||||||||||||||||||||||||||||||||||||||||||||||||||||||||
|---|---|---|---|---|---|---|---|---|---|---|---|---|---|---|---|---|---|---|---|---|---|---|---|---|---|---|---|---|---|---|---|---|---|---|---|---|---|---|---|---|---|---|---|---|---|---|---|---|---|---|---|---|---|---|---|---|---|---|---|---|---|---|---|---|---|---|---|---|---|---|---|---|---|---|
| ||||||||||||||||||||||||||||||||||||||||||||||||||||||||||||||||||||||||||
| Items | ||||||||||||||||||||||||||||||||||||||||||||||||||||||||||||||||||||||||||||||||||||||||||||||||||||||||||||||||||||||||||||||
|---|---|---|---|---|---|---|---|---|---|---|---|---|---|---|---|---|---|---|---|---|---|---|---|---|---|---|---|---|---|---|---|---|---|---|---|---|---|---|---|---|---|---|---|---|---|---|---|---|---|---|---|---|---|---|---|---|---|---|---|---|---|---|---|---|---|---|---|---|---|---|---|---|---|---|---|---|---|---|---|---|---|---|---|---|---|---|---|---|---|---|---|---|---|---|---|---|---|---|---|---|---|---|---|---|---|---|---|---|---|---|---|---|---|---|---|---|---|---|---|---|---|---|---|---|---|---|
| ||||||||||||||||||||||||||||||||||||||||||||||||||||||||||||||||||||||||||||||||||||||||||||||||||||||||||||||||||||||||||||||
1F
Enter the base, turn the corner, and use Strength to move past the group of boulders. Continue on to battle the Grunt on the east side of the chamber, then take the southeast doorway.
2F
Make your way down the cliffside, battling four more Grunts along the way. After that, head through the mid-level doorway to detour for a handful of items.
2F (Room 2)
Go north to fight a couple of Grunts in a Double Battle, then collect the Full Restore just beyond them. Head back south, then turn east to battle another two Grunts and grab the Max Elixir to the northwest. Continue eastward and head through the northeast doorway.
Back on 1F, follow the elevated path to the southwest, battling a single Grunt along the way to the path's end, where you find a Rare Candy. Backtrack through 2F (Room 2) to the southwest doorway to return to 2F.
2F
Continue down the cliffside and go through the doorway at the bottom.
3F
Head west around the lava pool to battle the first Grunt. Walk down the stairway and go through the doorway to the east.
3F (Room 2)
Pick up a PP Max to the northwest and battle the Grunt to the northeast, then return to the previous chamber.
3F
Walk down the stairway and fight the second Grunt. Go west and collect the Nugget before heading south through the doorway.
4F
Head down the stairway and go west, battling three more Grunts along the way. Continue westward and you are stopped by Magma Admin Tabitha. He tells you that Maxie is up ahead, and draws you into battle to buy some time for his boss.
VS Tabitha
| ||||||||||||||||||||||||||||||||||||||||||||||||||||||||||||||||||||||||||||||||||||||||||||||||||||||||||||||||||||||
Collect a Max Revive from the northwest corner, then turn south. Up ahead, you find Maxie standing on the edge of a lava pool, talking to the sleeping form of the super-ancient Pokémon, Groudon. He holds the Blue Orb high, and its light awakens the ancient beast, which immediately escapes. Maxie blames you, accusing you of some "cheap stunt", and prepares for battle!
VS Maxie
| |||||||||||||||||||||||||||||||||||||||||||||||||||||||||||||||||||||||||||||||||||||||||||
Defeated, Maxie flees to search for Groudon. Take the south doorway for a shortcut back to the entrance, and collect the Escape Rope along the way through 3F (Room 3) and 2F (Room 3).
Slateport City
When you arrive in Slateport, head straight for the northeast part of town. Outside Slateport Harbor, you find Captain Stern wrapping up a TV interview in front of a small crowd. Afterwards, you catch up with him for a little chat where he informs you of his newest discovery. He's found an underwater cavern on Route 128, and believes it to be the den of a super-ancient Pokémon long though to have been extinct. Just then, you hear a voice booming out from a megaphone. It's Archie, who mocks the captain and thanks him for the submarine.
Slateport Harbor
After rushing inside the building, you find Archie and a Grunt standing near the sub, ready to depart. He accepts that you won't simply leave him to his plans, and wonders if you will visit their hideout in Lilycove City. But he's come too far to be stopped now, and he and the Grunt quickly escape in the sub.
Lilycove City
A port city, Lilycove mirrors Slateport with its impressive size, its scenic lighthouse, and its spacious harbor. The main attraction is the Lilycove Department Store, while the Contest Hall, Lilycove Museum, and Cove Lily Motel are also located here.
| Available Pokémon | ||||||||||||||||||||||||||||||||||||||||||||||||||||||||||||||||||||||||||||||||||||||||||||||||||||||||||||||||||||||||||||||||||||||||||||||||||||||||||||||||||||||||||||||||||||||||
|---|---|---|---|---|---|---|---|---|---|---|---|---|---|---|---|---|---|---|---|---|---|---|---|---|---|---|---|---|---|---|---|---|---|---|---|---|---|---|---|---|---|---|---|---|---|---|---|---|---|---|---|---|---|---|---|---|---|---|---|---|---|---|---|---|---|---|---|---|---|---|---|---|---|---|---|---|---|---|---|---|---|---|---|---|---|---|---|---|---|---|---|---|---|---|---|---|---|---|---|---|---|---|---|---|---|---|---|---|---|---|---|---|---|---|---|---|---|---|---|---|---|---|---|---|---|---|---|---|---|---|---|---|---|---|---|---|---|---|---|---|---|---|---|---|---|---|---|---|---|---|---|---|---|---|---|---|---|---|---|---|---|---|---|---|---|---|---|---|---|---|---|---|---|---|---|---|---|---|---|---|---|---|---|---|
| ||||||||||||||||||||||||||||||||||||||||||||||||||||||||||||||||||||||||||||||||||||||||||||||||||||||||||||||||||||||||||||||||||||||||||||||||||||||||||||||||||||||||||||||||||||||||
| Items | ||||||||||||||||||||||||
|---|---|---|---|---|---|---|---|---|---|---|---|---|---|---|---|---|---|---|---|---|---|---|---|---|
|
Pokémon Trainer Fan Club
Members of the Pokémon Trainer Fan Club discuss popular Pokémon Trainers and Gym Leaders. After entering the Hall of Fame, several members announce themselves as your fans, as well.
Cove Lily Motel
Team Aqua's hideout on the edge of town has kept most tourists away, bringing the Cove Lily Motel's business to a halt. As a result, there's nothing of interest here at the moment. After resolving the conflict with the villainous team and entering the Hall of Fame, the Game Freak staff will visit the motel during their trip to Hoenn. The Game Designer will give Trainers the Poké Diploma after completing the Hoenn Pokédex.
Scott can be found napping at a table on the upper level. He thinks Pokémon Contests are entertaining, but still prefers battles and tough Trainers. He urges you to enjoy every kind of trial--Gyms, Contests, Battle Tents, the works!
Pokémon Contest Hall
The Contest Hall stands on the south side of town. This building hosts all four Contest levels—Normal Rank, Super Rank, Hyper Rank, and Master Rank.
Pokéblock Master's House
The Pokéblock Master's house stands to the north of the harbor. Talk to her and her family to learn tips on crafting potent Pokéblocks.
Rival Battle 5
When you approach the Department Store, you find May/Brendan waiting outside. She/He offers to battle you to determine which Trainer has been doing a better job of raising their Pokémon.
 Player chose Treecko
| ||||||||||||||||||||||||||||||||||||||||||||||||||||||||||||||||||||||||||||||||||||||||||||||||||||||||||||||||||||||||
 Player chose Torchic
| ||||||||||||||||||||||||||||||||||||||||||||||||||||||||||||||||||||||||||||||||||||||||||||||||||||||||||||||||||||||
 Player chose Mudkip
| ||||||||||||||||||||||||||||||||||||||||||||||||||||||||||||||||||||||||||||||||||||||||||||||||||||||||||||||||||||
Once the battle ends, your friend heads back to Littleroot Town to continue working on her/his Pokédex.
Lilycove Department Store
Welcome to the Lilycove Department Store! This massive shopping center offers a wide array of merchandise, so Trainers can find almost any item for sale here.
1F: Service Counter, Lottery Corner
The first floor is a welcome center. The receptionist on the left greets visitors, while the one on the right runs the Pokémon Lottery Corner. Talk to her to draw a random Pokémon Loto Ticket. If the ticket's number matches up with any of your Pokémon's ID numbers, you win a prize! You can draw one Loto Ticket per day.
| Matching Digits | Prize | |
|---|---|---|
| 2 digits | PP Up | |
| 3 digits | Exp. Share | |
| 4 digits | Max Revive | |
| 5 digits | Master Ball | |
2F: Trainers' Zone
The second floor offers items that are useful during battle. The left clerk sells Poké Balls and items to cure status ailments, while the right clerk sells Potions, Repels, and other items.
3F: Battle Collection
The third floor sells stat-enhancing items. The left clerk offers Vitamins that permanently boost their respective stat, like Protein. The right clerk offers Battle items that give a temporary boost in battle, like X Attack.
4F: TM Corner
The fourth floor offers eight different TMs for sale. Speak to the left clerk to buy TMs containing offensive moves, and the right clerk for TMs containing defensive moves.
5F: Decoration Floor
The fifth floor is dedicated to Secret Base fanatics. Here you'll find a wide selection of Decorations to deck out your Base, including dolls, mats, posters, and cushions.
Rooftop Plaza
After entering the Hall of Fame, the store occasionally holds a major clearance sale. A special selection of Secret Base Decorations are offered, with items listed anywhere from $200 to $10,000. Though this sale rarely occurs, many of the items available for purchase cannot be obtained anywhere else.
Also on the rooftop, a girl fantasizes about copying herself and living several different lives. Speak to her, and she offers to teach the move Substitute to a Pokémon, one time only.
Lilycove Museum
The Lilycove Museum stands in the northwest part of town. The museum's curator initially blocks the stairs to the second floor because the upper level is empty. He is still searching for modern and vibrant artwork to display there, and asks you to search for such artwork. If you happen to win a Master Rank Pokémon Contest with at least 800 points, an artist will approach you saying that he's done a painting that might even look good in a museum, at which point you direct him to the Lilycove Museum. If you collect one painting for each of the five Contest categories, the curator will reward you with a Glass Ornament for your Secret Base.
Move Deleter's House
The first house to the east of the Department Store is home to the Move Deleter, an absent-minded man with the power to make a Pokémon forget any move. This is the only way for a Pokémon to forget an HM move. Unlike the Move Reminder in Fallarbor Town, the Move Deleter's services are free of charge.
A Berry A Day
Speak to the Gentleman to the east of the Move Deleter's house to get one random Berry. This kind old man will give you either a Cheri, Chesto, Pecha, Rawst, Aspear, Leppa, Oran, Persim, Lum, or Sitrus Berry every day.
|
Emerald walkthrough |
|

|
This article is part of Project Walkthroughs, a Bulbapedia project that aims to write comprehensive step-by-step guides on each Pokémon game. |
