Appendix:Black and White walkthrough/Section 8: Difference between revisions
mNo edit summary |
|||
| (16 intermediate revisions by 8 users not shown) | |||
| Line 1: | Line 1: | ||
== Outside Twist Mountain == | ==Outside Twist Mountain== | ||
Check the puddle to the right for a hidden {{DL|Poké Ball|Ultra Ball}}. | Check the puddle to the right for a hidden {{DL|Poké Ball|Ultra Ball}}. Just as you are about to climb the staircase to the mountain's entrance, [[Cheren]] shows up again. Since you each have a {{badge|Jet}} now, he's here for another battle. | ||
{| align="center" | {| align="center" | ||
| Line 7: | Line 7: | ||
! {{MS|501|Oshawott (Pokémon)}} If the {{player}} chose {{p|Oshawott}}: | ! {{MS|501|Oshawott (Pokémon)}} If the {{player}} chose {{p|Oshawott}}: | ||
|- | |- | ||
|{{Party | |{{Party/Single | ||
|color={{black color}} | |color={{black color}} | ||
|headcolor={{black color light}} | |headcolor={{black color light}} | ||
| Line 18: | Line 18: | ||
|location=Twist Mountain | |location=Twist Mountain | ||
|pokemon=4 | |pokemon=4 | ||
| | }}|{{Pokémon/5 | ||
|game=Black | |game=Black | ||
|ndex=510 | |ndex=510 | ||
| Line 33: | Line 32: | ||
|move4=Hone Claws|move4type=Dark|move4cat=Status | |move4=Hone Claws|move4type=Dark|move4cat=Status | ||
}} | }} | ||
| | |{{Pokémon/5 | ||
|game=Black | |game=Black | ||
|ndex=512 | |ndex=512 | ||
| Line 48: | Line 46: | ||
|move4=Fury Swipes|move4type=Normal|move4cat=Physical | |move4=Fury Swipes|move4type=Normal|move4cat=Physical | ||
}} | }} | ||
| | {{Party/Div|color={{black color}}}} | ||
|{{Pokémon/5 | |||
|game=Black | |game=Black | ||
|ndex=521_m | |ndex=521_m | ||
| Line 64: | Line 62: | ||
|move4=Taunt|move4type=Dark|move4cat=Status | |move4=Taunt|move4type=Dark|move4cat=Status | ||
}} | }} | ||
| | |{{Pokémon/5 | ||
|game=Black | |game=Black | ||
|ndex=499 | |ndex=499 | ||
| Line 80: | Line 77: | ||
|move4=Smog|move4type=Poison|move4cat=Special | |move4=Smog|move4type=Poison|move4cat=Special | ||
}} | }} | ||
}} | {{Party/Footer}} | ||
|{{Party | |{{Party/Single | ||
|color={{black color}} | |color={{black color}} | ||
|headcolor={{black color light}} | |headcolor={{black color light}} | ||
| Line 93: | Line 90: | ||
|location=Twist Mountain | |location=Twist Mountain | ||
|pokemon=4 | |pokemon=4 | ||
| | }}|{{Pokémon/5 | ||
|game=Black | |game=Black | ||
|ndex=510 | |ndex=510 | ||
| Line 108: | Line 104: | ||
|move4=Hone Claws|move4type=Dark|move4cat=Status | |move4=Hone Claws|move4type=Dark|move4cat=Status | ||
}} | }} | ||
| | |{{Pokémon/5 | ||
|game=Black | |game=Black | ||
|ndex=514 | |ndex=514 | ||
| Line 123: | Line 118: | ||
|move4=Fury Swipes|move4type=Normal|move4cat=Physical | |move4=Fury Swipes|move4type=Normal|move4cat=Physical | ||
}} | }} | ||
| | {{Party/Div|color={{black color}}}} | ||
|{{Pokémon/5 | |||
|game=Black | |game=Black | ||
|ndex=521_m | |ndex=521_m | ||
| Line 139: | Line 134: | ||
|move4=Taunt|move4type=Dark|move4cat=Status | |move4=Taunt|move4type=Dark|move4cat=Status | ||
}} | }} | ||
| | |{{Pokémon/5 | ||
|game=Black | |game=Black | ||
|ndex=502 | |ndex=502 | ||
| Line 154: | Line 148: | ||
|move4=Water Pulse|move4type=Water|move4cat=Special | |move4=Water Pulse|move4type=Water|move4cat=Special | ||
}} | }} | ||
}} | {{Party/Footer}} | ||
|{{Party | |{{Party/Single | ||
|color={{black color}} | |color={{black color}} | ||
|headcolor={{black color light}} | |headcolor={{black color light}} | ||
| Line 167: | Line 161: | ||
|location=Twist Mountain | |location=Twist Mountain | ||
|pokemon=4 | |pokemon=4 | ||
| | }}|{{Pokémon/5 | ||
|game=Black | |game=Black | ||
|ndex=510 | |ndex=510 | ||
| Line 182: | Line 175: | ||
|move4=Hone Claws|move4type=Dark|move4cat=Status | |move4=Hone Claws|move4type=Dark|move4cat=Status | ||
}} | }} | ||
| | |{{Pokémon/5 | ||
|game=Black | |game=Black | ||
|ndex=516 | |ndex=516 | ||
| Line 197: | Line 189: | ||
|move4=Fury Swipes|move4type=Normal|move4cat=Physical | |move4=Fury Swipes|move4type=Normal|move4cat=Physical | ||
}} | }} | ||
| | {{Party/Div|color={{black color}}}} | ||
|{{Pokémon/5 | |||
|game=Black | |game=Black | ||
|ndex=521 m | |ndex=521 m | ||
| Line 213: | Line 205: | ||
|move4=Taunt|move4type=Dark|move4cat=Status | |move4=Taunt|move4type=Dark|move4cat=Status | ||
}} | }} | ||
| | |{{Pokémon/5 | ||
|game=Black | |game=Black | ||
|ndex=496 | |ndex=496 | ||
| Line 228: | Line 219: | ||
|move4=Slam|move4type=Normal|move4cat=Physical | |move4=Slam|move4type=Normal|move4cat=Physical | ||
}} | }} | ||
}} | {{Party/Footer}} | ||
|} | |} | ||
When you defeat [[Cheren]], [[Alder]] jumps down from the cliff. | When you defeat [[Cheren]], [[Alder]] jumps down from the cliff. He was watching the battle, and tells Cheren that what he does with the power gained by becoming stronger is important. Alder gives you each a copy of {{HM|03|Surf}}, then leaves to the south. Cheren climbs the staircase and enters Twist Mountain. | ||
Now that you have the ability to cross bodies of water, you can backtrack to a few locations that were previously unreachable. | Now that you have the ability to cross bodies of water, you can backtrack to a few locations that were previously unreachable. | ||
== The Southeast Ocean == | ==The Southeast Ocean== | ||
=== Route 1 (southwest) === | ===Route 2=== | ||
To reach {{rt|17|Unova}}, you need to get back to {{rt|1|Unova}} and surf west. | There isn't much of thing to do here (except getting items that previously were blocked by Cut trees if not done already) and that rustling grass appears here. | ||
{| class="expandable" align="center" style="background: #{{white color}}; {{roundy}}; border: 5px solid #{{black color}};" | |||
|- align="center" | |||
! Available Pokémon | |||
|- | |||
| | |||
{{catch/header|forest|2}} | |||
{{catch/div|forest|Rustling grass}} | |||
{{catch/entry5|531|Audino|yes|yes|no|Rustling|4-7|all=100%|type1=Normal}} | |||
{{catch/footer|forest|2}} | |||
|} | |||
===Route 1 (southwest)=== | |||
To reach {{rt|17|Unova}}, you need to get back to {{rt|1|Unova}} and surf west. Leave an open slot in your party for the treasure hunter's Egg! Pick up the {{DL|Ether|Max Ether}} near the western shore, then battle the two {{tc|Pokémon Ranger}}s and the {{tc|Fisherman}}. Grab the {{DL|Valuable item|Pearl}} to the southeast, and walk through the gate to reach {{rt|17|Unova}}. | |||
{| class="expandable" align="center" style="background: #{{white color}}; {{roundy}}; border: 5px solid #{{black color}};" | {| class="expandable" align="center" style="background: #{{white color}}; {{roundy}}; border: 5px solid #{{black color}};" | ||
| Line 248: | Line 251: | ||
{{trainerheader|land}} | {{trainerheader|land}} | ||
{{trainerentry|Spr BW Pokémon Ranger F.png|Pokémon Ranger|Brenda|2100|2|528|Swoobat|♀|35|None|514|Simisear|♂|35|None}} | {{trainerentry|Spr BW Pokémon Ranger F.png|Pokémon Ranger|Brenda|2100|2|528|Swoobat|♀|35|None|514|Simisear|♂|35|None}} | ||
{{trainerdiv|land}} | |||
{{trainerentry|Spr BW Fisherman.png|Fisherman|Sean|1088|2|592|Frillish|♂|34|None|592|Frillish|♀|34|None}} | |||
{{trainerdiv|land}} | {{trainerdiv|land}} | ||
{{trainerentry|Spr BW Pokémon Ranger M.png|Pokémon Ranger|Claude|2100|2|573|Cinccino|♀|35|None|523|Zebstrika|♂|35|None}} | {{trainerentry|Spr BW Pokémon Ranger M.png|Pokémon Ranger|Claude|2100|2|573|Cinccino|♀|35|None|523|Zebstrika|♂|35|None}} | ||
{{trainerfooter|land|5}} | {{trainerfooter|land|5}} | ||
|} | |} | ||
| Line 261: | Line 264: | ||
{{catch/header|land|2}} | {{catch/header|land|2}} | ||
{{catch/div|land|Dark grass}} | {{catch/div|land|Dark grass}} | ||
{{catch/entry5|507|Herdier|yes|yes|no| | {{catch/entry5|507|Herdier|yes|yes|no|Dark|32-34|all=39%|type1=Normal}} | ||
{{catch/entry5|505|Watchog|yes|yes|no| | {{catch/entry5|505|Watchog|yes|yes|no|Dark|32-35|all=36%|type1=Normal}} | ||
{{catch/entry5|559|Scraggy|yes|yes|no| | {{catch/entry5|559|Scraggy|yes|yes|no|Dark|33-35|all=25%|type1=Dark|type2=Fighting}} | ||
{{catch/div|land|Rustling grass}} | |||
{{catch/entry5|531|Audino|yes|yes|no|Rustling|2-4|all=100%|type1=Normal}} | |||
{{catch/div|water|Surfing}} | {{catch/div|water|Surfing}} | ||
{{catch/entry5|550|Basculin|yes|no|no|Surf|5-15|all=100%|type1=Water}} | {{catch/entry5|550|Basculin|yes|no|no|Surf|5-15|all=100%|type1=Water}} | ||
{{catch/entry5|550B|Basculin|no|yes|no|Surf|5-15|all=100%|type1=Water}} | {{catch/entry5|550B|Basculin|no|yes|no|Surf|5-15|all=100%|type1=Water}} | ||
{{catch/div|water|Rippling Water}} | {{catch/div|water|Rippling Water}} | ||
{{catch/entry5|550|Basculin|no|yes|no| | {{catch/entry5|550|Basculin|no|yes|no|Rippling|5-20|all=100%|type1=Water}} | ||
{{catch/entry5|550B|Basculin|yes|no|no| | {{catch/entry5|550B|Basculin|yes|no|no|Rippling|5-20|all=100%|type1=Water}} | ||
{{catch/footer|land|2}} | {{catch/footer|land|2}} | ||
|} | |} | ||
| Line 278: | Line 283: | ||
| | | | ||
{{itlisth}} | {{itlisth}} | ||
{{ | {{Itemlist|Max Ether|Near the western shore|Bl=yes|W=yes|display={{DL|Ether|Max Ether}}}} | ||
{{ | {{Itemlist|Persim Berry| | ||
* From {{tc|Pokémon Ranger}} Brenda after defeating her | * From {{tc|Pokémon Ranger}} Brenda after defeating her | ||
* From {{tc|Pokémon Ranger}} Claude after defeating him| | * From {{tc|Pokémon Ranger}} Claude after defeating him|Bl=yes|W=yes|display=[[Persim Berry]] ×2}} | ||
{{ | {{Itemlist|Pearl|South of {{tc|Pokémon Ranger}} Claude|Bl=yes|W=yes|display={{DL|Valuable item|Pearl}}}} | ||
{{ | {{Itemlist|Big Mushroom|Under a tree, near the {{DL|Valuable item|Pearl}} (hidden)|Bl=yes|W=yes|display={{DL|Valuable item|Big Mushroom}}}} | ||
{{itlistfoot}} | {{itlistfoot}} | ||
|} | |} | ||
===Route 17=== | |||
[[File:Unova Route 17 {{#switch: {{#expr: {{#time: n}} mod 4}}|0=Winter|1=Spring|2=Summer|3=Autumn}} BW.png|thumb|right|Route 17]] | |||
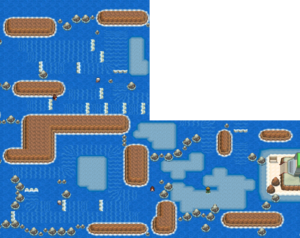
The swift ocean currents can make travel difficult, so proceed carefully. Surf to the first spot of shallow water, then grab {{TM|06|Toxic}} from the next. Ride the northernmost of the two westbound currents to fight {{tc|Swimmer}} Wright and pick up a {{DL|Evolution-inducing held item|DeepSeaTooth}}. Take the southern current west to reach the large island on {{rt|18|Unova}}. | |||
The swift ocean currents can make travel difficult, so proceed carefully. | |||
{| class="expandable" align="center" style="background: #{{white color}}; {{roundy}}; border: 5px solid #{{black color}};" | {| class="expandable" align="center" style="background: #{{white color}}; {{roundy}}; border: 5px solid #{{black color}};" | ||
| Line 317: | Line 321: | ||
{{catch/header|ocean|seasons=yes}} | {{catch/header|ocean|seasons=yes}} | ||
{{catch/div|ocean|Surfing}} | {{catch/div|ocean|Surfing}} | ||
{{catch/entry5|592|Frillish|yes|yes|no|Surf|5-15|all= | {{catch/entry5|592|Frillish|yes|yes|no|Surf|5-15|all=100%|type1=Water|type2=Ghost}} | ||
{{catch/div|ocean|Rippling Water}} | {{catch/div|ocean|Rippling Water}} | ||
{{catch/entry5|594|Alomomola|yes|yes|no| | {{catch/entry5|594|Alomomola|yes|yes|no|Rippling|5-20|all=95%|type1=Water}} | ||
{{catch/entry5| | {{catch/entry5|{{#ifexpr: ({{#time: H}} mod 2) = 0|593|593F}}|Jellicent|yes|yes|no|Rippling|5-20|all=5%|type1=Water|type2=Ghost}} | ||
{{catch/footer|ocean}} | {{catch/footer|ocean}} | ||
|} | |} | ||
| Line 331: | Line 333: | ||
| | | | ||
{{itlisth|ocean}} | {{itlisth|ocean}} | ||
{{ | {{Itemlist|TM Poison|Shallow water northwest of {{tc|Fisherman}} Lydon|Bl=yes|W=yes|display={{TM|06|Toxic}}}} | ||
{{ | {{Itemlist|DeepSeaTooth|Shallow water northeast of {{tc|Swimmer}}♂ Wright|Bl=yes|W=yes|display={{DL|Evolution-inducing held item|DeepSeaTooth}}}} | ||
{{ | {{Itemlist|Heart Scale| | ||
* On a small rock near the [[P2 Laboratory]] (hidden) | * On a small rock near the [[P2 Laboratory]] (hidden) | ||
* West of Swimmer Berke (hidden) | * West of Swimmer Berke (hidden) | ||
* West of Swimmer Caroline (hidden)| | * West of Swimmer Caroline (hidden)|Bl=yes|W=yes|display={{DL|Exchangeable item|Heart Scale}} ×3}} | ||
{{ | {{Itemlist|Big Pearl|Southwest of the [[P2 Laboratory]] (hidden)|Bl=yes|W=yes|display={{DL|Valuable item|Big Pearl}}}} | ||
{{itlistfoot|ocean}} | {{itlistfoot|ocean}} | ||
|} | |} | ||
===Route 18=== | |||
[[File:Unova Route 18 Summer BW.png|thumb|Route 18]] | |||
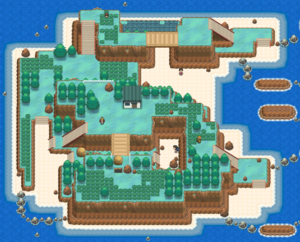
Climb the staircase to the top of the cliff and battle {{tc|Hiker}} Jeremiah. Trek through the tall grass to reach the only building on the island; a girl inside will restore your Pokémon's health. Talk to the {{tc|Pokémon Ranger}} here to receive an Egg he found in the [[Relic Castle]]. The man in black is looking for a {{DL|Valuable item|Rare Bone}}; wild {{p|Crustle}} sometimes hold them, which you can sell to him for {{PDollar}}10,000. | |||
Climb the staircase to the top of the cliff and battle {{tc|Hiker}} Jeremiah. | |||
If you have a Pokémon that knows {{m|Strength}}, you can cross the bridge to the south and drop the boulder to find a {{DL|Ether|Max Elixir}}. | If you have a Pokémon that knows {{m|Strength}}, you can cross the bridge to the south and drop the boulder to find a {{DL|Ether|Max Elixir}}. Go down the staircase and shove the second boulder east to fight {{tc|Backpacker}} Sam, and pick up a {{DL|Evolution-inducing held item|Dragon Scale}}. Head to the northwest, then double-back through the tall grass on the island's west side to find {{HM|05|Waterfall}}! Go north and climb another staircase to fight {{tc|Veteran}} Ray, then continue east across a second bridge and climb down the last staircase. | ||
{| class="expandable" align="center" style="background: #{{white color}}; {{roundy}}; border: 5px solid #{{black color}};" | {| class="expandable" align="center" style="background: #{{white color}}; {{roundy}}; border: 5px solid #{{black color}};" | ||
| Line 378: | Line 379: | ||
{{catch/entry5|538|Throh|no|yes|no|Grass|29-31|all=10%|type1=Fighting}} | {{catch/entry5|538|Throh|no|yes|no|Grass|29-31|all=10%|type1=Fighting}} | ||
{{catch/div|land|Dark grass}} | {{catch/div|land|Dark grass}} | ||
{{catch/entry5|559|Scraggy|yes|yes|no| | {{catch/entry5|559|Scraggy|yes|yes|no|Dark|32-35|all=40%|type1=Dark|type2=Fighting}} | ||
{{catch/entry5|558|Crustle|yes|yes|no| | {{catch/entry5|558|Crustle|yes|yes|no|Dark|34-35|all=30%|type1=Bug|type2=Rock}} | ||
{{catch/entry5|505|Watchog|yes|yes|no| | {{catch/entry5|505|Watchog|yes|yes|no|Dark|32-34|all=20%|type1=Normal}} | ||
{{catch/entry5|539|Sawk|yes|no|no| | {{catch/entry5|539|Sawk|yes|no|no|Dark|33-35|all=10%|type1=Fighting}} | ||
{{catch/entry5|538|Throh|no|yes|no| | {{catch/entry5|538|Throh|no|yes|no|Dark|33-35|all=10%|type1=Fighting}} | ||
{{catch/div|land|Rustling grass}} | {{catch/div|land|Rustling grass}} | ||
{{catch/entry5|531|Audino|yes|yes|no| | {{catch/entry5|531|Audino|yes|yes|no|Rustling|28-31|all=95%|type1=Normal}} | ||
{{catch/entry5|539|Sawk|no|yes|no| | {{catch/entry5|539|Sawk|no|yes|no|Rustling|33-35|all=5%|type1=Fighting}} | ||
{{catch/entry5|538|Throh|yes|no|no| | {{catch/entry5|538|Throh|yes|no|no|Rustling|33-35|all=5%|type1=Fighting}} | ||
{{catch/div|ocean|Surfing}} | {{catch/div|ocean|Surfing}} | ||
{{catch/entry5|592|Frillish|yes|yes|no|Surf|5-15|all= | {{catch/entry5|592|Frillish|yes|yes|no|Surf|5-15|all=100%|type1=Water|type2=Ghost}} | ||
{{catch/div|ocean|Rippling water}} | {{catch/div|ocean|Rippling water}} | ||
{{catch/entry5|594|Alomomola|yes|yes|no| | {{catch/entry5|594|Alomomola|yes|yes|no|Rippling|5-20|all=85%|type1=Water}} | ||
{{catch/entry5| | {{catch/entry5|{{#ifexpr: ({{#time: H}} mod 2) = 0|593|593F}}|Jellicent|yes|yes|no|Rippling|5-20|all=5%|type1=Water|type2=Ghost}} | ||
{{catch/div|land|Special}} | {{catch/div|land|Special}} | ||
{{catch/entry5|636|Larvesta|yes|yes|no|Egg|1|all=From a {{tc|Pokémon Ranger}} in the house|type1=Bug|type2=Fire}} | {{catch/entry5|636|Larvesta|yes|yes|no|Egg|1|all=From a {{tc|Pokémon Ranger}} in the house|type1=Bug|type2=Fire}} | ||
| Line 404: | Line 403: | ||
| | | | ||
{{itlisth}} | {{itlisth}} | ||
{{ | {{Itemlist|Max Elixir|Across the bridge from the prefab house (requires {{m|Strength}})|Bl=yes|W=yes|display={{DL|Ether|Max Elixir}}}} | ||
{{ | {{Itemlist|Dragon Scale|Northwest of {{tc|Backpacker}} Sam (requires {{m|Strength}})|Bl=yes|W=yes|display={{DL|Evolution-inducing held item|Dragon Scale}}}} | ||
{{ | {{Itemlist|Calcium|On a rock west of {{tc|Backpacker}} Sam (hidden, requires {{m|Strength}})|Bl=yes|W=yes|display={{DL|Vitamin|Calcium}}}} | ||
{{ | {{Itemlist|HM Water|In the tall grass on the island's southwest edge|Bl=yes|W=yes|display={{HM|05|Waterfall}}}} | ||
{{catch/div|land|After arriving from the P2 Laboratory}} | {{catch/div|land|After arriving from the P2 Laboratory}} | ||
{{ | {{Itemlist|Heart Scale|On the secluded southern beach|Bl=yes|W=yes|display={{DL|Exchangeable item|Heart Scale}}}} | ||
{{ | {{Itemlist|TM Psychic|In the tall grass on the island's north side|Bl=yes|W=yes|display={{TM|19|Telekinesis}}}} | ||
{{ | {{Itemlist|Big Pearl|On the beach, east of {{tc|Battle Girl}} Hillary (hidden)|Bl=yes|W=yes|display={{DL|Valuable item|Big Pearl}}}} | ||
{{ | {{Itemlist|Pearl|On the beach, southeast of {{tc|Battle Girl}} Hillary (hidden)|Bl=yes|W=yes|display={{DL|Valuable item|Pearl}}}} | ||
{{itlistfoot}} | {{itlistfoot}} | ||
|} | |} | ||
===P2 Laboratory=== | |||
[[File:P2 Laboratory {{#switch: {{#expr: {{#time: n}} mod 4}}|0=Winter|1=Spring|2=Summer|3=Autumn}} BW.png|thumb|The P2 Laboratory island]] | |||
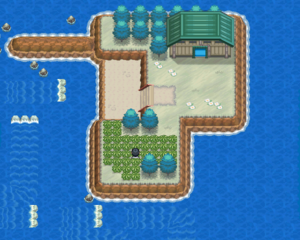
Ride the southernmost of the two eastbound currents to wind up in front of a small island. Grab {{TM|24|Thunderbolt}} to the south, then check out the [[P2 Laboratory]]. The building is devoid of people, but is cluttered with machines. {{m|Surf}} southwest between the currents and around two {{tc|Swimmer}}s to reach the large island's interior. A {{DL|Valuable item|Heart Scale}} lies on a secluded part of the beach to the south, while {{tc|Battle Girl}} Hillary and {{TM|19|Telekinesis}} are farther west. | |||
Ride the southernmost of the two eastbound currents to wind up in front of a small island. | |||
{| class="expandable" align="center" style="background: #{{white color}}; {{roundy}}; border: 5px solid #{{black color}};" | {| class="expandable" align="center" style="background: #{{white color}}; {{roundy}}; border: 5px solid #{{black color}};" | ||
| Line 436: | Line 434: | ||
|- | |- | ||
| | | | ||
{{ | {{Catch/header|land}} | ||
{{catch/entry5|505|Watchog|yes|yes| | {{catch/entry5|505|Watchog|yes|yes|N/A|Grass|28-31|all=36%|type1=Normal}} | ||
{{catch/entry5|507|Herdier|yes|yes| | {{catch/entry5|507|Herdier|yes|yes|N/A|Grass|28-31|all=36%|type1=Normal}} | ||
{{catch/entry5|559|Scraggy|yes|yes| | {{catch/entry5|559|Scraggy|yes|yes|N/A|Grass|29-31|all=14%|type1=Dark|type2=Fighting}} | ||
{{catch/entry5|599|Klink|yes|yes| | {{catch/entry5|599|Klink|yes|yes|N/A|Grass|29-31|all=14%|type1=Steel}} | ||
{{catch/div|building|Rustling grass}} | |||
{{catch/entry5|531|Audino|yes|yes|N/A|Rustling|28-31|all=95%|type1=Normal}} | |||
{{catch/entry5|508|Stoutland|yes|yes|N/A|Rustling|31|all=5%|type1=Normal}} | |||
{{catch/div|ocean|Surfing}} | {{catch/div|ocean|Surfing}} | ||
{{catch/entry5|592| | {{catch/entry5|{{#ifexpr: ({{#time: H}} mod 2) = 0|592|592F}}|Frillish|yes|yes|N/A|Surf|5-15|all=100%|type1=Water|type2=Ghost}} | ||
{{Catch/div|ocean|Rippling water}} | |||
{{ | {{catch/entry5|594|Alomomola|yes|yes|N/A|Rippling|5-20|all=95%|type1=Water}} | ||
{{catch/entry5|594|Alomomola|yes|yes| | {{catch/entry5|{{#ifexpr: ({{#time: H}} mod 2) = 0|593|593F}}|Jellicent|yes|yes|N/A|Rippling|5-20|all=5%|type1=Water|type2=Ghost}} | ||
{{catch/entry5| | |||
{{catch/footer|land}} | {{catch/footer|land}} | ||
|} | |} | ||
| Line 457: | Line 455: | ||
| | | | ||
{{itlisth|building}} | {{itlisth|building}} | ||
{{ | {{Itemlist|TM Electric|In the tall grass|Bl=yes|W=yes|display={{TM|24|Thunderbolt}}}} | ||
{{ | {{Itemlist|Dubious Disc|On the floor of the lab|Bl=yes|W=yes|display={{DL|Evolution-inducing held item|Dubious Disc}}}} | ||
{{itlistfoot|building}} | {{itlistfoot|building}} | ||
|} | |} | ||
==Mistralton Cave== | |||
[[File:Mistralton Cave 1F BW.png|thumb|right|Mistralton Cave 1F]] | |||
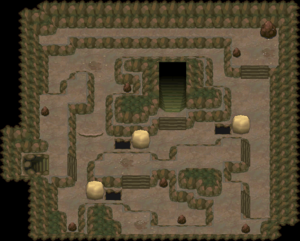
The next place to visit is [[Mistralton Cave]], situated across the river on {{rt|6|Unova}}. Somewhere in its depths, the legendary {{p|Cobalion}} lives in hiding. Legends claim that Cobalion saved the Pokémon of [[Unova]] from a sea of fire in the distant past. Remember to bring a Pokémon with {{m|Strength}}; {{m|Flash}} is also good to have. | |||
The next place to visit is [[Mistralton Cave]], situated across the river on {{rt|6|Unova}}. | |||
{| class="expandable" align="center" style="background: #{{white color}}; {{roundy}}; border: 5px solid #{{black color}};" | {| class="expandable" align="center" style="background: #{{white color}}; {{roundy}}; border: 5px solid #{{black color}};" | ||
| Line 490: | Line 487: | ||
{{catch/entry5|610|Axew|yes|yes|no|Cave|30-31|all=20%|type1=Dragon|}} | {{catch/entry5|610|Axew|yes|yes|no|Cave|30-31|all=20%|type1=Dragon|}} | ||
{{catch/div|cave|Dust clouds}} | {{catch/div|cave|Dust clouds}} | ||
{{catch/entry5|529|Drilbur|yes|yes|no| | {{catch/entry5|529|Drilbur|yes|yes|no|Dust|28-31|all=100%|type1=Ground}} | ||
{{catch/div|cave|Guidance Chamber}} | {{catch/div|cave|Guidance Chamber}} | ||
{{catch/entry5|638|Cobalion|yes|yes|no|Cave|42|all=One|type1=Steel|type2=Fighting|}} | {{catch/entry5|638|Cobalion|yes|yes|no|Cave|42|all=One|type1=Steel|type2=Fighting|}} | ||
| Line 502: | Line 499: | ||
{{itlisth|cave}} | {{itlisth|cave}} | ||
{{catch/div|cave|1F}} | {{catch/div|cave|1F}} | ||
{{ | {{Itemlist|Elixir|On a small rock near the first boulder (hidden)|Bl=yes|W=yes|display={{DL|Ether|Elixir}}}} | ||
{{ | {{Itemlist|Hyper Potion| | ||
* On a small rock north of {{tc|Hiker}} Clarke (hidden) | * On a small rock north of {{tc|Hiker}} Clarke (hidden) | ||
* Northeast of the entrance| | * Northeast of the entrance|Bl=yes|W=yes|display={{DL|Potion|Hyper Potion}} ×2}} | ||
{{ | {{Itemlist|Max Repel|East of {{tc|Hiker}} Clarke|Bl=yes|W=yes|display={{DL|Repel|Max Repel}}}} | ||
{{catch/div|cave|2F}} | {{catch/div|cave|2F}} | ||
{{ | {{Itemlist|Ultra Ball|On a small rock southwest of the first boulder|Bl=yes|W=yes|display={{DL|Poké Ball|Ultra Ball}}}} | ||
{{ | {{Itemlist|Hyper Potion|On a small rock east of the first boulder|Bl=yes|W=yes|display={{DL|Potion|Hyper Potion}}}} | ||
{{ | {{Itemlist|Hard Stone|Near the southern wall|Bl=yes|W=yes|display={{DL|Type-enhancing item|Hard Stone}}}} | ||
{{ | {{Itemlist|TM Rock|In the northwest corner|Bl=yes|W=yes|display={{TM|80|Rock Slide}}}} | ||
{{ | {{Itemlist|Iron|In an alcove in the center of the floor|Bl=yes|W=yes|display={{DL|Vitamin|Iron}}}} | ||
{{ | {{Itemlist|PP Up|In an alcove west of the {{DL|Vitamin|Iron}} (hidden)|Bl=yes|W=yes|display={{DL|Vitamin|PP Up}}}} | ||
{{catch/div|cave|Guidance Chamber}} | {{catch/div|cave|Guidance Chamber}} | ||
{{ | {{Itemlist|Revive|In the southwest|Bl=yes|W=yes}} | ||
{{ | {{Itemlist|Ultra Ball|On a rock east of the {{evostone|Dusk Stone}}|Bl=yes|W=yes|display={{DL|Poké Ball|Ultra Ball}}}} | ||
{{ | {{Itemlist|Dusk Stone|In the northeast|Bl=yes|W=yes|display={{evostone|Dusk Stone}}}} | ||
{{ | {{Itemlist|Rare Candy|Northwest of the old man|Bl=yes|W=yes|display={{DL|Vitamin|Rare Candy}}}} | ||
{{ | {{Itemlist|Carbos|On the rock behind the {{DL|Vitamin|Rare Candy}} (hidden)|Bl=yes|W=yes|display={{DL|Vitamin|Carbos}}}} | ||
{{itlistfoot|cave}} | {{itlistfoot|cave}} | ||
|} | |} | ||
=== 1F === | ===1F=== | ||
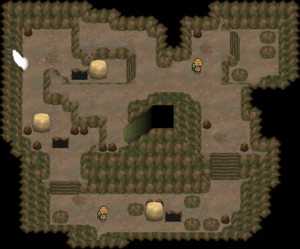
Go south and push the boulder to the hole in the floor. | Go south and push the boulder to the hole in the floor. Walk east past {{tc|Hiker}} Hugh and move the second boulder to the next hole. Head north along the east wall to fight {{tc|Hiker}} Clarke, and pick up the {{DL|Repel|Max Repel}}. Grab the {{DL|Potion|Hyper Potion}} to the northwest, and move the third boulder into place to create a shortcut. Climb the stairway to the second floor. | ||
=== 2F === | ===2F=== | ||
Head south to move the next boulder. | [[File:Mistralton Cave 2F BW.png|thumb|right|Mistralton Cave 2F]] | ||
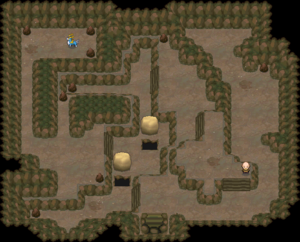
Head south to move the next boulder. Walk across the rock ledge, and double-back along the southern wall to find a {{DL|Type-enhancing item|Hard Stone}}. Go north, then west to push two more boulders into place. Head to the northeast, then follow the north wall to the west along the upper level for {{TM|80|Rock Slide}}. Go west along the lower level to reach an {{DL|Vitamin|Iron}}, then jump south over the ledge, and climb up to the third floor. | |||
=== Guidance Chamber === | ===Guidance Chamber=== | ||
Head west from the stairway to find a [[Revive]]. | [[File:Mistralton Cave 3F BW.png|thumb|right|Guidance Chamber]] | ||
Head west from the stairway to find a [[Revive]]. Backtrack to the east and follow the wall north to get a {{evostone|Dusk Stone}}. Talk to the old man to hear a story of the three legendary Pokémon, {{p|Cobalion}}, {{p|Terrakion}}, and {{p|Virizion}}. | |||
{| class="expandable" align="center" | {| class="expandable" align="center" | ||
| Line 537: | Line 536: | ||
| '''The old man's story''' | | '''The old man's story''' | ||
|- | |- | ||
| ''In the distant past, when Pokémon and people lived in different worlds, a war between people started an intense fire in a forest where many Pokémon lived. | | ''In the distant past, when Pokémon and people lived in different worlds, a war between people started an intense fire in a forest where many Pokémon lived. The Pokémon were surrounded by smoke and flames. They were in big trouble. And then, the legends {{p|Cobalion}}, {{p|Terrakion}}, and {{p|Virizion}} appeared! Terrakion used its amazing strength to destroy rocks blocking the escape route. Virizion used its quick movements to protect Pokémon from looming flames. And Cobalion led the frightened Pokémon out of the burning woods. ... The people who started the war were routed by the power of the legends. Because of Cobalion, Terrakion, and Virizion, the war was ended. ... When people fight, there's no peace for Pokémon, either. The three legends learned that the deeds of humans could lead to dire consequences for their world. ... They cut themselves off from people and disappeared. No one saw much of them after that, and the three faded into myth...'' | ||
|} | |} | ||
Pick up a {{DL|Vitamin|Rare Candy}} to the northwest, then go south and drop the final two boulders into position. | Pick up a {{DL|Vitamin|Rare Candy}} to the northwest, then go south and drop the final two boulders into position. Head northwest to find {{p|Cobalion}}. | ||
==== Cobalion ==== | ====Cobalion==== | ||
{{p|Cobalion}}'s [[Ability]], {{a|Justified}}, gives it an {{stat|Attack}} boost whenever it is hit by a {{ | {{p|Cobalion}}'s [[Ability]], {{a|Justified}}, gives it an {{stat|Attack}} boost whenever it is hit by a {{type|Dark}} attack. When this happens, its {{m|Sacred Sword}} attack becomes very powerful, so be careful. Lower its health with {{t|Normal}}-, {{t|Grass}}-, and {{type|Ice}} moves before attempting to capture it. If you need to use TM's, it would be recommended to teach a Pokémon {{m|Reflect}} since it can reduce the damage from Cobalion's attacks by half. | ||
{| align="center" | {| align="center" | ||
| | | | ||
{{Pokémon/5 | {{Pokémon/5 | ||
|game=Black and White | |game=Black and White | ||
|ndex=638 | |ndex=638 | ||
| Line 564: | Line 562: | ||
|} | |} | ||
The old man approaches you after the battle, and says that because {{p|Cobalion}} is starting to trust you, {{p|Terrakion}} and {{p|Virizion}} will give you a chance to battle them, as well. Terrakion is hidden deep in [[Victory Road (Black and White)|Victory Road]], out of reach for now. Virizion, however, is waiting in Rumination Field, on the eastern side of [[Pinwheel Forest]]. | |||
==Pinwheel Forest== | |||
Regardless of the way you entered, look for a hole in the fence northeast of the bridges. Trek east through the dark grass and go to the far southeast edge of the forest to find {{TM|22|SolarBeam}}. Go west to reach the small pond, and check for a {{DL|Vitamin|Rare Candy}} on the southeast side. {{m|Surf}} west across the water to grab the {{DL|Type-enhancing item|SilverPowder}} from the ledge, then sail back across the pond and head northeast. Walk through the fallen log and pick up the {{DL|Potion|Hyper Potion}} from the tree stump. Rumination Field lies to the north. | |||
== Pinwheel Forest == | |||
Regardless of the way you entered, look for a hole in the fence northeast of the bridges. | |||
{| class="expandable" align="center" style="background: #{{white color}}; {{roundy}}; border: 5px solid #{{black color}};" | {| class="expandable" align="center" style="background: #{{white color}}; {{roundy}}; border: 5px solid #{{black color}};" | ||
| Line 576: | Line 573: | ||
| | | | ||
{{itlisth|forest}} | {{itlisth|forest}} | ||
{{ | {{Itemlist|TM Grass|In the far southeast part of the forest|Bl=yes|W=yes|display={{TM|22|SolarBeam}}}} | ||
{{ | {{Itemlist|Rare Candy|On the pond's southeast shore (hidden)|Bl=yes|W=yes|display={{DL|Vitamin|Rare Candy}}}} | ||
{{ | {{Itemlist|SilverPowder|West of the pond (requires {{m|Surf}})|Bl=yes|W=yes|display={{DL|Type-enhancing item|SilverPowder}}}} | ||
{{ | {{Itemlist|Hyper Potion|South of Rumination Field|Bl=yes|W=yes|display={{DL|Potion|Hyper Potion}}}} | ||
{{itlistfoot|forest}} | {{itlistfoot|forest}} | ||
|} | |} | ||
=== Rumination Field === | ===Rumination Field=== | ||
Rumination Field is a tiny, isolated part of the forest, with no other point of interest but {{p|Virizion}} itself. | Rumination Field is a tiny, isolated part of the forest, with no other point of interest but {{p|Virizion}} itself. Like {{p|Cobalion}}, its {{a|Justified}} [[Ability]] boosts its {{stat|Attack}} when it takes damage from a {{type|Dark}} move. Weaken it with super-effective moves (excluding {{type|Flying}} moves due to Virizion suffering a 4× weakness due to its type combo), then whittle its health down with {{t|Water}}-, {{t|Grass}}-, or {{type|Ground}} attacks. | ||
{| align="center" | {| align="center" | ||
| | | | ||
{{Pokémon/5 | {{Pokémon/5 | ||
|game=Black and White | |game=Black and White | ||
|ndex=640 | |ndex=640 | ||
Revision as of 16:45, 4 July 2015
Outside Twist Mountain
Check the puddle to the right for a hidden Ultra Ball. Just as you are about to climb the staircase to the mountain's entrance, Cheren shows up again. Since you each have a Jet Badge now, he's here for another battle.
When you defeat Cheren, Alder jumps down from the cliff. He was watching the battle, and tells Cheren that what he does with the power gained by becoming stronger is important. Alder gives you each a copy of HM03 (Surf), then leaves to the south. Cheren climbs the staircase and enters Twist Mountain.
Now that you have the ability to cross bodies of water, you can backtrack to a few locations that were previously unreachable.
The Southeast Ocean
Route 2
There isn't much of thing to do here (except getting items that previously were blocked by Cut trees if not done already) and that rustling grass appears here.
| Available Pokémon | ||||||||||||||||||||||||||||||||||||||||||||||||||||||||||
|---|---|---|---|---|---|---|---|---|---|---|---|---|---|---|---|---|---|---|---|---|---|---|---|---|---|---|---|---|---|---|---|---|---|---|---|---|---|---|---|---|---|---|---|---|---|---|---|---|---|---|---|---|---|---|---|---|---|---|
| ||||||||||||||||||||||||||||||||||||||||||||||||||||||||||
Route 1 (southwest)
To reach Route 17, you need to get back to Route 1 and surf west. Leave an open slot in your party for the treasure hunter's Egg! Pick up the Max Ether near the western shore, then battle the two Pokémon Rangers and the Fisherman. Grab the Pearl to the southeast, and walk through the gate to reach Route 17.
| Trainers | |||||||||||||||||||||||||||||||||||||||||||||||||||||||||||||||||
|---|---|---|---|---|---|---|---|---|---|---|---|---|---|---|---|---|---|---|---|---|---|---|---|---|---|---|---|---|---|---|---|---|---|---|---|---|---|---|---|---|---|---|---|---|---|---|---|---|---|---|---|---|---|---|---|---|---|---|---|---|---|---|---|---|---|
| |||||||||||||||||||||||||||||||||||||||||||||||||||||||||||||||||
| Available Pokémon | ||||||||||||||||||||||||||||||||||||||||||||||||||||||||||||||||||||||||||||||||||||||||||||||||||||||||||||||||||||||||||||||||||||||||||||||||||||||||||||||||||||||||||||||||||||||||||||||||||||||||||||||||||||||||||||||
|---|---|---|---|---|---|---|---|---|---|---|---|---|---|---|---|---|---|---|---|---|---|---|---|---|---|---|---|---|---|---|---|---|---|---|---|---|---|---|---|---|---|---|---|---|---|---|---|---|---|---|---|---|---|---|---|---|---|---|---|---|---|---|---|---|---|---|---|---|---|---|---|---|---|---|---|---|---|---|---|---|---|---|---|---|---|---|---|---|---|---|---|---|---|---|---|---|---|---|---|---|---|---|---|---|---|---|---|---|---|---|---|---|---|---|---|---|---|---|---|---|---|---|---|---|---|---|---|---|---|---|---|---|---|---|---|---|---|---|---|---|---|---|---|---|---|---|---|---|---|---|---|---|---|---|---|---|---|---|---|---|---|---|---|---|---|---|---|---|---|---|---|---|---|---|---|---|---|---|---|---|---|---|---|---|---|---|---|---|---|---|---|---|---|---|---|---|---|---|---|---|---|---|---|---|---|---|---|---|---|---|---|---|---|---|---|---|---|---|---|---|---|---|
| ||||||||||||||||||||||||||||||||||||||||||||||||||||||||||||||||||||||||||||||||||||||||||||||||||||||||||||||||||||||||||||||||||||||||||||||||||||||||||||||||||||||||||||||||||||||||||||||||||||||||||||||||||||||||||||||
| Items | ||||||||||||||||||||||||
|---|---|---|---|---|---|---|---|---|---|---|---|---|---|---|---|---|---|---|---|---|---|---|---|---|
| ||||||||||||||||||||||||
Route 17
The swift ocean currents can make travel difficult, so proceed carefully. Surf to the first spot of shallow water, then grab TM06 (Toxic) from the next. Ride the northernmost of the two westbound currents to fight Swimmer Wright and pick up a DeepSeaTooth. Take the southern current west to reach the large island on Route 18.
| Trainers | |||||||||||||||||||||||||||||||||||||||||||||||||||||||||||||||||||||||||||||||||||||||||||||||||||||||||||||||||
|---|---|---|---|---|---|---|---|---|---|---|---|---|---|---|---|---|---|---|---|---|---|---|---|---|---|---|---|---|---|---|---|---|---|---|---|---|---|---|---|---|---|---|---|---|---|---|---|---|---|---|---|---|---|---|---|---|---|---|---|---|---|---|---|---|---|---|---|---|---|---|---|---|---|---|---|---|---|---|---|---|---|---|---|---|---|---|---|---|---|---|---|---|---|---|---|---|---|---|---|---|---|---|---|---|---|---|---|---|---|---|---|---|---|
| |||||||||||||||||||||||||||||||||||||||||||||||||||||||||||||||||||||||||||||||||||||||||||||||||||||||||||||||||
| Available Pokémon | ||||||||||||||||||||||||||||||||||||||||||||||||||||||||||||||||||||||||||||||||||||||||||||||||||||||||||||||||
|---|---|---|---|---|---|---|---|---|---|---|---|---|---|---|---|---|---|---|---|---|---|---|---|---|---|---|---|---|---|---|---|---|---|---|---|---|---|---|---|---|---|---|---|---|---|---|---|---|---|---|---|---|---|---|---|---|---|---|---|---|---|---|---|---|---|---|---|---|---|---|---|---|---|---|---|---|---|---|---|---|---|---|---|---|---|---|---|---|---|---|---|---|---|---|---|---|---|---|---|---|---|---|---|---|---|---|---|---|---|---|---|---|
| ||||||||||||||||||||||||||||||||||||||||||||||||||||||||||||||||||||||||||||||||||||||||||||||||||||||||||||||||
| Items | ||||||||||||||||||||||||
|---|---|---|---|---|---|---|---|---|---|---|---|---|---|---|---|---|---|---|---|---|---|---|---|---|
| ||||||||||||||||||||||||
Route 18
Climb the staircase to the top of the cliff and battle Hiker Jeremiah. Trek through the tall grass to reach the only building on the island; a girl inside will restore your Pokémon's health. Talk to the Pokémon Ranger here to receive an Egg he found in the Relic Castle. The man in black is looking for a Rare Bone; wild Crustle sometimes hold them, which you can sell to him for $10,000.
If you have a Pokémon that knows Strength, you can cross the bridge to the south and drop the boulder to find a Max Elixir. Go down the staircase and shove the second boulder east to fight Backpacker Sam, and pick up a Dragon Scale. Head to the northwest, then double-back through the tall grass on the island's west side to find HM05 (Waterfall)! Go north and climb another staircase to fight Veteran Ray, then continue east across a second bridge and climb down the last staircase.
| Trainers | |||||||||||||||||||||||||||||||||||||||||||||||||||||||||||||||||||||||||||||||||||||||||||||||||||||
|---|---|---|---|---|---|---|---|---|---|---|---|---|---|---|---|---|---|---|---|---|---|---|---|---|---|---|---|---|---|---|---|---|---|---|---|---|---|---|---|---|---|---|---|---|---|---|---|---|---|---|---|---|---|---|---|---|---|---|---|---|---|---|---|---|---|---|---|---|---|---|---|---|---|---|---|---|---|---|---|---|---|---|---|---|---|---|---|---|---|---|---|---|---|---|---|---|---|---|---|---|---|
| |||||||||||||||||||||||||||||||||||||||||||||||||||||||||||||||||||||||||||||||||||||||||||||||||||||
| Available Pokémon | |||||||||||||||||||||||||||||||||||||||||||||||||||||||||||||||||||||||||||||||||||||||||||||||||||||||||||||||||||||||||||||||||||||||||||||||||||||||||||||||||||||||||||||||||||||||||||||||||||||||||||||||||||||||||||||||||||||||||||||||||||||||||||||||||||||||||||||||||||||||||||||||||||||||||||||||||||||||||||||||||||||||||||||||||||||||||||||||||||||||||||||||||||||||||||||||||||||||||||
|---|---|---|---|---|---|---|---|---|---|---|---|---|---|---|---|---|---|---|---|---|---|---|---|---|---|---|---|---|---|---|---|---|---|---|---|---|---|---|---|---|---|---|---|---|---|---|---|---|---|---|---|---|---|---|---|---|---|---|---|---|---|---|---|---|---|---|---|---|---|---|---|---|---|---|---|---|---|---|---|---|---|---|---|---|---|---|---|---|---|---|---|---|---|---|---|---|---|---|---|---|---|---|---|---|---|---|---|---|---|---|---|---|---|---|---|---|---|---|---|---|---|---|---|---|---|---|---|---|---|---|---|---|---|---|---|---|---|---|---|---|---|---|---|---|---|---|---|---|---|---|---|---|---|---|---|---|---|---|---|---|---|---|---|---|---|---|---|---|---|---|---|---|---|---|---|---|---|---|---|---|---|---|---|---|---|---|---|---|---|---|---|---|---|---|---|---|---|---|---|---|---|---|---|---|---|---|---|---|---|---|---|---|---|---|---|---|---|---|---|---|---|---|---|---|---|---|---|---|---|---|---|---|---|---|---|---|---|---|---|---|---|---|---|---|---|---|---|---|---|---|---|---|---|---|---|---|---|---|---|---|---|---|---|---|---|---|---|---|---|---|---|---|---|---|---|---|---|---|---|---|---|---|---|---|---|---|---|---|---|---|---|---|---|---|---|---|---|---|---|---|---|---|---|---|---|---|---|---|---|---|---|---|---|---|---|---|---|---|---|---|---|---|---|---|---|---|---|---|---|---|---|---|---|---|---|---|---|---|---|---|---|---|---|---|---|---|---|---|---|---|---|---|---|---|---|---|---|---|---|---|---|---|---|---|---|---|---|---|---|---|---|---|---|---|---|---|---|---|---|---|---|---|---|---|---|---|---|---|---|---|---|---|---|---|---|
| |||||||||||||||||||||||||||||||||||||||||||||||||||||||||||||||||||||||||||||||||||||||||||||||||||||||||||||||||||||||||||||||||||||||||||||||||||||||||||||||||||||||||||||||||||||||||||||||||||||||||||||||||||||||||||||||||||||||||||||||||||||||||||||||||||||||||||||||||||||||||||||||||||||||||||||||||||||||||||||||||||||||||||||||||||||||||||||||||||||||||||||||||||||||||||||||||||||||||||
| Items | |||||||||||||||||||||||||||||||||||||||||||||||||||||||
|---|---|---|---|---|---|---|---|---|---|---|---|---|---|---|---|---|---|---|---|---|---|---|---|---|---|---|---|---|---|---|---|---|---|---|---|---|---|---|---|---|---|---|---|---|---|---|---|---|---|---|---|---|---|---|---|
| |||||||||||||||||||||||||||||||||||||||||||||||||||||||
P2 Laboratory
Ride the southernmost of the two eastbound currents to wind up in front of a small island. Grab TM24 (Thunderbolt) to the south, then check out the P2 Laboratory. The building is devoid of people, but is cluttered with machines. Surf southwest between the currents and around two Swimmers to reach the large island's interior. A Heart Scale lies on a secluded part of the beach to the south, while Battle Girl Hillary and TM19 (Telekinesis) are farther west.
| Trainers | |||||||||||||||||
|---|---|---|---|---|---|---|---|---|---|---|---|---|---|---|---|---|---|
| |||||||||||||||||
| Available Pokémon | |||||||||||||||||||||||||||||||||||||||||||||||||||||||||||||||||||||||||||||||||||||||||||||||||||||||||||||||||||||||||||||||||||||||||||||||||||||||||||||||||||||||||||||||||||||||||||||||||||||||||||||||||||||||||||||||||||
|---|---|---|---|---|---|---|---|---|---|---|---|---|---|---|---|---|---|---|---|---|---|---|---|---|---|---|---|---|---|---|---|---|---|---|---|---|---|---|---|---|---|---|---|---|---|---|---|---|---|---|---|---|---|---|---|---|---|---|---|---|---|---|---|---|---|---|---|---|---|---|---|---|---|---|---|---|---|---|---|---|---|---|---|---|---|---|---|---|---|---|---|---|---|---|---|---|---|---|---|---|---|---|---|---|---|---|---|---|---|---|---|---|---|---|---|---|---|---|---|---|---|---|---|---|---|---|---|---|---|---|---|---|---|---|---|---|---|---|---|---|---|---|---|---|---|---|---|---|---|---|---|---|---|---|---|---|---|---|---|---|---|---|---|---|---|---|---|---|---|---|---|---|---|---|---|---|---|---|---|---|---|---|---|---|---|---|---|---|---|---|---|---|---|---|---|---|---|---|---|---|---|---|---|---|---|---|---|---|---|---|---|---|---|---|---|---|---|---|---|---|---|---|---|---|---|---|---|
| |||||||||||||||||||||||||||||||||||||||||||||||||||||||||||||||||||||||||||||||||||||||||||||||||||||||||||||||||||||||||||||||||||||||||||||||||||||||||||||||||||||||||||||||||||||||||||||||||||||||||||||||||||||||||||||||||||
| Items | ||||||||||||||||
|---|---|---|---|---|---|---|---|---|---|---|---|---|---|---|---|---|
| ||||||||||||||||
Mistralton Cave
The next place to visit is Mistralton Cave, situated across the river on Route 6. Somewhere in its depths, the legendary Cobalion lives in hiding. Legends claim that Cobalion saved the Pokémon of Unova from a sea of fire in the distant past. Remember to bring a Pokémon with Strength; Flash is also good to have.
| Trainers | ||||||||||||||||||||||||||||||||||||||
|---|---|---|---|---|---|---|---|---|---|---|---|---|---|---|---|---|---|---|---|---|---|---|---|---|---|---|---|---|---|---|---|---|---|---|---|---|---|---|
| ||||||||||||||||||||||||||||||||||||||
| Available Pokémon | |||||||||||||||||||||||||||||||||||||||||||||||||||||||||||||||||||||||||||||||||||||||||||||||||||||||||||||||||||||||||||||||||||||||||||||||||||||||||||||||
|---|---|---|---|---|---|---|---|---|---|---|---|---|---|---|---|---|---|---|---|---|---|---|---|---|---|---|---|---|---|---|---|---|---|---|---|---|---|---|---|---|---|---|---|---|---|---|---|---|---|---|---|---|---|---|---|---|---|---|---|---|---|---|---|---|---|---|---|---|---|---|---|---|---|---|---|---|---|---|---|---|---|---|---|---|---|---|---|---|---|---|---|---|---|---|---|---|---|---|---|---|---|---|---|---|---|---|---|---|---|---|---|---|---|---|---|---|---|---|---|---|---|---|---|---|---|---|---|---|---|---|---|---|---|---|---|---|---|---|---|---|---|---|---|---|---|---|---|---|---|---|---|---|---|---|---|---|---|---|---|
| |||||||||||||||||||||||||||||||||||||||||||||||||||||||||||||||||||||||||||||||||||||||||||||||||||||||||||||||||||||||||||||||||||||||||||||||||||||||||||||||
| Items | |||||||||||||||||||||||||||||||||||||||||||||||||||||||||||||||||||||||||||||||||||||||||||||||||||||||||||||
|---|---|---|---|---|---|---|---|---|---|---|---|---|---|---|---|---|---|---|---|---|---|---|---|---|---|---|---|---|---|---|---|---|---|---|---|---|---|---|---|---|---|---|---|---|---|---|---|---|---|---|---|---|---|---|---|---|---|---|---|---|---|---|---|---|---|---|---|---|---|---|---|---|---|---|---|---|---|---|---|---|---|---|---|---|---|---|---|---|---|---|---|---|---|---|---|---|---|---|---|---|---|---|---|---|---|---|---|---|---|
| |||||||||||||||||||||||||||||||||||||||||||||||||||||||||||||||||||||||||||||||||||||||||||||||||||||||||||||
1F
Go south and push the boulder to the hole in the floor. Walk east past Hiker Hugh and move the second boulder to the next hole. Head north along the east wall to fight Hiker Clarke, and pick up the Max Repel. Grab the Hyper Potion to the northwest, and move the third boulder into place to create a shortcut. Climb the stairway to the second floor.
2F
Head south to move the next boulder. Walk across the rock ledge, and double-back along the southern wall to find a Hard Stone. Go north, then west to push two more boulders into place. Head to the northeast, then follow the north wall to the west along the upper level for TM80 (Rock Slide). Go west along the lower level to reach an Iron, then jump south over the ledge, and climb up to the third floor.
Guidance Chamber
Head west from the stairway to find a Revive. Backtrack to the east and follow the wall north to get a Dusk Stone. Talk to the old man to hear a story of the three legendary Pokémon, Cobalion, Terrakion, and Virizion.
| The old man's story |
| In the distant past, when Pokémon and people lived in different worlds, a war between people started an intense fire in a forest where many Pokémon lived. The Pokémon were surrounded by smoke and flames. They were in big trouble. And then, the legends Cobalion, Terrakion, and Virizion appeared! Terrakion used its amazing strength to destroy rocks blocking the escape route. Virizion used its quick movements to protect Pokémon from looming flames. And Cobalion led the frightened Pokémon out of the burning woods. ... The people who started the war were routed by the power of the legends. Because of Cobalion, Terrakion, and Virizion, the war was ended. ... When people fight, there's no peace for Pokémon, either. The three legends learned that the deeds of humans could lead to dire consequences for their world. ... They cut themselves off from people and disappeared. No one saw much of them after that, and the three faded into myth... |
Pick up a Rare Candy to the northwest, then go south and drop the final two boulders into position. Head northwest to find Cobalion.
Cobalion
Cobalion's Ability, Justified, gives it an Attack boost whenever it is hit by a Dark-type attack. When this happens, its Sacred Sword attack becomes very powerful, so be careful. Lower its health with Normal-, Grass-, and Ice-type moves before attempting to capture it. If you need to use TM's, it would be recommended to teach a Pokémon Reflect since it can reduce the damage from Cobalion's attacks by half.
| ||||||||||||||||||||||||||||||||||
The old man approaches you after the battle, and says that because Cobalion is starting to trust you, Terrakion and Virizion will give you a chance to battle them, as well. Terrakion is hidden deep in Victory Road, out of reach for now. Virizion, however, is waiting in Rumination Field, on the eastern side of Pinwheel Forest.
Pinwheel Forest
Regardless of the way you entered, look for a hole in the fence northeast of the bridges. Trek east through the dark grass and go to the far southeast edge of the forest to find TM22 (SolarBeam). Go west to reach the small pond, and check for a Rare Candy on the southeast side. Surf west across the water to grab the SilverPowder from the ledge, then sail back across the pond and head northeast. Walk through the fallen log and pick up the Hyper Potion from the tree stump. Rumination Field lies to the north.
| Items | ||||||||||||||||||||||||
|---|---|---|---|---|---|---|---|---|---|---|---|---|---|---|---|---|---|---|---|---|---|---|---|---|
| ||||||||||||||||||||||||
Rumination Field
Rumination Field is a tiny, isolated part of the forest, with no other point of interest but Virizion itself. Like Cobalion, its Justified Ability boosts its Attack when it takes damage from a Dark-type move. Weaken it with super-effective moves (excluding Flying-type moves due to Virizion suffering a 4× weakness due to its type combo), then whittle its health down with Water-, Grass-, or Ground-type attacks.
| ||||||||||||||||||||||||||||||||||
Now fly back to Mistralton City, and trek through Route 7 to reach Twist Mountain.
|
Black and White walkthrough |
|

|
This article is part of Project Walkthroughs, a Bulbapedia project that aims to write comprehensive step-by-step guides on each Pokémon game. |


